

3 Getting Started
3.1 Overview
3.2 Prerequisites
3.2.1 Downloading the ns-3 release as a source archive
3.3 Downloading ns-3 using Git
3.3.1 Downloading ns-3 using Bake
3.4 Building ns-3
3.4.1 Building using build.py
3.4.2 Building with Bake
3.4.3 Building with Waf
3.5 Testing ns-3
3.6 Running the script
3.6.1 Command-line arguments
3.6.2 Debugging
3.6.3 Working directory
Chapter 3
Getting Started
This chapter aims to prepare the reader to get started, beginning with a computer on which ns-3 may not have been previously installed. The discussion covers supported platforms, prerequisites, ways to obtain ns-3, methods for building ns-3, and ways to verify your build and run simple programs.
3.1 Overview
The ns-3 simulator is constructed as a system of cooperating software libraries. During the build, the user's program code links to these libraries. User programs can be written in C++ or Python programming languages.
Ns-3 is distributed as source code, which means that the target system must have a software development environment to first build the libraries and then compile the user program. In principle, ns-3 could be distributed as ready-made libraries for specific systems, and they may be distributed this way in the future. However, currently, many users actually perform their work by editing ns-3 itself, so it is useful to have the source code for building the libraries. If someone would like to take on the task of creating ready-made libraries and packages for operating systems, please contact the mailing list. ns-developers.
Next, we will discuss three ways to download and build ns-3. The first is to download and build the official release from the main site. The second is to check out and build developer versions of the base ns-3 installation. The third is to use additional build tools to download more extensions for ns-3. We will go through each one, as the tools differ slightly.
Experienced Linux users might wonder why ns-3 is not provided as a package like most other libraries using package managers. Although there are binary packages for various Linux distributions (such as Debian), most users ultimately edit the libraries and have to recompile ns-3 themselves, so the availability of the source code is convenient. For this reason, we will focus on installation from the source code.
For most applications, ns-3 does not require privileges and it is recommended to use an unprivileged user account. root The entire set of available ns-3 libraries has several dependencies on external libraries, but for the most part, ns-3 can be built and used with support for several common (often pre-installed by default) components: C++ compiler, Python, source code editor (for example,
3.2 Prerequisites
emacs vim, Eclipse or ), and if development repositories are used, version control systems like Git. Most beginners do not need to worry if their configuration reports some missing optional ns-3 features, but for those who desire a complete installation, the project provides a wiki that includes pages with many useful tips and hints. One such page is the "Installation" page with installation instructions for various systems, available at:The "Prerequisites" section of this wiki page explains which packages are required to support common ns-3 options and also provides the commands used to install them on common Linux or macOS variants. .
You can take advantage of the opportunity to explore the ns-3 wiki page or the main website:
, as there is a lot of information there. Starting from the latest version of ns-3 (ns-3.29), the following tools are necessary to run ns-3: Tool Package/Version
C++ Compiler
- clang++ or g++ (g++ version 4.9 or greater)
python2 version >= 2.7.10, or python3 version >= 3.4 - Python
any recent version (for accessing ns-3 on GitLab.com) - Git
any recent version (for unpacking the ns-3 release) - tar
bunzip2 - any up-to-date version (for unpacking the ns-3 release)
To check the default installed Python version, type
python -V python -V. To check the version of g++, enter g++ -v. If any tools are missing or too old, consult the installation guide on the ns-3 wiki page.
From this point on, we assume that the reader is working on Linux, MacOS, or a Linux environment emulator, and has at least the aforementioned tools.
3.2.1 Downloading the ns-3 release as a source archive
This is how a new user can download and experiment with the latest release and package versions of ns-3. Releases of ns-3 are published as compressed source archives, sometimes referred to as tarball. tarball — a special format of software archive where multiple files are combined together. The archive is typically compressed. The process of downloading ns-3 via tarball is straightforward; you just need to select a release, download, and unpack it.
Assuming that you, as a user, want to build ns-3 in a local directory named workspace. You will be able to obtain a working copy of the release by entering the following in the Linux console (of course, replacing the appropriate version numbers)
$ cd
$ mkdir workspace
$ cd workspace
$ wget https://www.nsnam.org/release/ns-allinone-3.29.tar.bz2
$ tar xjf ns-allinone-3.29.tar.bz2
Note the utility used above, wget, which is a command-line tool for downloading objects from the Internet. If you haven't installed it, you can use your browser for this.
By following these steps, you will enter the ns-allinone-3.29 directory, where you should see several files and directories
$ cd ns-allinone-3.29
$ ls
bake constants.py ns-3.29 README
build.py netanim-3.108 pybindgen-0.17.0.post58+ngcf00cc0 util.py
Now you are ready to build the basic ns-3 distribution and can proceed to the section dedicated to building ns-3.
3.3 Downloading ns-3 using Git
The ns-3 code is available in Git repositories on GitLab.com at . The group nsnam consolidates various repositories used by the open-source project.
The easiest way to start using Git repositories is to fork or clone the ns-3-allinone. This is a set of scripts that manages the downloading and building of the most commonly used ns-3 subsystems. If you are new to Git, the terms "fork" and "cloning" may not be familiar to you; if so, we recommend simply cloning (creating your own copy of) the repository found on GitLab.com as follows:
$ cd
$ mkdir workspace
$ cd workspace
$ git clone https://gitlab.com/nsnam/ns-3-allinone.git
$ cd ns-3-allinone
At this stage, you should see your directory ns-3-allinone is slightly different from the directory with the release archive described above. It should look something like this:
$ ls
build.py constants.py download.py README util.py
Note the presence of the script download.py, which will additionally extract ns-3 and the accompanying source code. Here you have a choice: either download the latest development snapshot of ns-3:
$ python download.pyor prefer the ns-3 release by using the flag -n to specify the release number:
$ python download.py -n ns-3.29After this step, additional repositories will be downloaded into the directory ns-3-allinone additional repositories will be loaded ns-3, bake, pybindgen and netanim.
Note
On a machine with a clean Ubuntu 16.04, I had to change the command to the following: $ sudo python3 download.py -n ns-3.29 (here and thereafter translator's notes).
3.3.1 Downloading ns-3 using Bake
The two aforementioned methods (source archive or repository ns-3-allinone via Git) are useful for obtaining the simplest installation of ns-3 with several addons (pybindgen for generating Python bindings and netanim for animating the network). The third repository, provided by default in ns-3-allinone, is called bake.
Bake — this is a tool for coordinated software building from multiple repositories, developed for the ns-3 project. Bake It can be used to obtain development versions of ns-3, as well as to download and build extensions of the base version of the ns-3 distribution, such as the Direct Code Execution, CradleNetwork Simulation Cradle, the ability to create new Python bindings, and various ns-3 'applications'.
Note
CradleNetwork Simulation Cradle is a framework that allows using real TCP/IP network stacks within the network simulator.
If you expect that your ns-3 installation should have advanced or additional features, you can follow this installation path.
In the latest releases of ns-3 Bake it has been added to the tar release. The release includes a configuration file that allows downloading the software versions current at the time of the release creation. That is, for example, the version Bake, which is distributed with the ns-3.29 release, can be used to obtain components for that ns-3 release or earlier, but cannot be used to extract components for later releases (unless the package description file bakeconf.xml has been updated).
You can also obtain the most recent copy bake, by entering the following command in your Linux console (provided that you have Git installed):
$ cd
$ mkdir workspace
$ cd workspace
$ git clone https://gitlab.com/nsnam/bake.git
During the execution of the git command, you should see something like the following:
Cloning into 'bake'...
remote: Enumerating objects: 2086, done.
remote: Counting objects: 100% (2086/2086), done.
remote: Compressing objects: 100% (649/649), done.
remote: Total 2086 (delta 1404), reused 2078 (delta 1399)
Receiving objects: 100% (2086/2086), 2.68 MiB | 3.82 MiB/s, done.
Resolving deltas: 100% (1404/1404), done.
After the command completes, clone you should have a directory named bake, the contents of which should look something like this:
$ cd bake
$ ls
bake bakeconf.xml bake.py doc examples generate-binary.py test TODO
Note that you have downloaded several Python scripts, a Python module named bake and an XML configuration file. The next step will be to use these scripts to download and build the ns-3 distribution of your choice. Several setup targets are available:
ns-3.29: a module corresponding to the release; it will download components similar to the release in the tarball;
ns-3-dev: a similar module but using code from the development tree;
ns-allinone-3.29: a module that includes other additional features such as Click routing and Network Simulation Cradle, Openflow for ns-3.
ns-3-allinone: analogous to the release version of the module allinone, but for development code.
Note
Click — a modular software architecture for building routers.
Openflow is a protocol for managing the processing of data packets transmitted over the data transmission network by routers and switches, implementing the technology of software-defined networking.
The current development snapshot (non-release) of ns-3 can be found at:.
Developers strive to keep these repositories in a synchronized working state, but they are in the development area and contain non-release code, so if you do not plan to use new features, choose the official release.
You can find the latest version of the code by browsing the list of repositories, or by going to the 'ns-3 Releases' webpage: and clicking on the link for the latest version. In this example, we will continue with ns-3.29.
Now, to obtain the necessary components of ns-3, we will apply the tool Bake. Let me say a few introductory words about how Bake.
Bake works by downloading the package sources to the directory source and installing libraries into the build directory. Bake can be run by referencing the binary file, but if you want to run Bake not from the directory it was uploaded to, it is advisable to add the path to bake your path (environment variable PATH), for example, as follows (example for the Linux bash shell). Go to the ‘bake’ directory and then set the following environment variables:
$ export BAKE_HOME=`pwd`
$ export PATH=$PATH:$BAKE_HOME:$BAKE_HOME/build/bin
$ export PYTHONPATH=$PYTHONPATH:$BAKE_HOME:$BAKE_HOME/build/lib
This will place the program bake.py in the shell path and allow other programs to find the executables and libraries created by bake. In some use cases, the PATH and PYTHONPATH setup described above is not required, but it is usually needed for a complete build of ns-3-allinone (with additional packages). bakeEnter the working directory and type the following into the console:
$ ./bake.py configure -e ns-3.29
Next, we will askto check whether we have enough tools to download various components. Type: Bake $ ./bake.py check
You should see something like the following:> Python - OK > GNU C++ compiler - OK > Mercurial - OK > Git - OK > Tar tool - OK > Unzip tool - OK > Make - OK > cMake - OK > patch tool - OK > Path searched for tools: /usr/local/sbin /usr/local/bin /usr/sbin /usr/bin /sbin /bin ...
In particular, download tools such as Mercurial, CVS, Git, and Bazaar are essential at this stage as they allow us to obtain the code. At this point, install any missing tools in the usual way for your system (if you know how) or ask your system administrator for help.Next, try to download the software:
$ ./bake.py download
the result should be something like:>> Searching for system dependency setuptools - OK >> Searching for system dependency libgoocanvas2 - OK >> Searching for system dependency gi-cairo - OK >> Searching for system dependency pygobject - OK >> Searching for system dependency pygraphviz - OK >> Searching for system dependency python-dev - OK >> Searching for system dependency qt - OK >> Searching for system dependency g++ - OK >> Downloading pybindgen-0.19.0.post4+ng823d8b2 (target directory:pybindgen) - OK >> Downloading netanim-3.108 - OK >> Downloading ns-3.29 - OK
This will mean that three source files have been downloaded. Now go to the source directory and type ls; you should see:$ cd source $ ls netanim-3.108 ns-3.29 pybindgen
Now you are ready to build the ns-3 distribution.As with downloading ns-3, there are several ways to build ns-3. Most importantly, we want to emphasize that ns-3 is built using a build tool called
3.4 Building ns-3
Waf , described below. Most users will work with, described below. Most users will be working with , described below. Most users will work with, but there are several convenient scripts that can help you get started or organize more complex builds. So, please, before reading about , described below. Most users will work with, take a look at build.py and building with bake.
3.4.1 Building using build.py
Attention! This build step is only available from the source archive version obtained as described above; not downloaded via git or bake.
When working with the release archive tarball, in ns‑3‑allinone there is a convenient script that can simplify the building of components. It's called build.py. This program will set up the project for you in the most useful way. However, note that more complex configurations and working with ns‑3 typically involve using its own build system, Waf, which will be introduced later in this guide.
If you downloaded using tarball, then in your directory ~\/workspace there should be a directory named something like ns-allinone-3.29. Enter the following:
$ \.\/build.py --enable-examples --enable-tests
When invoked build.py we applied command-line arguments to build the examples and tests used in this guide, which are not built by default in ns‑3. By default, the program also builds all available modules. Later, if you wish, you can build ns‑3 without examples and tests or exclude modules that are not needed for your work.
You will see a lot of compiler output messages displayed by the script while building the various parts you have downloaded. First, the script will attempt to build the animator netanim, then the binding generator pybindgen and finally, ns‑3. At the end of the process, you should see the following:
Waf: Leaving directory '\/path\/to\/workspace\/ns-allinone-3.29\/ns-3.29\/build'\n'build' finished successfully (6m25.032s) \n\nModules built:\nantenna aodv applications\nbridge buildings config-store\ncore csma csma-layout\ndsdv dsr energy \nfd-net-device flow-monitor internet\ninternet-apps lr-wpan lte\nmesh mobility mpi\nnetanim (no Python) network nix-vector-routing \nolsr point-to-point point-to-point-layout \npropagation sixlowpan spectrum \nstats tap-bridge test (no Python) \ntopology-read traffic-control uan \nvirtual-net-device visualizer wave \nwifi wimax \n\nModules not built (see ns-3 tutorial for explanation):\nbrite click openflow \nLeaving directory .\/ns-3.29In the last three lines of the listing, we see a message about the modules that were not built:
Modules not built (see ns-3 tutorial for explanation):\nbrite clickThis simply means that some ns-3 modules that depend on external libraries may not have been built, or that their building is not required for this configuration. It does not mean that the simulator failed to build or that the built modules will work incorrectly.
3.4.2 Building with Bake
If you used bake to get the source code from the project repositories above, you can continue using it to build ns-3. Type:
$ ./bake.py buildand you should see something like:
>> Building pybindgen-0.19.0.post4+ng823d8b2 - OK
>> Building netanim-3.108 - OK
>> Building ns-3.29 - OKTip: you can also carry out both steps, loading and building, by calling "bake.py deploy."
When building all components, failures may occur, but the build will continue if the component is not essential. For example, a recent portability issue was that castxml can be built by the tool bake not on all platforms. In this case, a message like this will appear:
>> Building castxml - Problem
> Problem: Optional dependency, module "castxml" failed
This may reduce the functionality of the final build.
However, bake will continue since "castxml" is not an essential dependency.
For more information call bake with -v or -vvv, for full verbose mode.
However castxml is only necessary if you want to create updated Python bindings. Most users do not need this (at least until they start modifying ns-3), so such warnings can be safely ignored for now.
If a failure occurs, the following command will give you a hint about the missing dependencies:
$ ./bake.py showVarious package dependencies that you are trying to build will be listed.
3.4.3 Building with Waf
Up until now, to start building ns-3, we have used either the script build.py, or the tool bake. These tools are helpful for building ns-3 and supporting libraries. In fact, to compile, they invoke the build tool , described below. Most users will work with from the ns-3 directory. , described below. Most users will work with is installed along with the ns-3 source code. Most users quickly move to direct use of , described below. Most users will work with. So, to continue, please navigate to the ns-3 directory that you initially created.
Currently, it is not strictly required, but it can be helpful to take a moment to look at how to make changes to the project's configuration. Probably the most useful configuration change you can make will be to create an optimized version of the code. By default, you have set your project to build a debug version. Let's consider the project for building an optimized version. To instruct Waf to create optimized builds that include examples and tests, you will need to execute the following commands:
$ ./waf clean
$ ./waf configure --build-profile=optimized --enable-examples --enable-tests
This will initiate , described below. Most users will work with outside the local directory (for your convenience). The first command cleans up from the previous build; it is usually not strictly necessary, but it's good practice (also see build profiles below); this will remove previously created libraries and object files located in the build/. Once the project is reconfigured and the build system checks the various dependencies, you should see output similar to the following:
Setting top to      : /home/ns3user/workspace/bake/source/ns-3-dev
Setting out to      : /home/ns3user/workspace/bake/source/ns-3-dev/build
Checking for 'gcc' (C compiler)        : /usr/bin/gcc
Checking for cc version                : 7.3.0
Checking for 'g++' (C++ compiler)      : /usr/bin/g++
Checking for compilation flag -march=native support : ok
Checking for compilation flag -Wl,--soname=foo support : ok
Checking for compilation flag -std=c++11 support       : ok
Checking boost includes   : headers not found, please ,!provide a --boost-includes argument (see help)
Checking boost includes   : headers not found, please ,!provide a --boost-includes argument (see help)
Checking for program 'python'            : /usr/bin/python
Checking for python version >= 2.3       : 2.7.15 python-config                                                                     : /usr/bin/python-config
Asking python-config for pyembed '--cflags --libs --ldflags' flags : yes
Testing pyembed configuration                                      : yes
Asking python-config for pyext '--cflags --libs --ldflags' flags   : yes
Testing pyext configuration                                        : yes

Checking for compilation flag -fvisibility=hidden support          : ok
Checking for compilation flag -Wno-array-bounds support            : ok
Checking for pybindgen location          : ../pybindgen ,!(guessed)
Checking for python module 'pybindgen'   : 0.19.0. ,!post4+g823d8b2
Checking for pybindgen version           : 0.19.0. ,!post4+g823d8b2
Checking for code snippet                : yes
Checking for types uint64_t and unsigned long equivalence : no
Checking for code snippet                                 : no
Checking for types uint64_t and unsigned long long equivalence     : yes
Checking for the apidefs that can be used for Python bindings                       : gcc-LP64
Checking for internal GCC cxxabi         : complete
Checking for python module 'pygccxml'    : not found
Checking for click location              : not found
Checking for program 'pkg-config'        : /usr/bin/pkg- ,!config
Checking for 'gtk+-3.0'                  : not found
Checking for 'libxml-2.0'                : yes
checking for uint128_t                   : not found
checking for __uint128_t                 : yes
Checking high precision implementation   : 128-bit integer ,!(default)
Checking for header stdint.h             : yes
Checking for header inttypes.h           : yes
Checking for header sys/inttypes.h       : not found
Checking for header sys/types.h          : yes
Checking for header sys/stat.h           : yes
Checking for header dirent.h             : yes
Checking for header stdlib.h             : yes
Checking for header signal.h             : yes
Checking for header pthread.h            : yes
Checking for header stdint.h             : yes
Checking for header inttypes.h           : yes
Checking for header sys/inttypes.h       : not found
Checking for library rt                  : yes
Checking for header sys/ioctl.h          : yes
Checking for header net/if.h             : yes
Checking for header net/ethernet.h       : yes
Checking for header linux/if_tun.h       : yes
Checking for header netpacket/packet.h   : yes
Checking for NSC location                : not found
Checking for 'sqlite3'                   : not found
Checking for header linux/if_tun.h       : yes
Checking for python module 'gi'          : 3.26.1
Checking for python module 'gi.repository.GObject'      : ok
Checking for python module 'cairo'                      : ok
Checking for python module 'pygraphviz'                 : 1.4rc1
Checking for python module 'gi.repository.Gtk'          : ok
Checking for python module 'gi.repository.Gdk'          : ok
Checking for python module 'gi.repository.Pango'        : ok
Checking for python module 'gi.repository.GooCanvas'    : ok
Checking for program 'sudo'                             : /usr/bin/sudo
Checking for program 'valgrind'                         : not found
Checking for 'gsl' : not found python-config            : not found
Checking for compilation flag -fstrict-aliasing support : ok
Checking for compilation flag -fstrict-aliasing support : ok
Checking for compilation flag -Wstrict-aliasing support : ok
Checking for compilation flag -Wstrict-aliasing support : ok
Checking for program 'doxygen'                          : /usr/bin/doxygen
---- Summary of optional ns-3 features:
Build profile : optimized
Build directory :
BRITE Integration : not enabled (BRITE not enabled (see option --with- ,!brite))
DES Metrics event collection : not enabled (defaults to disabled)
Emulation FdNetDevice        : enabled
Examples                     : enabled
File descriptor NetDevice    : enabled
GNU Scientific Library (GSL) : not enabled (GSL not found)
Gcrypt library               : not enabled
(libgcrypt not found: you can use ,!libgcrypt-config to find its location.) GtkConfigStore               : not enabled (library 'gtk+-3.0 >= 3.0' not found)
MPI Support                  : not enabled (option --enable-mpi not selected)
ns-3 Click Integration       : not enabled (nsclick not enabled (see option --with- ,!nsclick))
ns-3 OpenFlow Integration   : not enabled (Required boost libraries not found)
Network Simulation Cradle    : not enabled (NSC not found (see option --with-nsc))
PlanetLab FdNetDevice         : not enabled (PlanetLab operating system not detected ,!(see option --force-planetlab)) PyViz visualizer : enabled
Python API Scanning Support   : not enabled (Missing 'pygccxml' Python module)
Python Bindings : enabled
Real Time Simulator           : enabled
SQlite stats data output      : not enabled (library 'sqlite3' not found)
Tap Bridge                    : enabled
Tap FdNetDevice               : enabled
Tests                         : enabled
Threading Primitives          : enabled
Use sudo to set suid bit   : not enabled (option --enable-sudo not selected)
XmlIo                         : enabled
'configure' finished successfully (6.387s)
Note the last part of the listing above. Some ns-3 options are not included by default or require system support for proper operation. For example, to enable XmlTo, the library must be present in the system libxml-2.0. If this library is not found and the corresponding ns-3 function is not enabled, a message will be displayed. Also, note that it is possible to use the command sudo to set the suid bit "set group ID on execution" for certain programs. It is not enabled by default, so this feature appears as "not enabled." Finally, to get a list of enabled options, use , described below. Most users will work with with the parameter --check-config.
Now let's go back and switch back to the debug build containing examples and tests.
$ ./waf clean
$ ./waf configure --build-profile=debug --enable-examples --enable-tests
The build system is now configured, and you can build debug versions of the ns-3 programs simply by typing:
$ ./wafEven though the above steps may have caused you to build part of the ns-3 system twice, you now know how to change the configuration and build optimized code.
To check which profile is active for the given project configuration, there is a command:
$ ./waf --check-profile
Waf: Entering directory `/path/to/ns-3-allinone/ns-3.29/build'
Build profile: debug
The scenario discussed above build.py also supports arguments --enable-examples and --enable-tests, but it does not directly support other options. For example, this will not work: , described below. Most users will work with $ ./build.py --disable-python
the response will be:build.py: error: no such option: --disable-python
However, a special operator - - can be used to pass additional parameters throughwaf , so instead of the above command, the following will work:$ ./build.py -- --disable-python
since it generates the main command./waf configure --disable-python . Here are some more introductory tips onError handling during the build , described below. Most users will work with.
Build error handling
The ns-3 releases have been tested on the latest available C++ compilers at the time of release on popular Linux and MacOS distributions. However, over time, new distributions with new compilers are released, and these newer compilers tend to be more pedantic about warnings. ns-3 configures its build to treat all warnings as errors, so sometimes, if you're using an older version on a newer system, a compiler warning may stop the build.
For example, there was previously a release of ns-3.28 for Fedora 28, which included a new major version gcc (gcc-8). Building the ns-3.28 release or earlier versions under Fedora 28, with Gtk2+ installed, will result in an error:
/usr/include/gtk-2.0/gtk/gtkfilechooserbutton.h:59:8: error: unnecessary parentheses ,!in declaration of ‘__gtk_reserved1’ [-Werror=parentheses] void (*__gtk_reserved1);In releases starting from ns-3.28.1, a , described below. Most users will work with option is available to address these issues. It disables the setting of the '-Werror' flag in g++ and clang++. This option is '--disable-werror', and it should be applied during configuration:
$ ./waf configure --disable-werror --enable-examples --enable-testsConfigure or build
Some commands , described below. Most users will work with make sense only in the configuration phase, while others act only in the build phase. For example, if you want to use ns-3 emulation features, you can enable the set bit suid using sudo, as described above. This will cancel the configuration phase commands, allowing you to change the configuration using the following command, which also includes examples and tests.
$ ./waf configure --enable-sudo --enable-examples --enable-testsIf you do this, , described below. Most users will work with it will run sudo, to change the socket creation programs of the emulation code to run with privileges. root. In , described below. Most users will work with There are many other options available for the configuration and build phases. To explore the options, enter:
$ ./waf --helpIn the next section, we will use some options related to testing.
Build profiles
We have already seen how to configure , described below. Most users will work with for builds debug and optimized:
$ ./waf --build-profile=debugThere is also an intermediate build profile, release. The option -d is synonymous with --build-profile. The build profile controls the usage of logging, assertions, and compiler optimization flags:
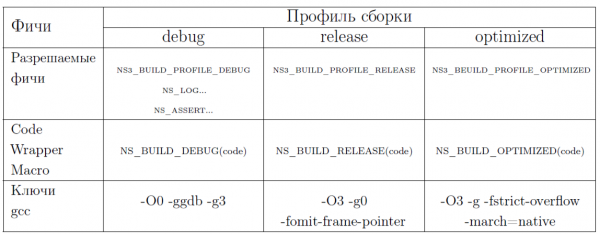
As can be seen, logging and assertions are only available in debug builds. The recommended practice is to develop your script in debug mode, then run repeated iterations (for statistics or parameter changes) in the optimized build profile.
If you have code that should only run in certain build profiles, use the Code Wrapper Macro:
NS_BUILD_DEBUG (std::cout << "Part of an output line..." << std::flush; timer.Start ,!()); DoLongInvolvedComputation (); NS_BUILD_DEBUG (timer.Stop (); std::cout << "Done: " << timer << std::endl;)By default, , described below. Most users will work with it places build artifacts in the build directory. You can specify a different output directory using the option - -out, for example:
$ ./waf configure --out=my-build-dirBy combining this with build profiles, you can easily switch between different compilation settings:
$ ./waf configure --build-profile=debug --out=build/debug
$ ./waf build
...
$ ./waf configure --build-profile=optimized --out=build/optimized
$ ./waf build
...
This allows you to work with multiple builds without having to rewrite the last build each time. When you switch to another profile, , described below. Most users will work with it will only compile that one, without a full recompilation of everything.
When you switch build profiles in this way, you need to ensure that you provide the same configuration parameters each time. Defining several environment variables can help you avoid mistakes:
$ export NS3CONFIG="--enable-examples --enable-tests"
$ export NS3DEBUG="--build-profile=debug --out=build/debug"
$ export NS3OPT="--build-profile=optimized --out=build/optimized"

$ ./waf configure $NS3CONFIG $NS3DEBUG
$ ./waf build
...
$ ./waf configure $NS3CONFIG $NS3OPT
$ ./waf build
Compilers and flags
In the above examples , described below. Most users will work with for building ns-3 uses the C++ compiler from GCC ( — Needed for compiling modules, as some of them are implemented in). However, you can change the compiler being used , described below. Most users will work with by defining the CXX environment variable. For example, to use the Clang C++ compiler, clang++,
$ CXX="clang++" ./waf configure
$ ./waf build
Similarly, you can set it up , described below. Most users will work with to use distributed compilation with distcc:
$ CXX="distcc g++" ./waf configure
$ ./waf build
More detailed information about distcc and distributed compilation can be found on the project page in the documentation section. To add compiler flags when configuring ns-3, use the CXXFLAGS_EXTRA environment variable.
Installation
, described below. Most users will work with can be used to install libraries in different locations of the system. By default, built libraries and executable files are located in the directory build, and since Waf knows the locations of these libraries and executable files, there is no need to install libraries anywhere else.
If users prefer installation outside the build directory, they can execute the command .\/waf install. By default, the installation prefix is /usr/local, therefore .\/waf install will install programs in /usr/local/bin, libraries in /usr/local/lib and header files in /usr/local/include. Superuser rights are usually required to install with the default prefix, so the typical command would be sudo .\/waf install. When started, Waf will first prefer to use the shared libraries in the build directory, then it will look for libraries along the library path set in the local environment. So when installing libraries to the system, it's good practice to check that the correct libraries are being used. Users can choose to install with another prefix by passing during configuration the option --prefix, for example:
.\/waf configure --prefix=\/opt\/localIf later, after building, the user enters the installation command .\/waf, the prefix /opt/local.
The command .\/waf clean should be used before reconfiguring the project if installation is to be done with , described below. Most users will work with under a different prefix.
Thus, for using ns‑3, there is no need to call .\/waf install. Most users will not need this command since , described below. Most users will work with will pick up the current libraries from the build directory, but some users may find it useful if their activities involve working with programs outside the ns‑3 directory.
Waf is unified
At the top level of the ns‑3 source tree, there is only one Waf script. Once you start working, you will spend a lot of time in the directory scratch\/ or deeper, insrc\/... and need to run , described below. Most users will work with. You can simply remember where you are and run , described below. Most users will work with as follows:
$ ..\/..\/..\/waf ...but this can be tedious and error-prone, so there are better solutions. One common way is to use a text editor like Eclipse or vim, which opens two terminal sessions, one used for building ns‑3 and the other for editing the source code. If you only have tarball, it may help to set an environment variable:
$ export NS3DIR="$PWD"
$ function waff { cd $NS3DIR && ./waf $* ; }

$ cd scratch
$ waff build
In the module directory, it might seem tempting to add a trivial waf script by example exec ../../waf. Please do not do this. It confuses newcomers, and if done poorly, it leads to hard-to-detect build errors. The solutions shown above are the way to go.
3.5 Testing ns-3
You can run the ns-3 distribution's module tests by executing the script ./test.py:
$ ./test.pyThese tests run in parallel with , described below. Most users will work with. Eventually, you should see a message stating that
92 of 92 tests passed (92 passed, 0 failed, 0 crashed, 0 valgrind errors)This is an important message for identifying failures, crashes, or valgrind errors, indicating issues with the code or incompatibility between tools and code.
You will also see the summary output from , described below. Most users will work with and the tester running each test, which will look something like this:
Waf: Entering directory `/path/to/workspace/ns-3-allinone/ns-3-dev/build'
Waf: Leaving directory `/path/to/workspace/ns-3-allinone/ns-3-dev/build'
'build' finished successfully (1.799s)

Modules built:
aodv           applications          bridge
click          config-store          core
csma           csma-layout           dsdv
emu            energy                flow-monitor
internet       lte                   mesh
mobility       mpi                   netanim
network        nix-vector-routing    ns3tcp
ns3wifi        olsr                  openflow
point-to-point point-to-point-layout propagation
spectrum       stats                 tap-bridge
template       test                  tools
topology-read  uan                   virtual-net-device
visualizer     wifi                  wimax

PASS: TestSuite ns3-wifi-interference
PASS: TestSuite histogram

...

PASS: TestSuite object
PASS: TestSuite random-number-generators
92 of 92 tests passed (92 passed, 0 failed, 0 crashed, 0 valgrind errors)
This command is typically run by users for a quick verification of the ns-3 distribution's build correctness. (Note that the order of the 'PASS: ...' lines may differ, which is normal. What matters is that the final line of the report shows all tests passed; no test finished with failure or crashed.) And , described below. Most users will work with, and test.py will parallelize work across the available CPU cores of the machine.
3.6 Running the script
Typically, we run scripts under control of , described below. Most users will work with. This allows the build system to ensure that the paths to the shared library are set correctly and that the libraries are available at runtime. To run the program, simply use , described below. Most users will work with with the parameter - -run. Let's run the equivalent of the ubiquitous program for ns-3 hello world, by typing the following:
$ ./waf --run hello-simulatorWaf will first check that the program is built correctly, and if necessary, will perform the build. Then , described below. Most users will work with it will execute the program, which will produce the following output.
Hello SimulatorCongratulations! You are now a user of ns‑3!
What should I do if I don't see the output?
If you see messages , described below. Most users will work with, indicating that the build was successfully completed, but do not see the output ‘Hello Simulator’, it is likely that you changed your build mode in the [Build with Waf] section optimized, but missed switching back to mode debug. All console output used in this guide uses a special ns‑3 component that performs log recording, which is applied to print custom messages to the console. Output from this component is automatically disabled when compiling optimized code — it is ‘optimized’. If you do not see the output ‘Hello Simulator’, enter the following:
$ ./waf configure --build-profile=debug --enable-examples --enable-teststo set up , described below. Most users will work with debug versions of ns‑3 programs, which include examples and tests. Then you need to rebuild the current debug version of the code by typing
$ ./wafNow, if you run the program hello-simulator, you should see the expected result.
3.6.1 Command-line arguments
To pass command line arguments to the ns‑3 program, use the following template:
$ ./waf --run --command-template="%s "Replace with the name of your program and with the arguments. The argument - -command-template for , described below. Most users will work with is essentially a recipe for building the actual command line , described below. Most users will work with used to execute the program. Waf checks that the build is complete, sets the paths to the common library, and then, using the provided command line template and substituting the program name for the placeholder %s, calls the executable file. If you find this syntax complicated, there's a simpler option that includes the ns‑3 program and its arguments enclosed in single quotes:
$ ./waf --run ' --arg1=value1 --arg2=value2 ...'Another particularly useful example is selectively running test suites. Let's assume there's a test suite mytest (which actually doesn't exist). Earlier, we used the script ./test.py to run a whole series of tests in parallel, which repeatedly calls the testing program test-runner. Call test-runner directly to perform a single test:
$ ./waf --run test-runner --command-template="%s --suite=mytest --verbose"Arguments will be passed to the program test-runner. Since mytest does not exist, an error message will be generated. To print the available parameters for test-runner, enter:
$ ./waf --run test-runner --command-template="%s --help"3.6.2 Debugging
To run ns-3 programs under another utility, such as a debugger (e.g., gdb) or a memory checking tool (e.g., valgrind), use a similar form - command-template = "…". For example, to run your hello-simulator ns-3 program with arguments: gdb $ ./waf --run=hello-simulator --command-template="gdb %s --args "
Note that the ns-3 program name comes with an argument, while the managing utility (here - -run) is the first token in the argument gdb- --args - -command-template. The option , while the rest of the command line belongs to the "lower" program. (Some versions reports gdbdo not understand the option gdb . In this case, remove the program arguments from , while the rest of the command line belongs to the "lower" program. (Some versionsand use a command set - -command-template .) We can combine this recipe and the previous one to run a test under the debugger: gdb args$ ./waf --run test-runner --command-template="gdb %s --args --suite=mytest --verbose"
Waf should be run from its location at the top of the ns-3 tree. This folder becomes the working directory where output files will be written. But what if you want to save these files outside the ns-3 source tree? Use the argument3.6.3 Working directory
- -cwd $ ./waf --cwd=...:
You may find it more convenient to receive output files in your working directory. In this case, an indirect action may help:$ function waff { CWD="$PWD" cd $NS3DIR >/dev/null ./waf --cwd="$CWD" $* cd - >/dev/null }
This decoration of the previous command version preserves the current working directory, changes to the directory, and then instructs , described below. Most users will work withto change the working directory back to the saved current working directory before running the program. We mention this command for completeness; most users simply run Waf from the top-level directory and generate output files there. , described below. Most users will work with Continuation: Chapter 4 $ ./waf --cwd=... Tutorial for the ns-3 network simulator. Chapter 4
Source: habr.com
