

The first step in deploying to Kubernetes is to place your application in a container. In this series, we will explore how to create an image of a small and secure container.
Thanks to Docker, creating container images has never been easier. Specify a base image, add your changes, and create the container.

Although this approach is great for getting started, using default base images can lead to security issues with large images full of vulnerabilities.
Moreover, most images in Docker use Debian or Ubuntu as their base image, and while this provides excellent compatibility and easy adaptation (the Docker file consists of only two lines of code), base images can add hundreds of megabytes of additional overhead to your container. For example, a simple Go 'hello-world' file in a node.js application occupies about 700 megabytes, while the size of your actual application is only a few megabytes.
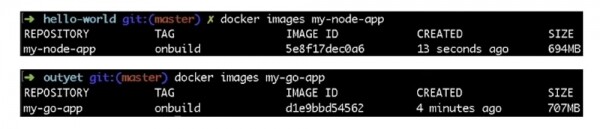
Therefore, all this additional overhead is a waste of digital space and a perfect hiding place for vulnerabilities and security flaws. So let's look at two ways to reduce the size of the container image.
The first is to use small-sized base images, and the second is to employ the Builder Pattern design pattern. Using smaller base images is likely the simplest way to decrease your container size. Your programming language or stack likely provides a base application image that is much smaller than the default image. Let's take a look at our node.js container.
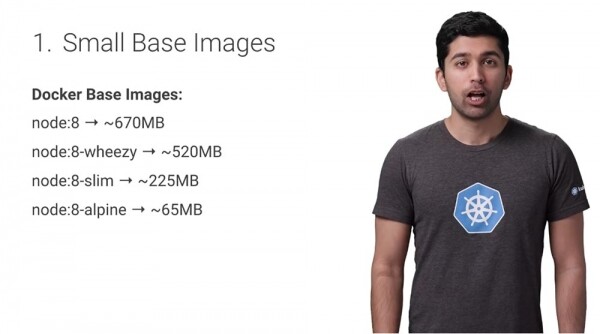
By default, the base image node:8 in Docker is 670 MB, while the size of node:8-alpine is just 65 MB, which is 10 times smaller. By using the smaller Alpine base image, you significantly reduce the size of your container. Alpine is a minimal and lightweight Linux distribution that is very popular among Docker users because it is compatible with many applications while keeping container sizes small. Unlike the standard Docker image 'node', 'node:alpine' removes many utility files and programs, leaving only what is necessary to run your application.
To switch to a smaller base image, simply update your Dockerfile to begin working with the new base image:

Now, unlike the old onbuild image, you need to copy your code into the container and install any dependencies. In the new Dockerfile, the container starts from the node:alpine image, creates a directory for the code, installs dependencies using the NPM package manager, and finally runs server.js.
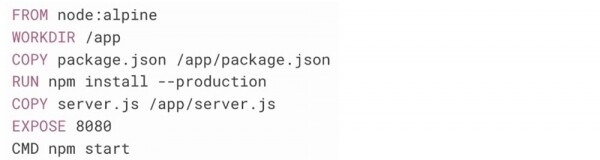
With this update, you get a container that is 10 times smaller. If your programming language or stack doesn't have a base image reduction feature, use Alpine Linux. It will also allow you to have full control over the content of the container. Using small-sized base images is a great way to quickly create small containers. However, even greater reduction can be achieved by using the Builder Pattern.
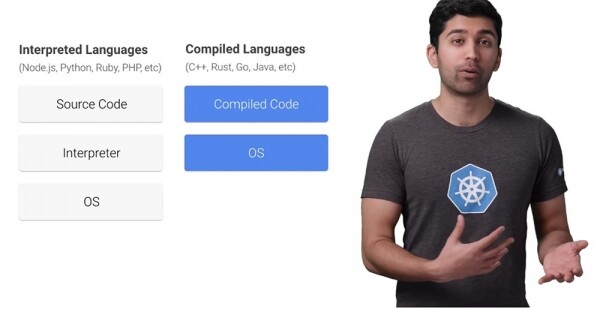
In interpreted languages, the source code is first passed to the interpreter before it is executed. In compiled languages, the source code is transformed into compiled code beforehand. During this process, compilation often uses tools that are not actually necessary for running the code. This means you can completely remove these tools from the final container. The Builder Pattern can be used for this purpose.
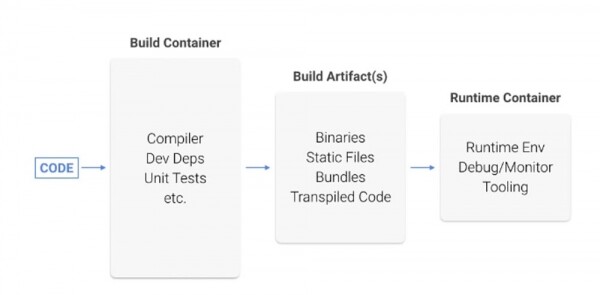
Code is created in the first container and compiled. Then the compiled code is packaged into the final container without the compilers and tools needed to compile that code. Let's take a Go application through this process. First, we will move from the onbuild image to Alpine Linux.
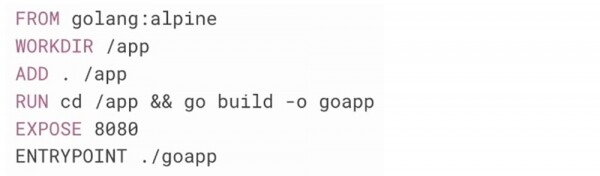
In the new Docker file, the container starts with the image golang:alpine. It then creates a directory for the code, copies the source code into that directory, builds the source code, and runs the application. This container is much smaller than the onbuild container, but it still contains the Go compiler and other tools that we actually don’t need. So let’s just extract the compiled program and package it in our own container.
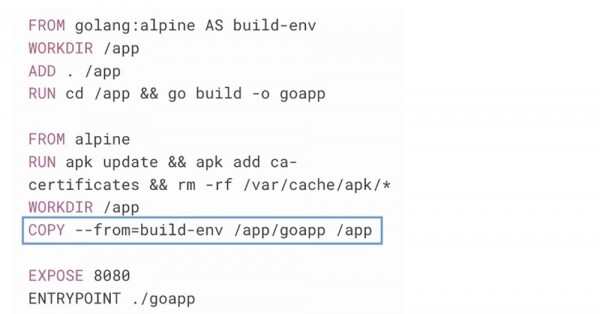
You may notice something unusual in this Docker file: it contains two FROM statements. The first section, which has four lines, looks exactly like the previous Docker file except that it uses the AS keyword to name this stage. In the next section, there’s a new FROM line that allows us to start a new image, using Raw alpine instead of the golang:alpine base image.
Raw Alpine Linux does not have any installed SSL certificates, which will cause most HTTPS API calls to fail, so let’s install a few root CA certificates.
Now for the interesting part: to copy the compiled code from the first container to the second, you can simply use the COPY command located on the 5th line of the second section. It will copy only a single application file and will not affect the Go tools. The new multi-stage Docker file will result in a container image size of only 12 megabytes, whereas the original container image was 700 megabytes, which is a significant difference!
Thus, using small base images and the Builder Pattern are excellent ways to create containers that are much smaller with less overhead.
Depending on the application stack, there may be additional ways to reduce the image and container size, but do small containers truly have a measurable advantage? Let’s examine two aspects where small containers are extremely effective – performance and security.
To evaluate the performance improvement, let’s consider the duration of the container creation process, pushing it to the registry, and subsequently pulling it from there. You can see that a smaller container has a significant advantage over a larger container.
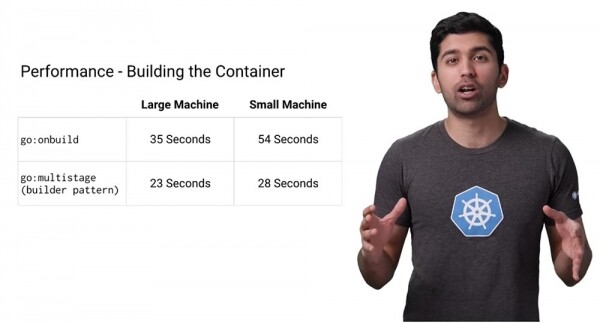
Docker will cache layers, making subsequent builds execute very quickly. However, in many CI systems used for building and testing containers, layers are not cached, leading to significant time savings. As shown, the build time for a large container, depending on your machine's power, ranges from 34 to 54 seconds, whereas using a container optimized via the Builder Pattern, it takes between 23 to 28 seconds. For operations of this nature, the performance gain will be 40-50%. So just think about how many times you create and test your code.
After a container is built, you need to push its image to a container registry so you can use it in your Kubernetes cluster. I recommend using the Google Container Registry.
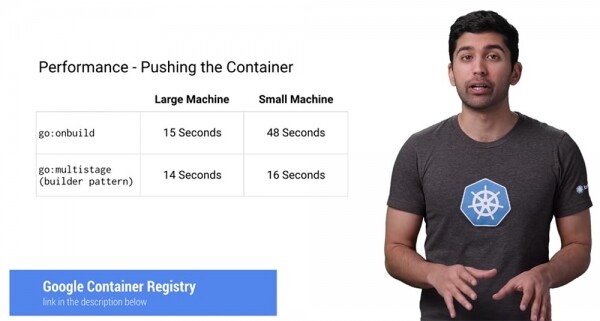
Using Google Container Registry (GCR), you only pay for 'raw' storage and network; there are no additional charges for container management. It is private, secure, and very fast. GCR employs various techniques to speed up the pull operation. As you can see, pushing a Docker container image using go:onbuild, depending on your computer's performance, can take between 15 to 48 seconds, while the same operation with a smaller container takes between 14 to 16 seconds. For less powerful machines, the speed advantage increases threefold. For larger machines, the time is roughly the same, as GCR uses a global cache for the shared image repository, meaning you don't need to download them at all. In low-power computers, the CPU is the bottleneck, so the advantage of using smaller containers is much more pronounced.
If you are using GCR, I highly recommend utilizing Google Container Builder (GCB) as part of your build system.
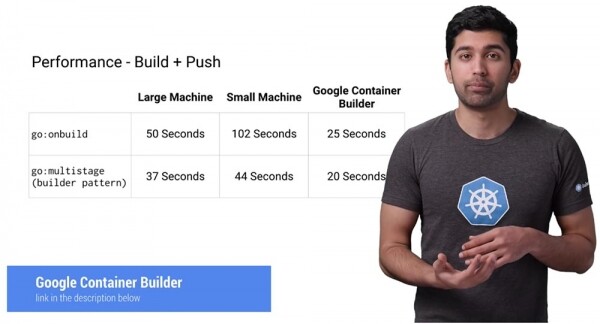
As you can see, using it allows for significantly better results in reducing the duration of the Build+Push operation compared to even a high-performance machine—in this case, the process of building and shipping containers to the host is sped up by almost 2 times. Additionally, every day you receive 120 minutes of free build time, which meets the container creation needs in most cases.
Next up is the most important performance metric—pull speed, or the speed of downloading containers. If you aren't particularly concerned about the time taken for the push operation, the duration of the pull process has a serious impact on the overall performance of the system. Suppose you have a cluster of three nodes and one of them fails. If you are using a management system like Google Kubernetes Engine, it will automatically replace the non-working node with a new one. However, this new node will be completely empty, and you will need to transfer all your containers to it for it to start working. If the pull operation takes a long time, your cluster will be running at reduced performance all that time.
There are many scenarios where this can happen: adding a new node to the cluster, updating nodes, or even switching to a new container for deployment. Thus, minimizing pull extraction time becomes a key factor. It is undeniable that a small container downloads significantly faster than a large one. If you are using multiple containers in a Kubernetes cluster, the time savings can be substantial.
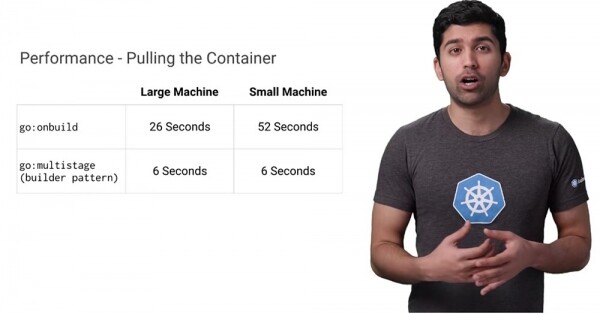
Look at the comparison provided: the pull operation when working with small containers takes 4-9 times less time depending on the machine's power, than the same operation using go:onbuild. Using shared base images of small containers significantly accelerates the time and speed at which new Kubernetes nodes can be deployed and go online.
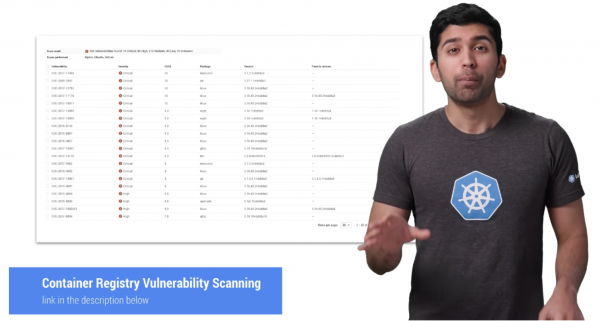
Let's address the security aspect. It is believed that smaller containers are significantly safer than larger ones, as they have a smaller attack surface. Is this really the case? One of the most useful features of Google Container Registry is its ability to automatically scan your containers for vulnerabilities. A few months ago, I created both onbuild and multi-stage containers, so let's see if there are any vulnerabilities present.
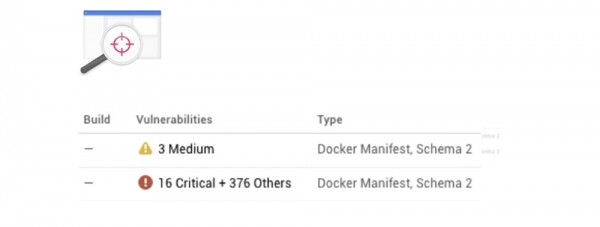
The results are impressive: only 3 medium vulnerabilities were found in the small container, while the large one had 16 critical and 376 other vulnerabilities. Examining the contents of the large container reveals that most security issues are unrelated to our application and are connected to programs we're not even using. Therefore, when people talk about a large attack surface, they mean precisely this.
The conclusion is clear: create small containers, as they provide real advantages in terms of your system's performance and security.
A little advertisement 🙂
Thank you for staying with us. Do you enjoy our articles? Want to see more interesting content? Support us by placing an order or recommending us to your friends, , a unique entry-level server alternative that we have created for you: (options available with RAID1 and RAID10, up to 24 cores and up to 40GB DDR4).
Dell R730xd at half the price in the Equinix Tier IV data center in Amsterdam? Only with us in the Netherlands! Dell R420 — 2x E5-2430 2.2GHz 6C 128GB DDR3 2x960GB SSD 1Gbps 100TB — from $99! Read about how
Source: habr.com
