

I am sure that everyone who has ever worked with , has had complaints about the inability to edit the configuration from the command line. This is particularly perplexing for those who previously worked with Cisco ASA, where everything can be configured through the CLI. At Check Point, it's the opposite — all security settings are performed exclusively through the graphical interface. However, certain tasks are quite inconvenient to do through the GUI (even one as user-friendly as Check Point's). For instance, adding 100 new hosts or networks becomes a long and tedious process. For each object, you have to click multiple times and input the IP address. The same applies to creating a group of sites or enabling/disabling IPS signatures in bulk. There is a high likelihood of making a mistake.
Recently, a 'miracle' occurred. With the release of the new version Gaia R80 , the possibility was announced to use the API, which opens up vast opportunities for automating settings, administration, monitoring, etc. Now you can:
- create objects;
- add or edit access lists;
- enable/disable blades;
- configure network interfaces;
- install policies;
- and much more.
Honestly, I don't understand how this news slipped by Habr. In this article, we will briefly describe how to use the API and provide several practical examples of configuring Check Point with scripts.
I would like to clarify right away that the API is only used for the Management server. That is, it is still impossible to manage gateways without the Management server.
Who might find this API useful?
- System administrators looking to simplify or automate routine tasks for configuring Check Point;
- Companies wanting to integrate Check Point with other solutions (virtualization systems, ticketing systems, configuration management systems, etc.);
- System integrators who want to standardize settings or create additional products related to Check Point.
Typical scheme
And so, let’s consider a typical scheme with Check Point:
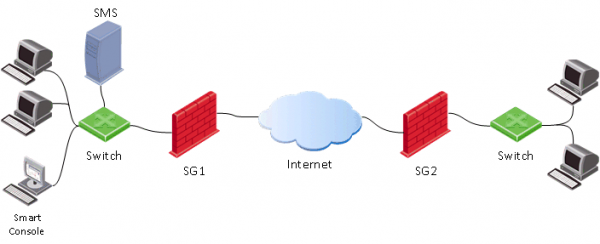
As usual, we have a gateway (SG), a management server (SMS), and an administrator console (SmartConsole). The usual process of configuring the gateway looks as follows:

That is, first you need to launch SmartConsole, through which we connect to the Management Server (SMS). Security settings are applied on SMS, and then (install policy) on the gateway (SG).
When using Management API, we can actually skip the first step (launching SmartConsole) and apply API commands directly to the Management Server (SMS).
Ways to Use the API
There are four main ways to edit configuration using the API:
1) Using the mgmt_cli utility
Example — # mgmt_cli add host name host1 ip-address 192.168.2.100
This command is executed from the command line of the Management Server (SMS). I think the syntax of the command is clear — host1 is created with the address 192.168.2.100.
2) Entering API commands through clish (in expert mode)
Basically, all you need to do is log in to the command line (mgmt login) under the account used for connecting through SmartConsole (or root account). Then you can enter API commands (in this case, there’s no need to use the utility before each command mgmt_cli). You can create full-fledged BASH scripts. An example script that creates a host:
Bash script
#!/bin/bash

main() {
    clear

    #LOGIN (don't ask for username and password, user is already logged in to Management server as 'root' user)
    mgmt_cli login --root true > id_add_host.txt
    on_error_print_and_exit "Error: Failed to login, check that the server is up and running (run 'api status')"

    #READ HOST NAME
    printf "Enter host name:n"
    read -e host_name
    on_empty_input_print_and_exit "$host_name" "Error: The host's name cannot be empty."

    #READ IP ADDRESS
    printf "nEnter host IP address:n"
    read -e ip
    on_empty_input_print_and_exit "$ip" "Error: The host's IP address cannot be empty."

    #CREATE HOST
    printf "Creating new host: $host_name with IP address: $ipn"
    new_host_response=$(mgmt_cli add host name $host_name ip-address $ip -s id_add_host.txt 2> /dev/null)
    on_error_print_and_exit "Error: Failed to create host object. n$new_host_response"

    #PUBLISH THE CHANGES
    printf "nPublishing the changesn"
    mgmt_cli publish --root true -s id_add_host.txt &> /dev/null
    on_error_print_and_exit "Error: Failed to publish the changes."

    #LOGOUT
    logout

	printf "Done.n"
}

logout(){
	mgmt_cli logout --root true -s id_add_host.txt &> /dev/null
}

on_error_print_and_exit(){
    if [ $? -ne 0 ]; then
        handle_error "$1"
	fi
}

handle_error(){
    printf "n$1n" #print error message
    mgmt_cli discard --root true -s id_add_host.txt &> /dev/null
    logout
    exit 1
}

on_empty_input_print_and_exit(){
	if [ -z "$1" ]; then
		printf "$2n" #print error message
		logout
		exit 0
	fi
}

# Script starts here. Call function "main".
main
If you're interested, you can watch the corresponding video:
3) Through SmartConsole by opening the CLI window
All you need to do is launch the window CLI right from SmartConsole, as shown in the picture below.
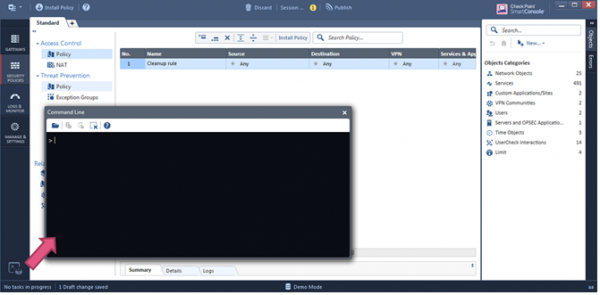
In this window, you can start entering API commands right away.
4) Web Services. Use HTTPS Post request (REST API)
In our opinion, this is one of the most promising methods, as it allows building entire applications for server management (apologies for the tautology). Below, we will examine this method in a bit more detail.
To summarize:
- API + cli is more suitable for those used to Cisco;
- API + shell for scripting and performing routine tasks;
- REST API for automation.
Enabling API
By default, the API is enabled on management servers with over 4GB of RAM and standalone configurations with over 8GB of RAM. You can check the status using the command: api status
If it turns out that the API is disabled, it can be easily enabled through SmartConsole: Manage & Settings > Blades > Management API > Advanced Settings
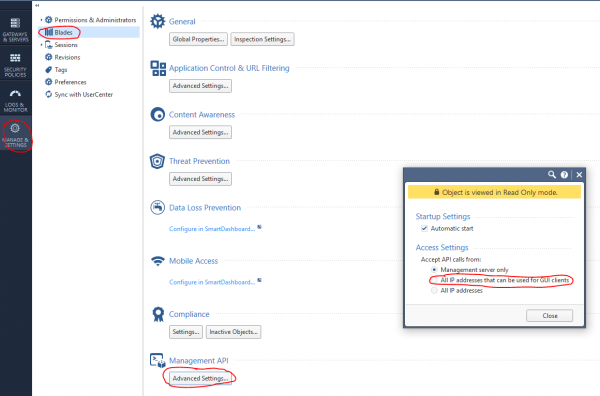
Then publish (Publish) the changes and execute the command api restart.
Web requests + Python
To execute API commands, you can use web requests with the application of Python and libraries requests, json. In general, the structure of a web request consists of three parts:
1) Address
(https://<management server>:<port>/web_api/<command>)
2) HTTP Headers
content-Type: application/json
x-chkp-sid: <session ID token as returned by the login command>
3) Request payload
Text in JSON format containing the different parameters
Example for invoking various commands:
def api_call(ip_addr, port, command, json_payload, sid):
    url = 'https://' + ip_addr + ':' + str(port) + '/web_api/' + command
    if sid == '':
        request_headers = {'Content-Type' : 'application/json'}
    else:
        request_headers = {'Content-Type' : 'application/json', 'X-chkp-sid' : sid}
    r = requests.post(url,data=json.dumps(json_payload), headers=request_headers,verify=False)
    return r.json()
'xxx.xxx.xxx.xxx' -> Ip address GAIA
Let’s look at some typical tasks that administrators often encounter when managing Check Point.
1) Example of authentication and logout functions:
Script
    payload = {'user': 'your_user', 'password' : 'your_password'}
    response = api_call('xxx.xxx.xxx.xxx', 443, 'login',payload, '')
    return response["sid"]

    response = api_call('xxx.xxx.xxx.xxx', 443,'logout', {} ,sid)
    return response["message"]
2) Enabling blades and configuring the network:
Script
new_gateway_data = {'name':'CPGleb','anti-bot':True,'anti-virus' : True,'application-control':True,'ips':True,'url-filtering':True,'interfaces':
                    [{'name':'eth0','topology':'external','ipv4-address': 'xxx.xxx.xxx.xxx','ipv4-network-mask': '255.255.255.0'},
                     {'name':'eth1','topology':'internal','ipv4-address': 'xxx.xxx.xxx.xxx','ipv4-network-mask': '255.255.255.0'}]}
new_gateway_result = api_call('xxx.xxx.xxx.xxx', 443,'set-simple-gateway', new_gateway_data ,sid)
print(json.dumps(new_gateway_result))
3) Modifying firewall rules:
Script
new_access_data={'name':'Cleanup rule','layer':'Network','action':'Accept'}
new_access_result = api_call('xxx.xxx.xxx.xxx', 443,'set-access-rule', new_access_data ,sid)
print(json.dumps(new_access_result))
4) Adding Application layer:
Script
add_access_layer_application={ 'name' : 'application123','applications-and-url-filtering' : True,'firewall' : False}
add_access_layer_application_result = api_call('xxx.xxx.xxx.xxx', 443,'add-access-layer', add_access_layer_application ,sid)
print(json.dumps(add_access_layer_application_result))

set_package_layer={'name' : 'Standard','access':True,'access-layers' : {'add' : [ { 'name' : 'application123','position' :2}]} ,'installation-targets' : 'CPGleb'}
set_package_layer_result = api_call('xxx.xxx.xxx.xxx', 443,'set-package', set_package_layer ,sid)
print(json.dumps(set_package_layer_result))
5) Publish and install policy, check command execution (task-id):
Script
publish_result = api_call('xxx.xxx.xxx.xxx', 443,'publish', {},sid)
print("publish result: " + json.dumps(publish_result))
new_policy = {'policy-package':'Standard','access':True,'targets':['CPGleb']}
new_policy_result = api_call('xxx.xxx.xxx.xxx', 443,'install-policy', new_policy ,sid)
print(json.dumps(new_policy_result))

task_id=(json.dumps(new_policy_result["task-id"]))
len_str=len(task_id)
task_id=task_id[1:(len_str-1)]
show_task_id ={'task-id':(task_id)}
show_task=api_call('xxx.xxx.xxx.xxx',443,'show-task',show_task_id,sid)
print(json.dumps(show_task))
6) Add host:
Script
new_host_data = {'name':'JohnDoePc', 'ip-address': '192.168.0.10'}
new_host_result = api_call('xxx.xxx.xxx.xxx', 443,'add-host', new_host_data ,sid)
print(json.dumps(new_host_result))
7) Add Threat Prevention field:
Script
set_package_layer={'name':'Standard','threat-prevention' :True,'installation-targets':'CPGleb'}
set_package_layer_result = api_call('xxx.xxx.xxx.xxx', 443,'set-package',set_package_layer,sid)
print(json.dumps(set_package_layer_result))
8) View session list
Script
new_session_data = {'limit':'50', 'offset':'0','details-level' : 'standard'}
new_session_result = api_call('xxx.xxx.xxx.xxx', 443,'show-sessions', new_session_data ,sid)
print(json.dumps(new_session_result))
9) Create a new profile:
Script
add_threat_profile={'name':'Apeiron', "active-protections-performance-impact" : "low","active-protections-severity" : "low or above","confidence-level-medium" : "prevent",
  "confidence-level-high" : "prevent", "threat-emulation" : True,"anti-virus" : True,"anti-bot" : True,"ips" : True,
  "ips-settings" : { "newly-updated-protections" : "staging","exclude-protection-with-performance-impact" : True,"exclude-protection-with-performance-impact-mode" : "High or lower"},
  "overrides" : [ {"protection" : "3Com Network Supervisor Directory Traversal","capture-packets" : True,"action" : "Prevent","track" : "Log"},
                  {"protection" : "7-Zip ARJ Archive Handling Buffer Overflow", "capture-packets" : True,"action" : "Prevent","track" : "Log"} ]}
add_threat_profile_result=api_call('xxx.xxx.xxx.xxx',443,'add-threat-profile',add_threat_profile,sid)
print(json.dumps(add_threat_profile_result))
10) Change the action for the IPS signature:
Script
set_threat_protection={
  "name" : "3Com Network Supervisor Directory Traversal",
  "overrides" : [{ "profile" : "Apeiron","action" : "Detect","track" : "Log","capture-packets" : True},
    { "profile" : "Apeiron", "action" : "Detect", "track" : "Log", "capture-packets" : False} ]}
set_threat_protection_result=api_call('xxx.xxx.xxx.xxx',443,'set-threat-protection',set_threat_protection,sid)
print(json.dumps(set_threat_protection_result))
11) Add your service:
Script
add_service_udp={    "name" : "Dota2_udp", "port" : '27000-27030',
"keep-connections-open-after-policy-installation" : False,
"session-timeout" : 0, "match-for-any" : True,
"sync-connections-on-cluster" : True,
"aggressive-aging" : {"enable" : True, "timeout" : 360,"use-default-timeout" : False  },
"accept-replies" : False}
add_service_udp_results=api_call('xxx.xxx.xxx.xxx',443,"add-service-udp",add_service_udp,sid)
print(json.dumps(add_service_udp_results))
12) Add a category, site or group:
Script
add_application_site_category={  "name" : "Valve","description" : "Valve Games"}
add_application_site_category_results=api_call('xxx.xxx.xxx.xxx',443,"add-application-site-category",add_application_site_category,sid)
print(json.dumps(add_application_site_category_results))

add_application_site={    "name" : "Dota2", "primary-category" : "Valve",  "description" : "Dotka",
  "url-list" : [ "www.dota2.ru" ], "urls-defined-as-regular-expression" : False}
add_application_site_results=api_call('xxx.xxx.xxx.xxx',443,"add-application-site " ,
add_application_site , sid)
print(json.dumps(add_application_site_results))

add_application_site_group={"name" : "Games","members" : [ "Dota2"]}
add_application_site_group_results=api_call('xxx.xxx.xxx.xxx',443,"add-application-site-group",add_application_site_group,sid)
print(json.dumps(add_application_site_group_results))
In addition, using Web API you can add and remove networks, hosts, access roles, etc. There is a possibility to configure blades Antivirus, Antibot, IPS, VPN. You can even install licenses using the command run-script. All Check Point API commands can be found .
Check Point API + Postman
It is also convenient to use Check Point Web API in conjunction with . Postman has desktop versions for Windows, Linux, and MacOS. Additionally, there is a plugin for Google Chrome. We will use it. First, you need to find Postman in the Google Chrome Store and install it:
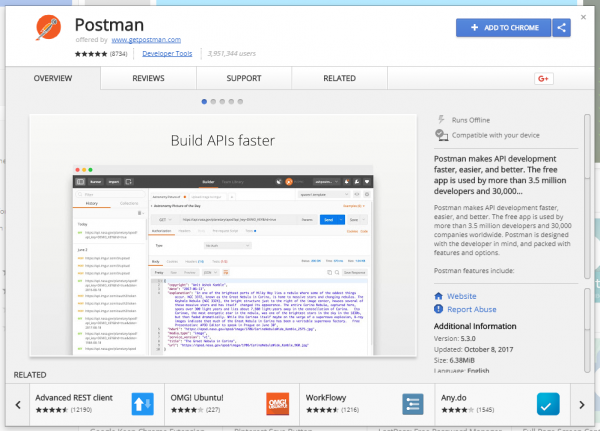
With this utility, we can generate Web requests to the Check Point API. To avoid memorizing all API commands, there is the possibility to import so-called collections (templates) that already contain all necessary commands:
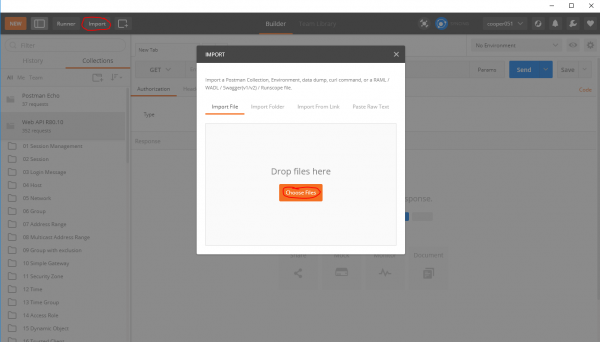
you will find collection for R80.10. After importing, we will have access to the API command templates:
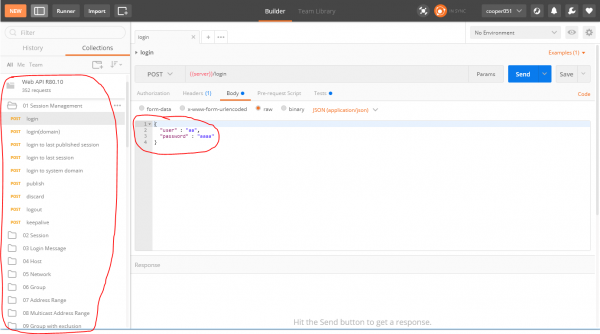
In my opinion, this is very convenient. You can quickly start developing applications using the Check Point API.
Check Point + Ansible
I would also like to note that there is Ansible for CheckPoint API. The module allows managing configurations, but it is not as convenient for solving exotic tasks. Writing scripts in any programming language provides more flexible and convenient solutions.
Output
I think we will conclude our brief review of the Check Point API here. In my opinion, this feature has been highly anticipated and necessary. The emergence of the API opens up very broad possibilities for both system administrators and systems integrators working with Check Point products. Orchestration, automation, feedback with SIEM... all of this is now possible.
P.S. You can find more articles about as always in our blog or in the blog at .
P.S.S. Technical questions related to Check Point setup can be asked
Only registered users can participate in the survey. , please.
Are you planning to use the API?
70,6%Yes12
23,5%No4
5,9%I already use it1
17 users have voted. 3 users did not take a position.
Source: habr.com
