

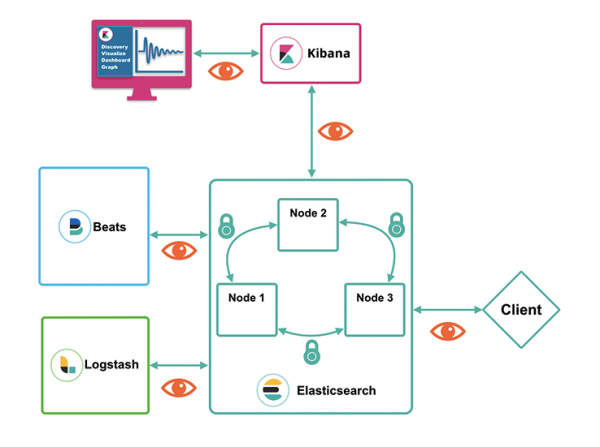
Elastic Stack is a well-known tool in the SIEM systems market (and actually, not just those). It can gather a vast array of data, both sensitive and not so sensitive. It wouldn’t be right for the elements of Elastic Stack to be unprotected. By default, all out-of-the-box Elastic components (Elasticsearch, Logstash, Kibana, and Beats collectors) operate over open protocols. Furthermore, authentication is disabled in Kibana. All these interactions can be secured, and this article will explain how to do that. For convenience, we have divided the narrative into three meaningful blocks:
- Role-Based Access Model
- Data Security Within the Elasticsearch Cluster
- Data Security Outside the Elasticsearch Cluster
Details below.
Role-Based Access Model
If you install Elasticsearch without any tuning, access to all indexes will be open to anyone interested—or to those who can use curl. To avoid this, Elasticsearch offers a role-based model, which is available starting from the Basic subscription level (which is free). It looks something like this:
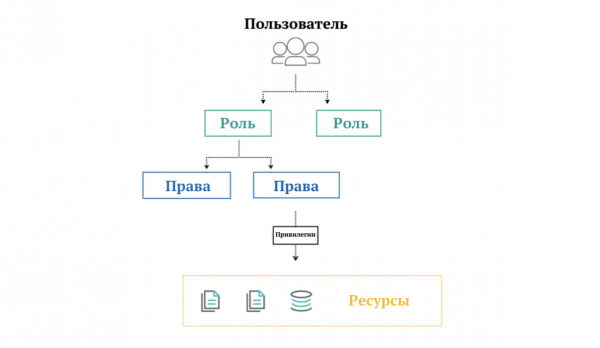
What’s in the Picture
- Users are anyone who can authenticate using credentials.
- A role is a set of permissions.
- Permissions are a set of privileges.
- Privileges are permissions for writing, reading, deleting, etc. ()
- Resources are indexes, documents, fields, users, and other entities in the repository (the role model for some resources is only available in paid subscriptions).
Elasticsearch by default has , linked to . Once security settings are enabled, they can be immediately used.
To activate security in the Elasticsearch settings, you need to add a new line to the configuration file (by default, this is elasticsearch/config/elasticsearch.yml) :
xpack.security.enabled: trueAfter modifying the configuration file, start or restart Elasticsearch for the changes to take effect. The next step is to assign passwords to the out-of-the-box users. We will do this interactively using the command below:
[elastic@node1 ~]$ ./elasticsearch/bin/elasticsearch-setup-passwords interactive
Initiating the setup of passwords for reserved users elastic, apm_system, kibana, logstash_system, beats_system, remote_monitoring_user.
You will be prompted to enter passwords as the process progresses.
Please confirm that you would like to continue [y/N] y


Enter password for [elastic]:
Reenter password for [elastic]:
Enter password for [apm_system]:
Reenter password for [apm_system]:
Enter password for [kibana]:
Reenter password for [kibana]:
Enter password for [logstash_system]:
Reenter password for [logstash_system]:
Enter password for [beats_system]:
Reenter password for [beats_system]:
Enter password for [remote_monitoring_user]:
Reenter password for [remote_monitoring_user]:
Changed password for user [apm_system]
Changed password for user [kibana]
Changed password for user [logstash_system]
Changed password for user [beats_system]
Changed password for user [remote_monitoring_user]
Changed password for user [elastic]
Checking:
[elastic@node1 ~]$ curl -u elastic 'node1:9200/_cat/nodes?pretty'
Enter host password for user 'elastic':
192.168.0.2 23 46 14 0.28 0.32 0.18 dim * node1
You can pat yourself on the back — the settings on the Elasticsearch side are complete. Now it's time to configure Kibana. If you run it now, errors will pop up, so it's important to create a keystore. This is done in two commands (user kibana and the password entered during the password creation step in Elasticsearch):
[elastic@node1 ~]$ ./kibana/bin/kibana-keystore add elasticsearch.username
[elastic@node1 ~]$ ./kibana/bin/kibana-keystore add elasticsearch.password
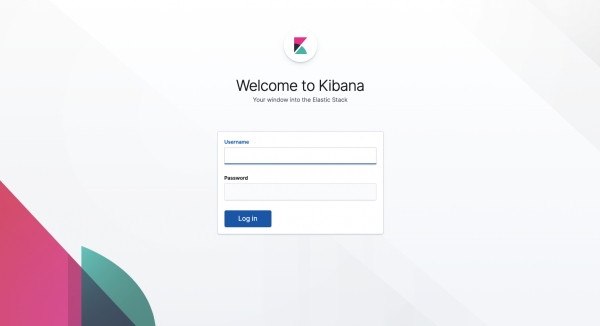
If everything is correct — Kibana will start asking for a username and password. In the Basic subscription, a role-based model based on internal users is available. Starting with Gold, you can connect external authentication systems — LDAP, PKI, Active Directory, and Single sign-on systems.
Access rights to objects within Elasticsearch can also be restricted. However, to do the same for documents or fields, a paid subscription is required (this luxury starts from the Platinum level). These settings are available in the Kibana interface or through . You can check through the familiar Dev Tools menu:
Creating a Role
PUT /_security/role/ruslan_i_ludmila_role
{
  "cluster": [],
  "indices": [
    {
      "names": [ "ruslan_i_ludmila" ],
      "privileges": ["read", "view_index_metadata"]
    }
  ]
}
Creating a User
POST /_security/user/pushkin
{
  "password" : "nataliaonelove",
  "roles" : [ "ruslan_i_ludmila_role", "kibana_user" ],
  "full_name" : "Alexander Pushkin",
  "email" : "pushkin@lyceum.edu",
  "metadata" : {
    "hometown" : "Saint-Petersburg"
  }
}
Data Security Within the Elasticsearch Cluster
When Elasticsearch operates in a cluster (which is common), security settings within the cluster become important. For secure interaction between nodes, Elasticsearch uses the TLS protocol. To configure secure interaction between them, a certificate is needed. We generate a certificate and a private key in PEM format:
[elastic@node1 ~]$ ./elasticsearch/bin/elasticsearch-certutil ca --pemAfter executing the command above, an archive will appear in the directory /../elasticsearch . Inside it, you will find the certificate and private key with the extensions elastic-stack-ca.zipcrt key and respectively. It is advisable to place them on a shared resource accessible from all nodes in the cluster. Each node now needs its own certificates and private keys based on those located in the shared directory. When executing the command, you will be prompted to set a password. Additional options can be added —ip and —dns for complete verification of interacting nodes.
[elastic@node1 ~]$ ./elasticsearch/bin/elasticsearch-certutil cert --ca-cert /shared_folder/ca/ca.crt --ca-key /shared_folder/ca/ca.key
As a result of executing the command, we will obtain a certificate and a private key in PKCS#12 format secured with a password. Now, just move the generated filep12 to the configuration directory: [elastic@node1 ~]$ mv elasticsearch/elastic-certificates.p12 elasticsearch/config
Let’s add the password to the certificate in the formatin the keystore and truststore on each node: to the configuration directory: [elastic@node1 ~]$ ./elasticsearch/bin/elasticsearch-keystore add xpack.security.transport.ssl.keystore.secure_password [elastic@node1 ~]$ ./elasticsearch/bin/elasticsearch-keystore add xpack.security.transport.ssl.truststore.secure_password
In the already knownelasticsearch.yml just add the lines with the certificate data: xpack.security.transport.ssl.enabled: true xpack.security.transport.ssl.verification_mode: certificate xpack.security.transport.ssl.keystore.path: elastic-certificates.p12 xpack.security.transport.ssl.truststore.path: elastic-certificates.p12
Start all Elasticsearch nodes and execute. If everything was done correctly, a response will be returned with several nodes: curl[elastic@node1 ~]$ curl node1:9200/_cat/nodes -u elastic:password 172.18.0.3 43 75 4 0.00 0.05 0.05 dim * node2 172.18.0.4 21 75 3 0.00 0.05 0.05 dim - node3 172.18.0.2 39 75 4 0.00 0.05 0.05 dim - node1
There is another security option — IP address filtering (available in subscriptions from the Gold level). It allows you to create whitelists of IP addresses that are permitted to access the nodes.Connecting external tools outside the cluster means tools like Kibana, Logstash, Beats, or other external clients.
Data Security Outside the Elasticsearch Cluster
To configure HTTPS support (instead of HTTP), we will add new lines in elasticsearch.yml:
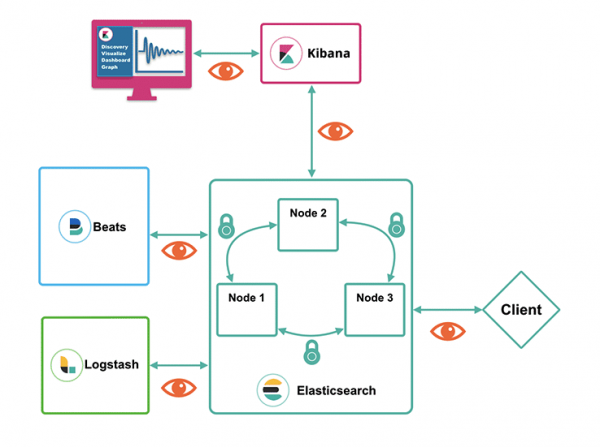
xpack.security.http.ssl.enabled: true xpack.security.http.ssl.keystore.path: elastic-certificates.p12 xpack.security.http.ssl.truststore.path: elastic-certificates.p12
Since the certificate is password-protected, we will add it to the keystore and truststore on each node:Since the certificate is password-protected, we will add it to the keystore and truststore on each node:
[elastic@node1 ~]$ ./elasticsearch/bin/elasticsearch-keystore add xpack.security.http.ssl.keystore.secure_password
[elastic@node1 ~]$ ./elasticsearch/bin/elasticsearch-keystore add xpack.security.http.ssl.truststore.secure_password
After adding the keys, the Elasticsearch nodes are ready for connection via https. They can now be started.
The next step is to create a key for connecting Kibana and add it to the configuration. Based on the certificate already placed in the shared directory, we will generate a certificate in PEM format (PKCS#12 Kibana, Logstash, and Beats do not support this yet):
[elastic@node1 ~]$ ./elasticsearch/bin/elasticsearch-certutil cert --ca-cert /shared_folder/ca/ca.crt --ca-key /shared_folder/ca/ca.key --pemNow we need to unpack the created keys into the Kibana configuration folder:
[elastic@node1 ~]$ unzip elasticsearch/certificate-bundle.zip -d kibana/configThe keys are ready, so we need to change the Kibana configuration to start using them. In the kibana.yml configuration file, change http to https and add the lines for SSL connection settings. The last three lines configure secure interaction between the user's browser and Kibana.
elasticsearch.hosts: ["https://${HOSTNAME}:9200"]
elasticsearch.ssl.certificateAuthorities: /shared_folder/ca/ca.crt
elasticsearch.ssl.verificationMode: certificate
server.ssl.enabled: true
server.ssl.key: /../kibana/config/instance/instance.key
server.ssl.certificate: /../kibana/config/instance/instance.crt
Thus, the settings are complete and access to data in the Elasticsearch cluster is encrypted.
If you have questions about the capabilities of the Elastic Stack on free or paid subscriptions, monitoring tasks, or creating a SIEM system, please leave a request in on our website.
Also, our articles about the Elastic Stack on Habr:
Source: habr.com
