

Using PowerShell, engineers and IT administrators successfully automate various tasks while working not only with on-premises but also with cloud infrastructures, particularly Azure. In many cases, working through PowerShell is much more convenient and faster than using the Azure portal. Thanks to the cross-platform nature of PowerShell, it can be used on any operating system.
Whether you are working with Ubuntu, Red Hat, or Windows, PowerShell will help manage cloud resources. Using the module , for example, you can specify any properties of virtual machines.
In this article, we will explore how to use PowerShell to resize a VM in Azure cloud, as well as to delete the VM and its associated resources.

Important! Don't forget to sanitize your hands to get ready for work:
- You will need the module Azure PowerShell Module — it can be downloaded from PowerShell Gallery using the command
Install-Module Az. - You need to authenticate in the Azure cloud where the virtual machine is running by executing the command
Connect-AzAccount.
First, let's create a script that resizes the Azure VM. We'll open VS Code and save a new PowerShell script named Resize-AzVirtualMachine.ps1 — we will add code snippets to it as we go through the example.
Request the available VM sizes
Before changing the size of the VM, you need to find out what valid sizes are available for virtual machines in Azure cloud. To do this, you should run the command Get-AzVMSize.
So, for the virtual machine devvm01 from the resource group dev we request all possible valid sizes:
Get-AzVMSize -ResourceGroupName dev -VMName devvm01(In real tasks, naturally, instead of ResourceGroupName=dev and VMName=devvm01 you will specify your own values for these parameters.)
The command will return a list like this:
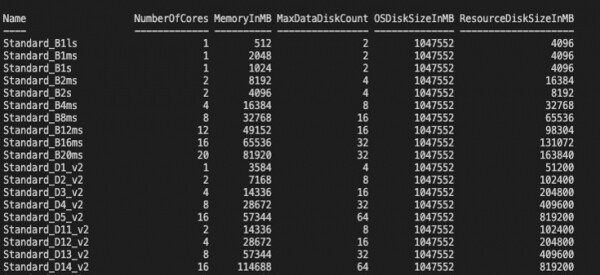
These are all the possible size options that can be set for this virtual machine.
Resizing the machine
For this example, we will resize to a new size of Standard_B1ls — it is first on the list above. (In real tasks, of course, you choose any size you need.)
- First, using the command
Get-AzVMwe retrieve information about our object (the virtual machine), saving it in the variable$virtualMachine:$virtualMachine = Get-AzVM -ResourceGroupName dev -VMName devvm01 - Then we take the property of this object
.HardwareProfile.VmSizeand set the required new value:$virtualMachine.HardwareProfile.VmSize = "Standard_B1ls" - And now we simply execute the command to update the VM —
Update-AzVm:Update-AzVM -VM devvm01 -ResourceGroupName dev - We confirm that everything has gone successfully — for this, we again request information about our object and look at the property
$virtualMachine.HardwareProfile:$virtualMachine = Get-AzVM -ResourceGroupName dev -VMName devvm01 $virtualMachine.HardwareProfile
If we see it there Standard_B1ls — it means everything is fine, the size of the machine has been changed. We can move forward and expand our success — resizing several VMs at once using an array.
What about deleting a VM in Azure?
Deleting is not as simple and straightforward as it might seem. You have to remove several resources associated with this machine, including:
- Boot diagnostics storage containers
- Network Interfaces
- Public IP addresses
- The system disk and blob where its status is stored
- Data disks
Therefore, we will create a function and call it Remove-AzrVirtualMachine — and it will delete not only the Azure VM but also all of the above.
We proceed in the standard way and first get our object (VM) using the command Get-AzVm. For example, let this machine be WINSRV19 from the resource group MyTestVMs.
We will save this object along with all its properties in a variable $vm:
$vm = Get-AzVm -Name WINSRV19 -ResourceGroupName MyTestVMsWe delete the boot diagnostics container
When creating a VM in Azure, the user is also offered to create a boot diagnostics container, so that if there are problems with the booting, there is something to refer to for troubleshooting. However, when deleting the VM, this container remains to continue its now purposeless existence. Let’s fix this situation.
- First, we need to find out which storage account this container belongs to — for this, we need to locate the property
storageUriwithin the objectDiagnosticsProfileof our VM. For this, I use the following regular expression:$diagSa = [regex]::match($vm.DiagnosticsProfile.bootDiagnostics.storageUri, '^http[s]?:\/\/([^\.]+)').groups[1].value - Now we need to find out the name of the container, for which we need to retrieve the VM ID using the command
Get-AzResource:if ($vm.Name.Length -gt 9) { $i = 9 } else { $i = $vm.Name.Length - 1 } $azResourceParams = @{ 'ResourceName' = WINSRV 'ResourceType' = 'Microsoft.Compute\/virtualMachines' 'ResourceGroupName' = MyTestVMs } $vmResource = Get-AzResource @azResourceParams $vmId = $vmResource.Properties.VmId $diagContainerName = ('bootdiagnostics-{0}-{1}' -f $vm.Name.ToLower().Substring(0, $i), $vmId) - Next, we get the name of the resource group to which the container belongs:
$diagSaRg = (Get-AzStorageAccount | where { $_.StorageAccountName -eq $diagSa }).ResourceGroupName - And now we have everything we need to remove the container using the command
Remove-AzStorageContainer:$saParams = @{ 'ResourceGroupName' = $diagSaRg 'Name' = $diagSa } Get-AzStorageAccount @saParams | Get-AzStorageContainer | where { $_.Name-eq $diagContainerName } | Remove-AzStorageContainer -Force
Removing the VM
Now we will remove the virtual machine itself, as we have already created a variable $vm for the corresponding object. Well, let's run the command Remove-AzVm:
$null = $vm | Remove-AzVM -ForceRemoving the network interface and public IP address
Our VM has one (or even several) network interfaces (NICs) — to remove them as they are no longer needed, we will go through the property NetworkInterfaces of our VM object and remove the NIC using the command Remove-AzNetworkInterface. In case there are multiple network interfaces, we will use a loop. At the same time, for each NIC, we will check the property IpConfiguration to see if the interface has a public IP address. If one is found, we will remove it with the command Remove-AzPublicIpAddress.
Here's an example of such code, where we loop through all the NICs, remove them, and check if there is a public IP. If there is, we parse the property PublicIpAddress, get the corresponding resource name by ID, and remove it:
foreach($nicUri in $vm.NetworkProfile.NetworkInterfaces.Id) {
    $nic = Get-AzNetworkInterface -ResourceGroupName $vm.ResourceGroupName -Name $nicUri.Split('\/')[-1]
    Remove-AzNetworkInterface -Name $nic.Name -ResourceGroupName $vm.ResourceGroupName -Force

    foreach($ipConfig in $nic.IpConfigurations) {
        if($ipConfig.PublicIpAddress -ne $null) {
            Remove-AzPublicIpAddress -ResourceGroupName $vm.ResourceGroupName -Name $ipConfig.PublicIpAddress.Id.Split('\/')[-1] -Force
        }
    }
}
Removing the system disk
The OS disk is a blob, for which there is a command to remove it Remove-AzStorageBlob — but before running it, you will need to specify the required values for its parameters. For this, in particular, you need to get the name of the storage container containing the system disk, and then pass it to this command along with the corresponding storage account.
$osDiskUri = $vm.StorageProfile.OSDisk.Vhd.Uri
$osDiskContainerName = $osDiskUri.Split('\/')[-2]
$osDiskStorageAcct = Get-AzStorageAccount | where { $_.StorageAccountName -eq $osDiskUri.Split('\/')[2].Split('.')[0] }
$osDiskStorageAcct | Remove-AzStorageBlob -Container $osDiskContainerName -Blob $osDiskUri.Split('\/')[-1]
Removing the status blob of the system disk
To do this, as you have probably guessed, we take the storage container where this disk is stored, and assuming that the blob ends with status, we pass the corresponding parameters to the removal command Remove-AzStorageBlob:
$osDiskStorageAcct | Get-AzStorageBlob -Container $osDiskContainerName -Blob "$($vm.Name)*.status" | Remove-AzStorageBlobAnd finally, we remove the data disks
Our VM may have had attached data disks that are no longer needed. If they are unnecessary, let's delete them as well. First, we'll parse StorageProfile of our VM and find the property Uri. If there are multiple disks, we'll organize a loop through URI. For each URI, we'll find the corresponding storage account using Get-AzStorageAccount. Then, we'll parse the storage URI to extract the necessary blob name and pass it to the deletion command Remove-AzStorageBlob along with the storage account. Here's how it will look in code:
if ($vm.DataDiskNames.Count -gt 0) {
    foreach ($uri in $vm.StorageProfile.DataDisks.Vhd.Uri) {
        $dataDiskStorageAcct = Get-AzStorageAccount -Name $uri.Split('\/')[2].Split('.')[0]
        $dataDiskStorageAcct | Remove-AzStorageBlob -Container $uri.Split('\/')[-2] -Blob $uri.Split('\/')[-1]
    }
}
And here we are at the happy ending! Now we need to assemble a cohesive whole from all these fragments. The good author Adam Bertram was kind enough to do this himself. Here’s a link to the final script titled Remove-AzrVirtualMachine.ps1:
→
I hope these practical tips will help you save effort, time, and resources when working with Azure VMs.
Source: habr.com
