

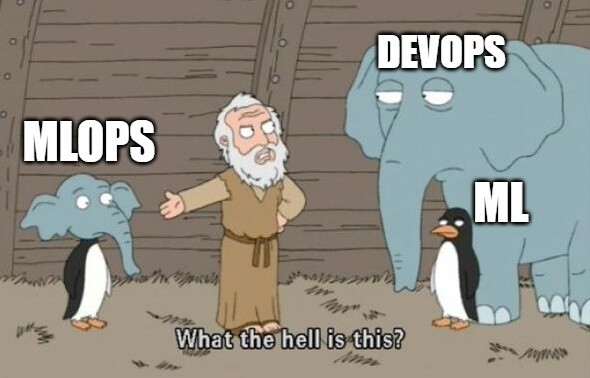
Hello everyone! I am a CV developer at KROK. For three years, we have been implementing projects in the field of CV. During this time, we have done various things, such as: monitoring drivers to ensure they do not drink, smoke, talk on the phone, or look away from the road while driving; recording those who like to use designated lanes and occupy multiple parking spots; ensuring that employees wear helmets, gloves, etc.; identifying employees who want to enter a site; counting everything that can be counted.
What am I getting at?
In the process of implementing projects, we have encountered many hurdles, some of which you may be familiar with or will become acquainted with in the future.
Let's model a situation
Imagine we have joined a young company "N" that is involved in ML. We are working on an ML (DL, CV) project, and then for some reason, we switch to another task, taking a break, and later return to our or someone else's neural network.
- The moment of truth arrives; we need to recall what we were working on, what hyperparameters we tested, and most importantly, what results they produced. There may be many ways to store information about all runs: in the mind, in configuration files, in notebooks, or in a cloud-based work environment. I have seen cases where hyperparameters were stored as commented lines in the code, showcasing the extent of creativity. Now imagine that you are returning not to your project, but to a project belonging to someone who left the company, and you've inherited code and a model named model_1.pb. To add to the complexity, let's assume you are also a novice specialist.
- Moving on. To run the code, we and everyone who will be working with it need to create an environment. Often, we find that this environment has also not been inherited for various reasons. This can also become a non-trivial task. We don’t want to spend time on this step, do we?
- We train the model (for example, a car detector). We reach a point where it performs reasonably well — it's time to save the result. We'll call it car_detection_v1.pb. Then, we train another one — car_detection_v2.pb. After some time, our colleagues or we may continue training more and more, using various architectures. In the end, we accumulate a bunch of artifacts, information about which needs to be meticulously gathered (but we'll do that later, as we have more pressing matters for now).
- And that's it! We have a model! We can start training the next model, develop an architecture for a new task, or perhaps take a tea break? But who will deploy it?
Identifying problems
Working on a project or product involves the effort of many people. As time passes, people leave and join, the number of projects increases, and the projects themselves become more complex. One way or another, situations from the described cycle (and not only) will arise in various combinations from iteration to iteration. All this results in wasted time, confusion, nerves, possible client dissatisfaction, and ultimately — lost money. While we often repeat past mistakes, I believe no one wants to experience these moments repeatedly.

So, we have gone through one development cycle and see that there are problems that need to be solved. To address this, we need to:
- conveniently store work results;
- simplify the onboarding process for new employees;
- streamline the development environment deployment process;
- set up a model versioning process;
- have a convenient way to validate models;
- find a tool for managing model states;
- find a way to deliver models to production.
It seems we need to devise a workflow that allows for easy and convenient management of this lifecycle? This practice is known as MLOps.
MLOps, or DevOps for machine learning, enables teams of data processing and analysis specialists and IT specialists to collaborate while increasing the pace of model development and deployment through monitoring, validation, and management systems for machine learning models.
You can , what the folks at Google think about all this. The article makes it clear that MLOps is quite a comprehensive concept.
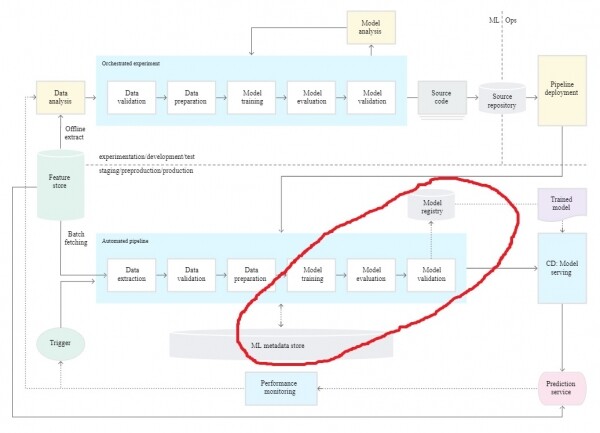
In the following article, I will describe only a part of the process. I will use the MLflow tool, as it is an open-source project that requires a small amount of code to integrate and has compatibility with popular ML frameworks. You can search online for other tools, such as Kubeflow, SageMaker, Trains, etc., and perhaps find one that better suits your needs.
"Building" MLOps using the MLFlow tool as an example
MLFlow is an open-source platform for managing the lifecycle of ML models ().
MLflow includes four components:
- MLflow Tracking — addresses the recording of results and parameters that led to those results;
- MLflow Project — allows you to package code and reproduce it on any platform;
- MLflow Models — responsible for deploying models to production;
- MLflow Registry — allows you to store models and manage their states in a centralized repository.
MLflow operates with two entities:
- Run — a complete training cycle, parameters, and metrics we want to record;
- Experiment — a "theme" that unites runs.
All steps of the example are implemented on the Ubuntu 18.04 operating system.
1. Setting up the server
To easily manage our project and obtain all necessary information, we will set up a server. The MLflow tracking server has two main components:
- Backend store — responsible for storing information about registered models (supports four databases: mysql, mssql, sqlite, and postgresql);
- Artifact store — responsible for storing artifacts (supports seven storage options: Amazon S3, Azure Blob Storage, Google Cloud Storage, FTP server, SFTP Server, NFS, HDFS).
As a artifact store for simplicity, we will use an SFTP server.
- Create a group
$ sudo groupadd sftpg - Add a user and set their password
$ sudo useradd -g sftpg mlflowsftp $ sudo passwd mlflowsftp - Adjust a couple of access settings
$ sudo mkdir -p /data/mlflowsftp/upload $ sudo chown -R root:sftpg /data/mlflowsftp $ sudo chown -R mlflowsftp:sftpg /data/mlflowsftp/upload - Add a few lines to /etc/ssh/sshd_config
Match Group sftpg ChrootDirectory /data/%u ForceCommand internal-sftp - Restart the service
$ sudo systemctl restart sshd
As a Backend store we will use postgresql.
$ sudo apt update
$ sudo apt-get install -y postgresql postgresql-contrib postgresql-server-dev-all
$ sudo apt install gcc
$ pip install psycopg2
$ sudo -u postgres -i
# Create new user: mlflow_user
[postgres@user_name~]$ createuser --interactive -P
Enter name of role to add: mlflow_user
Enter password for new role: mlflow
Enter it again: mlflow
Shall the new role be a superuser? (y/n) n
Shall the new role be allowed to create databases? (y/n) n
Shall the new role be allowed to create more new roles? (y/n) n
# Create database mlflow_bd owned by mlflow_user
$ createdb -O mlflow_user mlflow_db
To run the server, you need to install the following Python packages (I recommend creating a separate virtual environment):
pip install mlflow
pip install pysftp
Starting our server
$ mlflow server
                 --backend-store-uri postgresql://mlflow_user:mlflow@localhost/mlflow_db
                 --default-artifact-root sftp://mlflowsftp:mlflow@sftp_host/upload
                --host server_host
                --port server_port
2. Adding tracking
In order to ensure that the results of our training are preserved, that future generations of developers understand what has happened, and that both senior colleagues and you can analyze the learning process calmly, we need to add tracking. Tracking refers to saving parameters, metrics, artifacts, and any additional information about the training run, in our case, on the server.
For example, I created a small using Keras for the segmentation of everything in the . To add tracking, I created the file mlflow_training.py.
Here are the lines where the most interesting part happens:
def run(self, epochs, lr, experiment_name):
        # getting the id of the experiment, creating an experiment in its absence
        remote_experiment_id = self.remote_server.get_experiment_id(name=experiment_name)
        # creating a "run" and getting its id
        remote_run_id = self.remote_server.get_run_id(remote_experiment_id)

        # indicate that we want to save the results on a remote server
        mlflow.set_tracking_uri(self.tracking_uri)
        mlflow.set_experiment(experiment_name)

        with mlflow.start_run(run_id=remote_run_id, nested=False):
            mlflow.keras.autolog()
            self.train_pipeline.train(lr=lr, epochs=epochs)

        try:
            self.log_tags_and_params(remote_run_id)
        except mlflow.exceptions.RestException as e:
            print(e)
Here, self.remote_server is a small wrapper over the methods of mlflow.tracking.MlflowClient (which I created for convenience), which I use to create an experiment and run it on the server. Then, I specify where the results of the run should be sent (mlflow.set_tracking_uri(self.tracking_uri)). I connect automatic logging with mlflow.keras.autolog(). Currently, MLflow Tracking supports automatic logging for TensorFlow, Keras, Gluon XGBoost, LightGBM, and Spark. If you don't find your framework or library, you can always log explicitly. Let's start the training. We register tags and input parameters on the remote server.
A few lines and you, like everyone else, have access to information about all runs. Cool?
3. Setting Up the Project
Now let's make it so that launching the project is as easy as pie. For this, we will add the MLproject file and conda.yaml to the root of the project.
MLproject
name: flow_segmentation
conda_env: conda.yaml

entry_points:
  main:
    parameters:
        categories: {help: 'list of categories from coco dataset'}
        epochs: {type: int, help: 'number of epochs in training'}

        lr: {type: float, default: 0.001, help: 'learning rate'}
        batch_size: {type: int, default: 8}
        model_name: {type: str, default: 'Unet', help: 'Unet, PSPNet, Linknet, FPN'}
        backbone_name: {type: str, default: 'resnet18', help: 'example resnet18, resnet50, mobilenetv2 ...'}

        tracking_uri: {type: str, help: 'the server address'}
        experiment_name: {type: str, default: 'My_experiment', help: 'remote and local experiment name'}
    command: "python mlflow_training.py
            --epochs={epochs}
            --categories={categories}
            --lr={lr}
            --tracking_uri={tracking_uri}
            --model_name={model_name}
            --backbone_name={backbone_name}
            --batch_size={batch_size}
            --experiment_name={experiment_name}"
MLflow Project has several properties:
- Name — the name of your project;
- Environment — in my case, conda_env indicates that Anaconda is used for execution, and the dependency description is in the conda.yaml file;
- Entry Points — indicates which files and with what parameters we can run (all parameters during training start are logged automatically)
conda.yaml
name: flow_segmentation
channels:
  - defaults
  - anaconda
dependencies:
  - python==3.7
  - pip:
    - mlflow==1.8.0
    - pysftp==0.2.9
    - Cython==0.29.19
    - numpy==1.18.4
    - pycocotools==2.0.0
    - requests==2.23.0
    - matplotlib==3.2.1
    - segmentation-models==1.0.1
    - Keras==2.3.1
    - imgaug==0.4.0
    - tqdm==4.46.0
    - tensorflow-gpu==1.14.0
You can use Docker as the execution environment; for more details, refer to .
4. Starting Training
Clone the project and navigate to the project directory:
git clone https://github.com/simbakot/mlflow_example.git
cd mlflow_example/
To run, you need to install the libraries
pip install mlflow
pip install pysftp
Since I'm using conda_env in the example, Anaconda must be installed on your computer (but it's also possible to bypass this by installing all the necessary packages manually and experimenting with the launch parameters).
All the preparatory steps are completed, and we can start the training process. From the root of the project:
$ mlflow run -P epochs=10 -P categories=cat,dog -P tracking_uri=http://server_host:server_port .After entering the command, a conda environment will be automatically created, and training will begin.
In the example above, I specified the number of epochs for training, the categories we want to segment (the full list can be viewed ) and the address of our remote server.
The full list of possible parameters can be viewed in the MLproject file.
5. Evaluating the Training Results
After training is complete, we can navigate in the browser to our server's address
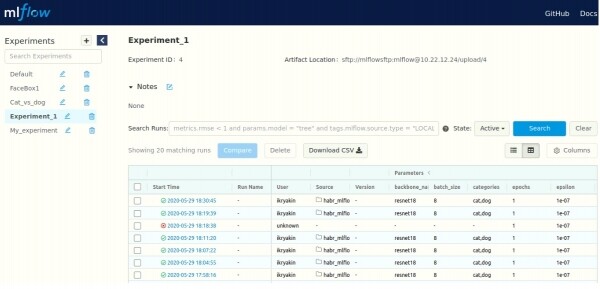
Here we see a list of all experiments (top left), as well as information about the runs (in the middle). We can view more detailed information (parameters, metrics, artifacts, and some additional information) about each run.
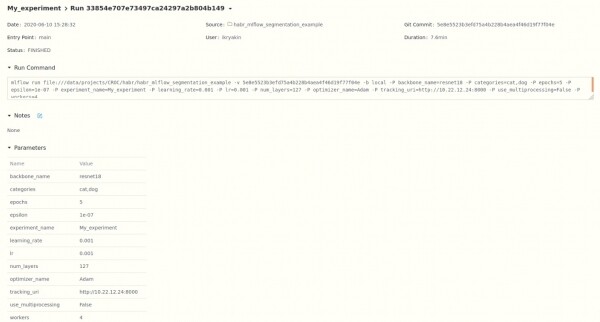
For each metric, we can observe the history of changes.
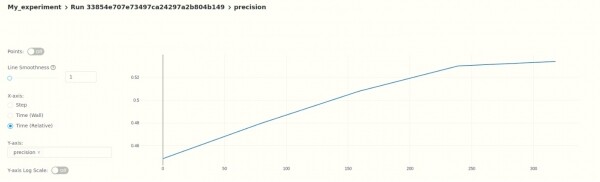
That is, at this point, we can analyze the results in a "manual" mode, but you can also set up automatic validation using the MLflow API.
6. Registering the Model
Once we have analyzed our model and decided that it is ready for production, we proceed to register it by selecting the desired run (as shown in the previous point) and scrolling down.
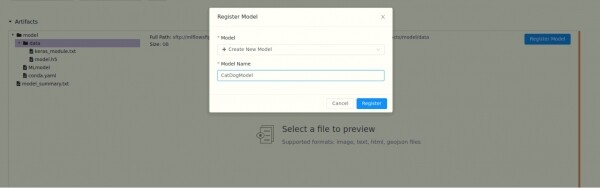
After naming our model, it receives a version. When saving another model with the same name, the version will automatically increase.
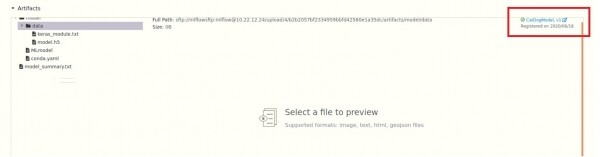
For each model, we can add a description and choose one of three statuses (Staging, Production, Archived), which, along with versioning, provides additional flexibility in accessing these states via the API.

We also have convenient access to all models
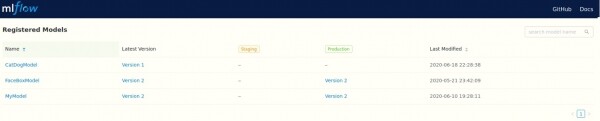
and their versions.
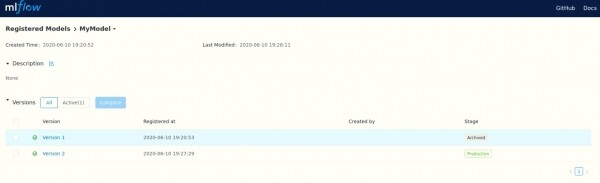
As in the previous point, all operations can be performed using the API.
7. Deploying the Model
At this stage, we already have a trained (keras) model. Here’s an example of how it can be used:
class SegmentationModel:
    def __init__(self, tracking_uri, model_name):

        self.registry = RemoteRegistry(tracking_uri=tracking_uri)
        self.model_name = model_name
        self.model = self.build_model(model_name)

    def get_latest_model(self, model_name):
        registered_models = self.registry.get_registered_model(model_name)
        last_model = self.registry.get_last_model(registered_models)
        local_path = self.registry.download_artifact(last_model.run_id, 'model', '.\/')
        return local_path

    def build_model(self, model_name):
        local_path = self.get_latest_model(model_name)

        return mlflow.keras.load_model(local_path)

    def predict(self, image):
        image = self.preprocess(image)
        result = self.model.predict(image)
        return self.postprocess(result)

    def preprocess(self, image):
        image = cv2.resize(image, (256, 256))
        image = image / 255.
        image = np.expand_dims(image, 0)
        return image

    def postprocess(self, result):
        return result
Here, self.registry is again a small wrapper over mlflow.tracking.MlflowClient for convenience. The essence is that I access a remote server and look for a model with the specified name, specifically the latest production version. Then I download the artifact locally into the folder .\/model and build the model from this directory using mlflow.keras.load_model(local_path). Now we can use our model. CV (ML) developers can focus on improving the model and publishing new versions.
In conclusion
I presented a system that allows:
- centralized storage of information about ML models, training progress, and results;
- quickly deploy a development environment;
- monitor and analyze the progress of work on models;
- easily manage versioning and the state of models;
- easily deploy the resulting models.
This example is toy-like and serves as a starting point for building your own system, which may include automating result evaluation and model registration (points 5 and 6 respectively) or you might add dataset versioning, or perhaps something else? I was trying to convey the idea that you need MLOps as a whole; MLflow is just a means to achieve the goal.
Please share what problems you faced that I did not cover?
What would you add to the system to meet your needs?
What tools and approaches do you use to address all or part of the problems?
P.S. I will leave a couple of links:
GitHub project —
MLflow —
My work email for questions — ikryakin@croc.ru
Our company regularly hosts various events for IT professionals. For example, on July 8th at 7:00 PM MSK, there will be an online meetup about CV. If you're interested, feel free to join; registration is open. .
Source: habr.com
