

This article's translation was prepared in anticipation of the course launch .
How to Save on Cloud Costs When Working with Kubernetes? There is no one-size-fits-all solution, but this article outlines several tools that can help you manage resources more efficiently and reduce cloud computing expenses.
I wrote this article with AWS Kubernetes in mind, but it will be applicable (almost) exactly the same for other cloud providers. I assume that your cluster(s) already has auto-scaling configured (). Removing resources and downsizing deployments will save costs only if it also reduces your fleet of worker nodes (EC2 instances).
This article will cover:
- cleaning up unused resources ()
- ), scaling down during non-working hours ()
- ), utilizing horizontal pod autoscaling (HPA),
- reducing resource over-commitment (, VPA)
- using Spot instances
Cleaning Up Unused Resources
Operating in a rapidly changing environment is great. We want technical organizations . Faster software delivery also means more PR deployments, preview environments, prototypes, and analytical solutions. Everything is deployed on Kubernetes. Who has time to manually clean up test deployments? It’s easy to forget about removing a weeks-old experiment. The cloud bill will ultimately grow because we forgot to shut down:
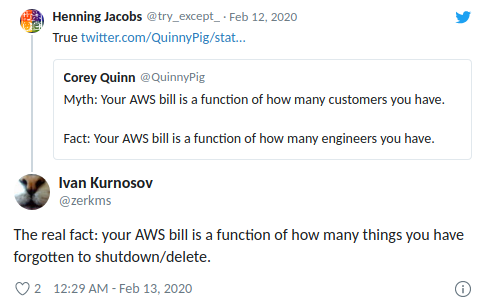
(Henning Jacobs:
Life:
(quotes) Corey Quinn:
Myth: Your AWS bill is a function of how many users you have.
Fact: Your AWS bill is a function of how many engineers you have.
Ivan Kurnosov (in response):
Real Fact: Your AWS bill is a function of how many things you forgot to turn off/remove.)
(kube-janitor) helps clean up your cluster. The janitor's configuration is flexible for both global and local use:
- General rules for the entire cluster can define a maximum time-to-live (TTL) for PR/test deployments.
- Individual resources can be annotated with janitor/ttl, for example, to automatically delete spikes/prototypes after 7 days.
General rules are defined in a YAML file. Its path is passed as a parameter --rules-file to kube-janitor. Here is an example rule for deleting all namespaces with -pr- in the name after two days:
- id: cleanup-resources-from-pull-requests
  resources:
    - namespaces
  jmespath: "contains(metadata.name, '-pr-')"
  ttl: 2d
The next example governs the use of the application label on Deployments and StatefulSet pods for all new Deployments/StatefulSets in 2020, while simultaneously allowing tests without this label for a week:
- id: require-application-label
  # remove deployments and statefulsets without the "application" label
  resources:
    - deployments
    - statefulsets
  # see http://jmespath.org/specification.html
  jmespath: "!(spec.template.metadata.labels.application) && metadata.creationTimestamp > '2020-01-01'"
  ttl: 7d
Running a time-limited demo for 30 minutes in a cluster where kube-janitor is running:
kubectl run nginx-demo --image=nginx
kubectl annotate deploy nginx-demo janitor/ttl=30m
Another source of growing costs is persistent volumes (AWS EBS). When a Kubernetes StatefulSet is deleted, its persistent volumes (PVC — PersistentVolumeClaim) are not removed. Unused EBS volumes can easily lead to hundreds of dollars in monthly expenses. Kubernetes Janitor has a feature to clean up unused PVCs. For example, this rule will remove all PVCs that are not mounted by a pod and that are not referenced by a StatefulSet or CronJob:
# удалить все PVC, которые не смонтированы и на которые не ссылаются StatefulSets
- id: remove-unused-pvcs
  resources:
  - persistentvolumeclaims
  jmespath: "_context.pvc_is_not_mounted && _context.pvc_is_not_referenced"
  ttl: 24h
Kubernetes Janitor can help you keep your cluster 'clean' and prevent slowly accumulating cloud computing costs. For instructions on deployment and configuration, follow the .
Reducing scale during off-hours
Testing and staging systems usually need to operate only during business hours. Some production applications, such as back-office/admin tools, also require limited availability and can be turned off overnight.
(kube-downscaler) allows users and operators to scale down the system during non-working hours. Deployments and StatefulSets can be scaled down to zero replicas. CronJobs can be paused. Kubernetes Downscaler is configured for the entire cluster, one or several namespaces, or individual resources. You can set either 'downtime' or 'uptime'. For instance, to minimize scaling during the night and weekends:
image: hjacobs/kube-downscaler:20.4.3
args:
  - --interval=30
  # do not disable infrastructure components
  - --exclude-namespaces=kube-system,infra
  # do not disable kube-downscaler, and also retain Postgres Operator to manage excluded databases
  - --exclude-deployments=kube-downscaler,postgres-operator
  - --default-uptime=Mon-Fri 08:00-20:00 Europe/Berlin
  - --include-resources=deployments,statefulsets,stacks,cronjobs
  - --deployment-time-annotation=deployment-time
Here is the scaling chart for the cluster's worker nodes on weekends:
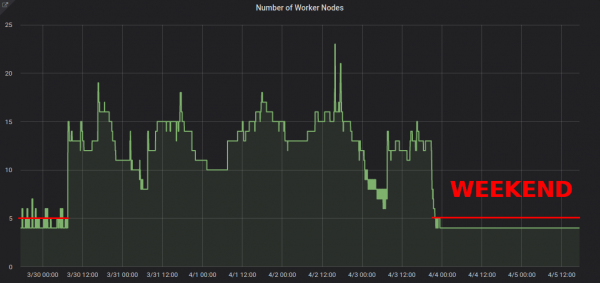
Reducing from ~13 to 4 worker nodes certainly makes a significant difference in the AWS bill.
But what if I need to operate during the cluster's 'downtime'? Certain deployments can be permanently excluded from scaling by adding the annotation downscaler/exclude: true. Deployments can be temporarily excluded using the downscaler/exclude-until annotation with an absolute timestamp in the format YYYY-MM-DD HH:MM (UTC). If necessary, the entire cluster can be scaled back by deploying a pod with the annotation downscaler/force-uptime, for example, by launching an nginx dummy:
kubectl run scale-up --image=nginx
kubectl annotate deploy scale-up janitor/ttl=1h # delete the deployment after an hour
kubectl annotate pod $(kubectl get pod -l run=scale-up -o jsonpath="{.items[0].metadata.name}") downscaler/force-uptime=true
See , if you are interested in deployment instructions and additional options.
Use Horizontal Pod Autoscaling
Many applications/services deal with a dynamic load pattern: sometimes their modules are idle, while at other times they are running at full capacity. Maintaining a constant pool of pods to handle maximum peak load is not cost-effective. Kubernetes supports horizontal autoscaling through the resource (HPA). CPU usage is often a good indicator for scaling:
apiVersion: autoscaling/v2beta2
kind: HorizontalPodAutoscaler
metadata:
  name: my-app
spec:
  scaleTargetRef:
    apiVersion: apps/v1
    kind: Deployment
    name: my-app
  minReplicas: 3
  maxReplicas: 10
  metrics:
  - type: Resource
    resource:
      name: cpu
      target:
        averageUtilization: 100
        type: Utilization
Zalando has created a component for easy integration of custom metrics for scaling: (kube-metrics-adapter) is a universal metrics adapter for Kubernetes that can collect and serve custom and external metrics for horizontal pod autoscaling. It supports scaling based on metrics from Prometheus, SQS queues, and other configurations. For example, to scale a deployment based on a custom metric provided by the application in JSON format at /metrics, use:
apiVersion: autoscaling/v2beta2
kind: HorizontalPodAutoscaler
metadata:
  name: myapp-hpa
  annotations:
    # metric-config.../
    metric-config.pods.requests-per-second.json-path/json-key: "$.http_server.rps"
    metric-config.pods.requests-per-second.json-path/path: /metrics
    metric-config.pods.requests-per-second.json-path/port: "9090"
spec:
  scaleTargetRef:
    apiVersion: apps/v1
    kind: Deployment
    name: myapp
  minReplicas: 1
  maxReplicas: 10
  metrics:
  - type: Pods
    pods:
      metric:
        name: requests-per-second
      target:
        averageValue: 1k
        type: AverageValue
Configuring horizontal autoscaling with HPA should be one of the default actions for efficiency in stateless services. Spotify has a presentation sharing their experience and recommendations for HPA: .
Reduce excessive resource reservations
Kubernetes workloads specify their CPU/memory requirements through resource requests. CPU resources are measured in virtual cores or more commonly in 'millicores' (mils), for example, 500m implies 50% vCPU. Memory resources are measured in bytes, and standard suffixes can be used, e.g., 500Mi means 500 megabytes. Resource requests 'lock' a volume on worker nodes, meaning a module with a CPU request of 1000m on a node with 4 virtual CPUs will leave only 3 virtual CPUs available for other modules.
Slack (excess reserve) is the difference between requested resources and actual usage. For example, a pod that requests 2 GiB of memory but uses only 200 MiB has ~1.8 GiB of "excess" memory. Excess costs money. It can be roughly estimated that 1 GiB of excess memory costs ~10 dollars per month.
(kube-resource-report) displays excess reserves and can help you identify potential savings:
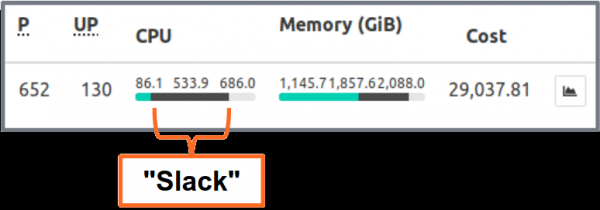
shows excess aggregated by application and team. This helps find areas where resource requests can be reduced. The generated HTML report provides only a snapshot of resource usage. You should look at CPU/memory usage over time to determine adequate resource requests. Here is a Grafana chart for a 'typical' service under heavy CPU load: all pods use significantly less than 3 requested CPU cores:
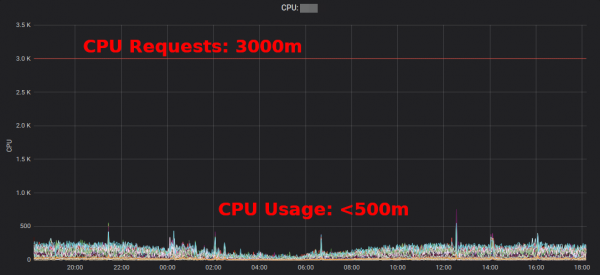
Reducing the CPU request from 3000m to ~400m frees up resources for other workloads and allows for a smaller cluster.
"Average CPU usage of EC2 instances often fluctuates in the range of single-digit percentages," . While for EC2 , changing some Kubernetes resource requests in the YAML file is straightforward and can yield significant savings.
But do we really want people to change values in YAML files? No, machines can do this much better! Kubernetes (VPA) does just that: it adapts resource requests and limits according to the workload. Here's an example of CPU requests charted by Prometheus (thin blue line), adapted by VPA over time:
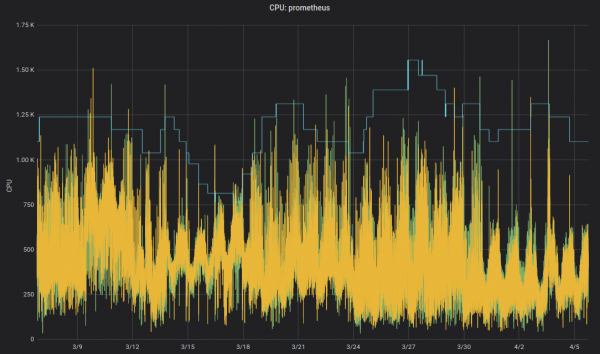
for infrastructure components. Non-critical applications can also use VPA.
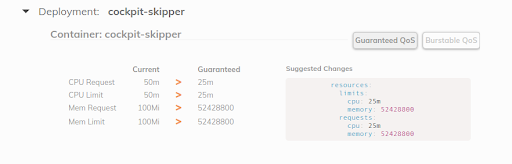
by Fairwind is a tool that creates a VPA for each deployment in the namespace and then displays the VPA recommendation on its dashboard. It can help developers set the right CPU/memory requests for their applications:
I wrote a short in 2019, and recently in .
Using EC2 Spot instances
Finally, and importantly, you can reduce AWS EC2 costs by using Spot instances as Kubernetes worker nodes. Spot instances are available at discounts of up to 90% compared to on-demand prices. Running Kubernetes on EC2 Spot is a great combination: you need to specify several different instance types for greater availability, meaning you can get a larger node for the same or lower price, and the increased capacity can be utilized by Kubernetes container workloads.
How do you run Kubernetes on EC2 Spot? There are several options: use a third-party service like SpotInst (now called 'Spot', don’t ask me why), or simply add a Spot AutoScaling Group (ASG) to your cluster. For example, here is a CloudFormation snippet for a 'capacity-optimized' Spot ASG with multiple instance types:
MySpotAutoScalingGroup:
 Properties:
   HealthCheckGracePeriod: 300
   HealthCheckType: EC2
   MixedInstancesPolicy:
     InstancesDistribution:
       OnDemandPercentageAboveBaseCapacity: 0
       SpotAllocationStrategy: capacity-optimized
     LaunchTemplate:
       LaunchTemplateSpecification:
         LaunchTemplateId: !Ref LaunchTemplate
         Version: !GetAtt LaunchTemplate.LatestVersionNumber
       Overrides:
         - InstanceType: "m4.2xlarge"
         - InstanceType: "m4.4xlarge"
         - InstanceType: "m5.2xlarge"
         - InstanceType: "m5.4xlarge"
         - InstanceType: "r4.2xlarge"
         - InstanceType: "r4.4xlarge"
   LaunchTemplate:
     LaunchTemplateId: !Ref LaunchTemplate
     Version: !GetAtt LaunchTemplate.LatestVersionNumber
   MinSize: 0
   MaxSize: 100
   Tags:
   - Key: k8s.io/cluster-autoscaler/node-template/label/aws.amazon.com/spot
     PropagateAtLaunch: true
     Value: "true"
Some notes on using Spot with Kubernetes:
- You need to handle Spot terminations, for instance by draining the node upon instance shutdown.
- Zalando uses official cluster autoscaling with node pool priorities.
- Spot nodes to accept 'registrations' of workloads to run in Spot.
Summary
I hope you find some of the tools presented useful for reducing your cloud computing bill. You can find much of the content of this article also in .
What are your best practices for saving cloud costs on Kubernetes? Please let me know on .
In practice, fewer than 3 virtual CPUs will remain usable, as node capacity decreases due to reserved system resources. Kubernetes distinguishes between the physical capacity of the node and the 'allocatable' resources ().
Example calculation: one m5.large instance with 8 GiB of memory costs about $84 per month (eu-central-1, On-Demand), meaning that reserving 1/8 of a node is approximately $10 per month.
There are many other ways to reduce your EC2 bill, such as reserved instances, savings plans, etc. — I won't cover these topics here, but you should definitely research them!
Source: habr.com
