

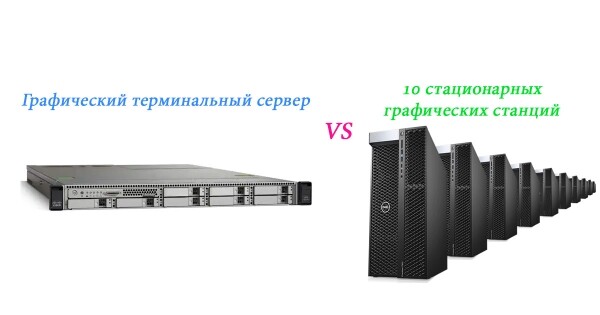
Almost every company now necessarily has a department or group working in CAD/CAM
or heavy design programs. This group of users shares serious hardware requirements: a lot of memory — 64GB or more, a professional graphics card, a fast SSD, and it should be reliable. Often, companies purchase several powerful PCs (or graphic stations) for some users in these departments and less powerful ones for others, depending on needs as well as the company's financial capabilities. This is often the standard approach to solving such tasks, and it works fine. However, during the pandemic and remote work, and in general, this approach is not optimal, it is excessively redundant, and extremely inconvenient in administration, management, and other aspects. Why is this so, and what solution perfectly satisfies the graphic station needs of many companies? Welcome to the next section, where you will find how to assemble a functional and inexpensive solution that achieves multiple objectives, and what small nuances need to be considered for successful implementation.
Last December, one company was opening a new office for a small design bureau and the task was to organize their entire computer infrastructure, considering that they already had laptops for users and a couple of servers. The laptops were a couple of years old and were mainly gaming configurations with 8-16GB of RAM, which were mostly unable to handle the load from CAD/CAM applications. Users must be mobile, as they often need to work outside the office. In the office, an additional monitor is purchased for each laptop (that's how they work with graphics). Given this input data, the only optimal but risky solution for me was to implement a powerful terminal server with a strong professional graphics card and an NVMe SSD drive.
Advantages of a graphic terminal server and working via RDP
- On separate powerful PCs or graphic stations, most of the time the hardware resources are used less than a third and sit idle, only being utilized at 35-100% of their capacity for short periods. Typically, the efficiency is only 5-20 percent.
- However, often the hardware is not the most expensive component, as basic graphics or CAD/CAM software licenses can cost from $5000, and with additional options, even from $10,000. Typically, these programs run without issues during an RDP session, but sometimes it is necessary to purchase an additional RDP option or search through forums for what to specify in the configs or registry and how to launch such software in an RDP session. But verifying that the required software works over RDP is essential. This needs to be done right at the beginning and it can be done simply: we try to connect via RDP—if the program launched and all basic software functions are operational, there is likely no problem with the licenses. But if an error appears, before implementing a solution with a graphical terminal server, we look for a satisfactory solution to the problem.
- Another significant advantage is the support for the same configuration and specific settings, components, and templates, which is often difficult to implement for all PC users. Management, administration, and software updates are also smooth and straightforward.
Overall, there are many advantages—let's see how our nearly ideal solution performs in practice.
We are assembling a server based on a used CISCO UCS-C220 M3 v2
Initially, we planned to buy a newer and more powerful server with 256GB DDR3 ECC memory and 10GB Ethernet, but we were advised to save a bit and stay within the budget for the terminal server of $1600. Well, alright—the client is always right, so we will fit into this amount:
used CISCO UCS-C220 M3 v2 (2 X SIX CORE 2.10GHZ E5-2620 v2) 128GB DDR3 ECC—$625
3.5" 3TB SAS 7200 from the USA—2×$65=$130
SSD M.2 2280 970 PRO, PCI-E 3.0 (x4) 512GB Samsung—$200
QUADRO P2200 graphics card 5120MB—$470
Ewell PCI-E 3.0 to M.2 SSD adapter (EW239)—$10
Total for the server = $1435
We planned to take a 1TB SSD and a 10GB Ethernet adapter—$40, but it turned out that there was no UPS for their 2 servers, so we had to scale back a bit and buy a UPS PowerWalker VI 2200 RLE for $350.
Why a server and not a powerful PC? Justification for the chosen configuration.
Many shortsighted admins (I have encountered this many times) somehow buy a powerful (often gaming) PC, install 2-4 disks there, create RAID 1, proudly call it a server, and put it in the corner of the office. Naturally, all the components are a 'mixed bag' of questionable quality. Therefore, I will explain in detail why this specific configuration was chosen for such a budget.
- Reliability!!! — all server components are designed and tested to operate for over 5-10 years. In contrast, consumer-grade motherboards typically last only 3-5 years, with failure rates during warranty periods exceeding 5% for some. Our server comes from the super-reliable brand CISCO, so we don't anticipate any significant problems, and the likelihood of issues is substantially lower than that of a stationary PC.
- Important components like the power supply are duplicated, allowing for the possibility of supplying power from two different lines. Thus, if one block fails, the server continues to operate.
- ECC Memory — few remember that ECC memory was originally introduced to correct single-bit errors, primarily caused by cosmic rays. With 128GB of memory, errors can occur several times a year. On a stationary PC, we might experience program crashes or freezes, which are not critical, but on a server, the cost of an error can be very high (for example, incorrect data entry in the database). In our case, a serious glitch may require a reboot, which can cost a day's work for several people.
- Scalability — often, a company's resource needs can grow several times over just a couple of years. With a server, it is easy to add memory, swap disks, and change processors (in our case, replacing six-core E5-2620s with ten-core Xeon E5 2690 v2s) — whereas a regular PC offers almost no scalability.
- Server format U1 — servers must be housed in server rooms and compact racks, not sitting in a corner of the office creating noise (up to 1Kw of heat)! In the new office, a small space (3-6 units) was specifically allocated in the server room, and we barely fit one unit for our server.
- Remote management and console — without this, proper server maintenance for remote operations is extremely difficult!
- 128GB of RAM — the specifications indicated 8-10 users, but in reality, we will have 5-6 concurrent sessions. Considering the typical maximum memory usage in that company is 2 users at 30-40GB each (70GB) and 4 users at 3-15GB each (36GB), plus up to 10GB for the operating system comes to a total of 116GB, leaving us with 10% reserve. This is all for rare cases of maximum usage. However, if more memory is needed, it can be easily increased to 256GB at any time.
- QUADRO P2200 5120MB Graphics Card — on average, this setup will provide sufficient performance for users in that company.
In the remote session, the video memory consumption ranged from 0.3GB to 1.5GB, so 5GB will be sufficient. The data was taken from a similar, but less powerful solution based on i5/64GB/Quadro P620 2GB, which was enough for 3-4 users. - SSD M.2 2280 970 PRO, PCI-E 3.0 (x4) 512GB Samsung — for simultaneous operations.
8-10 users require NVMe speed and the reliability of Samsung SSD. Functionally, this drive will be used for the OS and applications. - Two 3TB SAS drives will be combined in RAID 1 for large or rarely used local user data, as well as for backing up the system and critical local data from the NVMe drive.
The configuration has been approved and purchased, and soon the moment of truth will arrive!
Assembly, setup, installation, and troubleshooting.
From the very beginning, I wasn't confident this was a 100% working solution, as at any stage, from assembly to installation and the correct operation of applications, one could get stuck without a way to continue. Therefore, I agreed that the server could be returned within a couple of days, and other components could be used in an alternative solution.
One imagined problem — the graphics card is professional and full-size! + a couple of mm, what if it doesn't fit? 75W — what if the PCI slot can’t handle it? And how to ensure normal heat dissipation for those 75W? But it fit, powered up, and the heat dissipation is fine (especially if the server fans are set to above-average speeds). However, when I installed it, just to be sure nothing was short-circuited in the server, I bent something by 1mm (I no longer remember what), and for better heat dissipation, I later removed the instructional film that covered the entire lid after final adjustments, which could hinder heat dissipation through the lid.
The second test — the NVMe drive through an adapter might not be recognized, or the system might not install to it, and if it does install, it might not boot. Surprisingly, Windows installed on the NVMe drive, but it couldn't boot from it, which makes sense since the BIOS (even updated) didn’t recognize NVMe for booting at all. I didn’t want to use hacks, but it had to be done — here our beloved Habr and a post about booting from NVMe drives on legacy systems came to the rescue. downloaded , I created a flash drive with CloverBootManager according to the instructions from the post, set the flash drive as the first boot device in the BIOS, and now we are loading the bootloader from the flash drive. Clover successfully recognized our NVMe disk, and in a couple of seconds it automatically booted from it! I could have experimented with installing Clover on our 3TB RAID disk, but it was already Saturday evening, and there was still a day's work left, as by Monday we either had to return the server or keep it. I left the bootable flash drive inside the server; there was an extra USB port available.
The third near-threat of failure. I installed Windows 2019 Standard + RD services, set up the main application for which everything was initiated, and everything works wonderfully and is literally flying.
Wonderful! I'm on my way home and connecting via RDP, the application launches, but there's a noticeable lag. I see a message in the program: 'soft mode enabled.' What?! I'm looking for newer, super-professional drivers for the graphics card, install them — no result, older drivers for the P1000 also do nothing. Meanwhile, my internal voice keeps nagging me, 'I told you — don’t experiment with the latest stuff — just use the P1000.' And it’s already late at night outside; with a heavy heart, I go to bed. Sunday, I go to the office — I install the Quadro P620 in the server, and it also doesn’t work via RDP — what’s up with MS? I search the forums for '2019 server and RDP' — found the answer almost immediately.
It turns out that because most people now have monitors with high resolutions, and most servers have integrated graphics adapters that do not support these resolutions, hardware acceleration is disabled by default through group policies. I quote the instruction for enabling it:
- Open the Edit Group Policy tool from Control Panel or use the Windows Search dialog (Windows Key + R, then type in gpedit.msc)
- Browse to: Local Computer Policy > Computer Configuration > Administrative Templates > Windows Components > Remote Desktop Services > Remote Desktop Session Host > Remote Session Environment
- Then enable 'Use the hardware default graphics adapter for all Remote Desktop Services sessions.'
We are rebooting — everything works perfectly via RDP. We exchange the graphics card for the P2200 and it works again! Now that we are confident that the solution is fully operational, we are optimizing all server settings to perfection, entering the domain, configuring user access, and everything else, we place the server in the server room. We test it with the entire team for a couple of days — everything works flawlessly, the server resources are more than sufficient for all tasks, and the minimal lag resulting from RDP use is imperceptible to all users. Wonderful — the task is completed 100%.
A few points that determine the success of implementing a graphical server
As underwater obstacles can arise at any stage of the graphical server implementation in an organization, creating a situation similar to that in the image with the escaping fish

at the planning stage, it is necessary to take several simple steps:
- Target audience and tasks — users who work intensively with graphics and require hardware acceleration from the graphics card. The success of our solution is based on the fact that the power needs of users of graphics and CAD/CAM programs were met more than 10 years ago, and currently, we have more than 10 times the power surplus to meet their needs. For example, the GPU power of the Quadro P2200 is more than enough for 10 users, and even when there is a lack of video memory, the graphics card compensates with RAM, making the slight drop in speed for an ordinary 3D developer imperceptible. However, if the users' tasks involve intensive computations (rendering, calculations, etc.) that often utilize 100% of the resources — our solution is not suitable, as other users will not be able to work normally during these periods. Therefore, we carefully analyze user tasks and current resource load (at least approximately). We also pay attention to the daily write volume to the disk, and if it constitutes a large amount, we select server SSDs or Optane drives suitable for that volume.
- Based on the number of users, we select an appropriate server, graphics card, and disks:
- Processors are calculated based on the formula of 1 core per user plus 2.3 for the OS; still, each user at any given time utilizes only one or a maximum of two cores (under rare model load conditions).
- For the graphics card, we look at the average VRAM and GPU consumption per user during an RDP session and choose a professional-grade graphics card.
- We proceed similarly with RAM and storage systems (now you can find affordable RAID NVMe options).
- Carefully check the server documentation (as all branded servers come with complete documentation) for compliance with connectors, speeds, power, supported technologies, as well as physical dimensions and cooling standards for the additional components being installed.
- We verify the proper functioning of our software in multiple RDP sessions, check for any licensing restrictions, and ensure the necessary licenses are in place. We resolve this issue before the initial implementation steps. As mentioned in the comment by the esteemed malefix.
"- Licenses may be tied to the number of users - in that case, you violate the license.
- The software may behave incorrectly with multiple instances running - if it writes garbage in one place or stores settings not in the user profile/%temp% but in a public directory, it will be a challenge to troubleshoot later." - We consider where the graphics server will be installed, keeping in mind the need for UPS, high-speed Ethernet ports, and internet connectivity (if required), as well as meeting the climate requirements of the server.
- We extend the implementation timeframe to a minimum of 2.5 to 3 weeks, as many even small necessary components can take up to two weeks to arrive, and assembly and configuration take several days — the regular server boot to the OS can take more than 5 minutes.
- We discuss with management and suppliers that if at any stage the project does not proceed as planned, there can be a return or exchange.
- It was also kindly pointed out in
After all experiments with the settings, it's best to wipe everything and set up from scratch. Just like this:
- During experiments, all critical settings should be documented.
During the initial setup, you will reapply the minimum necessary configurations (which you documented in the previous step). - We begin by installing the operating system (preferably Windows Server 2019—offering quality RDP) in Trial mode, but under no circumstances should you choose evaluate (as this would require a complete reinstall later). Only after the successful launch do we address licensing issues and activate the OS.
- Before implementation, we also select a task force to test the operation and explain the advantages of working with a graphical server to future users. Doing this later increases the risk of complaints, sabotage, and unsubstantiated negative feedback.
Using RDP feels no different from working in a local session. You often forget you're working through RDP since even video and sometimes video calls operate without noticeable delays, given that most people now have high-speed internet. Microsoft continues to pleasantly surprise with the speed and functionality of RDP, including hardware acceleration for 3D and support for multiple monitors—all necessary for users of graphic, 3D, and CAD/CAM programs.
In many cases, setting up a graphical server, according to the implemented guidelines, is preferable and more mobile than 10 graphical stations or PCs.
P.S. How to easily and securely connect over the internet via RDP, as well as the optimal settings for RDP clients—you can find in the article ""
Source: habr.com
