

Hello everyone! My name is Kirill, I am the CTO at Adapty. A large part of our architecture is hosted on AWS, and today I will share how we reduced our server costs by three times by using spot instances in our production environment, as well as how to set up their auto-scaling. First, there will be an overview of how this works, followed by detailed instructions on how to get started.
What are spot instances?
instances are AWS servers from other users that are currently idle, and they are offered at a significant discount (Amazon states up to 90%, but according to our experience, it averages around 3x, varying by region, AZ, and instance type). The main difference from regular instances is that they can be terminated at any moment. Therefore, we used to think they were fine for development environments or tasks that involve calculations while saving intermediate results to S3 or a database, but not for production. There are third-party solutions that allow using spots in production, but for our case, they had many complications, which is why we didn't implement them. The approach described in this article fully utilizes standard AWS functionality, without additional scripts, cron jobs, etc.
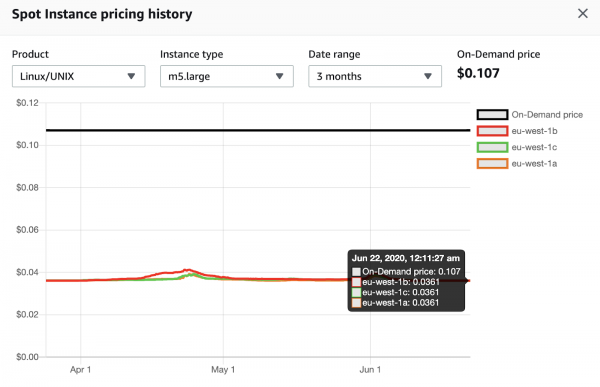
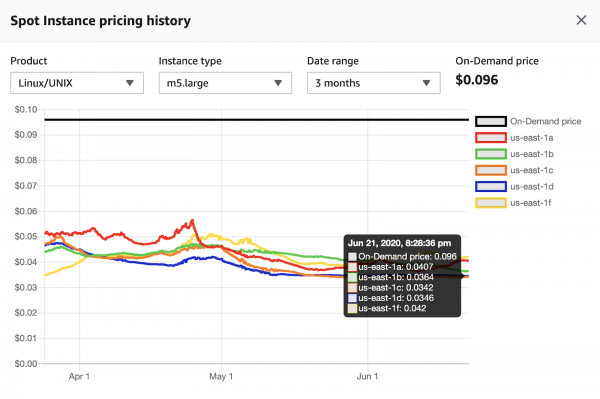
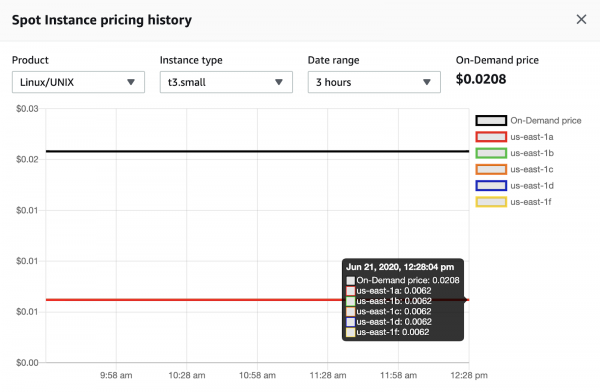
Next, I will provide several screenshots that show the price history of spot instances.
m5.large in the eu-west-1 region (Ireland). The price has remained mostly stable over the past 3 months, with current savings of 2.9x.
m5.large in the us-east-1 region (N. Virginia). The price constantly fluctuates over the past 3 months, with current savings ranging from 2.3x to 2.8x depending on the availability zone.
t3.small in the us-east-1 region (N. Virginia). The price has remained stable over the past 3 months, with current savings of 3.4x.
Service Architecture
The basic architecture of the service we will discuss in this article is illustrated in the diagram below.
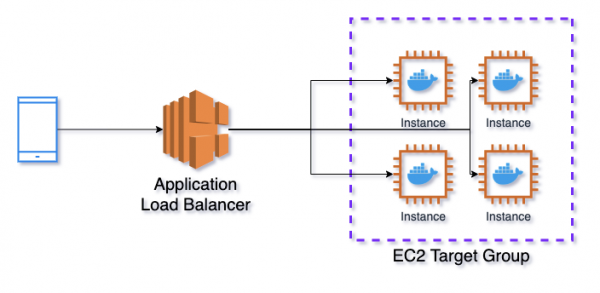
Application Load Balancer → EC2 Target Group → Elastic Container Service
The Application Load Balancer (ALB) is used as the load balancer, directing requests to the EC2 Target Group (TG). TG is responsible for opening ports for the ALB on the instances and linking them to the ports of the Elastic Container Service (ECS) containers. ECS is similar to Kubernetes in AWS, managing Docker containers.
Multiple running containers with the same ports can exist on a single instance, so we cannot set them fixed. ECS informs the TG that it is launching a new task (referred to as a pod in Kubernetes terminology), it checks for available ports on the instance, and assigns one of them for the task being launched. Additionally, the TG regularly checks whether the instance and API on it are functioning through health checks, and if any issues are detected, it stops forwarding requests to that instance.
EC2 Auto Scaling Groups + ECS Capacity Providers
The EC2 Auto Scaling Groups (ASG) service is not shown in the diagram above. From the name, it is clear that it is responsible for scaling instances. Until recently, AWS did not have a built-in capability to manage the number of running machines from ECS. ECS allowed for scaling the number of tasks based on CPU, RAM utilization, or the number of requests. However, if tasks occupied all available instances, new machines would not be automatically launched.
This changed with the advent of ECS Capacity Providers (ECS CP). Now each service in ECS can be linked to an ASG, and if tasks do not fit on the running instances, new ones will be launched (within the established ASG limits). It also works in reverse; if ECS CP sees idle instances without tasks, it will instruct the ASG to shut them down. ECS CP has the capability to specify a target utilization percentage for instances, ensuring that a certain number of machines are always available for rapid task scaling, which I will discuss further shortly.
EC2 Launch Templates
The last service I will describe before moving on to a detailed explanation of creating this infrastructure is the EC2 Launch Templates. It allows you to create a template that will be used to launch all machines so that you do not have to repeat this from scratch every time. Here, you can select the type of machine to be launched, the security group, the disk image, and many other parameters. You can also specify user data that will be uploaded to all launched instances. User data can be used to run scripts, for example, you can modify the contents of a file .
One of the most important parameters of the configuration in this article is =true. If this parameter is enabled, as soon as ECS receives a signal that the spot instance is being reclaimed, it changes the status of all tasks running on it to Draining. No new tasks will be assigned to this instance; if there are tasks currently scheduled to be deployed on it, they will be canceled. Requests from the load balancer will also cease. A notification of instance termination is sent 2 minutes before the actual event. Therefore, if your service does not perform tasks longer than 2 minutes and does not save anything to disk, you can use spot instances without data loss.
Regarding the disk — AWS recently using Elastic File System (EFS) with ECS possible; with this setup, even the disk is not a barrier, but we haven't tried it since we generally do not need a disk for state storage. By default, after receiving SIGINT (sent at the moment the task is transitioned to Draining status), all running tasks will be stopped after 30 seconds, even if they have not completed; this time can be changed using the parameter . It is important not to set it to more than 2 minutes for spot machines.
Creating a service
Let's move on to creating the service described. In the process, I will outline some additional useful points that were not mentioned earlier. Overall, this is a step-by-step guide, but I will not cover some very basic or very specific cases. All actions are performed in the AWS visual console, but they can also be reproduced programmatically using CloudFormation or Terraform. At Adapty, we use Terraform.
EC2 Launch Template
In this service, a configuration of machines that will be used is created. Template management occurs in the EC2 -> Instances -> Launch templates section.
Amazon machine image (AMI) — we specify the disk image that will be used to launch all instances. For ECS, in most cases, it is advisable to use the Amazon optimized image. It is regularly updated and contains everything necessary for ECS to function. To find out the current AMI ID, we visit the , select the region being used, and copy the AMI ID for it. For example, for the us-east-1 region, the current ID at the time of writing this article is ami-00c7c1cf5bdc913ed. This ID needs to be entered in the Specify a custom value field.
Instance type — specify the instance type. Choose the one that best fits your task.
Key pair (login) — specify the certificate through which you can connect to the instance via SSH, if necessary.
Network settings — specify the network parameters. Networking platform in most cases should be Virtual Private Cloud (VPC). Security groups — security groups for your instances. Since we will be using a load balancer in front of the instances, I recommend specifying a group here that allows incoming connections only from the load balancer. This means you will have 2 security groups: one for the load balancer that allows incoming (inbound) connections from everywhere on ports 80 (http) and 443 (https), and another for the machines that allows incoming connections on any ports from the load balancer group. Outgoing (outbound) connections in both groups need to be opened via TCP protocol to all ports on all addresses. You can restrict the ports and addresses for outgoing connections, but then you need to monitor constantly that you aren’t trying to access anywhere on a closed port.
Storage (volumes) — specify the disk parameters for the machines. The disk size cannot be less than what is defined in the AMI, for ECS Optimized — 30 GiB.
Advanced details — specify additional parameters.
Purchasing option — do we want to purchase spot instances. We do, but here we will not check this box, we will configure it in the Auto Scaling Group, where there are more options.
IAM instance profile — specify the role under which the instances will be launched. For the instances to work in ECS, they need permissions that are usually in the role ecsInstanceRole. In some cases, it can be created; if not, here on how to do that. After creation, we specify it in the template.
Next comes a lot of parameters; in most cases, you can leave the default values, but each of them has a clear description. I always include the EBS-optimized instance and T2/T3 Unlimited parameters if they use instances.
User data — specify user data. We will edit the file /etc/ecs/ecs.config, which contains the ECS agent configuration.
An example of what user data may look like:
#!/bin/bash
echo ECS_CLUSTER=DemoApiClusterProd >> /etc/ecs/ecs.config
echo ECS_ENABLE_SPOT_INSTANCE_DRAINING=true >> /etc/ecs/ecs.config
echo ECS_CONTAINER_STOP_TIMEOUT=1m >> /etc/ecs/ecs.config
echo ECS_ENGINE_AUTH_TYPE=docker >> /etc/ecs/ecs.config
echo "ECS_ENGINE_AUTH_DATA={"registry.gitlab.com":{"username":"username","password":"password"}}" >> /etc/ecs/ecs.config
ECS_CLUSTER=DemoApiClusterProd — this parameter indicates that the instance belongs to a cluster with the specified name, meaning this cluster will be able to place its tasks on this server. We haven't created a cluster yet, but we will use this name when we do.
ECS_ENABLE_SPOT_INSTANCE_DRAINING=true — this parameter indicates that upon receiving a shutdown signal for the spot instance, all tasks on it should transition to the Draining status.
ECS_CONTAINER_STOP_TIMEOUT=1m — this parameter indicates that after receiving a SIGINT signal, all tasks have 1 minute before they are killed.
ECS_ENGINE_AUTH_TYPE=docker — this parameter indicates that the docker schema is used as the authorization mechanism.
ECS_ENGINE_AUTH_DATA=... — connection parameters to the private container registry where your Docker images are stored. If it is public, you do not need to specify anything.
In this article, I will use a public image from Docker Hub, so I won't specify parameters. ECS_ENGINE_AUTH_TYPE and ECS_ENGINE_AUTH_DATA are not needed.
Good to know: it is recommended to regularly update the AMI, because new versions update the versions of Docker, Linux, ECS agent, etc. To remember this, you can for new version releases. You can receive notifications via email and update manually, or you can write a Lambda function that will automatically create a new Launch Template version with the updated AMI.
EC2 Auto Scaling Group
The Auto Scaling Group is responsible for launching and scaling instances. Management of the groups is done in the EC2 -> Auto Scaling -> Auto Scaling Groups section.
Launch template — select the template created in the previous step. Leave the version as default.
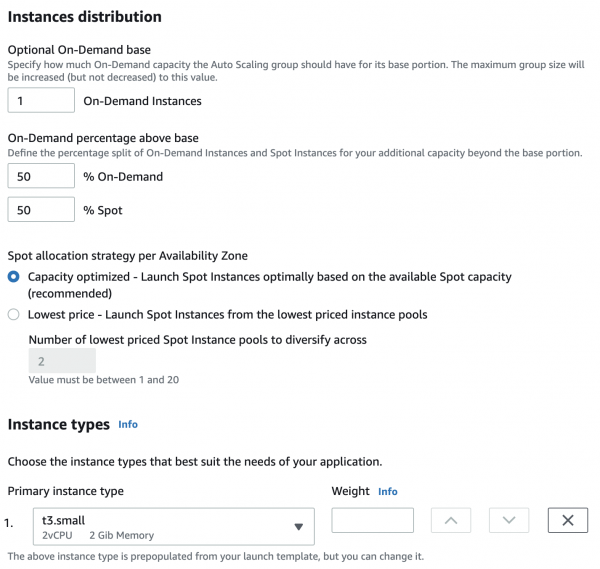
Purchase options and instance types — specify the instance types for the cluster. Adhere to launch template uses the instance type from the Launch Template. Combine purchase options and instance types allows flexible configuration of the instance types. We will use it.
Optional On-Demand base — the number of regular, non-spot instances that will always be running.
On-Demand percentage above base — the percentage ratio of regular instances to spot instances; a 50-50 distribution will balance them equally, while a 20-80 will raise 4 spot instances for each regular instance. For this example, I will set 50-50, but in reality, we often do 20-80, and in some cases, 0-100.
Instance types — here you can specify additional instance types that will be used in the cluster. We have never used this because I don’t quite understand the point of it. It might be about limits on specific instance types, but they can be easily increased through support. If you know of an application, I’d love to read about it in the comments)
Network — network settings, choose VPC and subnets for the machines; in most cases, it's best to select all available subnets.
Load Balancing — load balancer settings, but we will do this separately; here we leave everything as is. Health checks will also be configured later.
Group size — we set limits on the number of machines in the cluster and the desired number of machines at startup. The number of machines in the cluster will never be less than the minimum specified and more than the maximum, even if scaling based on metrics should occur.
Scaling policies — scaling parameters, but we will scale based on the running ECS tasks, so we will configure scaling later.
Instance scale-in protection — protection of instances from deletion during scaling down. We enable this so that the ASG does not delete the machine running active tasks. The ECS Capacity Provider will disable protection for instances without tasks.
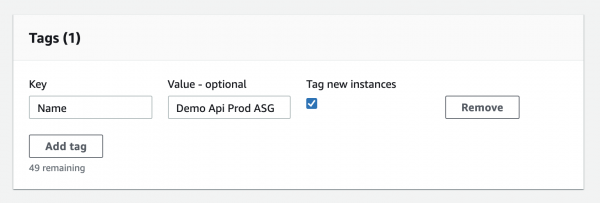
Add tags — tags can be specified for instances (for this, the Tag new instances checkbox must be checked). I recommend specifying the Name tag, so all instances launched within the group will have the same name, making them easy to view in the console.
After creating the group, open it and go to the Advanced configurations section, as not all options are visible in the console at the creation stage.
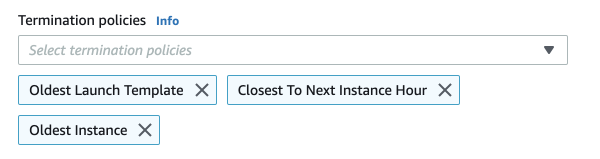
Termination policies — rules considered when deleting instances. They are applied in order. We usually use rules like those in the picture below. Instances with the oldest Launch Template are deleted first (for example, if we updated the AMI and created a new version, but all instances were able to switch to it). Then, instances closest to the next billing hour are selected. Lastly, the oldest by launch date are chosen.
Good to know: to update all machines in the cluster, it's convenient to use If you combine this with the Lambda function from the previous step, you will have a fully automated instance update system. Before updating all the machines, it is necessary to disable instance scale-in protection for all instances in the group. Not the setting in the group, but specifically the protection on the machines themselves, which can be done on the Instance management tab.
Application Load Balancer and EC2 Target Group
The load balancer is created in the EC2 → Load Balancing → Load Balancers section. We will use the Application Load Balancer; a comparison of different types of load balancers can be read on .
Listeners — it makes sense to set up ports 80 and 443 and redirect from 80 to 443 later using load balancer rules.
Availability Zones — in most cases, we choose all availability zones.
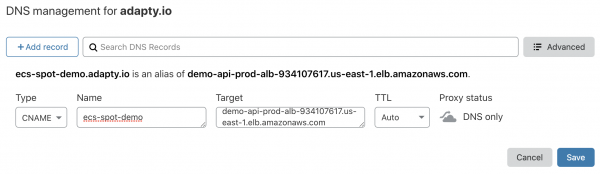
Configure Security Settings — here you specify the SSL certificate for the load balancer, the most convenient option is to in ACM. You can read about the differences in Security Policy in , the default selected can be kept ELBSecurityPolicy-2016-08. After creating the load balancer, you will see its DNS name, to which you need to set up a CNAME for your domain. For example, this is how it looks in Cloudflare.
Security Group — create or choose a security group for the load balancer, more about this was mentioned earlier in the EC2 Launch Template → Network settings section.
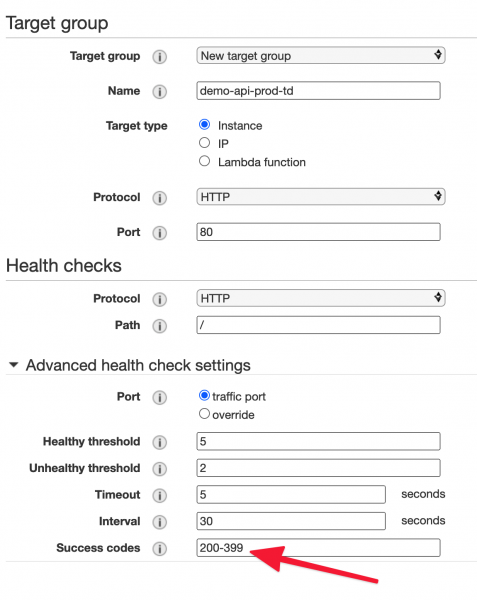
Target group — create a group that is responsible for routing requests from the load balancer to the machines and checking their accessibility to replace them in case of problems. Target type should be Instance, Protocol and Port any if you are using HTTPS for communication between the load balancer and the instances; you need to upload the certificate to them. For this example, we won't do this and will simply leave port 80.
Health checks — health check parameters for the service. In a real service, this should be a separate request that implements important parts of the business logic; for this example, I will leave the default settings. Next, you can choose the request interval, timeout, success response codes, etc. In our example, we will specify Success codes 200-399 because the Docker image that will be used returns a 304 code.
Register Targets — this is where you select machines for the group, but in our case, this will be handled by ECS, so we just skip this step.
Good to know: at the load balancer level, you can enable logs that will be saved in S3 in a specific From there, you can export them to third-party analytics services, or you can make SQL queries directly on the data in S3 using This is convenient and works without any additional code. I also recommend setting up log deletion from the S3 bucket after a specified period.
ECS Task Definition
In the previous steps, we created everything related to the service infrastructure, and now we move on to describing the containers that we will be launching. This is done in the ECS → Task Definitions section.
Launch type compatibility — we select EC2.
Task execution IAM role — we select ecsTaskExecutionRole.This role writes logs, provides access to secret variables, and more.
In the Container Definitions section, click Add Container.
Image — the link to the image with the project code; for this example, I will use a public image from Docker Hub .
Memory Limits — memory limits for the container. Hard Limit — the hard limit; if the container exceeds the specified value, the command docker kill will be executed, and the container will die immediately. Soft Limit — the soft limit; the container may exceed the specified value, but this parameter will be taken into account when placing tasks on machines. For example, if a machine has 4 GiB of RAM and the container's soft limit is 2048 MiB, then at most 2 tasks with this container can be running on that machine. In reality, 4 GiB of RAM is slightly less than 4096 MiB, which can be seen on the ECS Instances tab in the cluster. The soft limit cannot exceed the hard limit. It is important to understand that if there are multiple containers in one task, their limits are summed up.
Port mappings — in Host port we specify 0, which means the port will be assigned dynamically, and it will be monitored by the Target Group. Container Port — the port on which your application runs, often specified in the execution command or assigned in your application's code, Dockerfile, etc. For our example, we use 3000 because it is specified in the used image.
Health check — parameters for checking the container's health; do not confuse it with the one configured in the Target Group.
Environment — environment settings. CPU units — similar to Memory limits, but for the processor. Each CPU core represents 1024 units, so if the server has a dual-core processor and the container is set to 512, then up to 4 tasks can run on that server with this container. CPU units always correspond to the number of cores; there cannot be slightly fewer, as in the case with memory.
Command — command to start the service inside the container, all parameters are specified through a comma. This can be gunicorn, npm, etc. If not specified, the value of the CMD directive from the Dockerfile will be used. We specify npm,start.
Environment variables — the environment variables of the container. These can be simple text data or secret variables from or .
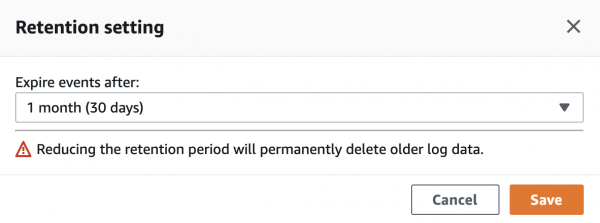
Storage and Logging — here we will set up logging to CloudWatch Logs (the logging service from AWS). To do this, simply check the Auto-configure CloudWatch Logs box. After creating the Task Definition, a log group in CloudWatch will automatically be created. By default, logs are stored there indefinitely, I recommend changing the Retention period from Never Expire to the required duration. This is done in CloudWatch Log groups, where you need to click on the current period and select a new one.
ECS Cluster and ECS Capacity Provider
Go to the ECS → Clusters section to create a cluster. As a template, select EC2 Linux + Networking.
Cluster name — very important, make sure to give it the same name as specified in the Launch Template under the ECS_CLUSTER, in our case — DemoApiClusterProd. Check the Create an empty cluster box. Optionally, you can enable Container Insights to view metrics for services in CloudWatch. If you've done everything correctly, you should see the machines created in the Auto Scaling group in the ECS Instances section.
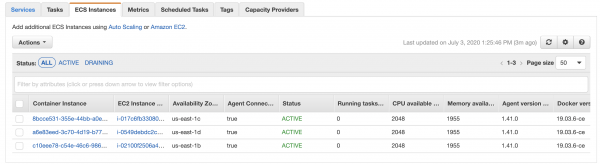
Go to the Capacity Providers tab and create a new one. Let me remind you that it is needed to control the creation and shutdown of machines depending on the number of running ECS tasks. It is important to note that the provider can only be linked to one group.
Auto Scaling group — select the previously created group.
Managed scaling — enable it so the provider can scale the service.
Target capacity % — what percentage of machine load tasks we need. If you set 100%, all machines will always be occupied with running tasks. If you set 50%, half of the machines will always be free. In this case, if there is a sudden surge in load, new tasks will immediately go to the free machines without having to wait for instance deployment.
Managed termination protection — if enabled, this parameter allows the provider to remove instance deletion protection. This happens when there are no active tasks on the machine and allows for Target capacity %.
ECS Service and scaling configuration
Final step :) To create a service, you need to go to the previously created cluster and the Services tab.
Launch type — you need to click on Switch to capacity provider strategy and select the previously created provider.

Task Definition — select the previously created Task Definition and its revision.
Service name — to avoid confusion, we always specify the same name as the Task Definition.
Service type — always Replica.
Number of tasks — the desired number of active tasks in the service. This parameter is controlled by scaling, but it still needs to be specified.
Minimum healthy percent and Maximum percent — determine the behavior of tasks during deployment. The default values are 100 and 200, indicating that during deployment the number of tasks will double and then return to the desired state. If you have 1 task, min=0, and max=100, then during deployment it will be killed, and after that a new one will be launched, which means there will be downtime. If you have 1 task, min=50, max=150, then deployment won't happen at all because 1 task cannot be split in half or increased by one and a half times.
Deployment type — leave as Rolling update.
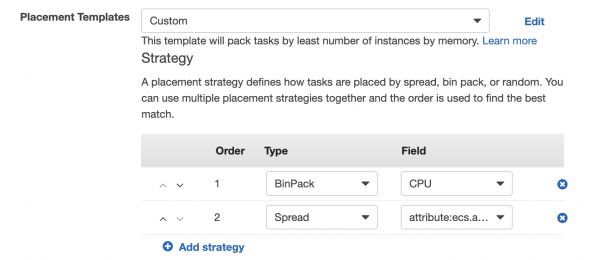
Placement Templates — placement rules for tasks on machines. By default, it is set to AZ Balanced Spread — which means that each new task will be placed on a new instance until machines are up in all availability zones. We usually do BinPack — CPU and Spread — AZ, under this policy tasks are placed as densely as possible on one machine by CPU. If a new machine needs to be created, it is created in a new availability zone.
Load balancer type — choose Application Load Balancer.
Service IAM role — choose ecsServiceRole.
Load balancer name — select the previously created load balancer.
Health check grace period — pause before executing health checks after rolling out a new task, we usually set it to 60 seconds.
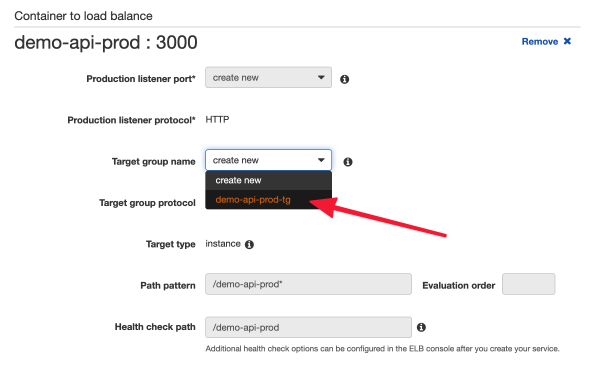
Container to load balance In the Target group name field, select the previously created group, and everything will be filled in automatically.
Service Auto Scaling Scaling parameters for the service. Select Configure Service Auto Scaling to adjust your service's desired count. Set the minimum and maximum task count for scaling.
IAM role for Service Auto Scaling — choose AWSServiceRoleForApplicationAutoScaling_ECSService.
Automatic task scaling policies There are two types:
- Target tracking Tracking a target metric (CPU/RAM usage or the number of requests per task). For example, we want the average CPU load to be 85%. If it goes above this, new tasks will be added until it reaches the target value. If the load is below, tasks will be removed unless scale-in protection is enabled (Disable scale-in).
- Step scaling A response to arbitrary events. Here you can configure a response to any event (CloudWatch Alarm); when it occurs, you can add or remove the specified number of tasks, or specify an exact number of tasks.
The service can have multiple scaling rules, which can be useful; just ensure they do not conflict with each other.
Conclusion
If you followed the instructions and used the same Docker image, your service should return this page.

- We created a template for launching all machines in the service. We also learned how to update machines when the template changes.
- We set up handling for the spot instance termination signal, so within a minute after receiving it, all running tasks are removed from the machine, thus nothing is lost or interrupted.
- We set up a load balancer to distribute the load evenly across machines.
- We created a service that runs on spot instances, which reduces machine costs by about three times.
- We configured auto-scaling in both directions to handle increased loads while also avoiding payments for idle time.
- We use Capacity Provider to allow the application to manage the infrastructure (machines), rather than the other way around.
- We did great.
If you have predictable spikes in load, for example, if you are running a large email campaign, you can set up scaling based on .
You can also scale based on data from different parts of your system. For example, we have the functionality to users of the mobile application. Sometimes a campaign is sent to over 1 million people. After such a mailing, there is always a significant increase in API requests, as many users access the application simultaneously. So if we notice that the queue for sending promotional push notifications has significantly exceeded standard parameters, we can immediately launch several additional machines and tasks to be ready for the load.
I would be glad if you could share interesting use cases of spot instances and ECS or anything related to scaling in the comments.
Soon there will be articles on how we process thousands of analytical events per second on a predominantly serverless stack (with money) and how we deploy services using GitLab CI and Terraform Cloud.
Follow us, it will be interesting!
Only registered users can participate in the survey. , please.
Do you use spot instances in production?
22,2%Yes6
66,7%No18
11,1%I learned about them from an article, I plan to use them3
27 users voted. 5 users abstained.
Source: habr.com
