

In this article, I will explain how to set up OpenDaylight to work with network equipment, and I will show how to manage this equipment using Postman and simple RESTCONF requests. We won't be working with hardware, but instead, we will deploy small virtual labs with a single router using Vrnetlab on top of Ubuntu 20.04 LTS.
I will demonstrate the detailed setup first using the Juniper vMX 20.1R1.11, and then we will compare it with the setup of Cisco xRV9000 7.0.2.
Content
- Necessary knowledge
- Part 1: briefly discussing OpenDaylight (hereafter referred to as ODL), Postman and Vrnetlab and why we need it
- Part 2: description of the virtual lab
- Part 3: setting up OpenDaylight
- Part 4: setting up Vrnetlab
- Part 5: using Postman connecting the virtual router (Juniper vMX) to ODL
- Part 6: obtaining and modifying the router's configuration using Postman and ODL
- Part 7: adding Cisco xRV9000
- Conclusion
- P.S.
- References
Necessary knowledge
To keep the article from becoming too lengthy, I have skipped some technical details (with links to literature where you can read about them).
Therefore, I suggest topics that would be good (but not strictly necessary) to know before reading:
- ,
- /
Part 1: A bit of theory

- An open SDN platform for managing and automating all kinds of networks, supported by Linux Foundation
- Java inside
- Based on Model-Driven Service Abstraction Level (MD-SAL)
- Uses YANG models for automatic creation of RESTCONF APIs for network devices
The main module for network management. It's through this that we will interact with connected devices. It is managed via its own API.
More details about OpenDaylight can be found .

- A tool for testing APIs
- Simple and user-friendly interface
In our case, it is interesting as a means of sending REST requests to the OpenDaylight API. Of course, requests can also be sent manually, but in Postman, everything looks very clear and is perfectly suited for our purposes.
For those interested in digging deeper: there are many training materials written about it ().

- A tool for deploying virtual routers in Docker
- Supports: Cisco XRv, Juniper vMX, Arista vEOS, Nokia VSR, and others.
- Open Source
A very interesting but little-known tool. In our case, we will use it to run Juniper vMX and Cisco xRV9000 on regular Ubuntu 20.04 LTS.
You can read more about it at .
Part 2: laboratory work
In this tutorial, we will be setting up the following system:
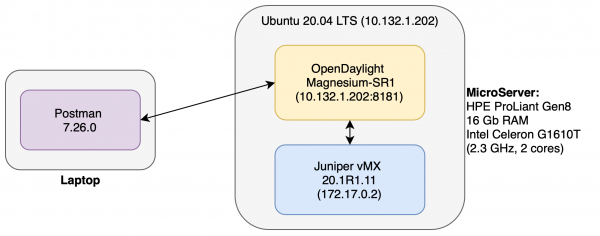
How it works
- Juniper vMX running in Docker a container (using Vrnetlab) and functioning as a regular virtual router.
- ODL connected to the router and allows for management.
- Postman running on a separate machine through which we send commands ODL: to connect/disconnect the router, change the configuration, etc.
Commentary on the system device
Juniper vMX and ODL require a considerable amount of resources for stable operation. One alone vMX requests 6 GB of RAM and 4 cores. Therefore, it was decided to move all the "heavyweights" to a separate machine (Heulett Packard Enterprise MicroServer ProLiant Gen8, Ubuntu 20.04 LTS). The router, of course, does not "fly" on it, but the performance is sufficient for small experiments.
Part 3: configuring OpenDaylight
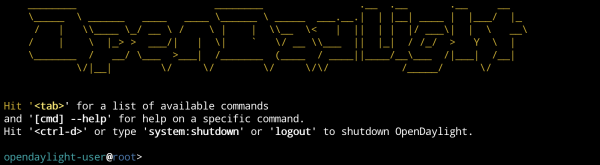
The current version of ODL at the time of writing is — Magnesium SR1
1) Installing Java OpenJDK 11 (for more detailed installation )
ubuntu:~$ sudo apt install default-jdk2) Finding and downloading the latest build ODL
3) Unzipping the downloaded archive
4) Moving to the obtained directory
5) Running ./bin/karaf
At this step ODL it should start, and we will find ourselves in the console (To access from outside, port 8181 is used, which we will exploit later).
Next, we install ODL Features, intended to work with protocols NETCONF and RESTCONF. For this in the console ODL we execute:
opendaylight-user@root> feature:install odl-netconf-topology odl-restconf-allThis completes the simplest setup. (More details can be read ODL Part 4: configuring Vrnetlab ).
Before installation
System Preparation
it is necessary to install the required packages for its operation. Such as Vrnetlab sshpass , , :
Installing Vrnetlabcloning the corresponding repository from github:
To install Vrnetlab ubuntu:~$ cd ~ ubuntu:~$ git clone https://github.com/plajjan/vrnetlab.git
vrnetlabGo to the directory ubuntu:~$ cd ~/vrnetlab:
Here you can see all the scripts necessary for running. Note that a corresponding directory has been made for each type of router:Here you can see all the scripts necessary for launching. Note that a corresponding directory has been created for each type of router:
ubuntu:~/vrnetlab$ ls
CODE_OF_CONDUCT.md  config-engine-lite        openwrt           vr-bgp
CONTRIBUTING.md     csr                       routeros          vr-xcon
LICENSE             git-lfs-repo.sh           sros              vrnetlab.sh
Makefile            makefile-install.include  topology-machine  vrp
README.md           makefile-sanity.include   veos              vsr1000
ci-builder-image    makefile.include          vmx               xrv
common              nxos                      vqfx              xrv9k
Creating the router image
Each supported router Vrnetlab, has its own unique setup procedure. In the case of Juniper vMX we just need to place the .tgz archive with the router (you can download it from ) into the vmx directory and execute the command make:
ubuntu:~$ cd ~/vrnetlab/vmx
ubuntu:~$ # Copy the .tgz router archive into this directory
ubuntu:~$ sudo make
Image Build vMX will take about 10-20 minutes. It's the perfect time to brew some coffee!
Why is it taking so long, you may ask?
Translation from the author to this question:
"This is because when VCP (Control Plane) starts for the first time, it reads the configuration file, which determines whether it will operate as the VRR VCP in vMX. Previously, this start-up occurred during Docker's boot, but this meant that the VCP would always be restarted once before the virtual router became available, leading to a long boot time (about 5 minutes). Now the first VCP start occurs during the Docker image build, and since the Docker build cannot be run with the --privileged parameter, this means that qemu runs without KVM hardware acceleration and, thus, the build takes a long time. A lot of logs are output during this process, so at least you can see what's happening. I think that the long build time isn't so bad because we create the image once and run many."
Afterwards, we can see our router's image in Docker:
ubuntu:~$ sudo docker image list
REPOSITORY          TAG                 IMAGE ID            CREATED             SIZE
vrnetlab/vr-vmx     20.1R1.11           b1b2369b453c        3 weeks ago         4.43GB
debian              stretch             614bb74b620e        7 weeks ago         101MB
Starting the vr-vmx container
Run the command:
ubuntu:~$ sudo docker run -d --privileged --name jun01 b1b2369b453cNext, we can check information about active containers:
ubuntu:~$ sudo docker container list
CONTAINER ID        IMAGE               COMMAND             CREATED             STATUS                     PORTS                                                 NAMES
120f882c8712        b1b2369b453c        "/launch.py"        2 minutes ago       Up 2 minutes (unhealthy)   22/tcp, 830/tcp, 5000/tcp, 10000-10099/tcp, 161/udp   jun01
Connecting to the router
The IP address of the router's network interface can be obtained with the following command:
ubuntu:~$ sudo docker inspect --format '{{.NetworkSettings.IPAddress}}' jun01
172.17.0.2
By default, Vrnetlab creates a user router vrnetlab/VR-netlab9.
Connecting using ssh:
ubuntu:~$ ssh vrnetlab@172.17.0.2
The authenticity of host '172.17.0.2 (172.17.0.2)' can't be established.
ECDSA key fingerprint is SHA256:g9Sfg/k5qGBTOX96WiCWyoJJO9FxjzXYspRoDPv+C0Y.
Are you sure you want to continue connecting (yes/no/[fingerprint])? yes
Warning: Permanently added '172.17.0.2' (ECDSA) to the list of known hosts.
Password:
--- JUNOS 20.1R1.11 Kernel 64-bit  JNPR-11.0-20200219.fb120e7_build
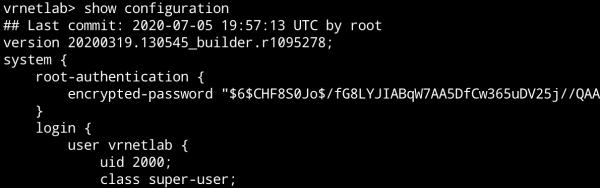
vrnetlab> show version
Model: vmx
Junos: 20.1R1.11
At this point, the router configuration is complete.
Installation recommendations for routers from various vendors can be found at in the corresponding directories.
Part 5: Postman — connecting the router to OpenDaylight
Installing Postman
To install, simply download the application .
Connecting the router to ODL
Let's create PUT request:
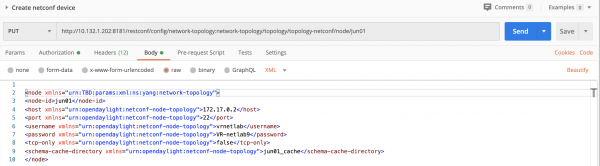
- Request line:
PUT http://10.132.1.202:8181/restconf/config/network-topology:network-topology/topology/topology-netconf/node/jun01 - Request body (Body tab):
jun01 172.17.0.2 22 vrnetlab VR-netlab9 false jun01_cache - In the Authorization tab, you need to set the parameter
Basic Authand the username/password: admin/admin. This is necessary for access to ODL:

- In the Headers tab, you need to add two headers:
- Accept application/xml
- Content-Type application/xml
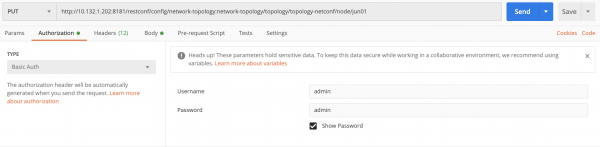
Our request is formed. Sending. If everything is set up correctly, we should receive a status "201 Created":

What does this request do?
We are creating a node within ODL with the parameters of the real router we want to access.
xmlns="urn:TBD:params:xml:ns:yang:network-topology"
xmlns="urn:opendaylight:netconf-node-topology"
These are internal namespaces XML (XML namespace) according to which it creates a node. ODL Next, accordingly, the router's name is
node-id , the router's address isand so on. host The most interesting line is the last one.
Schema-cache-directory creates a directory where all files are downloaded YANG Schema of the connected router. They can be found at $ODL_ROOT/cache/jun01_cache Checking the router connection.
GET http://10.132.1.202:8181/restconf/operational/network-topology:network-topology/topology/topology-netconf/
Let's create GET request:
- Request line:
and username/password: admin/admin. - In the Authorization tab, you need to set the parameter
Basic AuthSending. Should receive status "200 OK" and a list of all devices supported.
Sending. We should receive a status "200 OK" and a list of all devices supported by the device. of the connected router. They can be found at:
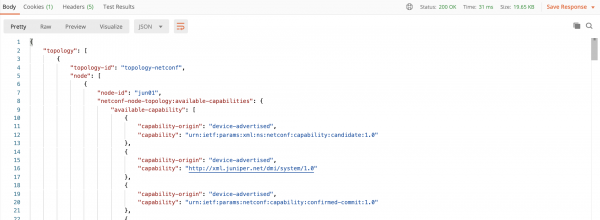
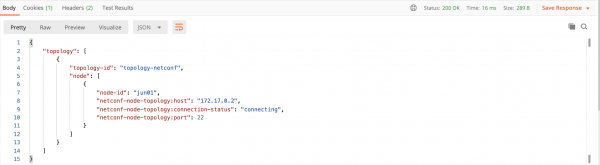
Comment: To see the latest updates, in my case, I had to wait about 10 minutes after execution PUT, while all YANG schema will be loaded onto ODL. Until that moment, executing this GET request will output the following:
Deleting the router
Let's create DELETE request:
- Request line:
DELETE http://10.132.1.202:8181/restconf/config/network-topology:network-topology/topology/topology-netconf/node/jun01 - In the Authorization tab, you need to set the parameter
Basic AuthSending. Should receive status "200 OK" and a list of all devices supported.
Part 6: Changing the router configuration
Getting the configuration
Let's create GET request:
- Request line:
GET http://10.132.1.202:8181/restconf/config/network-topology:network-topology/topology/topology-netconf/node/jun01/yang-ext:mount/ - In the Authorization tab, you need to set the parameter
Basic AuthSending. Should receive status "200 OK" and a list of all devices supported.
Sending. We should receive status "200 OK" and the router configuration:
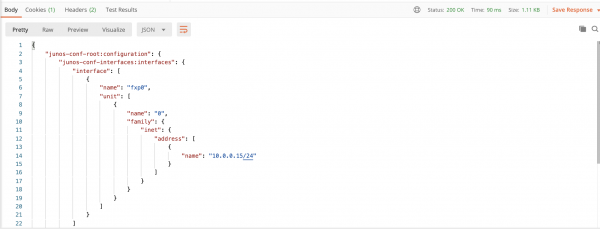
Creating the configuration
As an example, let's create the following configuration and modify it:
protocols {
    bgp {
        disable;
        shutdown;
    }
}
Let's create POST request:
- Request line:
POST http://10.132.1.202:8181/restconf/config/network-topology:network-topology/topology/topology-netconf/node/jun01/yang-ext:mount/junos-conf-root:configuration/junos-conf-protocols:protocols - Request body (Body tab):
- In the Authorization tab, you need to set the parameter
Basic AuthSending. Should receive status "200 OK" and a list of all devices supported. - In the Headers tab, you need to add two headers:
- Accept application/xml
- Content-Type application/xml
After sending, we should receive status "204 No Content"
To check that the configuration has changed, we can use the previous request. But for this example, we will create another one that will output information only about the protocols configured on the router.
Let's create GET request:
- Request line:
GET http://10.132.1.202:8181/restconf/config/network-topology:network-topology/topology/topology-netconf/node/jun01/yang-ext:mount/junos-conf-root:configuration/junos-conf-protocols:protocols - In the Authorization tab, you need to set the parameter
Basic AuthSending. Should receive status "200 OK" and a list of all devices supported.
After executing the request, we will see the following:
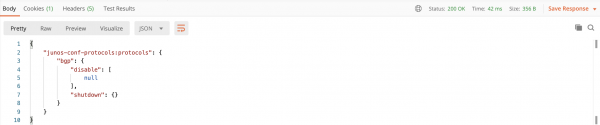
Changing the configuration
We will change the information about the BGP protocol. After our actions, it will look as follows:
protocols {
    bgp {
        disable;
    }
}
Let's create PUT request:
- Request line:
PUT http://10.132.1.202:8181/restconf/config/network-topology:network-topology/topology/topology-netconf/node/jun01/yang-ext:mount/junos-conf-root:configuration/junos-conf-protocols:protocols - Request body (Body tab):
- In the Authorization tab, you need to set the parameter
Basic AuthSending. Should receive status "200 OK" and a list of all devices supported. - In the Headers tab, you need to add two headers:
- Accept application/xml
- Content-Type application/xml
Using the previous GET request, we see the changes:
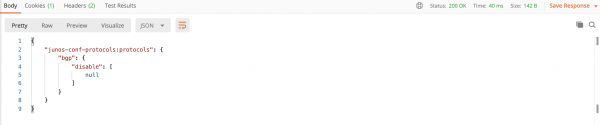
Deleting the configuration
Let's create DELETE request:
- Request line:
DELETE http://10.132.1.202:8181/restconf/config/network-topology:network-topology/topology/topology-netconf/node/jun01/yang-ext:mount/junos-conf-root:configuration/junos-conf-protocols:protocols - In the Authorization tab, you need to set the parameter
Basic AuthSending. Should receive status "200 OK" and a list of all devices supported.
When invoked GET From the request with information about the protocols, we will see the following:
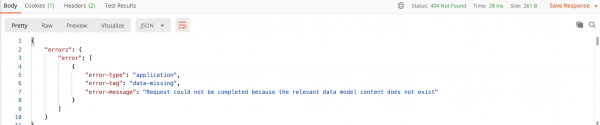
The vulnerability is confirmed in many official Docker images, including images for Couchbase, Elasticsearch, Flink, Solr, Storm, etc.
To change the configuration, it is not necessary to send the request body in the format XML. This can also be done in the format JSON.
For this, for example, in the request PUT for changing the configuration, we will replace the request body with:
{
    "junos-conf-protocols:protocols": {
        "bgp": {
            "description" : "Changed in postman"
        }
    }
}
Don't forget to change the headers on the Headers tab to:
- Accept application/json
- Content-Type application/json
After sending, we will get the following result (Check the response using GET Request):

Part 7: Adding Cisco xRV9000
What do we all say about Juniper? Let's talk about Cisco!
I found an xRV9000 version 7.0.2 (a beast that needs 8Gb RAM and 4 cores. It's not available for free, so please contact ) — and we will run it.
Starting the container
The process of creating a Docker container is quite similar to Juniper. Similarly, we place the .qcow2 file with the router into the directory corresponding to its name, (in this case xrv9k) and execute the command make docker-image.
After a few minutes, we see that the image has been created:
ubuntu:~$ sudo docker image ls
REPOSITORY          TAG                 IMAGE ID            CREATED             SIZE
vrnetlab/vr-xrv9k   7.0.2               54debc7973fc        4 hours ago         1.7GB
vrnetlab/vr-vmx     20.1R1.11           b1b2369b453c        4 weeks ago         4.43GB
debian              stretch             614bb74b620e        7 weeks ago         101MB
We start the container:
ubuntu:~$ sudo docker run -d --privileged --name xrv01 54debc7973fcAfter a while, we see that the container has started:
ubuntu:~$ sudo docker ps
CONTAINER ID        IMAGE               COMMAND             CREATED             STATUS                 PORTS                                                      NAMES
058c5ecddae3        54debc7973fc        "/launch.py"        4 hours ago         Up 4 hours (healthy)   22/tcp, 830/tcp, 5000-5003/tcp, 10000-10099/tcp, 161/udp   xrv01
We connect via SSH:
ubuntu@ubuntu:~$ ssh vrnetlab@172.17.0.2
Password:

RP/0/RP0/CPU0:ios#show version
Mon Jul  6 12:19:28.036 UTC
Cisco IOS XR Software, Version 7.0.2
Copyright (c) 2013-2020 by Cisco Systems, Inc.

Build Information:
 Built By     : ahoang
 Built On     : Fri Mar 13 22:27:54 PDT 2020
 Built Host   : iox-ucs-029
 Workspace    : /auto/srcarchive15/prod/7.0.2/xrv9k/ws
 Version      : 7.0.2
 Location     : /opt/cisco/XR/packages/
 Label        : 7.0.2

cisco IOS-XRv 9000 () processor
System uptime is 3 hours 22 minutes
We connect the router to OpenDaylight.
The addition process is exactly the same as with the vMX image. We just need to change the names.
PUT request:
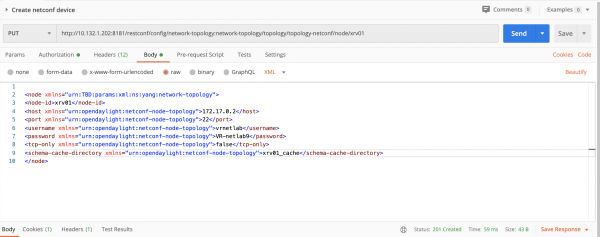
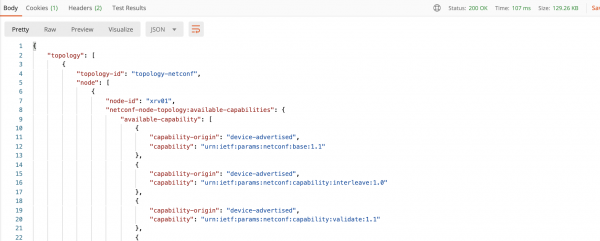
After a while, we invoke GET the request to check that everything is connected:
Changing the configuration
Let's configure the following:
!
router ospf LAB
 mpls ldp auto-config
!
Let's create POST request:
- Request line:
POST http://10.132.1.202:8181/restconf/config/network-topology:network-topology/topology/topology-netconf/node/xrv01/yang-ext:mount/Cisco-IOS-XR-ipv4-ospf-cfg:ospf - Request body (Body tab):
{ "processes": { "process": [ { "process-name": "LAB", "default-vrf": { "process-scope": { "ldp-auto-config": [ null ] } } } ] } } - In the Authorization tab, you need to set the parameter
Basic AuthSending. Should receive status "200 OK" and a list of all devices supported. - In the Headers tab, you need to add two headers:
- Accept application/json
- Content-Type application/json
After executing it, we should receive a status "204 No Content".
Let's check what we've accomplished.
To do this, we'll create GET request:
- Request line:
GET http://10.132.1.202:8181/restconf/config/network-topology:network-topology/topology/topology-netconf/node/xrv01/yang-ext:mount/Cisco-IOS-XR-ipv4-ospf-cfg:ospf - In the Authorization tab, you need to set the parameter
Basic AuthSending. Should receive status "200 OK" and a list of all devices supported.
After execution, we should see the following:
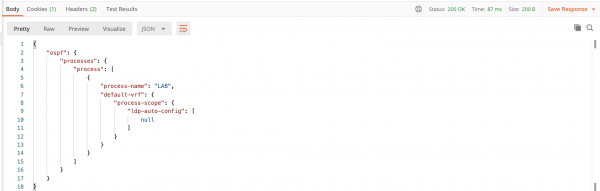
To delete the configuration, we use DELETE:
- Request line:
DELETE http://10.132.1.202:8181/restconf/config/network-topology:network-topology/topology/topology-netconf/node/xrv01/yang-ext:mount/Cisco-IOS-XR-ipv4-ospf-cfg:ospf - In the Authorization tab, you need to set the parameter
Basic AuthSending. Should receive status "200 OK" and a list of all devices supported.
Conclusion
As you may have noticed, the connection procedures for Cisco and Juniper to OpenDaylight are quite similar — this opens up a wide range of creative possibilities. From managing configurations across all network components to creating custom network policies.
In this tutorial, I’ve provided simple examples of how to interact with networking equipment using OpenDaylight. Undoubtedly, the requests from the provided examples can be made much more complex, and entire services can be set up with a mere click of a mouse — the only limit is your imagination*
To be continued…
P.S.
If you already know all this, or conversely, if you’ve gone through it and fallen in love with ODL, I recommend looking into application development on the ODL controller. You can start with .
Wishing you successful experiments!
List of References
- / Brian Linkletter
- OpenDaylight Cookbook / Mathieu Lemay, Alexis de Talhouet, Et al
- Network Programmability with YANG / Benoît Claise, Loe Clarke, Jan Lindblad
- Learning XML, Second Edition / Erik T. Ray
- Effective DevOps / Jennifer Davis, Ryn Daniels
Source: habr.com
