

Dear readers, good day. Today we will talk a little about Apache Spark and its development prospects.
In the modern world of Big Data, Apache Spark is the de facto standard for developing batch data processing tasks. In addition, it is also used for creating streaming applications that operate under the micro-batch concept, processing and delivering data in small portions (Spark Structured Streaming). Traditionally, it has been part of the overall Hadoop stack, using YARN as the resource manager (or, in some cases, Apache Mesos). By 2020, its usage in its traditional form for most companies is under serious doubt due to the lack of decent Hadoop distributions — the development of HDP and CDH has stalled, CDH is not well developed and has a high cost, while other Hadoop providers have either ceased to exist or have an unclear future. Therefore, increasing interest from the community and large companies is being attracted to running Apache Spark with Kubernetes — as the standard for container orchestration and resource management in private and public clouds, it addresses the issue of awkward resource scheduling for Spark tasks on YARN and provides a steadily evolving platform with numerous commercial and open-source distributions for companies of all sizes and types. Moreover, with the wave of popularity, most have already established a couple of their installations and built expertise in its use, which simplifies the transition.
Starting from version 2.3.0, Apache Spark gained official support for running tasks in a Kubernetes cluster, and today we will discuss the current maturity of this approach, various usage options, and the challenges that one might face when implementing it.
First of all, let's consider the process of developing tasks and applications based on Apache Spark and highlight typical cases where it is necessary to run a task in a Kubernetes cluster. For this post, OpenShift is used as the distribution, and commands relevant to its command-line utility (oc) will be provided. For other Kubernetes distributions, the corresponding commands of the standard Kubernetes command-line utility (kubectl) or their analogs (for example, oc adm policy) may be used.
The first use case is spark-submit
During the development of tasks and applications, the developer needs to run tasks to debug data transformations. Theoretically, stubs could be used for this purpose, but development involving real (even test) instances of the end systems has proven to be faster and more effective for this class of tasks. When debugging on real instances of end systems, two scenarios are possible:
- the developer runs the Spark task locally in standalone mode;

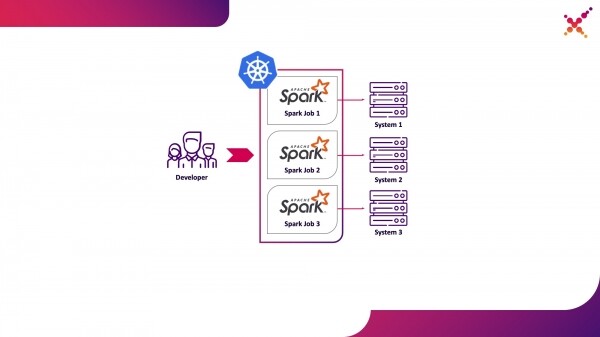
- the developer runs the Spark task on a Kubernetes cluster in the test environment.
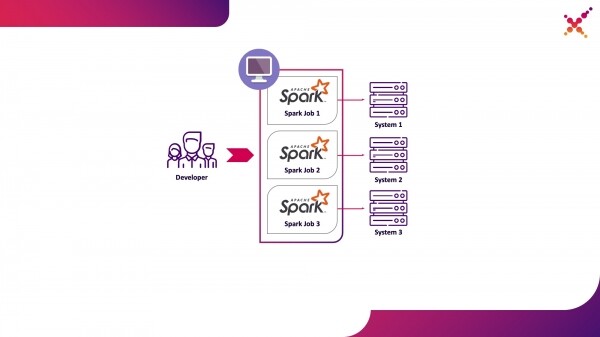
The first option is valid but comes with a number of drawbacks:
- each developer needs to ensure access from their workstations to all necessary instances of the end systems;
- the working machine requires sufficient resources to run the developing task.
The second option lacks these drawbacks, as using a Kubernetes cluster allows for allocating the necessary pool of resources to run tasks and ensuring the necessary access to instances of end systems, flexibly providing access through Kubernetes' role-based model for all team members. We will highlight this as the first use case — running Spark tasks from a developer's local machine on a Kubernetes cluster in a test environment.
Let's discuss the process of setting up Spark for local execution in more detail. To start using Spark, it needs to be installed:
mkdir /opt/spark
cd /opt/spark
wget http://mirror.linux-ia64.org/apache/spark/spark-2.4.5/spark-2.4.5.tgz
tar zxvf spark-2.4.5.tgz
rm -f spark-2.4.5.tgz
We assemble the necessary packages to work with Kubernetes:
cd spark-2.4.5/
./build/mvn -Pkubernetes -DskipTests clean package
The full build takes a long time, and to create Docker images and run them on the Kubernetes cluster, only the jar files from the 'assembly/' directory are actually needed, so we can build only this subproject:
./build/mvn -f ./assembly/pom.xml -Pkubernetes -DskipTests clean package
To run Spark tasks in Kubernetes, it is necessary to create a Docker image that will be used as the base. There are two approaches possible here:
- The created Docker image includes the executable code of the Spark task;
- The created image includes only Spark and the necessary dependencies, with the executable code stored remotely (for example, in HDFS).
First, let's build a Docker image containing a sample Spark task. Spark has a corresponding utility called "docker-image-tool" for creating Docker images. Let's check its help:
./bin/docker-image-tool.sh --help
With this utility, you can create Docker images and upload them to remote registries, but by default, it has several drawbacks:
- it mandatory creates 3 Docker images — for Spark, PySpark, and R;
- it does not allow specifying the image name.
Therefore, we will use a modified version of this utility, as shown below:
vi bin/docker-image-tool-upd.sh
#!/usr/bin/env bash

function error {
  echo "$@" 1>&2
  exit 1
}

if [ -z "${SPARK_HOME}" ]; then
  SPARK_HOME="$(cd "`dirname "$0"`"/..; pwd)"
fi
. "${SPARK_HOME}/bin/load-spark-env.sh"

function image_ref {
  local image="$1"
  local add_repo="${2:-1}"
  if [ $add_repo = 1 ] && [ -n "$REPO" ]; then
    image="$REPO/$image"
  fi
  if [ -n "$TAG" ]; then
    image="$image:$TAG"
  fi
  echo "$image"
}

function build {
  local BUILD_ARGS
  local IMG_PATH

  if [ ! -f "$SPARK_HOME/RELEASE" ]; then
    IMG_PATH=$BASEDOCKERFILE
    BUILD_ARGS=(
      ${BUILD_PARAMS}
      --build-arg
      img_path=$IMG_PATH
      --build-arg
      datagram_jars=datagram/runtimelibs
      --build-arg
      spark_jars=assembly/target/scala-$SPARK_SCALA_VERSION/jars
    )
  else
    IMG_PATH="kubernetes/dockerfiles"
    BUILD_ARGS=(${BUILD_PARAMS})
  fi

  if [ -z "$IMG_PATH" ]; then
    error "Cannot find docker image. This script must be run from a runnable distribution of Apache Spark."
  fi

  if [ -z "$IMAGE_REF" ]; then
    error "Cannot find docker image reference. Please add -i arg."
  fi

  local BINDING_BUILD_ARGS=(
    ${BUILD_PARAMS}
    --build-arg
    base_img=$(image_ref $IMAGE_REF)
  )
  local BASEDOCKERFILE=${BASEDOCKERFILE:-"$IMG_PATH/spark/docker/Dockerfile"}

  docker build $NOCACHEARG "${BUILD_ARGS[@]}"
    -t $(image_ref $IMAGE_REF)
    -f "$BASEDOCKERFILE" .
}

function push {
  docker push "$(image_ref $IMAGE_REF)"
}

function usage {
  cat <<EOF
Usage: $0 [options] [command]
Builds or pushes the built-in Spark Docker image.

Commands:
  build       Build image. Requires a repository address to be provided if the image will be
              pushed to a different registry.
  push        Push a pre-built image to a registry. Requires a repository address to be provided.

Options:
  -f file               Dockerfile to build for JVM based Jobs. By default builds the Dockerfile shipped with Spark.
  -p file               Dockerfile to build for PySpark Jobs. Builds Python dependencies and ships with Spark.
  -R file               Dockerfile to build for SparkR Jobs. Builds R dependencies and ships with Spark.
  -r repo               Repository address.
  -i name               Image name to apply to the built image, or to identify the image to be pushed.
  -t tag                Tag to apply to the built image, or to identify the image to be pushed.
  -m                    Use minikube's Docker daemon.
  -n                    Build docker image with --no-cache
  -b arg      Build arg to build or push the image. For multiple build args, this option needs to
              be used separately for each build arg.

Using minikube when building images will do so directly into minikube's Docker daemon.
There is no need to push the images into minikube in that case, they'll be automatically
available when running applications inside the minikube cluster.

Check the following documentation for more information on using the minikube Docker daemon:

  https://kubernetes.io/docs/getting-started-guides/minikube/#reusing-the-docker-daemon

Examples:
  - Build image in minikube with tag "testing"
    $0 -m -t testing build

  - Build and push image with tag "v2.3.0" to docker.io/myrepo
    $0 -r docker.io/myrepo -t v2.3.0 build
    $0 -r docker.io/myrepo -t v2.3.0 push
EOF
}

if [[ "$@" = *--help ]] || [[ "$@" = *-h ]]; then
  usage
  exit 0
fi

REPO=
TAG=
BASEDOCKERFILE=
NOCACHEARG=
BUILD_PARAMS=
IMAGE_REF=
while getopts f:mr:t:nb:i: option
do
 case "${option}"
 in
 f) BASEDOCKERFILE=${OPTARG};;
 r) REPO=${OPTARG};;
 t) TAG=${OPTARG};;
 n) NOCACHEARG="--no-cache";;
 i) IMAGE_REF=${OPTARG};;
 b) BUILD_PARAMS=${BUILD_PARAMS}" --build-arg "${OPTARG};;
 esac
done

case "${@: -1}" in
  build)
    build
    ;;
  push)
    if [ -z "$REPO" ]; then
      usage
      exit 1
    fi
    push
    ;;
  *)
    usage
    exit 1
    ;;
esac
With it, we will assemble a base Spark image containing a test task for calculating Pi using Spark (here {docker-registry-url} — the URL of your Docker image registry, {repo} — the repository name within the registry that matches the project in OpenShift, {image-name} — the image name (if using a three-tier image separation, for example, as in the integrated Red Hat OpenShift image registry), {tag} — the tag for this image version):
./bin/docker-image-tool-upd.sh -f resource-managers/kubernetes/docker/src/main/dockerfiles/spark/Dockerfile -r {docker-registry-url}/{repo} -i {image-name} -t {tag} build
Log in to the OKD cluster using the console utility (here {OKD-API-URL} — the URL of the OKD cluster API):
oc login {OKD-API-URL}
Get the current user's token for authorization in the Docker Registry:
oc whoami -t
Log in to the internal Docker Registry of the OKD cluster (using the token obtained from the previous command as the password):
docker login {docker-registry-url}
Upload the built Docker image to the OKD Docker Registry:
./bin/docker-image-tool-upd.sh -r {docker-registry-url}/{repo} -i {image-name} -t {tag} push
Check that the built image is available in OKD. To do this, open the URL in your browser with the list of images for the corresponding project (here {project} — the project name within the OpenShift cluster, {OKD-WEBUI-URL} — the URL of the OpenShift web console) — https://{OKD-WEBUI-URL}/console/project/{project}/browse/images/{image-name}.
For task execution, a service account must be created with privileges to run pods as root (we will discuss this later):
oc create sa spark -n {project}
oc adm policy add-scc-to-user anyuid -z spark -n {project}
Execute the spark-submit command to publish the Spark task in the OKD cluster, specifying the created service account and the Docker image:
/opt/spark/bin/spark-submit --name spark-test --class org.apache.spark.examples.SparkPi --conf spark.executor.instances=3 --conf spark.kubernetes.authenticate.driver.serviceAccountName=spark --conf spark.kubernetes.namespace={project} --conf spark.submit.deployMode=cluster --conf spark.kubernetes.container.image={docker-registry-url}/{repo}/{image-name}:{tag} --conf spark.master=k8s://https://{OKD-API-URL} local:///opt/spark/examples/target/scala-2.11/jars/spark-examples_2.11-2.4.5.jar
Here:
--name — the name of the task that will participate in forming the names of Kubernetes pods;
—class — the class of the executable file invoked when starting the task;
—conf — configuration parameters for Spark;
spark.executor.instances — the number of Spark executors to launch;
spark.kubernetes.authenticate.driver.serviceAccountName — the name of the Kubernetes service account used when launching pods (to define security context and capabilities when interacting with the Kubernetes API);
spark.kubernetes.namespace — the Kubernetes namespace where the driver and executor pods will run;
spark.submit.deployMode — the mode of running Spark (for standard spark-submit it is 'cluster', for Spark Operator and later versions of Spark it is 'client');
spark.kubernetes.container.image — the Docker image used for launching the pods;
spark.master — the URL of the Kubernetes API (specified externally for access from the local machine);
local:// — the path to the Spark executable file inside the Docker image.
Switching to the corresponding OKD project and examining the created pods — https://{OKD-WEBUI-URL}/console/project/{project}/browse/pods.
To simplify the development process, another option can be used where a common base Spark image is created, used by all tasks for execution, and the snapshots of the executable files are published to external storage (for example, Hadoop) and specified during the spark-submit call as a link. In this case, different versions of Spark tasks can be launched without rebuilding Docker images, using for publication, for example, WebHDFS. We send a request to create a file (here {host} is the WebHDFS service host, {port} is the WebHDFS service port, {path-to-file-on-hdfs} is the desired path to the file on HDFS):
curl -i -X PUT "http://{host}:{port}/webhdfs/v1/{path-to-file-on-hdfs}?op=CREATE
In this case, a response of the form will be received (here {location} is the URL that should be used to upload the file):
HTTP/1.1 307 TEMPORARY_REDIRECT
Location: {location}
Content-Length: 0
Uploading the Spark executable file to HDFS (here {path-to-local-file} is the path to the Spark executable file on the current host):
curl -i -X PUT -T {path-to-local-file} "{location}"
After that, we can perform spark-submit using the Spark file uploaded to HDFS (here {class-name} is the name of the class that needs to be executed for the task):
/opt/spark/bin/spark-submit --name spark-test --class {class-name} --conf spark.executor.instances=3 --conf spark.kubernetes.authenticate.driver.serviceAccountName=spark --conf spark.kubernetes.namespace={project} --conf spark.submit.deployMode=cluster --conf spark.kubernetes.container.image={docker-registry-url}/{repo}/{image-name}:{tag} --conf spark.master=k8s://https://{OKD-API-URL} hdfs://{host}:{port}/{path-to-file-on-hdfs}
It should be noted that to access HDFS and ensure the task works, you may need to modify the Dockerfile and the entrypoint.sh script — add a directive in the Dockerfile to copy dependent libraries to the /opt/spark/jars directory and include the HDFS configuration file in SPARK_CLASSPATH in entrypoint.sh.
The second use case is Apache Livy
Next, when the task is developed and the output needs to be tested, a question arises about running it within the CI/CD process and tracking its execution status. Of course, it can be executed using a local spark-submit call, but this complicates the CI/CD infrastructure as it requires installing and configuring Spark on the CI server agents/runners and setting up access to the Kubernetes API. For this case, the chosen implementation targets using Apache Livy as a REST API to launch Spark tasks hosted within the Kubernetes cluster. This allows for launching Spark tasks on the Kubernetes cluster using standard cURL requests, which can be easily implemented in any CI solution, and its placement within the Kubernetes cluster addresses the authentication issue when interacting with the Kubernetes API.
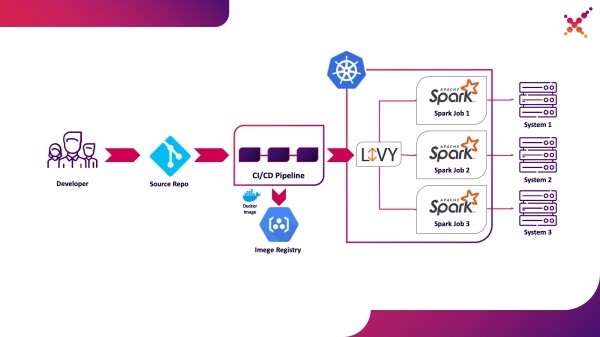
We highlight it as the second use case - launching Spark tasks within the CI/CD process on a Kubernetes cluster in a test environment.
A bit about Apache Livy - it acts as an HTTP server, providing a Web interface and a RESTful API that allows remote execution of spark-submit by passing the required parameters. Traditionally, it was included as part of the HDP distribution, but it can also be deployed in OKD or any other Kubernetes installation using the appropriate manifest and a set of Docker images, for example, this one - . For our case, a similar Docker image was built, which includes Spark version 2.4.5 from the following Dockerfile:
FROM java:8-alpine

ENV SPARK_HOME=/opt/spark
ENV LIVY_HOME=/opt/livy
ENV HADOOP_CONF_DIR=/etc/hadoop/conf
ENV SPARK_USER=spark

WORKDIR /opt

RUN apk add --update openssl wget bash &&
    wget -P /opt https://downloads.apache.org/spark/spark-2.4.5/spark-2.4.5-bin-hadoop2.7.tgz &&
    tar xvzf spark-2.4.5-bin-hadoop2.7.tgz &&
    rm spark-2.4.5-bin-hadoop2.7.tgz &&
    ln -s /opt/spark-2.4.5-bin-hadoop2.7 /opt/spark

RUN wget http://mirror.its.dal.ca/apache/incubator/livy/0.7.0-incubating/apache-livy-0.7.0-incubating-bin.zip &&
    unzip apache-livy-0.7.0-incubating-bin.zip &&
    rm apache-livy-0.7.0-incubating-bin.zip &&
    ln -s /opt/apache-livy-0.7.0-incubating-bin /opt/livy &&
    mkdir /var/log/livy &&
    ln -s /var/log/livy /opt/livy/logs &&
    cp /opt/livy/conf/log4j.properties.template /opt/livy/conf/log4j.properties

ADD livy.conf /opt/livy/conf
ADD spark-defaults.conf /opt/spark/conf/spark-defaults.conf
ADD entrypoint.sh /entrypoint.sh

ENV PATH="/opt/livy/bin:${PATH}"

EXPOSE 8998

ENTRYPOINT ["/entrypoint.sh"]
CMD ["livy-server"]
The created image can be built and uploaded to your existing Docker repository, such as your internal OKD repository. The following manifest is used for its deployment ({registry-url} — Docker image registry URL, {image-name} — Docker image name, {tag} — Docker image tag, {livy-url} — desired URL where the Livy server will be accessible; the "Route" manifest is applied if Red Hat OpenShift is used as the Kubernetes distribution; otherwise, the corresponding Ingress or NodePort type Service manifest is used):
---
apiVersion: apps/v1
kind: Deployment
metadata:
  labels:
    component: livy
  name: livy
spec:
  progressDeadlineSeconds: 600
  replicas: 1
  revisionHistoryLimit: 10
  selector:
    matchLabels:
      component: livy
  strategy:
    rollingUpdate:
      maxSurge: 25%
      maxUnavailable: 25%
    type: RollingUpdate
  template:
    metadata:
      creationTimestamp: null
      labels:
        component: livy
    spec:
      containers:
        - command:
            - livy-server
          env:
            - name: K8S_API_HOST
              value: localhost
            - name: SPARK_KUBERNETES_IMAGE
              value: 'gnut3ll4/spark:v1.0.14'
          image: '{registry-url}/{image-name}:{tag}'
          imagePullPolicy: Always
          name: livy
          ports:
            - containerPort: 8998
              name: livy-rest
              protocol: TCP
          resources: {}
          terminationMessagePath: /dev/termination-log
          terminationMessagePolicy: File
          volumeMounts:
            - mountPath: /var/log/livy
              name: livy-log
            - mountPath: /opt/.livy-sessions/
              name: livy-sessions
            - mountPath: /opt/livy/conf/livy.conf
              name: livy-config
              subPath: livy.conf
            - mountPath: /opt/spark/conf/spark-defaults.conf
              name: spark-config
              subPath: spark-defaults.conf
        - command:
            - /usr/local/bin/kubectl
            - proxy
            - '--port'
            - '8443'
          image: 'gnut3ll4/kubectl-sidecar:latest'
          imagePullPolicy: Always
          name: kubectl
          ports:
            - containerPort: 8443
              name: k8s-api
              protocol: TCP
          resources: {}
          terminationMessagePath: /dev/termination-log
          terminationMessagePolicy: File
      dnsPolicy: ClusterFirst
      restartPolicy: Always
      schedulerName: default-scheduler
      securityContext: {}
      serviceAccount: spark
      serviceAccountName: spark
      terminationGracePeriodSeconds: 30
      volumes:
        - emptyDir: {}
          name: livy-log
        - emptyDir: {}
          name: livy-sessions
        - configMap:
            defaultMode: 420
            items:
              - key: livy.conf
                path: livy.conf
            name: livy-config
          name: livy-config
        - configMap:
            defaultMode: 420
            items:
              - key: spark-defaults.conf
                path: spark-defaults.conf
            name: livy-config
          name: spark-config
---
apiVersion: v1
kind: ConfigMap
metadata:
  name: livy-config
data:
  livy.conf: |-
    livy.spark.deploy-mode=cluster
    livy.file.local-dir-whitelist=/opt/.livy-sessions/
    livy.spark.master=k8s://http://localhost:8443
    livy.server.session.state-retain.sec = 8h
  spark-defaults.conf: 'spark.kubernetes.container.image        "gnut3ll4/spark:v1.0.14"'
---
apiVersion: v1
kind: Service
metadata:
  labels:
    app: livy
  name: livy
spec:
  ports:
    - name: livy-rest
      port: 8998
      protocol: TCP
      targetPort: 8998
  selector:
    component: livy
  sessionAffinity: None
  type: ClusterIP
---
apiVersion: route.openshift.io/v1
kind: Route
metadata:
  labels:
    app: livy
  name: livy
spec:
  host: {livy-url}
  port:
    targetPort: livy-rest
  to:
    kind: Service
    name: livy
    weight: 100
  wildcardPolicy: None
After using it and successfully launching the pod, the Livy graphical interface is available at the link: http://{livy-url}/ui. With Livy, we can publish our Spark job using a REST request, for example, from Postman. An example collection with requests is presented below (in the "args" array, configuration arguments with variables necessary for the running job can be passed):
{
    "info": {
        "_postman_id": "be135198-d2ff-47b6-a33e-0d27b9dba4c8",
        "name": "Spark Livy",
        "schema": "https://schema.getpostman.com/json/collection/v2.1.0/collection.json"
    },
    "item": [
        {
            "name": "1 Submit job with jar",
            "request": {
                "method": "POST",
                "header": [
                    {
                        "key": "Content-Type",
                        "value": "application/json"
                    }
                ],
                "body": {
                    "mode": "raw",
                    "raw": "{nt\"file\": \"local://opt/spark/examples/target/scala-2.11/jars/spark-examples_2.11-2.4.5.jar\", nt\"className\": \"org.apache.spark.examples.SparkPi\",nt\"numExecutors\":1,nt\"name\": \"spark-test-1\",nt\"conf\": {ntt\"spark.jars.ivy\": \"/tmp/.ivy\",ntt\"spark.kubernetes.authenticate.driver.serviceAccountName\": \"spark\",ntt\"spark.kubernetes.namespace\": \"{project}\",ntt\"spark.kubernetes.container.image\": \"{docker-registry-url}/{repo}/{image-name}:{tag}\"nt}n}"
                },
                "url": {
                    "raw": "http://{livy-url}/batches",
                    "protocol": "http",
                    "host": [
                        "{livy-url}"
                    ],
                    "path": [
                        "batches"
                    ]
                }
            },
            "response": []
        },
        {
            "name": "2 Submit job without jar",
            "request": {
                "method": "POST",
                "header": [
                    {
                        "key": "Content-Type",
                        "value": "application/json"
                    }
                ],
                "body": {
                    "mode": "raw",
                    "raw": "{nt\"file\": \"hdfs://{host}:{port}/{path-to-file-on-hdfs}\", nt\"className\": \"{class-name}\",nt\"numExecutors\":1,nt\"name\": \"spark-test-2\",nt\"proxyUser\": \"0\",nt\"conf\": {ntt\"spark.jars.ivy\": \"/tmp/.ivy\",ntt\"spark.kubernetes.authenticate.driver.serviceAccountName\": \"spark\",ntt\"spark.kubernetes.namespace\": \"{project}\",ntt\"spark.kubernetes.container.image\": \"{docker-registry-url}/{repo}/{image-name}:{tag}\"nt},nt\"args\": [ntt\"HADOOP_CONF_DIR=/opt/spark/hadoop-conf\",ntt\"MASTER=k8s://https://kubernetes.default.svc:8443"nt]n}"
                },
                "url": {
                    "raw": "http://{livy-url}/batches",
                    "protocol": "http",
                    "host": [
                        "{livy-url}"
                    ],
                    "path": [
                        "batches"
                    ]
                }
            },
            "response": []
        }
    ],
    "event": [
        {
            "listen": "prerequest",
            "script": {
                "id": "41bea1d0-278c-40c9-ad42-bf2e6268897d",
                "type": "text/javascript",
                "exec": [
                    ""
                ]
            }
        },
        {
            "listen": "test",
            "script": {
                "id": "3cdd7736-a885-4a2d-9668-bd75798f4560",
                "type": "text/javascript",
                "exec": [
                    ""
                ]
            }
        }
    ],
    "protocolProfileBehavior": {}
}
We will perform the first request from the collection, navigate to the OKD interface, and check that the job has started successfully — https://{OKD-WEBUI-URL}/console/project/{project}/browse/pods. At the same time, a session will appear in the Livy interface (http://{livy-url}/ui), where you can monitor the progress of the task and examine the session logs using the Livy API or graphical interface.
Now let's show how Livy works. To do this, we will examine the Livy container logs inside the pod with the Livy server — https://{OKD-WEBUI-URL}/console/project/{project}/browse/pods/{livy-pod-name}?tab=logs. From these logs, it is clear that when the Livy REST API is called, spark-submit is executed in the container named 'livy', similar to what we used earlier (here {livy-pod-name} is the name of the created pod with the Livy server). The collection also presents a second request that allows running tasks with remote placement of the Spark executable file using the Livy server.
The third usage option is the Spark Operator.
Now that the task has been tested, the question arises about its regular execution. The native way to schedule tasks regularly in a Kubernetes cluster is to use a CronJob entity, and it can be used, but currently, the use of operators to manage applications in Kubernetes is gaining significant popularity, and there is a sufficiently mature operator for Spark, which is also used in Enterprise-level solutions (for example, the Lightbend FastData Platform). We recommend using it — the current stable version of Spark (2.4.5) has quite limited capabilities for configuring the execution of Spark tasks in Kubernetes, while the next major version (3.0.0) promises full support for Kubernetes, but the release date remains unknown. The Spark Operator compensates for this limitation by adding important configuration parameters (for example, mounting a ConfigMap with access configuration to Hadoop into the Spark pods) and the ability to schedule task executions.
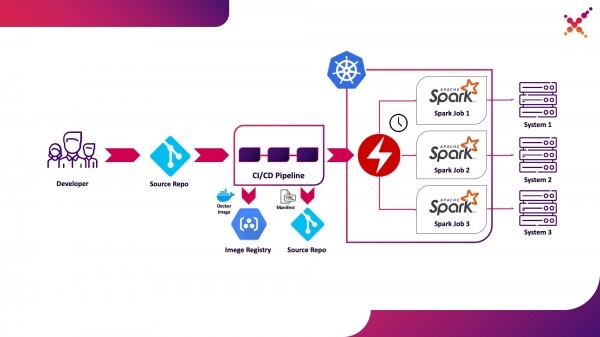
We will highlight it as the third usage option — regular execution of Spark tasks in the Kubernetes cluster in a production environment.
The Spark Operator is open source and is developed within the Google Cloud Platform — . It can be installed in 3 ways:
- As part of the installation of the Lightbend FastData Platform/Cloudflow;
- Using Helm:
helm repo add incubator http://storage.googleapis.com/kubernetes-charts-incubator helm install incubator/sparkoperator --namespace spark-operator - Using manifests from the official repository (https://github.com/GoogleCloudPlatform/spark-on-k8s-operator/tree/master/manifest). It is important to note that Cloudflow includes an operator with API version v1beta1. If this type of installation is used, the descriptions of the Spark application manifests should be based on examples from the tags in Git with the corresponding API version, for example, 'v1beta1-0.9.0-2.4.0'. The operator version can be found in the CRD description that is part of the operator in the 'versions' dictionary:
oc get crd sparkapplications.sparkoperator.k8s.io -o yaml
If the operator is installed correctly, an active pod with the Spark operator will appear in the corresponding project (for example, cloudflow-fdp-sparkoperator in the Cloudflow namespace for the Cloudflow installation) and a corresponding resource type named 'sparkapplications' will be available. The existing Spark applications can be explored using the following command:
oc get sparkapplications -n {project}
To run tasks using the Spark Operator, three things are required:
- create a Docker image that includes all necessary libraries, as well as configuration and executable files. In the target scenario, this is an image created during the CI/CD stage and tested on the test cluster;
- publish the Docker image to a registry accessible from the Kubernetes cluster;
- form a manifest with the type 'SparkApplication' and a description of the task to be executed. Examples of manifests are available in the official repository (for example, ). It is important to note the following key points regarding the manifest:
- the 'apiVersion' field must specify the API version corresponding to the operator version;
- the 'metadata.namespace' field must indicate the namespace in which the application will be deployed;
- the 'spec.image' field must specify the address of the created Docker image in the accessible registry;
- the 'spec.mainClass' field must specify the Spark task class that should be executed when the process starts;
- the 'spec.mainApplicationFile' field must specify the path to the executable jar file;
- the 'spec.sparkVersion' field must specify the version of Spark being used;
- the 'spec.driver.serviceAccount' field must specify the service account within the relevant Kubernetes namespace that will be used to run the application;
- the 'spec.executor' field must specify the amount of resources allocated to the application;
- In the dictionary "spec.volumeMounts", a local directory must be specified where the local Spark task files will be created.
An example of manifest creation (where {spark-service-account} is the service account within the Kubernetes cluster for running Spark tasks):
apiVersion: "sparkoperator.k8s.io/v1beta1"
kind: SparkApplication
metadata:
  name: spark-pi
  namespace: {project}
spec:
  type: Scala
  mode: cluster
  image: "gcr.io/spark-operator/spark:v2.4.0"
  imagePullPolicy: Always
  mainClass: org.apache.spark.examples.SparkPi
  mainApplicationFile: "local:///opt/spark/examples/jars/spark-examples_2.11-2.4.0.jar"
  sparkVersion: "2.4.0"
  restartPolicy:
    type: Never
  volumes:
    - name: "test-volume"
      hostPath:
        path: "/tmp"
        type: Directory
  driver:
    cores: 0.1
    coreLimit: "200m"
    memory: "512m"
    labels:
      version: 2.4.0
    serviceAccount: {spark-service-account}
    volumeMounts:
      - name: "test-volume"
        mountPath: "/tmp"
  executor:
    cores: 1
    instances: 1
    memory: "512m"
    labels:
      version: 2.4.0
    volumeMounts:
      - name: "test-volume"
        mountPath: "/tmp"
This manifest specifies a service account, for which necessary role bindings must be created before publishing the manifest, granting the required access rights for the Spark application to interact with the Kubernetes API (if needed). In our case, the application requires permissions to create Pods. Let’s create the necessary role binding:
oc adm policy add-role-to-user edit system:serviceaccount:{project}:{spark-service-account} -n {project}
It is also noteworthy that the specification of this manifest can include the "hadoopConfigMap" parameter, which allows specifying a ConfigMap with Hadoop configuration without the need to place the corresponding file in the Docker image beforehand. It is also suitable for regularly scheduled tasks — using the "schedule" parameter, a schedule for this task can be specified.
After that, we save our manifest in the file spark-pi.yaml and apply it to our Kubernetes cluster:
oc apply -f spark-pi.yaml
This will create an object of type "sparkapplications":
oc get sparkapplications -n {project}
> NAME       AGE
> spark-pi   22h
A pod with the application will be created, the status of which will be displayed in the created "sparkapplications". It can be viewed with the following command:
oc get sparkapplications spark-pi -o yaml -n {project}
Upon task completion, the POD will change to "Completed" status, which will also be updated in "sparkapplications". The application logs can be viewed in the browser or using the following command (where {sparkapplications-pod-name} is the name of the pod running the task):
oc logs {sparkapplications-pod-name} -n {project}
Task management in Spark can also be performed using the specialized utility sparkctl. To install it, clone the repository with its source code, install Go, and build this utility:
git clone https://github.com/GoogleCloudPlatform/spark-on-k8s-operator.git
cd spark-on-k8s-operator/
wget https://dl.google.com/go/go1.13.3.linux-amd64.tar.gz
tar -xzf go1.13.3.linux-amd64.tar.gz
sudo mv go /usr/local
mkdir $HOME/Projects
export GOROOT=/usr/local/go
export GOPATH=$HOME/Projects
export PATH=$GOPATH/bin:$GOROOT/bin:$PATH
go -version
cd sparkctl
go build -o sparkctl
sudo mv sparkctl /usr/local/bin
Let's examine the list of running Spark tasks:
sparkctl list -n {project}
We'll create a specification for the Spark task:
vi spark-app.yaml
apiVersion: "sparkoperator.k8s.io/v1beta1"
kind: SparkApplication
metadata:
  name: spark-pi
  namespace: {project}
spec:
  type: Scala
  mode: cluster
  image: "gcr.io/spark-operator/spark:v2.4.0"
  imagePullPolicy: Always
  mainClass: org.apache.spark.examples.SparkPi
  mainApplicationFile: "local:///opt/spark/examples/jars/spark-examples_2.11-2.4.0.jar"
  sparkVersion: "2.4.0"
  restartPolicy:
    type: Never
  volumes:
    - name: "test-volume"
      hostPath:
        path: "/tmp"
        type: Directory
  driver:
    cores: 1
    coreLimit: "1000m"
    memory: "512m"
    labels:
      version: 2.4.0
    serviceAccount: spark
    volumeMounts:
      - name: "test-volume"
        mountPath: "/tmp"
  executor:
    cores: 1
    instances: 1
    memory: "512m"
    labels:
      version: 2.4.0
    volumeMounts:
      - name: "test-volume"
        mountPath: "/tmp"
Let's start the described task using sparkctl:
sparkctl create spark-app.yaml -n {project}
Let's examine the list of running Spark tasks:
sparkctl list -n {project}
Let's review the list of events for the running Spark task:
sparkctl event spark-pi -n {project} -f
Let's check the status of the running Spark task:
sparkctl status spark-pi -n {project}
In conclusion, let's consider the disadvantages observed while using the current stable version of Spark (2.4.5) on Kubernetes:
- The first and perhaps the main drawback is the lack of Data Locality. Despite all the shortcomings, YARN had its advantages, such as the principle of data delivery to the code (instead of code to the data). This allowed Spark tasks to run on nodes where the relevant data was located, significantly reducing the time spent on data delivery over the network. With Kubernetes, we face the necessity of transferring the data involved in the task over the network. If this data is sufficiently large, the execution time of the task can increase significantly, and a considerable amount of disk space will be required for Spark task instances to temporarily store this data. This drawback can be mitigated by using specialized software solutions that ensure data locality in Kubernetes (such as Alluxio), but this effectively means the need to maintain a complete copy of the data on the nodes of the Kubernetes cluster.
- The second significant drawback is security. By default, the security-related functions regarding the execution of Spark tasks are disabled, and the option to use Kerberos is not covered in the official documentation (although the relevant parameters appeared in version 3.0.0, which will require further development), and in the security documentation for Spark (https://spark.apache.org/docs/2.4.5/security.html), the only key store options mentioned are YARN, Mesos, and Standalone Cluster. Additionally, the user under which the Spark tasks run cannot be specified directly—we can only set a service account under which the job will run, and the user is chosen based on the configured security policies. Consequently, either the root user is used, which is not safe in a production environment, or a user with a random UID is employed, which is inconvenient for managing data access rights (this can be resolved by creating PodSecurityPolicies and binding them to the appropriate service accounts). Currently, the solution involves either placing all necessary files directly in the Docker image or modifying the Spark startup script to use the secret storage and retrieval mechanism adopted in your organization.
- Running Spark jobs with Kubernetes is still officially in experimental mode, and significant changes to the artifacts used (configuration files, base Docker images, and launch scripts) may occur in the future. Indeed, during the preparation of this material, versions 2.3.0 and 2.4.5 were tested, and their behavior differed significantly.
We look forward to updates — a new version of Spark (3.0.0) has recently been released, bringing substantial changes to Spark's operation on Kubernetes while maintaining the experimental status of support for this resource manager. Future updates may indeed allow for a full recommendation to abandon YARN and run Spark jobs on Kubernetes without worrying about your system's security and without the need for independent modifications to functional components.
Fin.
Source: habr.com
