

This article's translation was prepared in anticipation of the course launch

Load balancing is a common solution for horizontally scaling web applications across multiple hosts while providing users with a single access point to the service. is one of the most popular open-source load balancing programs, which also ensures high availability and proxying functionality.
HAProxy aims to optimize resource utilization, maximize throughput, minimize response times, and avoid overloading any individual resource. It can be installed on a variety of Linux distributions, such as CentOS 8, which we will focus on in this guide, as well as on systems and .
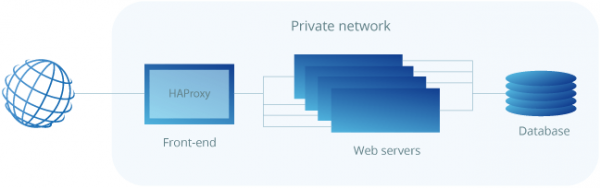
HAProxy is particularly suitable for websites with very high traffic and is often used to enhance the reliability and performance of web service configurations with multiple servers. This guide outlines the steps to set up HAProxy as a load balancer on a CentOS 8 cloud host, which then directs traffic to your web servers.
As a prerequisite for achieving the best results, you should have at least two web servers and a load balancing server. The web servers should have at least a basic web service running, such as nginx or httpd, to verify load balancing between them.
Installing HAProxy on CentOS 8
Due to HAProxy being a rapidly evolving open-source application, the version available in the standard CentOS repositories may not be the latest. To check the current version, run the following command:
sudo yum info haproxyHAProxy always offers three stable versions to choose from: the two most recent supported versions and a third, older one that still receives critical updates. You can always check the latest stable version listed on the HAProxy website and then decide which version you want to work with.
In this guide, we will install the latest stable version 2.0, which was not available in the standard repositories at the time of writing this guide. You will need to install it from the source. But first, ensure that you meet the necessary prerequisites for downloading and compiling the program.
sudo yum install gcc pcre-devel tar make -yDownload the source code using the command below. You can check if a newer version is available at .
wget http://www.haproxy.org/download/2.0/src/haproxy-2.0.7.tar.gz -O ~/haproxy.tar.gzOnce the download is complete, extract the files using the command below:
tar xzvf ~/haproxy.tar.gz -C ~/Navigate to the extracted source directory:
cd ~/haproxy-2.0.7Then compile the program for your system:
make TARGET=linux-glibcAnd finally, install HAProxy itself:
sudo make installHAProxy is now installed, but it requires some additional configurations to work. Let’s continue setting up the software and services below.
Configuring HAProxy for your server
Now add the following directories and statistics file for HAProxy records:
sudo mkdir -p /etc/haproxy
sudo mkdir -p /var/lib/haproxy
sudo touch /var/lib/haproxy/stats
Create a symbolic link for the binary files, so you can run HAProxy commands as a regular user:
sudo ln -s /usr/local/sbin/haproxy /usr/sbin/haproxyIf you want to add the proxy server to the system as a service, copy the haproxy.init file from examples to your /etc/init.d directory. Edit the file permissions so that the script is executable, and then reload the systemd daemon:
sudo cp ~/haproxy-2.0.7/examples/haproxy.init /etc/init.d/haproxy
sudo chmod 755 /etc/init.d/haproxy
sudo systemctl daemon-reload
You also need to enable the service to start automatically on system startup:
sudo chkconfig haproxy onFor convenience, it is also recommended to add a new user to run HAProxy:
sudo useradd -r haproxyAfter this, you can check the installed version number again with the following command:
haproxy -v
HA-Proxy version 2.0.7 2019/09/27 - https://haproxy.org/
In our case, the version should be 2.0.7, as shown in the output example above.
Finally, the firewall in CentOS 8 is quite restrictive by default for this project. Use the following commands to allow the necessary services and reload the firewall:
sudo firewall-cmd --permanent --zone=public --add-service=http
sudo firewall-cmd --permanent --zone=public --add-port=8181/tcp
sudo firewall-cmd --reload
Load Balancer Configuration
Configuring HAProxy is a relatively straightforward process. Essentially, all you need to do is tell HAProxy which connections it should listen to and where to route them.
This is done by creating a configuration file at /etc/haproxy/haproxy.cfg with the defining settings. You can read about the HAProxy configuration options , if you want to learn more about it.
Layer 4 Load Balancing
Let’s start with a basic setup. Create a new configuration file, for example, using vi with the command below:
sudo vi /etc/haproxy/haproxy.cfgAdd the following sections to the file. Replace server_name with what should be calling your servers on the stats page, and private_ip with the private IP addresses of the servers to which you want to direct web traffic. You can check the private IP addresses and on the tab Private Network in the menu. Network.
global
   log /dev/log local0
   log /dev/log local1 notice
   chroot /var/lib/haproxy
   stats timeout 30s
   user haproxy
   group haproxy
   daemon

defaults
   log global
   mode http
   option httplog
   option dontlognull
   timeout connect 5000
   timeout client 50000
   timeout server 50000

frontend http_front
   bind *:80
   stats uri /haproxy?stats
   default_backend http_back

backend http_back
   balance roundrobin
   server server_name1 private_ip1:80 check
   server server_name2 private_ip2:80 check
This defines a layer 4 load balancer with the external name http_front listening on port 80, which then directs traffic to the default backend named http_back. The additional stats /haproxy?stats connects the stats page at the specified address.
Various Load Balancing Algorithms.
Specifying servers in the backend section allows HAProxy to use these servers for load balancing based on the round-robin algorithm when possible.
Load balancing algorithms are used to determine which backend server each connection is sent to. Here are some useful options:
- Roundrobin: each server is used in turn according to its weight. This is the smoothest and fairest algorithm when processing times across servers remain evenly distributed. This algorithm is dynamic, allowing for server weight adjustment on the fly.
- Leastconn: The server with the lowest number of connections is selected. A round-robin method is executed among servers with equal load. It is recommended to use this algorithm for long sessions, such as LDAP, SQL, TSE, etc., but it is not very suitable for short sessions like HTTP.
- First: The first server with available slots for connections gets the connection. Servers are selected from the lowest numerical identifier to the highest, which by default corresponds to the server's position in the farm. Once a server reaches the maxconn value, the next server is used.
- Source: The source IP address is hashed and divided by the total weight of the running servers to determine which server will receive the request. Thus, the same client IP address will always be routed to the same server while the servers remain unchanged.
Setting up load balancing at the application level (layer 7)
Another option available is to set up the load balancer to operate at the application level (layer 7), which is useful when parts of your web application are located on different hosts. This can be achieved by regulating the connection forwarding, for instance, by URL.
Open the HAProxy configuration file with a text editor:
sudo vi /etc/haproxy/haproxy.cfgThen configure the frontend and backend segments according to the example below:
frontend http_front
   bind *:80
   stats uri /haproxy?stats
   acl url_blog path_beg /blog
   use_backend blog_back if url_blog
   default_backend http_back

backend http_back
   balance roundrobin
   server server_name1 private_ip1:80 check
   server server_name2 private_ip2:80 check

backend blog_back
   server server_name3 private_ip3:80 check
The frontend declares an ACL rule named url_blog, which applies to all connections with paths starting with /blog. use_backend specifies that connections matching the url_blog condition should be served by the backend named blog_back, while all other requests are handled by the default backend.
On the backend side, the configuration establishes two server groups: http_back, as before, and a new one called blog_back, which serves connections to example.com/blog.
After modifying the settings, save the file and restart HAProxy with the following command:
sudo systemctl restart haproxyIf you received any warnings or error messages when starting, check the configuration for them and ensure that you have created all necessary files and folders, then try restarting again.
Testing the Configuration
Once HAProxy is configured and running, open the public IP address of the load balancer in your browser and verify if you are correctly connected to the backend. The stats uri parameter in the configuration creates a statistics page at the specified address.
http://load_balancer_public_ip/haproxy?statsWhen you load the statistics page, if all your servers are displayed in green, the setup was successful!
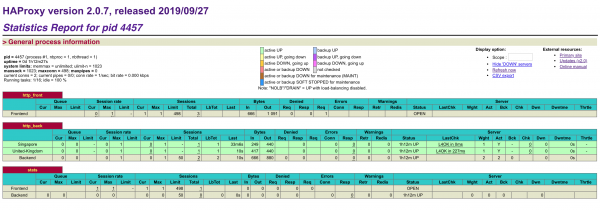
The statistics page contains useful information for tracking your web hosts, including uptime/downtime and session counts. If a server is marked red, ensure that the server is up and that you can ping it from the load balancer machine.
If your load balancer is unresponsive, ensure that HTTP connections are not blocked by a firewall. Also, verify that HAProxy is running using the command below:
sudo systemctl status haproxyProtecting the Statistics Page with a Password
However, if the statistics page is simply exposed at the frontend, it is open for public viewing, which may not be a good idea. Instead, you can assign it its own port number by adding the example below to the end of your haproxy.cfg file. Replace username and password with something secure:
listen stats
   bind *:8181
   stats enable
   stats uri /
   stats realm Haproxy Statistics
   stats auth username:password
After adding the new listener group, remove the old reference to stats uri from the frontend group. When finished, save the file and restart HAProxy.
sudo systemctl restart haproxyThen reopen the load balancer with the new port number and log in with the username and password you specified in the configuration file.
http://load_balancer_public_ip:8181Ensure that all your servers are still displayed in green, and then open only the IP of the load balancer without any port numbers in your browser.
http://load_balancer_public_ip/If there is any variety of target pages on your internal servers, you will notice that every time you refresh the page, you receive a response from a different host. You can try different load balancing algorithms in the configuration section or check out the .
Conclusion: HAProxy Load Balancer
Congratulations on successfully setting up your HAProxy load balancer! Even with a basic load balancing setup, you can significantly improve the performance and availability of your web application. This guide is only an introduction to load balancing with HAProxy, which is capable of much more than can be described in a brief setup instruction. We recommend experimenting with various configurations using , available for HAProxy, and then proceed to plan load balancing for your production environment.
Using multiple hosts to safeguard your web service with extra capacity, the load balancer itself can still present a single point of failure. You can further enhance high availability by setting up a floating IP among several load balancers. You can learn more about this in our .
Learn more about the course ***
Source: habr.com
