


Do you love GitLab and hate errors? Want to improve the quality of your source code? Then you're in the right place. Today, we'll explain how to configure the C# analyzer PVS-Studio to check merge requests. Wishing everyone a unicorn mood and pleasant reading.
is a tool for identifying errors and potential vulnerabilities in the source code of programs written in C, C++, C#, and Java. It works on 64-bit systems running Windows, Linux, and macOS. It can analyze code intended for 32-bit, 64-bit, and embedded ARM platforms.
By the way, we have released PVS-Studio 7.08, in which we made a lot of interesting updates. . For example:
- C# analyzer for Linux and macOS;
- plugin for Rider;
- new mode for checking file lists.
File list checking mode
Previously, to check specific files, you had to provide the analyzer with an .xml file containing the list of files. But since that wasn't very convenient, we added the ability to pass a .txt file, which greatly simplifies things.
To check specific files, you need to specify the flag --sourceFiles (-f) and provide a .txt file with the list of files. It looks like this:
pvs-studio-dotnet -t path/to/solution.sln -f fileList.txt -o project.jsonIf you're interested in setting up checks for commits or pull requests, you can also do this using this mode. The difference will be in obtaining the list of files for analysis, depending on the systems you are using.
The principle for checking merge requests
The main idea of the check is to ensure that issues detected by the analyzer do not end up in the master branch. Also, we don't want to analyze the entire project every time. Moreover, when merging branches, we have a list of modified files. Therefore, I propose adding a check for merge requests.
Here's what a merge request looks like before implementing the static analyzer:
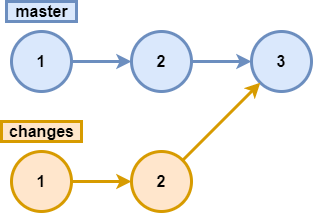
That is, all the errors that were in the branch changes, will move to the master branch. Since we would prefer to avoid that, we add the analysis, and now the process looks as follows:
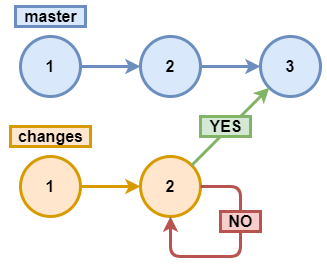
We analyze changes2 and if there are no errors, we accept the merge request; otherwise, we reject it.
By the way, if you are interested in analyzing commits and pull requests for C/C++, you can read about it .
GitLab
— a web-based DevOps lifecycle tool with open-source code, providing a code repository management system for Git with its own wiki, bug tracking system, CI/CD pipeline, and other features.
Before starting the implementation of the merge request analysis, you need to register and upload your project. If you don't know how to do this, I suggest my colleague.
NoteThe method described below for setting up the environment is just one of the possible approaches. The goal is to demonstrate the steps required to set up the environment for analysis and launch the analyzer. It might be more optimal in your case to separate the stages of preparing the environment (adding repositories, installing the analyzer) and analysis: for instance, preparing Docker images with the necessary environment and using them, or some other method.
To better understand what will be happening now, I suggest taking a look at the following diagram:
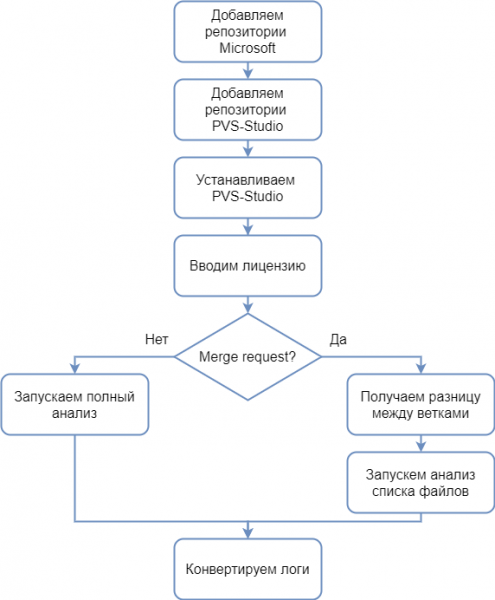
The analyzer requires .NET Core SDK 3, so before installing the analyzer, you need to add the Microsoft repositories from which the dependencies necessary for the analyzer will be installed. Adding Microsoft repositories for various Linux distributions .
To install PVS-Studio via a package manager, you also need to add the PVS-Studio repositories. Adding repositories for various distributions is described in more detail in .
To operate, the analyzer requires a license key. You can obtain a trial license from the .
NotePlease note that for the described mode of operation (analyzing merge requests), an Enterprise license is required. Therefore, if you wish to try this mode of operation, don't forget to specify in the "Message" field that you need an Enterprise license.
If a merge request occurs, we will need to analyze only the list of changed files; otherwise, we analyze all files. After the analysis, we need to convert the logs into the format we need.
Now, having the algorithm in front of us, we can proceed to writing the script. To do this, you need to modify the file .gitlab-ci.yml or, if it does not exist, create it. To create it, click on the name of your project -> Set up CI/CD.
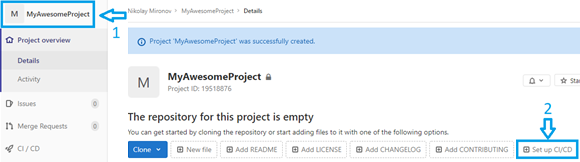
Now we are ready to write the script. Let's first write the code that will install the analyzer and input the license:
before_script:
  - apt-get update && apt-get -y install wget gnupg

  - apt-get -y install git
  - wget https://packages.microsoft.com/config/debian/10/
packages-microsoft-prod.deb -O packages-microsoft-prod.deb
  - dpkg -i packages-microsoft-prod.deb
  - apt-get update
  - apt-get install apt-transport-https
  - apt-get update

  - wget -q -O - https://files.viva64.com/etc/pubkey.txt | apt-key add -
  - wget -O /etc/apt/sources.list.d/viva64.list
https://files.viva64.com/etc/viva64.list
  - apt-get update
  - apt-get -y install pvs-studio-dotnet

  - pvs-studio-analyzer credentials $PVS_NAME $PVS_KEY
  - dotnet restore "$CI_PROJECT_DIR"/Test/Test.sln
Since the installation and activation must occur before all other scripts, we use a special label before_script. Let me explain this fragment a bit.
Preparing for the analyzer installation:
  - wget https://packages.microsoft.com/config/debian/10/
packages-microsoft-prod.deb -O packages-microsoft-prod.deb
  - dpkg -i packages-microsoft-prod.deb
  - apt-get update
  - apt-get install apt-transport-https
  - apt-get update
Adding PVS-Studio repositories and the analyzer:
  - wget -q -O - https://files.viva64.com/etc/pubkey.txt | apt-key add -
  - wget -O /etc/apt/sources.list.d/viva64.list
https://files.viva64.com/etc/viva64.list
  - apt-get update
  - apt-get -y install pvs-studio-dotnet
Activating the license:
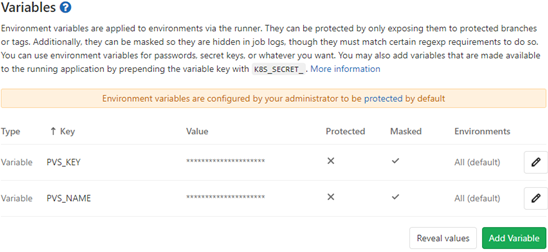
- pvs-studio-analyzer credentials $PVS_NAME $PVS_KEY$PVS_NAME — username.
$PVS_KEY — product key.
Restoring project dependencies, where $CI_PROJECT_DIR – the full path to the project directory:
- dotnet restore "$CI_PROJECT_DIR"/Path/To/Solution.slnFor correct analysis, the project must build successfully, and its dependencies must be restored (for instance, the necessary NuGet packages should be downloaded).
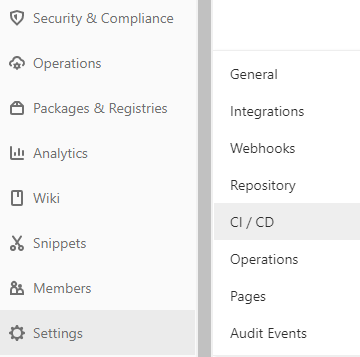
You can set the environment variables containing the license information by clicking on Setting, and then on CI / CD.
In the opened window, find the item Variables, then click the button on the right labeled Expand and add the variables. The result should look like this:
Now you can proceed to the analysis. First, let's add the script for a full analysis. In the flag -t we pass the path to the solution; in the flag -o we specify the path to the file where the analysis results will be recorded. We're also interested in the return code. In this case, we want the job to stop when the return code indicates warnings were issued during the analysis. This is how this fragment looks:
job:
  script:
  - exit_code=0
  - pvs-studio-dotnet -t "$CI_PROJECT_DIR"/Test/Test.sln -o
PVS-Studio.json || exit_code=$?
  - exit_code=$((($exit_code & 8)/8))
  - if [[ $exit_code == 1 ]]; then exit 1; else exit 0; fi
Return codes work on the principle of a bitmask. For example, if warnings were issued as a result of the analysis, the return code will be 8. If the license expires within a month, the return code will be 4. If errors were found during the analysis and the license expires within a month, both values will be combined in the return code: we add the numbers together to get the final return code — 8+4=12. Thus, by checking the relevant bits, we can obtain information about various states during the analysis. Return codes are described in more detail in the section "Return codes pvs-studio-dotnet (Linux / macOS)" of the document.".
In this case, we are interested in all return codes where 8 appears.
- exit_code=$((($exit_code & 8)/8))We will get 1 when the return code contains the bit of interest, otherwise, we will get 0.
It's time to add merge request analysis. Before doing this, we need to prepare a place for the script. We need it to execute only when a merge request occurs. It looks like this:
merge:
  script:
  only:
  - merge_requests
Let's move on to the script itself. I encountered the issue that the virtual machine knows nothing about origin/master. So we give it a bit of help:
- git fetch originNow we will get the branch differences and save the result in txt file:
- git diff --name-only origin/master $CI_COMMIT_SHA > pvs-fl.txtWhere $CI_COMMIT_SHA – the hash of the latest commit.
Next, we run the analysis of the file list, using the flag -f. We pass the previously obtained .txt file to it. And similarly to the full analysis, we check the return codes:
  - exit_code=0
  - pvs-studio-dotnet -t "$CI_PROJECT_DIR"/Test/Test.sln -f
pvs-fl.txt -o PVS-Studio.json || exit_code=$?
  - exit_code=$((($exit_code & 8)/8))
  - if [[ $exit_code == 1 ]]; then exit 1; else exit 0; fi
The complete script for checking the merge request will look like this:
merge:
  script:
  - git fetch origin
  - git diff --name-only origin/master $CI_COMMIT_SHA > pvs-fl.txt
  - exit_code=0
  - pvs-studio-dotnet -t "$CI_PROJECT_DIR"/Test/Test.sln -f
pvs-fl.txt -o PVS-Studio.json || exit_code=$?
  - exit_code=$((($exit_code & 8)/8))
  - if [[ $exit_code == 1 ]]; then exit 1; else exit 0; fi
  only:
  - merge_requests
We just need to add log conversion after all scripts have run. We'll use the label after_script and the utility plog-converter:
after_script:
  - plog-converter -t html -o eLog ./PVS-Studio.json
Utility is an open-source project used to convert parser error reports into various formats, such as HTML. More detailed information about the utility can be found in the section "Plog Converter Utility" .
By the way, if you want to conveniently work with the .json report locally from the IDE, I suggest our for Rider IDE. More details on its usage are described in .
For convenience, here is .gitlab-ci.yml in full:
image: debian

before_script:
  - apt-get update && apt-get -y install wget gnupg

  - apt-get -y install git
  - wget https://packages.microsoft.com/config/debian/10/
packages-microsoft-prod.deb -O packages-microsoft-prod.deb
  - dpkg -i packages-microsoft-prod.deb
  - apt-get update
  - apt-get install apt-transport-https
  - apt-get update

  - wget -q -O - https://files.viva64.com/etc/pubkey.txt | apt-key add -
  - wget -O /etc/apt/sources.list.d/viva64.list
https://files.viva64.com/etc/viva64.list
  - apt-get update
  - apt-get -y install pvs-studio-dotnet

  - pvs-studio-analyzer credentials $PVS_NAME $PVS_KEY
  - dotnet restore "$CI_PROJECT_DIR"/Test/Test.sln

merge:
  script:
  - git fetch origin
  - git diff --name-only origin/master $CI_COMMIT_SHA > pvs-fl.txt
  - exit_code=0
  - pvs-studio-dotnet -t "$CI_PROJECT_DIR"/Test/Test.sln -f
pvs-fl.txt -o PVS-Studio.json || exit_code=$?
  - exit_code=$((($exit_code & 8)/8))
  - if [[ $exit_code == 1 ]]; then exit 1; else exit 0; fi
  only:
  - merge_requests

job:
  script:
  - exit_code=0
  - pvs-studio-dotnet -t "$CI_PROJECT_DIR"/Test/Test.sln -o
PVS-Studio.json || exit_code=$?
  - exit_code=$((($exit_code & 8)/8))
  - if [[ $exit_code == 1 ]]; then exit 1; else exit 0; fi

after_script:
  - plog-converter -t html -o eLog ./PVS-Studio.json
Once you've added everything to the file, click on Commit changes. To check that everything is correct, go to CI/CD -> Pipelines -> Running. A virtual machine window will open, at the end of which the following should be displayed:
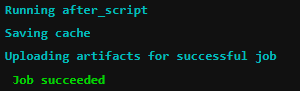
You should see Job succeeded – success, everything is perfect. Now you can test what you've done.
Examples of operation
As an example, we will create a simple project (in master) which will have several files. After that, in a different branch, we will change only one file and try to make a merge request.
Let's consider two cases: when the modified file contains an error and when it does not. First, an example with an error.
Suppose the master branch has a file Program.cs, which contains no errors, while in another branch the developer added erroneous code and wants to make a merge request. What exact error he made is not so important; the main thing is that it exists. For example, he forgot the operator throw (yes, ):
void MyAwesomeMethod(String name)
{
  if (name == null)
    new ArgumentNullException(....);
  // do something
  ....
}
Let's look at the analysis result of the example with the error. Also, to ensure that only one file was analyzed, I added the flag -r to the launch line pvs-studio-dotnet:
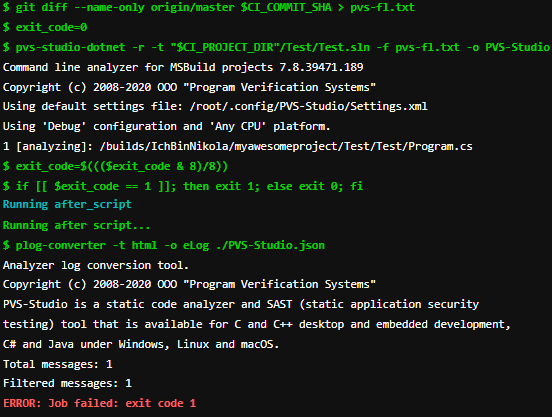
We see that the analyzer found an error and did not allow merging the branches.
Now let's check the example without an error. We correct the code:
void MyAwesomeMethod(String name)
{
  if (name == null)
    throw new ArgumentNullException(....);
  // do something
  ....
}
Results of the merge request analysis:
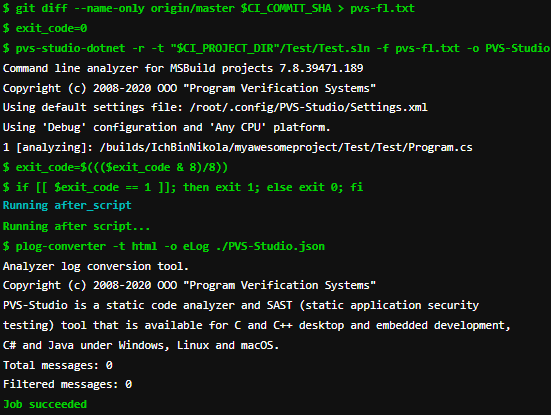
As we can see, no errors were found, and the task execution was successful, which is what we wanted to check.
Conclusion
Eliminating bad code before merging branches is very convenient and pleasant. Therefore, if you use CI/CD, try to integrate a static analyzer for verification. Moreover, it's quite simple to do.
Thank you for your attention.
If you want to share this article with an English-speaking audience, please use the link to the translation: Nikolay Mironov. .
Source: habr.com
