

Using Istio+Kiali for Running and Visualizing Canary Deployments

Articles in this series
- (this article)
- Canary Deployment Using Jenkins-X Istio Flagger
Canary Deployment
We hope you have read , where we briefly explained what Canary deployments are and showed how to implement them using standard Kubernetes resources.
Istio
And we assume that as you read this article, you already know what Istio is. If not, you can read about it .
Test Application
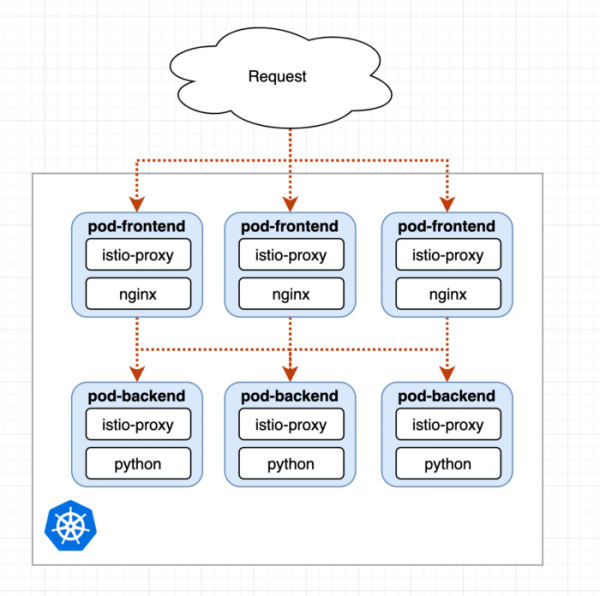
Each pod contains two containers: our application and istio-proxy.
We will use a simple test application with frontend-nginx and backend pods on Python. The nginx pod will simply redirect each request to the backend pod and act as a proxy. Details can be seen in the following yaml files:
Running the Test Application Independently
If you want to follow my example and use this test application on your own, see .
Initial Deployment
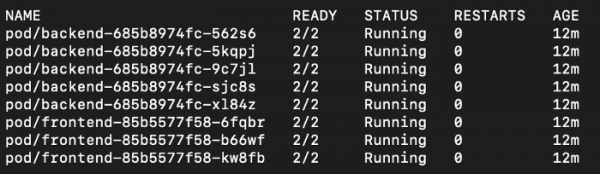
When launching the first Deployment, we see that our application pods have only 2 containers each, meaning the Istio sidecar is just being injected:
And we also see the Istio Gateway Loadbalancer in the namespace istio-system:

Creating Traffic
We will use the following IP to generate traffic that will be accepted by the frontend pods and redirected to the backend pods:
while true; do curl -s --resolve 'frontend.istio-test:80:35.242.202.152' frontend.istio-test; sleep 0.1; done
We will also add frontend.istio-test to our hosts file.
Viewing Mesh Through Kiali
We have installed the test application and Istio along with Tracing, Grafana, Prometheus, and Kiali (see more in ). Therefore, we can access Kiali via:
istioctl dashboard kiali # admin:admin
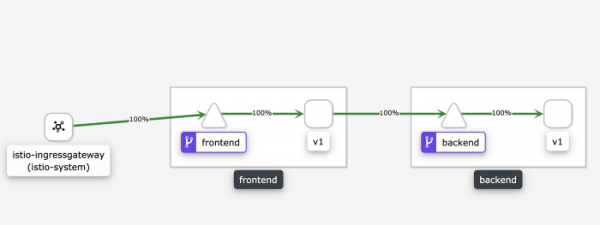
Kiali Visualizes Current Traffic Through the Mesh
As we can see, 100% of the traffic goes to the frontend service, then to the frontend pod with label v1, since we are using a simple nginx proxy that redirects requests to the backend service, which in turn redirects them to the backend pods with label v1.
Kiali works great with Istio and provides a ready-made solution for visualizing the Mesh. Simply excellent.
Canary Deployment
Our backend already has two k8s deployments, one for v1 and one for v2. Now we just need to instruct Istio to redirect a specific percentage of requests to v2.
Step 1: 10%
And all we need to do is adjust the weight of the VirtualService in :
apiVersion: networking.istio.io/v1alpha3
kind: VirtualService
metadata:
  name: backend
  namespace: default
spec:
  gateways: []
  hosts:
  - "backend.default.svc.cluster.local"
  http:
  - match:
    - {}
    route:
    - destination:
        host: backend.default.svc.cluster.local
        subset: v1
        port:
          number: 80
      weight: 90
    - destination:
        host: backend.default.svc.cluster.local
        subset: v2
        port:
          number: 80
weight: 10 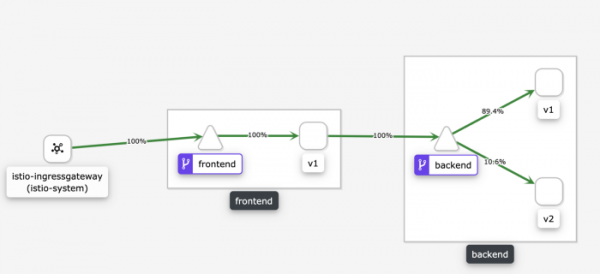
We see that 10% of the requests are routed to v2.
Step 2: 50%
Now it's sufficient to increase it to 50:
apiVersion: networking.istio.io/v1alpha3
kind: VirtualService
metadata:
  name: backend
  namespace: default
spec:
...
    - destination:
        host: backend.default.svc.cluster.local
        subset: v1
        port:
          number: 80
      weight: 50
    - destination:
        host: backend.default.svc.cluster.local
        subset: v2
        port:
          number: 80
weight: 50 
Step 3: 100%
Now the Canary deployment can be considered complete and all traffic is routed to v2:
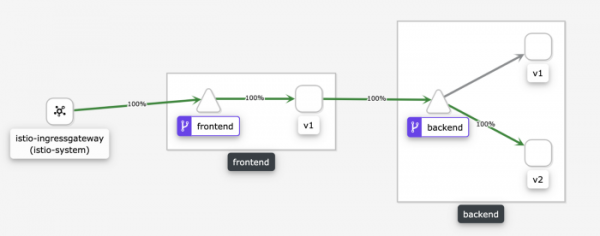
Testing Canary manually
Suppose we are currently sending 10% of all requests to v2 on the backend. What if we want to manually test v2 to ensure everything is functioning as expected?
We can add a specific matching rule based on HTTP headers:
apiVersion: networking.istio.io/v1alpha3
kind: VirtualService
metadata:
  name: backend
  namespace: default
spec:
  gateways: []
  hosts:
  - "backend.default.svc.cluster.local"
  http:
  - match:
    - headers:
        canary:
          exact: "canary-tester"
    route:
    - destination:
        host: backend.default.svc.cluster.local
        subset: v2
        port:
          number: 80
      weight: 100
  - match:
    - {}
    route:
    - destination:
        host: backend.default.svc.cluster.local
        subset: v1
        port:
          number: 80
      weight: 90
    - destination:
        host: backend.default.svc.cluster.local
        subset: v2
        port:
          number: 80
      weight: 10
Now using curl we can force a request to v2 by sending the header:

Requests without the header will still be governed by the 1/10 ratio:
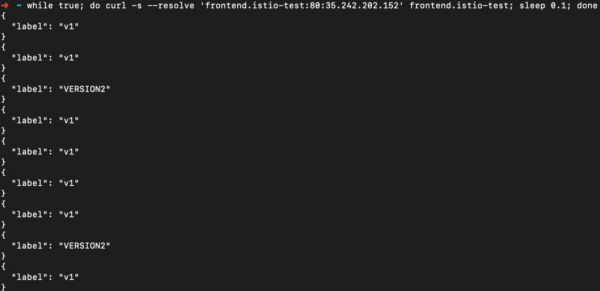
Canary for two dependent versions
Now let's consider a case where we have version v2 for both frontend and backend. For both, we specified that 10% of the traffic should go to v2:
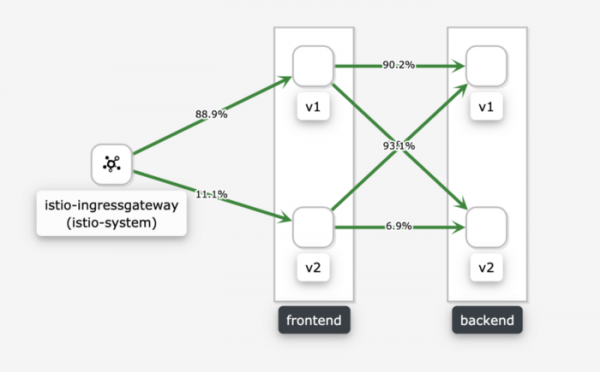
We see that both frontend v1 and v2 are routing traffic in a 1/10 ratio to both backend v1 and v2.
What if we needed to route traffic from frontend-v2 only to backend-v2, because it is not compatible with v1? For this, we will set a 1/10 ratio for the frontend, which controls which traffic gets to backend-v2 using matching by sourceLabels :
apiVersion: networking.istio.io/v1alpha3
kind: VirtualService
metadata:
  name: backend
  namespace: default
spec:
  gateways: []
  hosts:
  - "backend.default.svc.cluster.local"
  http:
...
  - match:
    - sourceLabels:
        app: frontend
        version: v2
    route:
    - destination:
        host: backend.default.svc.cluster.local
        subset: v2
        port:
          number: 80
      weight: 100
As a result, we get what we need:
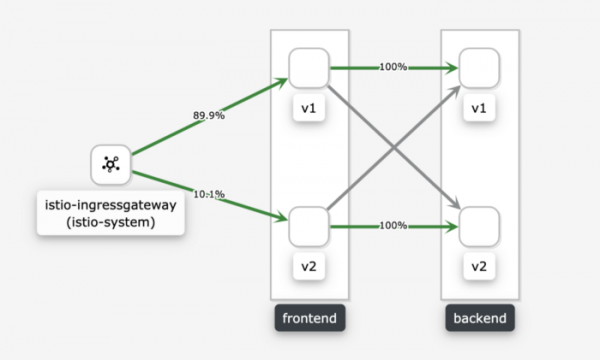
Differences from the manual Canary approach
In the first part we performed a manual Canary deployment, also using two k8s deployments. There, we managed the traffic ratio by adjusting the number of replicas. This approach works, but has significant drawbacks.
Istio allows you to define the traffic ratio regardless of the number of replicas. This means, for example, that we can use HPAs (Horizontal Pod Autoscalers) and it doesn't need to be configured based on the current state of the Canary deployment.
Summary
Istio works great and using it together with Kiali gives us a very powerful combination. Next on my list of interests is the combination of Spinnaker with Istio for automation and Canary analytics.
Source: habr.com
