

You've learned Git commands, but do you want to understand how continuous integration (CI) happens in reality? Or perhaps you want to optimize your daily activities? This course will provide you with practical skills in continuous integration using a repository on GitHub. This course is not designed as a wizard that you can simply click through; rather, you will perform the same actions that people actually do at work, in the same way they do them. I will explain the theory as you progress through the relevant steps.
What will we do?
As we move forward, we’ll gradually create a list of typical CI steps, which is a great way to memorize this list. In other words, we will compile a list of actions that developers take while performing continuous integration. We will also use a simple set of tests to bring our CI process closer to reality.
This GIF schematically shows commits in your repository as you progress through the course. As you can see, it’s nothing complicated, only the essentials.
You will go through standard CI scenarios:
- Working on a feature;
- Applying automated tests to ensure quality;
- Implementing a priority task;
- Resolving a merge conflict;
- Encountering an error in a production environment.
What will you learn?
You will be able to answer the following questions:
- What is continuous integration (CI)?
- What types of automated tests are used in CI, and what actions trigger them?
- What is a pull request and when are they needed?
- What is test-driven development (TDD) and how does it relate to CI?
- Should you merge or rebase changes?
- Should you roll back or fix in the next version?
At first, I translated terms like 'pull request' everywhere, but eventually decided to revert some phrases to English to reduce the madness in the text. I will sometimes use a mix of jargon, like the delightful verb 'to commit,' where people actually use it at work.
What is continuous integration?
Continuous integration, or CI, is a technical practice where each team member integrates their code into a shared repository at least once a day, and the resulting code must compile without errors.
There are differing interpretations of this term.
The point of contention is the frequency of integration. Some argue that merging code just once a day is not enough and that true integration should be continuous. For example, a team might take fresh code in the morning and integrate once in the evening. While this is a reasonable objection, it is generally considered that a definition of "once a day" is practical, specific, and suitable for teams of various sizes.
Another argument is that C++ is no longer the only language used during development, and the simple requirement of compiling without errors as a form of validation is weak. A certain set of tests (e.g., unit tests, run locally) should also successfully complete. Currently, the community leans towards making such a requirement mandatory, and in the future, "build + unit tests" will likely become standard practice, if it hasn’t already.
Continuous integration differs from continuous delivery (Continuous Delivery, CD) in that it does not require a release candidate after each integration cycle.
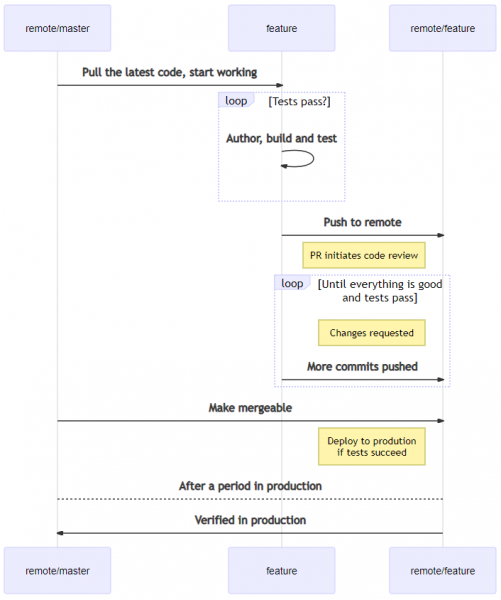
The list of steps that we will use throughout the course
- Pull in the latest code. Create a branch from
master. Start working. - Create commits on your new branch. Build and test locally. Pass? Go to the next step. Fail? Fix errors or tests and try again.
- Push to your remote repository or remote branch.
- Create a pull request. Discuss the changes, add more commits as the discussion continues. Make tests pass on the feature branch.
- Merge/rebase commits from master. Make tests pass on the merge result.
- Deploy from the feature branch to production.
- If everything is good in production for some period of time, merge changes to master.
️ Preparation
Ensure you have the required software
To complete this course, you will need and .
You can use any Git client, but I will provide commands only for the command line.
Make sure you have a command line supported Git client installed.
If you don’t have a command line supported Git client installed yet, you can find installation instructions .
Prepare the repository.
You will need to create a personal copy (fork) of on GitHub. Let’s agree to call this personal copy the course repository..
Did you do it? If you haven't changed the default settings, your course repository is likely named continuous-integration-team-scenarios-students, it is located in your GitHub account, and the URL looks like
https://github.com//continuous-integration-team-scenarios-studentsI will refer to this address simply as <URL репозитория>.
Angle brackets like
<тут>will indicate that you should replace that expression with the corresponding value.
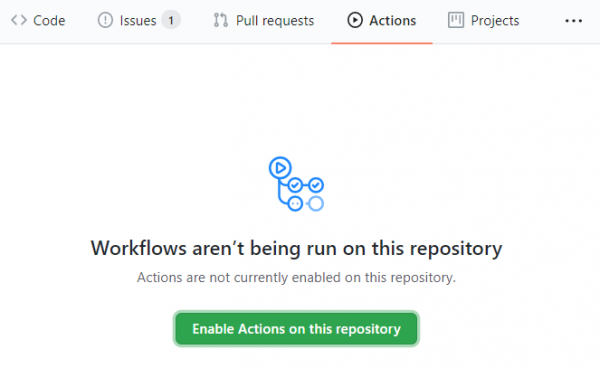
Make sure that GitHub actions are enabled for this course repository. If they are not enabled, please turn them on by clicking the large button in the middle of the page, which you can access by clicking Actions in the GitHub interface.
You will not be able to complete the course by following my instructions if GitHub Actions are not enabled.
You can always use GitHub's ability to display Markdown to see the current status of the list we are compiling here
https://github.com//continuous-integration-team-scenarios-students/blob/master/ci.mdAbout responses
Although the best way to complete this course is to do everything hands-on, you may face some difficulties.
If you feel that you do not understand what to do and cannot continue, you can check the branch solution, which exists in your starter repository.
Please do not perform merges solution downward API support (simultaneously with this in master during the course. You can use this branch to figure out what to do or to compare your code with the author's using all the capabilities that Git provides us. If you are completely lost, you can fully replace your branch master with the branch solution and then reset your working directory to the step of the course that you need.
Use this only if you really need to
Commit your code
git add .
git commit -m "Backing up my work"
These commands
- rename
masterdownward API support (simultaneously with this inmaster-backup; - rename
solutiondownward API support (simultaneously with this inmaster; - switch to a new branch
masterand rewrite the contents of the working directory; - create a branch "solution" from "master" (which was previously "solution") in case you need the "solution" branch in the future.
git branch -m master master-backup
git branch -m solution master
git checkout master -f
git branch solution
After these actions, you can use git log master to find out which commit you need.
You can reset your working directory to this commit as follows:
git reset --hardIf you are satisfied with the result, at some point you will need to publish your repository version to a remote repository. Be sure to specify the remote branch clearly when doing this.
git push --force origin masterPlease note that we use git push --force. You probably won't want to do this often, but we have a very specific scenario with one repository user who also knows what he is doing.
Starting working
Let's start compiling our list of CI steps. Usually, you start this step by fetching the latest version of the code from the remote repository, but we don't have a local repository yet, so instead, we will clone it from the remote.
️ Task: update the local repository, create a branch from master, start working
- Clone the course repository from
<URL репозитория>. - Run
npm installin the course repository directory; this is required for installing Jest, which we use to run tests. - Create a branch and name it
feature. Switch to this branch. Add test code in
ci.test.jsbetween comments requesting this.it('1. pull latest code', () => { expect(/.*pull.*/ig.test(fileContents)).toBe(true); }); it('2. add commits', () => { expect(/.*commit.*/ig.test(fileContents)).toBe(true); }); it('3. push to the remote branch with the same name', () => { expect(/.*push.*/ig.test(fileContents)).toBe(true); }); it('4. create a pull request and continue working', () => { expect(/.*pulls+request.*/ig.test(fileContents)).toBe(true); });- Add the text with the first 4 steps to the file
ci.md.1. Pull in the latest code. Create a branch from `master`. Start working. 2. Create commits on your new branch. Build and test locally. Pass? Go to the next step. Fail? Fix errors or tests and try again. 3. Push to your remote repository or remote branch. 4. Create a pull request. Discuss the changes, add more commits as discussion continues. Make tests pass on the feature branch.Commands
# Клонируйте репозиторий курса
git clone <repository URL>
cd <repository name>

# Выполните npm install в каталоге репозитория курса; он установит Jest, который мы используем для запуска тестов.
npm install

# Создайте ветку и назовите ее feature. Переключитесь на эту в ветку.
git checkout -b feature

# Отредактируйте ci.test.js как описано выше.
# Отредактируйте ci.md как описано выше
Make commits on your new branch, build, and test locally.
We are going to set up tests to run before commits, and then commit the code.
Common scenarios when tests run automatically
- Locally:
- Continuously or in response to relevant code changes;
- On save (for interpreted or JIT-compiled languages);
- During build (when compilation is required);
- On commit;
- On publishing to a shared repository.
- On the build server or in the build environment:
- When code is published to a personal branch/repository.
- Code is tested in this branch.
- The potential merge outcome is tested (usually with
master). - As a step in the continuous integration / continuous delivery pipeline
Typically, the faster a set of tests runs, the more often you can afford to execute it. A typical stage distribution might look like this.
- Fast unit tests — at build time, in the CI pipeline
- Slow unit tests, fast component and integration tests — at commit time, in the CI pipeline
- Slow component and integration tests — in the CI pipeline
- Security testing, load testing, and other lengthy or costly tests — in CI/CD pipelines, but only in certain modes/stages/build pipelines, such as when preparing a release candidate or running manually.
️ Task
I suggest first running the tests manually using the command npm test. After that, let's add a git hook to run our tests on commit. There’s one catch: Git hooks are not considered part of the repository and therefore cannot be cloned from GitHub along with the other course materials. To set up the hook, you need to run install_hook.sh or copy the file repo/hooks/pre-commit to the local directory .git/hooks/.
On commit, you will see that tests are running, and they check for the presence of certain keywords in the list.
- Run the tests manually by executing the command
npm testin your course repository folder. Make sure the tests were completed. - Set up the commit hook (pre-commit hook) by running
install_hook.sh. - Commit changes to the local repository.
- Ensure that tests run before a commit.
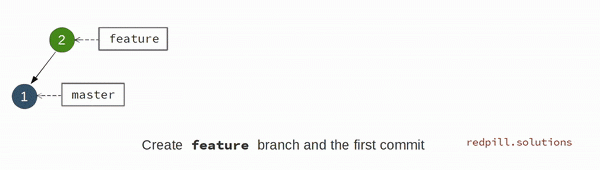
Your repository should look like this after completing these actions.
Commands
# Установите pre-commit hook выполнив install_hook.sh.

# Закоммитьте изменения в локальный репозиторий. Используйте "Add first CI steps" в качестве сообщения при коммите.
git add ci.md ci.test.js
git commit -m "Add first CI steps"

# Убедитесь, что тесты запускаются перед коммитом.
Publish the code to a remote repository or remote branch
Once developers finish working locally, they typically make their code public so it can eventually be integrated with the main codebase. With GitHub, this is usually achieved by publishing work either in a personal copy of the repository (personal fork) or in a personal branch.
- When using forks, a developer clones a remote shared repository, creating their own personal remote copy, also known as a fork. After that, they clone this personal repository to work on it locally. When the work is complete and commits are made, they push them to their fork, where they are available to others and can be integrated into the shared repository. This approach is commonly used in open source projects on GitHub. It is also used in my advanced course [Team Work and CI with Git].).
- Another approach is to use only one remote repository and consider only the branch
masterof the shared repository as "protected." In this scenario, individual developers publish their code to branches of the remote repository so others can review it, and if everything is fine, merge it withmasterthe shared repository.
In this specific course, we will use a workflow that utilizes branches.
Let's publish our code.
️ Task
- Publish changes to the remote branch with the same name as your working branch
Commands
git push --set-upstream origin featureCreate a pull request
Create a pull request titled Steps review. Set feature as "head branch" and master as "base branch."
Make sure you set
masterin your fork of the repository as the "base branch," I will not respond to requests for changes in the course materials repository.
In GitHub slang, the "base branch" is the branch on which you base your work, while the "head branch" is the branch containing the proposed changes.
Discuss the changes, add new commits as the discussion continues.
A pull request (PR)
A pull request (PR) is a way to discuss and document code, as well as conduct code review. Pull requests are named after the general method of integrating individual changes into the main code. Typically, a person clones the project's official remote repository and works on the code locally. After that, they place the code in their personal remote repository and ask the maintainers of the official repository to pullpull) their code into their local repositories, where they review it and possibly integratemerge) it. This concept is also known by other names, such as merge request..
In fact, you don't necessarily have to use the pull request feature of GitHub or similar platforms. Development teams can use other forms of communication, including face-to-face conversations, voice calls, or emails, but there are still several reasons to use pull requests in a discussion forum style. Here are some of them:
- organized discussions related to specific code changes;
- as a venue for reviewing feedback on unfinished work from both automated tests and colleagues;
- formalization of code reviews;
- so that later you can determine the reasons and considerations behind a particular piece of code.
Typically, you create a pull request when you need to discuss something or get feedback. For example, if you're working on a feature that can be implemented in several ways, you might create a request for changes even before writing the first line of code to share your ideas and discuss your plans with co-authors. If the work is simpler, a pull request is opened after something has been completed, fixed, and can be discussed. In some scenarios, you might open a PR only for quality control purposes: to run automated tests or initiate a code review. Whatever you decide, remember to @mention the people whose approval you need in your pull request.
Usually, when creating a PR, you do the following.
- Specify what you are proposing to change and where.
- Write a description explaining the purpose of the changes. You might want to:
- add something important that isn't obvious from the code, or something helpful for understanding the context, such as relevant #bugs and commit numbers;
- @mention everyone you want to collaborate with, or you can @mention them in comments later;
- ask colleagues to help with something or to review something specific.
After you open a PR, tests that are set up to run in such cases are executed. In our case, this will be the same set of tests that we ran locally, but in a real project, there may be additional tests and checks.
Please wait while the tests finish. You can see the status of the tests at the bottom of the PR discussion in the GitHub interface. Continue when the tests are complete.
️ Add a note about the arbitrary nature of the CI steps list.
The list used in this course is arbitrary and subjective; we should add a note about this.
️ Task: create a pull request for this remark.
- Switch to the branch.
master. - Create a branch named
bugfix.. - Add the remark text to the end of the file.
ci.md.> **GitHub flow** is sometimes used as a nickname to refer to a flavor of trunk-based development when code is deployed straight from feature branches. This list is just an interpretation that I use in my [DevOps courses](http://redpill.solutions). The official tutorial is [here](https://guides.github.com/introduction/flow/). - Commit the changes.
- Push the branch
bugfix.to the remote repository. - Create a pull request named Adding a remark. with the main branch.
bugfix.and the base branch.master.
Make sure you set
masterin your fork of the repository as the "base branch," I will not respond to requests for changes in the course materials repository.
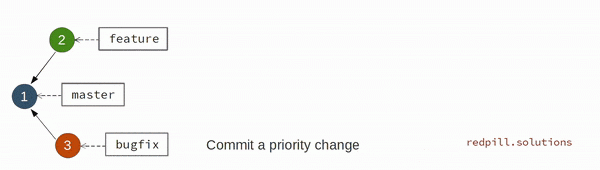
Here's how your repository should look.
Commands
# Переключитесь на ветку master. Создайте ветку bugfix.
git checkout master

# Создайте ветку bugfix-remark.
git checkout -b bugfix

# Добавьте текст примечания внизу ci.md.

# Закоммитьте изменения
git add ci.md
git commit -m "Add a remark about the list being opinionated"

# Опубликуйте ветку bugfix в удалённый репозиторий.
git push --set-upstream origin bugfix

# Создайте pull request при помощи интерфейса GitHub как описано выше
Approve the pull request "Adding a remark."
️ Task
- Create a pull request.
- Click "Merge pull request."
- Click "Confirm merge."
- Click "Delete branch," we no longer need it.
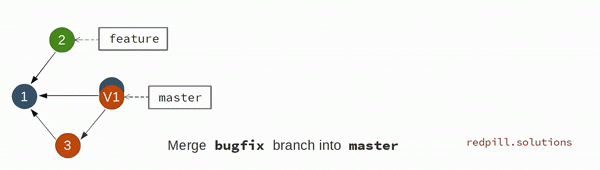
This is the commit diagram after the merge.
️ Continue working and adding tests.
Collaborating on a pull request often leads to the need for additional work. Typically, this results from code review or discussions, but in our course, we will simulate this by adding new items to our CI steps list.
Continuous integration typically involves some test coverage. Test coverage requirements vary and are usually found in a document titled something like "contribution guidelines." We'll keep it simple and add one test for each item in our checklist.
When tackling assignments, first try to commit the tests. If you have set up the pre-commit hook correctly, the newly added test will run, fail, and nothing will be committed. Note: this is how we learn that our tests actually check something. Interestingly, if we had started with code before tests, passing tests could mean either that the code works as expected or that the tests are actually checking nothing. Furthermore, had we not written tests in the first place, we might have forgotten them altogether, as nothing would remind us.
Test-Driven Development (TDD)
TDD recommends writing tests before the code. A typical workflow using TDD looks like this.
- Add a test.
- Run all tests and ensure that the new test does not pass successfully.
- Write the code.
- Run the tests, ensuring that all tests pass successfully.
- Refactor the code.
- Repeat.
Since the results of tests that did not pass are usually displayed in red, and those that pass are displayed in green, this cycle is also known as "red-green-refactor."
️ Task
First, try committing the tests and let them finish unsuccessfully, then add and commit the actual CI step list text. You will see that the tests pass ("green").
Then publish the new code to the remote repository and check how the tests are running in the GitHub interface at the bottom of the pull request discussion, and the PR status updates.
- Switch to the branch.
feature. Add these tests to
ci.test.jsafter the last callit (...);.it('5. Merge/rebase commits from master. Make tests pass on the merge result.', () => { expect(/.*merge.*commits.*tests+pass.*/ig.test(fileContents)).toBe(true); }); it('6. Deploy from the feature branch to production.', () => { expect(/.*Deploy.*to+production.*/ig.test(fileContents)).toBe(true); }); it('7. If everything is good in production for some period of time, merge changes to master.', () => { expect(/.*merge.*to+master.*/ig.test(fileContents)).toBe(true); });- Try to commit the tests. If
pre-committhe hook is set up, the commit attempt will fail. - After that, add this text to
ci.md.5. Merge/rebase commits from master. Make tests pass on the merge result. 6. Deploy from the feature branch with a sneaky bug to production. 7. If everything is good in production for some period of time, merge changes to master. - Make and commit the changes locally.
- Publish the changes to the branch
feature.
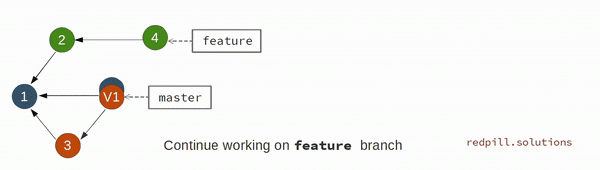
Now you should have something like this
Commands
# Переключительна ветку feature
git checkout feature

# Добавить тесты в ci.test.js как описано выше

# Добавьте в индекс ci.test.js чтобы позже закоммитить
git add ci.test.js

# Попытайтесь закоммитить тесты. Если pre-commit hook установлены, коммит не произойдёт.
git commit

# Теперь добавьте текст в ci.md как описано выше

# Внесите изменения и закоммитьте их
git add ci.md
git commit -m "Add the remaining CI steps"

# Опубликуйте изменения в ветку feature
git push
Merge conflict
Go to the pull request Steps review.
Although we haven’t done anything wrong, and the tests for our code have passed successfully, we still cannot merge the branch. feature and master. This is because another branch bugfix. has been merged with master while we were working on this PR.
This creates a situation where the remote branch master has a newer version than the one we based our branch on. feature. Because of this, we cannot simply roll back HEAD master to the end of the branch. feature. In this situation, we need to either merge or apply commits feature on top of (rebase). masterGitHub can actually perform automatic merges if there are no conflicts. Unfortunately, in our case, both branches have competing changes in the file. ci.mdThis situation is known as a merge conflict, and we need to resolve it manually.
Merge or rebase
Merge
- Creates an additional merge commit and preserves the history.
- Keeps the original commits of the branches with their original timestamps and authors.
- Preserves the SHA of the commits and references them in the discussions of pull requests.
- Requires one-time resolution of conflicts.
- Makes the history nonlinear.
- The history can be hard to read due to the numerous branches (resembling an IDE cable).
- Complicates automated debugging, for example, makes
git bisectless useful – it will only find the merge commit.
Rebase
- Replays commits from the current branch onto the base one by one.
- New commits are created with new SHAs, causing commits on GitHub to correspond with the original pull requests, but not with the corresponding comments.
- Commits can be rebased and altered in the process or even merged into one.
- Multiple conflicts may need to be resolved.
- Allows for maintaining a linear history.
- The history may be easier to read, provided it isn’t too long without good reason.
- Automated debugging and troubleshooting are somewhat easier: it makes possible
git bisectand may make automatic rollbacks clearer and more predictable.
- Requires publishing the branch with moved commits with the flag
--forcewhen using with pull requests.
Typically, teams agree to always use the same strategy when they need to merge changes. This can be 'clean' merging or 'clean' applying of commits on top or something in between, such as performing the application of commits in an interactive mode (git rebase -i) locally for branches not published in a common repository, but merging for 'public' branches.
Here we will use merging.
️ Task
- Ensure that the code in the local branch
masteris updated from the remote repository. - Switch to the branch.
feature. - Initiate the merge with the branch
master. A merge conflict will be reported related to competing changes inci.md. - Resolve the conflict so that both our CI steps list and the note about it remain in the text.
- Publish the merge commit to the remote branch
feature. - Check the status of the pull request in the GitHub user interface, and wait until the merge is resolved.
Commands
# Убедитесь, что код в локальное ветке `master` обновлён из удалённого репозитория.
git checkout master
git pull

# Переключитесь на ветку feature
git checkout feature

# Инициируйте слияние с веткой master
git merge master

# A merge conflict related to concurrent changes to ci.md will be reported
# => Auto-merging ci.md
#    CONFLICT (content): Merge conflict in ci.md
#    Automatic merge failed; fix conflicts and then commit the result.

# Разрешите конфликт так, чтобы и наш список шагов CI, и замечание о нем остались в тексте.
# отредактируйте ci.md чтоб он не содержал маркеров конфликта слияния
git add ci.md
git merge --continue
# при коммите можете оставить сообщение по умолчанию

# Опубликуйте коммит слияния в удаленную ветку feature.
git push

# Проверьте статус запроса на изменения в пользовательском интерфейсе GitHub, дождитесь пока слияние не будет разрешено.
Great job!
You have completed work on the list and now need to approve the pull request in master.
️ Task: Approve the pull request "Steps review"
- Open the pull request.
- Click "Merge pull request."
- Click "Confirm merge."
- Click "Delete branch" since we no longer need it.
This is your repository at the moment
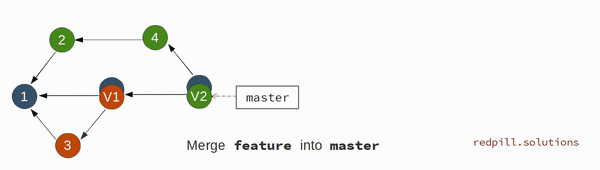
Error in production
It is said that "testing can show the presence of bugs, but never their absence." Even though we had tests and they showed no errors, a sneaky bug crept into production.
In such a scenario, we need to take care of:
- what is deployed in production;
- the code in the branch
masterwith the bug, from which developers can start new work.
Rollback or fix in the next release?
"Rolling back" is deploying a known good earlier version into the production environment and reverting commits that contain the bug. "Fixing forward" is adding a fix to master and deploying a new version as soon as possible. Since APIs and database schemas change as code is deployed into the production environment, with continuous delivery and good test coverage, rolling back is generally much more complex and riskier than fixing in the next version.
Since rolling back carries no risk in our case, we will go this route, as it allows us to
- fix the error in production as soon as possible;
- make the code in
masterimmediately suitable for starting new work.
️ Task
- Switch to the branch.
masterlocally. - Update the local repository from the remote repository.
- Revert the merge commit of the PR Steps review downward API support (simultaneously with this in
master. - Publish the changes to the remote repository.
This is the history of the repository with the reverted merge commit
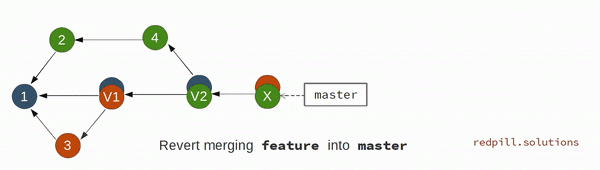
Commands
# Переключитесь на ветку master.
git checkout master

# Обновите локальный репозиторий из удалённого репозитория.
git pull

# Отмените коммит слияния PR Steps review в master.
# Мы отменяем коммит слияния, поэтому нам нужно выбрать ветку истории, которую мы захотим оставить
git show HEAD

# предположим, что коммит, который был последним в ветке master до слияния, был отображён предыдущей командой первым
git revert HEAD -m 1
# можете не менять сообщения коммитов

# Опубликуйте изменения в удалённый репозиторий
git push
️ Self-check
Ensure that ci.md no longer contains the text "sneaky bug" after reverting the merge commit.
Fix the CI steps list and return it to master
We have completely reverted the merge commit of the branch feature. The good news is that we no longer have the bug in masterThe bad news is that our precious continuous integration checklist has disappeared. So ideally, we need to apply the fix to the commits from feature and bring them back to master along with the fix.
We can approach the task in different ways:
- revert the commit that undoes the merge
featurewithmaster; - carry the commits from the former
feature.
Different development teams use different approaches in this case; we will move the useful commits to a separate branch and create a separate pull request for this new branch.
️ Task
- Create a branch named
feature-fixand switch to it. Transfer all commits from the former branch
featureto the new branch. Resolve any merge conflicts that arise during the transfer.
Add a regression test in
ci.test.js:it('does not contain the sneaky bug', () => { expect( /.*sneakys+bug.*\/gi.test(fileContents)).toBe(false); });- Run the tests locally to ensure they do not fail.
- Remove the text " with a sneaky bug" in
ci.md. - Stage the changes to the tests and the changes to the checklist, and commit them.
- Publish the branch to the remote repository.
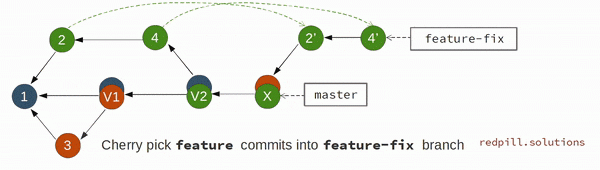
You should end up with something like
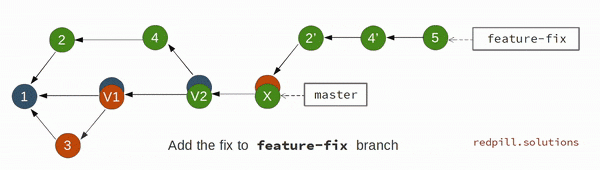
Commands
# Создайте ветку под названием feature-fix и переключитесь на нее.
git checkout -b feature-fix

# Перенесите все коммиты из бывшей ветки feature в новую ветку. Разрешите конфликты слияния, которые возникли при переносе.
# используйте историю чтобы узнать хэши коммитов:
# - предшествующего коммиту с первой частью списка: C0
# - добавляющего последние элементы списка: C2
git log --oneline --graph
git cherry-pick C0..C2
# разрешите конфликты слияния
# - отредактируйте ci.md и/или ci.test.js
# - добавьте файлы в индекс
# - выполните "git cherry-pick --continue", можете не менять сообщение коммита

# Добавьте регрессионный тест в ci.test.js
# Запустите тесты локально, чтобы убедиться, что они не завершаются успешно.

# Удалите текст " with a sneaky bug" в ci.md.

# Добавьте в индекс изменения тестов и в списке шагов и закоммитьте их.
git add ci.md ci.test.js
git commit -m "Fix the bug in steps list"

# Опубликуйте ветку в удалённый репозиторий.
git push --set-upstream origin feature-fix
Create a pull request.
Create a pull request titled Fixing the feature. Set feature-fix as your "head branch," and master as "base branch."
Please wait for the tests to finish. You can see the test status at the bottom of the PR discussion.
Make sure you set
masterin your fork of the repository as the "base branch," I will not respond to requests for changes in the course materials repository.
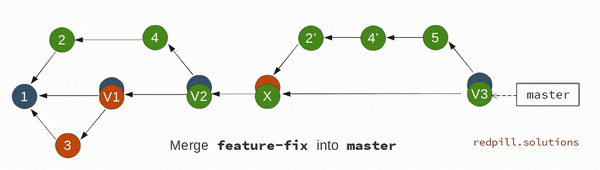
Approve the pull request "Fixing the feature"
Thank you for the fix! Please approve the changes in master from the pull request.
️ Task
- Click "Merge pull request."
- Click "Confirm merge."
- Click "Delete branch" since we no longer need it.
This is what you should have at the moment
Congratulations!
You have completed all the steps that people usually take in the continuous integration process.
If you notice any issues with the course or know how to improve it, create an issue in . This course also has an using GitHub Learning Lab as the platform.
Source: habr.com
