

In the beginning, there was a technology called BPF. We took a look at it in , the Old Testament article of this series. In 2013, thanks to the efforts of Alexei Starovoitov and Daniel Borkman, an enhanced version was developed and included in the Linux kernel, optimized for modern 64-bit machines. This new technology was briefly named Internal BPF, then it was renamed Extended BPF, and now, after a few years, everyone simply refers to it as BPF.
Roughly speaking, BPF allows users to run arbitrary code in the Linux kernel space, and the new architecture proved to be so successful that we will need at least a dozen more articles to cover all its applications. (The only thing the developers, as you can see in the image below, failed to create is a decent logo.)
This article describes the structure of the BPF virtual machine, kernel interfaces for working with BPF, development tools, as well as a brief, very brief, overview of existing capabilities, i.e., everything we will need for a deeper exploration of practical BPF applications.
Summary of the article
First, we will take a bird's-eye view of the BPF architecture and outline the main components.
Now that we have a general understanding of the architecture, we will describe the structure of the BPF virtual machine.
In this section, we will take a closer look at the lifecycle of BPF objects — programs and maps.
Having some understanding of the system, we will finally see how to create and manage objects from user space using a special system call — bpf(2).
It is certainly possible to write programs using the system call, but it is difficult. For a more realistic scenario, a library was developed by kernel programmers called libbpf. We will create the simplest skeleton of a BPF application, which we will use in subsequent examples.
Here we will learn how BPF programs can access kernel helper functions — a tool that, along with maps, fundamentally expands the capabilities of the new BPF compared to the classic version.
By this point, we will know enough to understand how to create programs that use maps. We'll even get a glimpse of the mighty verifier.
A reference section on how to compile the necessary utilities and the kernel for experiments.
At the end of the article, those who read this far will find some motivational words and a brief description of what will be covered in future articles. We will also list some links for self-study for those who do not wish or are unable to wait for the continuation.
Introduction to BPF architecture
Before we start examining the BPF architecture, we will once again refer to , which was developed in response to the emergence of RISC machines and addressed the issue of effective packet filtering. The architecture turned out so successful that, born in the tumultuous nineties in Berkeley UNIX, it was ported to most existing operating systems, survived into the crazy twenties, and continues to find new applications.
The new BPF was developed in response to the widespread adoption of 64-bit machines, cloud services, and increasing demands for tools to create SDN (Software-defined networking). Developed by kernel network engineers as an enhanced replacement for classic BPF, the new BPF found applications in the challenging task of tracing Linux systems just six months after its introduction, and now, six years later, we will need an entire subsequent article just to list the different types of programs.
Fun Pictures
At its core, BPF is a sandbox virtual machine that allows the execution of arbitrary code in kernel space without compromising security. BPF programs are created in user space, loaded into the kernel, and attached to some event source. An event can be, for example, the delivery of a packet to a network interface or the invocation of a kernel function, etc. In the case of a packet, the BPF program will have access to the packet data and metadata (for reading and possibly writing, depending on the program type), and in the case of a kernel function invocation — the function arguments, including pointers to kernel memory, etc.
Let's take a closer look at this process. To begin with, we'll discuss the first difference from classic BPF, whose programs were written in assembly language. In the new version, the architecture has been enhanced so that programs can be written in high-level languages, primarily in C. For this purpose, a backend for llvm was developed, which allows generating bytecode for the BPF architecture.

The BPF architecture was developed, in part, to execute efficiently on modern machines. For this to work in practice, the BPF bytecode, after being loaded into the kernel, is translated into native code using a component called the JIT compiler (Just In Time). Moreover, if you recall, in classic BPF, a program was loaded into the kernel and attached to an event source atomically — in the context of a single system call. In the new architecture, this occurs in two stages: first, the code is loaded into the kernel via a system call bpf(2), and then, later, through other mechanisms that vary depending on the program type, the program attaches to the event source.
Here the reader may wonder: was that possible? How is the security of such code execution guaranteed? The safety of execution is guaranteed by the BPF program loading stage known as the verifier (in English, this stage is called the verifier and I will continue to use the English term):
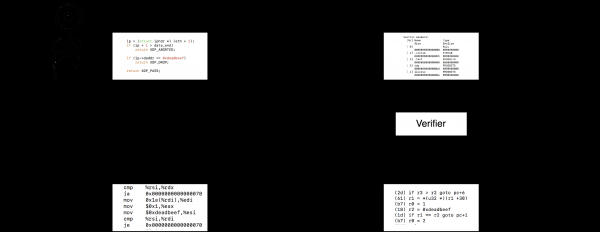
Verifier is a static analyzer that ensures a program does not disrupt the normal operation of the kernel. This, by the way, does not mean that a program cannot interfere with the system's operation — BPF programs, depending on their type, can read and rewrite parts of kernel memory, modify return values of functions, trim, augment, rewrite, and even forward network packets. The Verifier guarantees that the execution of a BPF program will not cause the kernel to crash and that a program permitted to write, for example, the data of an outgoing packet, cannot overwrite kernel memory outside the packet. We will take a closer look at the verifier in the corresponding section after we familiarize ourselves with all the other components of BPF.
So, what have we learned so far? The user writes a program in C, loads it into the kernel using a system call bpf(2), where it undergoes verification by the verifier and is compiled into native bytecode. Then, the same or another user attaches the program to an event source, and it begins to execute. The separation of loading and attaching is necessary for several reasons. First, invoking the verifier is relatively costly, and by loading the same program multiple times, we waste computational resources. Second, how a program is attached depends on its type, and a single 'universal' interface developed a year ago may not suit new types of programs. (However, now that the architecture is maturing, there is an idea to standardize this interface at the level libbpf.)
A keen reader may notice that we have not yet finished with the images. Indeed, everything mentioned above does not explain how BPF fundamentally changes the picture compared to classic BPF. Two innovations that significantly expand the applicability boundaries are the ability to use shared memory and kernel helper functions. In BPF, shared memory is implemented using so-called maps—shared data structures with a defined API. They were probably named that way because the first type of map to appear was a hash table. Later came arrays, local (per-CPU) hash tables and local arrays, search trees, maps containing pointers to BPF programs, and much more. What interests us now is the fact that BPF programs gained the ability to maintain state between calls and share it with other programs and with user space.
Access to maps is performed from user processes via a system call bpf(2), and from BPF programs running in the kernel—using helper functions. Moreover, helpers exist not only for working with maps but also for accessing other capabilities of the kernel. For instance, BPF programs can utilize helper functions to redirect packets to other interfaces, generate events for the perf subsystem, access kernel structures, etc.
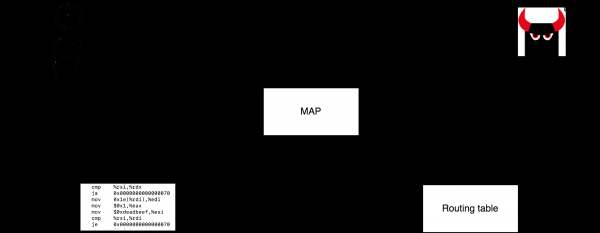
In summary, BPF provides the ability to load arbitrary user code, i.e., code that has passed verification by the verifier, into kernel space. This code can maintain state between calls and exchange data with user space, as well as have access to the subsystems of the kernel permitted for this type of program.
This already resembles the capabilities provided by kernel modules, with BPF having certain advantages (of course, only similar applications can be compared, such as system tracing—it's not possible to write arbitrary drivers with BPF). Notably, it has a lower entry threshold (some utilities using BPF do not expect users to have kernel programming skills, or even programming skills in general), runtime safety (raise your hand in the comments if you haven't broken the system while writing or testing modules), and atomicity—when reloading modules there is downtime, whereas the BPF subsystem ensures that no events are missed (to be fair, this is not true for all types of BPF programs).
The availability of such capabilities makes BPF a universal tool for extending the kernel, which is confirmed in practice: new types of programs are continually being added to BPF, more and more large companies use BPF on production servers 24×7, and an increasing number of startups build their businesses based on BPF solutions. BPF is used everywhere: in DDoS attack protection, in the creation of SDN (for example, implementing networks for Kubernetes), as a primary tool for system tracing and statistics collection, in intrusion detection systems, and in sandbox systems, etc.
Let's conclude the overview section of this article and take a closer look at the virtual machine and ecosystem of BPF.
Sidebar: Utilities
To be able to run the examples from the following sections, you may need a few utilities, at a minimum: llvm/clang with BPF support and bpftool. In the section you can read instructions for building utilities as well as your own kernel. This section is placed below to maintain the coherence of our exposition.
Registers and command system of the BPF virtual machine
The BPF architecture and instruction set were designed with the understanding that programs would be written in C and then translated into native code after being loaded into the kernel. Therefore, the number of registers and the set of instructions were chosen with a focus on the intersection, in a mathematical sense, of the capabilities of modern machines. In addition, various limitations were imposed on the programs; for instance, until recently, it was impossible to write loops and subroutines, and the number of instructions was limited to 4096 (now privileged programs can load up to a million instructions).
BPF has eleven available 64-bit user-accessible registers. r0—r10 and the program counter. The register r10 contains a pointer to the stack (frame pointer) and is read-only. Programs during execution have access to a 512-byte stack and an unlimited amount of shared memory in the form of maps.
BPF programs are allowed to invoke a specific set of helper functions (kernel helpers) depending on the type of program and, recently, regular functions as well. Each called function can take up to five arguments passed in the registers r1—r5, and the return value is passed in r0. It is guaranteed that after returning from the function, the contents of the registers r6—r9 will remain unchanged.
For efficient translation of programs, the registers r0—r11 for all supported architectures are mapped directly to actual registers, taking into account the specifics of the current architecture's ABI. For example, for x86_64 the registers r1—r5, which are used for passing function parameters, are mapped to rdi, rsi, rdx, rcx, r8, which are used for passing parameters to functions on x86_64. For instance, the code on the left is translated into the code on the right as follows:
1:  (b7) r1 = 1                    mov    $0x1,%rdi
2:  (b7) r2 = 2                    mov    $0x2,%rsi
3:  (b7) r3 = 3                    mov    $0x3,%rdx
4:  (b7) r4 = 4                    mov    $0x4,%rcx
5:  (b7) r5 = 5                    mov    $0x5,%r8
6:  (85) call pc+1                 callq  0x0000000000001ee8
The register r0 is also used to return the result of program execution, and the register r1 receives a pointer to the context for the program — depending on the type of program, this could be, for example, the structure for XDP, or the structure for various network programs, or the structure for different types of tracing programs, etc.
So, we had a set of registers, kernel helpers, a stack, a context pointer, and shared memory in the form of maps. Not that all of this was absolutely necessary for the trip, but…
Let's continue describing and discuss the command system for working with these objects. All () BPF instructions have a fixed size of 64 bits. If you look at an instruction on a 64-bit Big Endian machine, you'll see

Here Code — this is the instruction encoding, Dst/Src — these are the encodings for the destination and source, respectively, Off — a 16-bit signed offset, and Imm — this is a 32-bit signed integer used in some commands (similar to the constant K from cBPF). The encoding Code comes in one of two forms:
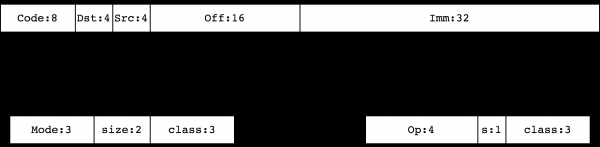
Instruction classes 0, 1, 2, 3 define commands for working with memory. They are , BPF_LD, BPF_LDX, BPF_ST, BPF_STX, respectively. Classes 4, 7 (BPF_ALU, BPF_ALU64) consist of a set of ALU instructions. Classes 5, 6 (BPF_JMP, BPF_JMP32) contain jump instructions.
The further plan for studying the BPF command system is as follows: instead of meticulously listing all instructions and their parameters, we will analyze a couple of examples in this section, which will clarify how instructions are actually structured and how to manually disassemble any binary file for BPF. To reinforce the material, later in the article we will encounter individual instructions in sections about the Verifier, JIT compiler, classic BPF translation, as well as when studying maps, calling functions, and so on.
When we talk about individual instructions, we will refer to the kernel files and , where the numerical codes for BPF instructions are defined. When self-studying the architecture and/or analyzing binaries, you can find the semantics in the following, sorted by difficulty, sources: , , and, of course, in the Linux source code — verifier, JIT, BPF interpreter.
Example: Disassembling BPF in your mind
Let's analyze an example where we compile a program readelf-example.c and take a look at the resulting binary. We will reveal the original contents readelf-example.c below, after we restore its logic from the binary codes:
$ clang -target bpf -c readelf-example.c -o readelf-example.o -O2
$ llvm-readelf -x .text readelf-example.o
Hex dump of section '.text':
0x00000000 b7000000 01000000 15010100 00000000 ................
0x00000010 b7000000 02000000 95000000 00000000 ................
The first column in the output readelf — this is an indentation and our program thus consists of four commands:
Code Dst Src Off  Imm
b7   0   0   0000 01000000
15   0   1   0100 00000000
b7   0   0   0000 02000000
95   0   0   0000 00000000
The command codes are equal b7, 15, b7 and 95. Let’s recall that the three least significant bits represent the instruction class. In our case, the fourth bit is empty for all instructions, so the instruction classes are equal, namely 7, 5, 7, 5. Class 7 is BPF_ALU64, and 5 is BPF_JMP. For both classes, the instruction format is the same (see above) and we can rewrite our program like this (while we are at it, let’s rewrite the other columns in a human-readable format):
Op S  Class   Dst Src Off  Imm
b  0  ALU64   0   0   0    1
1  0  JMP     0   1   1    0
b  0  ALU64   0   0   0    2
9  0  JMP     0   0   0    0
The operation b class ALU64 — this is . It assigns a value to the destination register. If the bit is set tr1 != str2 (source), then the value is taken from the source register; if it is not set, as in our case, the value is taken from the field Imm. Thus, in the first and third instructions, we perform the operation r0 = Imm. Next, the operation of class JMP is (jump if equal). In our case, since the bit S is equal to zero, it compares the value of the source register with the field Imm. If the values coincide, the jump occurs to PC + Off, where PC, which, as usual, contains the address of the next instruction. Finally, the operation of class 9 of JMP is . This instruction terminates the program, returning to the kernel r0. Let’s add a new column to our table:
Op    S  Class   Dst Src Off  Imm    Disassm
MOV   0  ALU64   0   0   0    1      r0 = 1
JEQ   0  JMP     0   1   1    0      if (r1 == 0) goto pc+1
MOV   0  ALU64   0   0   0    2      r0 = 2
EXIT  0  JMP     0   0   0    0      exit
We can rewrite this in a more convenient form:
     r0 = 1
     if (r1 == 0) goto END
     r0 = 2
END:
     exit
If we recall that in the register r1 the program passes a pointer to the context from the kernel, and in the register r0 returns a value to the kernel, we can see that if the pointer to the context is zero, we return 1, otherwise we return 2. Let’s check if we are right by looking at the source:
$ cat readelf-example.c
int foo(void *ctx)
{
        return ctx ? 2 : 1;
}
Yes, this is a meaningless program, but it compiles down to just four simple instructions.
Example exception: 16-byte instruction
Earlier we mentioned that some instructions take more than 64 bits. This applies, for example, to the instruction lddw (Code = 0x18 = | | ) — to load a double word from the fields Imm. The point is that Imm has a size of 32, and a double word is 64 bits, so loading a 64-bit immediate value into a 64-bit register in a single 64-bit instruction is not possible. Instead, two adjacent instructions are used to store the second part of the 64-bit value in a field. Imm. Example:
$ cat x64.c
long foo(void *ctx)
{
        return 0x11223344aabbccdd;
}
$ clang -target bpf -c x64.c -o x64.o -O2
$ llvm-readelf -x .text x64.o
Hex dump of section '.text':
0x00000000 18000000 ddccbbaa 00000000 44332211 ............D3".
0x00000010 95000000 00000000                   ........
There are only two instructions in the binary program:
Binary                                 Disassm
18000000 ddccbbaa 00000000 44332211    r0 = Imm[0]|Imm[1]
95000000 00000000                      exit
We will encounter the instruction lddw, when we talk about relocations and working with maps.
Example: disassembling BPF using standard tools
So, we have learned to read BPF binary codes and are ready to dissect any instruction if needed. However, it is worth mentioning that in practice, it is more convenient and faster to disassemble programs using standard tools, such as:
$ llvm-objdump -d x64.o

Disassembly of section .text:

0000000000000000 :
 0: 18 00 00 00 dd cc bb aa 00 00 00 00 44 33 22 11 r0 = 1234605617868164317 ll
 2: 95 00 00 00 00 00 00 00 exit
Lifecycle of BPF objects, bpffs file system
(Some details discussed in this subsection I first learned from Alexei Starovoitov in .)
BPF objects — programs and maps — are created from user space using the commands BPF_PROG_LOAD and BPF_MAP_CREATE of the system call bpf(2), we will discuss how this happens in the next section. During this process, kernel data structures are created, and for each of them, refcount (reference count) is set to one, and a file descriptor pointing to the object is returned to the user. After the descriptor is closed, refcount the object decreases by one, and when it reaches zero, the object is destroyed.
If a program uses maps, then refcount the reference count of these maps increases by one after loading the program, meaning their file descriptors can be closed from the user process without that refcount becoming zero:
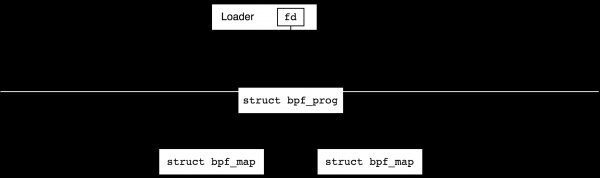
After successfully loading a program, we usually attach it to some event generator. For example, we can attach it to a network interface for processing incoming packets or connect it to some tracepoint in the kernel. At this point, the reference count also increases by one, and we can close the file descriptor in the loader program.
What happens if we complete the bootloader now? It depends on the type of event generator (hook). All network hooks will exist after the bootloader completes; these are known as global hooks. In contrast, tracing programs will be released after the process that created them finishes (hence they are called local, from 'local to the process'). Technically, local hooks always have the corresponding file descriptor in user space and therefore are closed with the closure of the process, whereas global hooks are not. In the next illustration, I will use red crosses to show how the completion of the bootloader program affects the lifetime of objects in the case of local and global hooks.
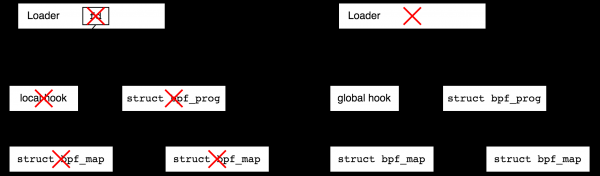
Why is there a distinction between local and global hooks? Running certain types of network programs makes sense even without user space. For example, imagine a DDoS protection program—the bootloader sets the rules and attaches a BPF program to the network interface, after which the bootloader can terminate. On the other hand, think of a tracing debug program you wrote in a rush in ten minutes; upon its completion, you would prefer to leave no garbage in the system, and local hooks guarantee that.
Conversely, imagine you want to connect to a tracepoint in the kernel and collect statistics over many years. In this case, you would like to finish the user part and return to the statistics from time to time. The bpf filesystem offers this capability. It is a pseudo-filesystem that exists only in memory, allowing you to create files that reference BPF objects, thus prolonging refcount the life of the objects. After that, the bootloader can finish its work, and the objects it created will remain alive.
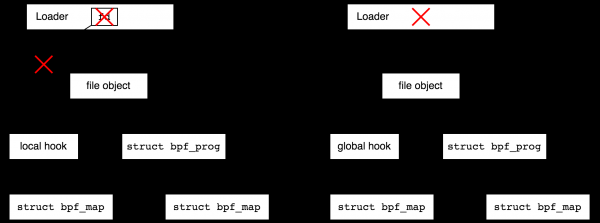
Creating files in bpffs that reference BPF objects is called 'pinning' (as in the following phrase: 'process can pin a BPF program or map'). Creating file objects for BPF objects makes sense not only for extending the lifetime of local objects but also for the convenience of using global objects—returning to the example of the global DDoS protection program, we want to have the ability to periodically check the statistics.
The BPF filesystem is usually mounted at /sys/fs/bpf, but it can also be mounted locally, for example, like this:
$ mkdir bpf-mountpoint
$ sudo mount -t bpf none bpf-mountpoint
Names in the filesystem are created using the command BPF_OBJ_PIN of the BPF system call. As an illustration, let’s take some program, compile it, load it, and pin it to bpffs. Our program does not perform any useful task; we provide its code just so you can reproduce the example:
$ cat test.c
__attribute__((section("xdp"), used))
int test(void *ctx)
{
        return 0;
}

char _license[] __attribute__((section("license"), used)) = "GPL";
Let’s compile this program and create a local copy of the filesystem bpffs:
$ clang -target bpf -c test.c -o test.o
$ mkdir bpf-mountpoint
$ sudo mount -t bpf none bpf-mountpoint
Now let’s load our program using the utility bpftool and look at the accompanying system calls bpf(2) (some unrelated lines have been removed from the strace output):
$ sudo strace -e bpf bpftool prog load ./test.o bpf-mountpoint/test
bpf(BPF_PROG_LOAD, {prog_type=BPF_PROG_TYPE_XDP, prog_name="test", ...}, 120) = 3
bpf(BPF_OBJ_PIN, {pathname="bpf-mountpoint/test", bpf_fd=3}, 120) = 0
Here we loaded the program using BPF_PROG_LOAD, received a file descriptor from the kernel 3 and with the command BPF_OBJ_PIN pinned this file descriptor as a file "bpf-mountpoint/test". After this, the loader program bpftool finished execution, but our program remained in the kernel, even though we did not attach it to any network interface:
$ sudo bpftool prog | tail -3
783: xdp  name test  tag 5c8ba0cf164cb46c  gpl
        loaded_at 2020-05-05T13:27:08+0000  uid 0
        xlated 24B  jited 41B  memlock 4096B
We can remove the file object using a regular unlink(2) and after that the corresponding program will be removed:
$ sudo rm ./bpf-mountpoint/test
$ sudo bpftool prog show id 783
Error: get by id (783): No such file or directory
Removing objects
Speaking of object removal, it is important to clarify that after we detach the program from the hook (event generator), no new event will cause it to run; however, all currently running instances of the program will terminate normally.
Some types of BPF programs allow replacing the program on the fly, i.e., they provide atomicity of the sequence replace = detach old program, attach new program. In this case, all active instances of the old version of the program will finish executing, and new event handlers will be created from the new program, and 'atomicity' here means that no event will be missed.
Connecting programs to event sources
In this article, we will not separately describe the connection of programs to event sources, as it makes sense to study this in the context of a specific type of program. See below, where we show how programs of type XDP are connected.
Managing objects via the bpf system call
BPF programs
All BPF objects are created and managed from user space via the bpfsystem call, which has the following prototype:
#include <linux/bpf.h>

int bpf(int cmd, union bpf_attr *attr, unsigned int size);
Here the command cmd is one of the values of type , attr — a pointer to the parameters for a specific program, and size — the size of the object pointed to, i.e., usually sizeof(*attr). In kernel 5.8, the system call bpf supports 34 different commands, and union bpf_attr takes 200 lines. But we should not be intimidated by this, as we will get acquainted with commands and parameters over several articles.
We will start with the command BPF_PROG_LOAD, which creates BPF programs — takes a set of BPF instructions and loads them into the kernel. Upon loading, the verifier is triggered, then the JIT compiler runs, and, after successful execution, a file descriptor for the program is returned to the user. We saw what happens to it next in the previous section .
Now we will write a user program that will load a simple BPF program, but first we need to decide what kind of program we want to load — we will have to choose and write a program within this type that will pass the verifier check. However, to simplify the process, here is a ready-made solution: we will take a program of type BPF_PROG_TYPE_XDP, which will return the value XDP_PASS (pass all packets). In BPF assembly, this looks very simple:
r0 = 2
exit
After we have decided what we will load, we can explain how we will do this: what Interesting events in the program begin with defining the array
#define _GNU_SOURCE
#include <string.h>
#include <unistd.h>
#include <sys/syscall.h>
#include <linux/bpf.h>

static inline __u64 ptr_to_u64(const void *ptr)
{
        return (__u64) (unsigned long) ptr;
}

int main(void)
{
    struct bpf_insn insns[] = {
        {
            .code = BPF_ALU64 | BPF_MOV | BPF_K,
            .dst_reg = BPF_REG_0,
            .imm = XDP_PASS
        },
        {
            .code = BPF_JMP | BPF_EXIT
        },
    };

    union bpf_attr attr = {
        .prog_type = BPF_PROG_TYPE_XDP,
        .insns     = ptr_to_u64(insns),
        .insn_cnt  = sizeof(insns)/sizeof(insns[0]),
        .license   = ptr_to_u64("GPL"),
    };

    strncpy(attr.prog_name, "woo", sizeof(attr.prog_name));
    syscall(__NR_bpf, BPF_PROG_LOAD, &attr, sizeof(attr));

    for ( ;; )
        pause();
}
insns — our BPF program in machine code. Each BPF program instruction is packed into a bpf_insn corresponds to the instruction — our BPF program in machine code. Each BPF program instruction is packed into a r0 = 2 A digression., the second — sigreturn.
In the kernel, more convenient macros are defined for writing machine codes, and, using the kernel header file tools/include/linux/filter.h we could write struct bpf_insn insns[] = { BPF_MOV64_IMM(BPF_REG_0, XDP_PASS), BPF_EXIT_INSN() };
struct bpf_insn insns[] = {
    BPF_MOV64_IMM(BPF_REG_0, XDP_PASS),
    BPF_EXIT_INSN()
};
However, since writing BPF programs in machine codes is only necessary for writing tests in the kernel and articles about BPF, the absence of these macros doesn't really complicate the developer's life.
After determining the BPF program, we move on to loading it into the kernel. Our minimalist set of parameters attr includes the program type, a set and number of instructions, a mandatory license, and a name "woo", which we use to locate our program in the system after loading. The program, as promised, is loaded into the system using a system call bpf.
At the end of the program, we enter an infinite loop that simulates a payload. Without it, the program will be terminated by the kernel upon closing the file descriptor returned by the system call bpf, and we won't see it in the system.
Well, we are ready for testing. Let's compile and run the program under strace, to check that everything works as it should:
$ clang -g -O2 simple-prog.c -o simple-prog

$ sudo strace ./simple-prog
execve("./simple-prog", ["./simple-prog"], 0x7ffc7b553480 /* 13 vars */) = 0
...
bpf(BPF_PROG_LOAD, {prog_type=BPF_PROG_TYPE_XDP, insn_cnt=2, insns=0x7ffe03c4ed50, license="GPL", log_level=0, log_size=0, log_buf=NULL, kern_version=KERNEL_VERSION(0, 0, 0), prog_flags=0, prog_name="woo", prog_ifindex=0, expected_attach_type=BPF_CGROUP_INET_INGRESS}, 72) = 3
pause(
Everything is fine, bpf(2) returned us descriptor 3 and we entered an infinite loop with pause(). Let's try to find our program in the system. For this, we will go to another terminal and use the utility bpftool:
# bpftool prog | grep -A3 woo
390: xdp  name woo  tag 3b185187f1855c4c  gpl
        loaded_at 2020-08-31T24:66:44+0000  uid 0
        xlated 16B  jited 40B  memlock 4096B
        pids simple-prog(10381)
We can see that there is a loaded program in the system woo whose global ID equals 390, and that there is currently an open file descriptor in the process simple-prog pointing to the program (and if it simple-prog terminates, it woo will disappear). As expected, the program woo takes up 16 bytes — two instruction — binary codes in the BPF architecture, but in native form (x86_64) — it is already 40 bytes. Let's take a look at our program in its original form:
# bpftool prog dump xlated id 390
   0: (b7) r0 = 2
   1: (95) exit
no surprises. Now let's look at the code produced by the JIT compiler:
# bpftool prog dump jited id 390
bpf_prog_3b185187f1855c4c_woo:
   0:   nopl   0x0(%rax,%rax,1)
   5:   push   %rbp
   6:   mov    %rsp,%rbp
   9:   sub    $0x0,%rsp
  10:   push   %rbx
  11:   push   %r13
  13:   push   %r14
  15:   push   %r15
  17:   pushq  $0x0
  19:   mov    $0x2,%eax
  1e:   pop    %rbx
  1f:   pop    %r15
  21:   pop    %r14
  23:   pop    %r13
  25:   pop    %rbx
  26:   leaveq
  27:   retq
not very efficient for exit(2), but to be fair, our program is too simple, and for non-trivial programs, the prologue and epilogue added by the JIT compiler are certainly needed.
Maps
BPF programs can use structured areas of memory that are accessible to both other BPF programs and user space programs. These objects are called maps, and in this section, we will demonstrate how to manage them using system calls. bpf.
Let’s clarify that the capabilities of maps are not limited to just accessing shared memory. There are specialized maps that contain, for example, pointers to BPF programs or pointers to network interfaces, as well as maps for working with perf events, etc. We will not discuss these here to avoid confusing the reader. Additionally, we will ignore synchronization issues as they are not important for our examples. A complete list of available map types can be found in , and in this section, we will take the historically first type as an example: the hash table. BPF_MAP_TYPE_HASH.
If you create a hash table, say, in C++, you would say unordered_map woo, which means in English, "I need a table woo of unlimited size, where the keys are of type int, and the values are of type long. To create a BPF hash table, we need to do something similar, with the caveat that we will have to specify the maximum size of the table, and instead of the types of keys and values, we need to specify their sizes in bytes. The command for creating maps is BPF_MAP_CREATE of the system call bpf. Let’s take a look at a somewhat minimal program that creates a map. After the previous program that loads BPF programs, this one should seem simple to you:
$ cat simple-map.c
#define _GNU_SOURCE
#include
#include
#include
#include

int main(void)
{
    union bpf_attr attr = {
        .map_type = BPF_MAP_TYPE_HASH,
        .key_size = sizeof(int),
        .value_size = sizeof(int),
        .max_entries = 4,
    };
    strncpy(attr.map_name, "woo", sizeof(attr.map_name));
    syscall(__NR_bpf, BPF_MAP_CREATE, &attr, sizeof(attr));

    for ( ;; )
        pause();
}
Here we define a set of parameters attr, where we say, "I need a hash table with keys and values of size sizeof(int), into which I can put a maximum of four elements." When creating BPF maps, you can specify other parameters as well; for instance, just as in the example with the program, we specified the object name as "woo".
Let's compile and run the program:
$ clang -g -O2 simple-map.c -o simple-map
$ sudo strace ./simple-map
execve("./simple-map", ["./simple-map"], 0x7ffd40a27070 /* 14 vars */) = 0
...
bpf(BPF_MAP_CREATE, {map_type=BPF_MAP_TYPE_HASH, key_size=4, value_size=4, max_entries=4, map_name="woo", ...}, 72) = 3
pause(
This is a system call bpf(2) that returned the map descriptor number to us 3 and then the program, as expected, waits for further instructions in the system call. pause(2).
Now let's move our program to the background or open another terminal and inspect our object using the utility bpftool (we can distinguish our map from others by its name):
$ sudo bpftool map
...
114: hash  name woo  flags 0x0
        key 4B  value 4B  max_entries 4  memlock 4096B
...
The number 114 is the global ID of our object. Any program in the system can use this ID to open an existing map with the command BPF_MAP_GET_FD_BY_ID of the system call bpf.
Now we can play around with our hash table. Let's check its contents:
$ sudo bpftool map dump id 114
Found 0 elements
It's empty. Let's add a value to it. hash[1] = 1:
$ sudo bpftool map update id 114 key 1 0 0 0 value 1 0 0 0Let's take a look at the table again:
$ sudo bpftool map dump id 114
key: 01 00 00 00  value: 01 00 00 00
Found 1 element
Hooray! We successfully added one element. Note that we have to work at the byte level, as bpftool doesn't know what type the values in the hash table have. (This knowledge can be passed using BTF, but not now.)
How exactly does bpftool read and add elements? Let's look under the hood:
$ sudo strace -e bpf bpftool map dump id 114
bpf(BPF_MAP_GET_FD_BY_ID, {map_id=114, next_id=0, open_flags=0}, 120) = 3
bpf(BPF_MAP_GET_NEXT_KEY, {map_fd=3, key=NULL, next_key=0x55856ab65280}, 120) = 0
bpf(BPF_MAP_LOOKUP_ELEM, {map_fd=3, key=0x55856ab65280, value=0x55856ab652a0}, 120) = 0
key: 01 00 00 00  value: 01 00 00 00
bpf(BPF_MAP_GET_NEXT_KEY, {map_fd=3, key=0x55856ab65280, next_key=0x55856ab65280}, 120) = -1 ENOENT
First, we opened the map by its global ID using the command BPF_MAP_GET_FD_BY_ID and bpf(2) which returned the descriptor 3. Then, using the command BPF_MAP_GET_NEXT_KEY we found the first key in the table by passing NULL as a pointer to the "previous" key. When we have a key, we can do BPF_MAP_LOOKUP_ELEM, which returns the value in the pointer value. The next step is we try to find the next element by passing the pointer to the current key, but our table contains only one element, and the command BPF_MAP_GET_NEXT_KEY brings back ENOENT.
Alright, let's change the value for key 1, let's say our business logic requires us to set hash[1] = 2:
$ sudo strace -e bpf bpftool map update id 114 key 1 0 0 0 value 2 0 0 0
bpf(BPF_MAP_GET_FD_BY_ID, {map_id=114, next_id=0, open_flags=0}, 120) = 3
bpf(BPF_MAP_UPDATE_ELEM, {map_fd=3, key=0x55dcd72be260, value=0x55dcd72be280, flags=BPF_ANY}, 120) = 0
As expected, it's quite simple: the command BPF_MAP_GET_FD_BY_ID opens our map by ID, and the command BPF_MAP_UPDATE_ELEM overwrites the element.
In total, after creating a hash table from one program, we can read and write its contents from another. Note that if we could do this from the command line, any other program on the system can do it too. In addition to the commands described above, the following are available for user-space operations with maps. :
BPF_MAP_LOOKUP_ELEM: find a value by keyBPF_MAP_UPDATE_ELEM: update/create a valueBPF_MAP_DELETE_ELEM: delete a keyBPF_MAP_GET_NEXT_KEY: find the next (or first) keyBPF_MAP_GET_NEXT_ID: allows iterating through all existing maps; this is howbpftool mapBPF_MAP_GET_FD_BY_ID: open an existing map by its global IDBPF_MAP_LOOKUP_AND_DELETE_ELEM: atomically update an object’s value and return the old oneBPF_MAP_FREEZE: make the map immutable from userspace (this operation cannot be undone)BPF_MAP_LOOKUP_BATCH,BPF_MAP_LOOKUP_AND_DELETE_BATCH,BPF_MAP_UPDATE_BATCH,BPF_MAP_DELETE_BATCH: batch operations. For example,BPF_MAP_LOOKUP_AND_DELETE_BATCH— this is the only reliable way to read and zero out all values from a map
Not all of these commands work for all types of maps, but generally, working with other types of maps from user space looks exactly the same as working with hash tables.
For the sake of completion, let’s finish our experiments with the hash table. Remember that we created a table that can contain up to four keys? Let’s add a few more items:
$ sudo bpftool map update id 114 key 2 0 0 0 value 1 0 0 0
$ sudo bpftool map update id 114 key 3 0 0 0 value 1 0 0 0
$ sudo bpftool map update id 114 key 4 0 0 0 value 1 0 0 0
So far, so good:
$ sudo bpftool map dump id 114
key: 01 00 00 00  value: 01 00 00 00
key: 02 00 00 00  value: 01 00 00 00
key: 04 00 00 00  value: 01 00 00 00
key: 03 00 00 00  value: 01 00 00 00
Found 4 elements
Let’s try to add one more:
$ sudo bpftool map update id 114 key 5 0 0 0 value 1 0 0 0
Error: update failed: Argument list too long
As expected, we were unable to do that. Let’s take a closer look at the error:
$ sudo strace -e bpf bpftool map update id 114 key 5 0 0 0 value 1 0 0 0
bpf(BPF_MAP_GET_FD_BY_ID, {map_id=114, next_id=0, open_flags=0}, 120) = 3
bpf(BPF_OBJ_GET_INFO_BY_FD, {info={bpf_fd=3, info_len=80, info=0x7ffe6c626da0}}, 120) = 0
bpf(BPF_MAP_UPDATE_ELEM, {map_fd=3, key=0x56049ded5260, value=0x56049ded5280, flags=BPF_ANY}, 120) = -1 E2BIG (Argument list too long)
Error: update failed: Argument list too long
+++ exited with 255 +++
Everything is fine: as expected, the command BPF_MAP_UPDATE_ELEM is trying to create a new, fifth key, but fails with E2BIG.
So, we know how to create and load BPF programs, as well as create and manage maps from user space. Now it makes sense to look at how we can use maps from the actual BPF programs. We could talk about this in the language of hard-to-read machine code, but now it's time to show how BPF programs are actually written and maintained — using libbpf.
(For readers dissatisfied with the lack of a low-level example: we will thoroughly dissect programs using maps and helper functions created with libbpf and explain what happens at the instruction level. For readers who are not satisfied with very much, we have added at the appropriate place in the article.)
Writing BPF programs using libbpf
Writing BPF programs with machine codes can be interesting only at first, and then it becomes tedious. At this point, one needs to turn their attention to llvm, which has a backend for generating code for the BPF architecture, as well as the library libbpf, which allows writing the user part of BPF applications and loading BPF program code generated with llvm/clang.
In fact, as we will see in this and subsequent articles, libbpf does quite a bit of work, and without it (or similar tools — iproute2, libbcc, libbpf-go, etc.) it's impossible to live. One of the killer features of the project libbpf is BPF CO-RE (Compile Once, Run Everywhere) — a project that allows writing BPF programs that are portable from one kernel to another, with the ability to run on different APIs (for example, when the kernel structure changes from version to version). To be able to work with CO-RE, your kernel must be compiled with BTF support (how to do this is described in the section . You can easily check if your kernel is compiled with BTF or not — by the presence of the following file:
$ ls -lh /sys/kernel/btf/vmlinux
-r--r--r-- 1 root root 2.6M Jul 29 15:30 /sys/kernel/btf/vmlinux
This file contains information about all data types used in the kernel and is used in all our examples that utilize libbpf. We will talk about CO-RE in detail in the next article, but in this one — just build yourself a kernel with CONFIG_DEBUG_INFO_BTF.
Library libbpf living right in the directory tools/lib/bpf of the kernel and its development is conducted through the mailing list bpf@vger.kernel.org. However, for applications living outside the kernel, a separate repository is supported in which the kernel library is mirrored for read access pretty much as is.
In this section, we will look at how to create a project using libbpf, we will write a few (more or less meaningless) test programs and thoroughly discuss how all of this works. This will allow us to explain more easily in the following sections how BPF programs interact with maps, kernel helpers, BTF, etc.
Typically, projects using libbpf add a GitHub repository as a git submodule, and we will do the same:
$ mkdir /tmp/libbpf-example
$ cd /tmp/libbpf-example/
$ git init-db
Initialized empty Git repository in /tmp/libbpf-example/.git/
$ git submodule add https://github.com/libbpf/libbpf.git
Cloning into '/tmp/libbpf-example/libbpf'...
remote: Enumerating objects: 200, done.
remote: Counting objects: 100% (200/200), done.
remote: Compressing objects: 100% (103/103), done.
remote: Total 3354 (delta 101), reused 118 (delta 79), pack-reused 3154
Receiving objects: 100% (3354/3354), 2.05 MiB | 10.22 MiB/s, done.
Resolving deltas: 100% (2176/2176), done.
It compiles libbpf very easily:
$ cd libbpf/src
$ mkdir build
$ OBJDIR=build DESTDIR=root make -s install
$ find root
root
root/usr
root/usr/include
root/usr/include/bpf
root/usr/include/bpf/bpf_tracing.h
root/usr/include/bpf/xsk.h
root/usr/include/bpf/libbpf_common.h
root/usr/include/bpf/bpf_endian.h
root/usr/include/bpf/bpf_helpers.h
root/usr/include/bpf/btf.h
root/usr/include/bpf/bpf_helper_defs.h
root/usr/include/bpf/bpf.h
root/usr/include/bpf/libbpf_util.h
root/usr/include/bpf/libbpf.h
root/usr/include/bpf/bpf_core_read.h
root/usr/lib64
root/usr/lib64/libbpf.so.0.1.0
root/usr/lib64/libbpf.so.0
root/usr/lib64/libbpf.a
root/usr/lib64/libbpf.so
root/usr/lib64/pkgconfig
root/usr/lib64/pkgconfig/libbpf.pc
Our further plan in this section is as follows: we will write a BPF program of type BPF_PROG_TYPE_XDP, the same one as in the previous example, but in C, compile it using clang, and write a helper program that will load it into the kernel. In the following sections, we will expand the capabilities of both the BPF program and the helper program.
Example: creating a complete application using libbpf
To start, we will use the file /sys/kernel/btf/vmlinux, mentioned above, and create its equivalent as a header file:
$ bpftool btf dump file /sys/kernel/btf/vmlinux format c > vmlinux.hThis file will store all the data structures present in our kernel, for example, this is how the IPv4 header is defined in the kernel:
$ grep -A 12 'struct iphdr {' vmlinux.h
struct iphdr {
    __u8 ihl: 4;
    __u8 version: 4;
    __u8 tos;
    __be16 tot_len;
    __be16 id;
    __be16 frag_off;
    __u8 ttl;
    __u8 protocol;
    __sum16 check;
    __be32 saddr;
    __be32 daddr;
};
Now we will write our BPF program in C:
$ cat xdp-simple.bpf.c
#include "vmlinux.h"
#include

SEC("xdp/simple")
int simple(void *ctx)
{
        return XDP_PASS;
}

char LICENSE[] SEC("license") = "GPL";
Even though our program is very simple, we should still pay attention to many details. First of all, the first header file we include is vmlinux.h, which we just generated using bpftool btf dump — now we don't need to install the kernel-headers package to find out what the kernel structures look like. The next header file comes from the library libbpf. Right now, we need it only to define the macro SEC, which sends a symbol to the corresponding section of the ELF object file. Our program is contained in the section xdp/simple, where before the slash we define the BPF program type — this is an agreement used in libbpf, based on the section name, it will substitute the correct type when loading bpf(2). The BPF program itself is very simple and consists of one line C return XDP_PASS . Finally, a separate section"license" contains the name of the license. We can compile our program using llvm/clang, version >= 10.0.0, or better — more (see section
$ clang --version clang version 11.0.0 (https://github.com/llvm/llvm-project.git afc287e0abec710398465ee1f86237513f2b5091) ...$ clang -O2 -g -c -target bpf -I libbpf/src/root/usr/include xdp-simple.bpf.c -o xdp-simple.bpf.o ):
Among the interesting features: we specify the target architecture-target bpf and the path to the headers , which we recently installed. Also, don’t forget about libbpf, without this option, you might face surprises later on. Let’s look at our code, did we manage to write the program we wanted? -O2$ llvm-objdump --section=xdp/simple --no-show-raw-insn -D xdp-simple.bpf.oxdp-simple.bpf.o: file format elf64-bpfDisassembly of section xdp/simple:0000000000000000 : 0: r0 = 2 1: exit
Yes, it worked! Now we have a binary file with the program, and we want to create an application that will load it into the kernel. For this, the libraryoffers us two options — to use a low-level API or a higher-level API. We will take the second route because we want to learn how to write, load, and attach BPF programs with minimal effort for further study. libbpf To start, we need to generate a "skeleton" of our program from its binary using the same utility
First, we need to generate the 'skeleton' of our program from its binary using the same utility bpftool — the Swiss army knife of BPF (which can be interpreted literally, as Daniel Borkman is one of the creators and maintainers of BPF — a Swiss):
$ bpftool gen skeleton xdp-simple.bpf.o > xdp-simple.skel.hIn the file xdp-simple.skel.h contains the binary code of our program and functions for management — loading, attaching, detaching our object. In our simple case, this seems like overkill, but it works even when the object file contains multiple BPF programs and maps, and to load this gigantic ELF, we only need to generate the skeleton and call one or two functions from the user application, which we will now move on to writing.
In fact, our loader program is trivial:
#include <err.h>
#include <unistd.h>
#include "xdp-simple.skel.h"

int main(int argc, char **argv)
{
    struct xdp_simple_bpf *obj;

    obj = xdp_simple_bpf__open_and_load();
    if (!obj)
        err(1, "failed to open and/or load BPF objectn");

    pause();

    xdp_simple_bpf__destroy(obj);
}
Here struct xdp_simple_bpf is defined in the file xdp-simple.skel.h and describes our object file:
struct xdp_simple_bpf {
    struct bpf_object_skeleton *skeleton;
    struct bpf_object *obj;
    struct {
        struct bpf_program *simple;
    } progs;
    struct {
        struct bpf_link *simple;
    } links;
};
We can notice traces of low-level API here: the structure struct bpf_program *simple and struct bpf_link *simple. The first structure specifically describes our program, recorded in the section xdp/simple, while the second describes how the program connects to the event source.
Function xdp_simple_bpf__open_and_load, opens the ELF object, parses it, creates all structures and substructures (besides the program in ELF, there are also other sections — data, readonly data, debug information, license, etc.), and then loads it into the kernel via a system call bpf, which we can verify by compiling and running the program:
$ clang -O2 -I ./libbpf/src/root/usr/include/ xdp-simple.c -o xdp-simple ./libbpf/src/root/usr/lib64/libbpf.a -lelf -lz

$ sudo strace -e bpf ./xdp-simple
...
bpf(BPF_BTF_LOAD, 0x7ffdb8fd9670, 120)  = 3
bpf(BPF_PROG_LOAD, {prog_type=BPF_PROG_TYPE_XDP, insn_cnt=2, insns=0xdfd580, license="GPL", log_level=0, log_size=0, log_buf=NULL, kern_version=KERNEL_VERSION(5, 8, 0), prog_flags=0, prog_name="simple", prog_ifindex=0, expected_attach_type=0x25 /* BPF_??? */, ...}, 120) = 4
Now let's look at our program using bpftool. Let's find its ID:
# bpftool p | grep -A4 simple
463: xdp  name simple  tag 3b185187f1855c4c  gpl
        loaded_at 2020-08-01T01:59:49+0000  uid 0
        xlated 16B  jited 40B  memlock 4096B
        btf_id 185
        pids xdp-simple(16498)
and dump it (we are using the shortened version of the command bpftool prog dump xlated):
# bpftool p d x id 463
int simple(void *ctx):
; return XDP_PASS;
   0: (b7) r0 = 2
   1: (95) exit
Something new! The program printed pieces of our source file in C. This was done by the library libbpf, which found the debug section in the binary, compiled it into a BTF object, loaded it into the kernel using BPF_BTF_LOAD, and then indicated the resulting file descriptor when loading the program with the command BPG_PROG_LOAD.
Kernel Helpers
BPF programs can invoke "external" functions — kernel helpers. These helper functions enable BPF programs to access kernel structures, manage maps, and interact with the "real world" — creating perf events, managing hardware (for example, redirecting packets), etc.
Example: bpf_get_smp_processor_id
Within the paradigm of "learning by examples," let's consider one of the helper functions, bpf_get_smp_processor_id(), in the file kernel/bpf/helpers.c. It returns the ID of the processor on which the invoking BPF program runs. However, we are more interested in its implementation rather than its semantics, which occupies a single line:
BPF_CALL_0(bpf_get_smp_processor_id)
{
    return smp_processor_id();
}
Definitions of BPF helper functions resemble definitions of Linux system calls. Here, for instance, a function that takes no arguments is defined. (A function taking, say, three arguments is defined using the macro BPF_CALL_3. The maximum number of arguments is five.) However, this is only the first part of the definition. The second part involves defining a structure of type struct bpf_func_proto, which contains a description of the helper function that the verifier understands:
const struct bpf_func_proto bpf_get_smp_processor_id_proto = {
    .func     = bpf_get_smp_processor_id,
    .gpl_only = false,
    .ret_type = RET_INTEGER,
};
Registering helper functions
For BPF programs of a certain type to utilize this function, they must register it, for example, for the type BPF_PROG_TYPE_XDP in the kernel, a function is defined xdp_func_proto, which determines whether XDP supports this function based on the helper function ID. Our function :
static const struct bpf_func_proto *
xdp_func_proto(enum bpf_func_id func_id, const struct bpf_prog *prog)
{
    switch (func_id) {
    ...
    case BPF_FUNC_get_smp_processor_id:
        return &bpf_get_smp_processor_id_proto;
    ...
    }
}
New types of BPF programs are "defined" in the file using the macro BPF_PROG_TYPE. The term defined is in quotes because this is a logical definition, while in C language terms, the definition of a whole set of specific structures occurs elsewhere. Specifically, in the file kernel/bpf/verifier.c all definitions from the file bpf_types.h are used to create an array of structures bpf_verifier_ops[]:
static const struct bpf_verifier_ops *const bpf_verifier_ops[] = {
#define BPF_PROG_TYPE(_id, _name, prog_ctx_type, kern_ctx_type)
    [_id] = & _name ## _verifier_ops,
#include
#undef BPF_PROG_TYPE
};
That is, for each type of BPF programs, a pointer to a data structure of type struct bpf_verifier_ops, which is initialized with the value _name ## _verifier_ops, i.e., xdp_verifier_ops for xdp. The structure xdp_verifier_ops in the file net/core/filter.c as follows:
const struct bpf_verifier_ops xdp_verifier_ops = {
    .get_func_proto     = xdp_func_proto,
    .is_valid_access    = xdp_is_valid_access,
    .convert_ctx_access = xdp_convert_ctx_access,
    .gen_prologue       = bpf_noop_prologue,
};
Here we see our familiar function xdp_func_proto, which will be invoked by the verifier every time it encounters a call to some function inside the BPF program, see .
Let's look at how a hypothetical BPF program uses the function bpf_get_smp_processor_id. To do this, we will rewrite the program from our previous section as follows:
#include "vmlinux.h"
#include <bpf/bpf_helpers.h>

SEC("xdp/simple")
int simple(void *ctx)
{
    if (bpf_get_smp_processor_id() != 0)
        return XDP_DROP;
    return XDP_PASS;
}

char LICENSE[] SEC("license") = "GPL";
The symbol bpf_get_smp_processor_id downward API support (simultaneously with this in <bpf/bpf_helper_defs.h> a library libbpf as
static u32 (*bpf_get_smp_processor_id)(void) = (void *) 8;that is, bpf_get_smp_processor_id — this is a pointer to a function, the value of which is 8, where 8 is the value BPF_FUNC_get_smp_processor_id of type enum bpf_fun_id, which is defined for us in the file vmlinux.h (the file bpf_helper_defs.h in the kernel is generated by a script, so 'magic' numbers are okay). This function does not take arguments and returns a value of type __u32. When we execute it in our program, clang it generates the instruction BPF_CALL of the 'correct type'. Let's compile the program and look at the section xdp/simple:
$ clang -O2 -g -c -target bpf -I libbpf/src/root/usr/include xdp-simple.bpf.c -o xdp-simple.bpf.o
$ llvm-objdump -D --section=xdp/simple xdp-simple.bpf.o

xdp-simple.bpf.o:       file format elf64-bpf

Disassembly of section xdp/simple:

0000000000000000 :
       0:       85 00 00 00 08 00 00 00 call 8
       1:       bf 01 00 00 00 00 00 00 r1 = r0
       2:       67 01 00 00 20 00 00 00 r1 <>= 32
       4:       b7 00 00 00 02 00 00 00 r0 = 2
       5:       15 01 01 00 00 00 00 00 if r1 == 0 goto +1
       6:       b7 00 00 00 01 00 00 00 r0 = 1

0000000000000038 :
       7:       95 00 00 00 00 00 00 00 exit
In the very first line, we see the instruction call, the parameter IMM which is equal to 8, and SRC_REG — zero. According to the ABI convention used by the verifier, this is the call to helper function number eight. After it is invoked, the logic is simple. The returned value from the register r0 is copied to r1 and in lines 2, 3 it is cast to type u32 — the upper 32 bits are zeroed out. In lines 4, 5, 6, 7 we return 2 (XDP_PASS) or 1 (XDP_DROP) depending on whether the helper function from line 0 returned zero or non-zero value.
Let's check ourselves: load the program and look at the output bpftool prog dump xlated:
$ bpftool gen skeleton xdp-simple.bpf.o > xdp-simple.skel.h
$ clang -O2 -g -I ./libbpf/src/root/usr/include/ -o xdp-simple xdp-simple.c ./libbpf/src/root/usr/lib64/libbpf.a -lelf -lz
$ sudo ./xdp-simple &
[2] 10914

$ sudo bpftool p | grep simple
523: xdp  name simple  tag 44c38a10c657e1b0  gpl
        pids xdp-simple(10915)

$ sudo bpftool p d x id 523
int simple(void *ctx):
; if (bpf_get_smp_processor_id() != 0)
   0: (85) call bpf_get_smp_processor_id#114128
   1: (bf) r1 = r0
   2: (67) r1 <>= 32
   4: (b7) r0 = 2
; }
   5: (15) if r1 == 0x0 goto pc+1
   6: (b7) r0 = 1
   7: (95) exit
Great, the verifier found the correct kernel helper.
Example: we pass the arguments and finally run the program!
All helper functions at runtime have the prototype
u64 fn(u64 r1, u64 r2, u64 r3, u64 r4, u64 r5)Parameters are passed to the helper functions in registers r1—r5, and the return value is given in a register r0. There are no functions that take more than five arguments, and adding their support is not planned in the future.
Let's look at the new kernel helper and how BPF passes parameters. We will rewrite xdp-simple.bpf.c as follows (the other lines remain unchanged):
SEC("xdp/simple")
int simple(void *ctx)
{
    bpf_printk("running on CPU%un", bpf_get_smp_processor_id());
    return XDP_PASS;
}
Our program prints the CPU number on which it is running. Let's compile it and take a look at the code:
$ llvm-objdump -D --section=xdp/simple --no-show-raw-insn xdp-simple.bpf.o

0000000000000000 :
       0:       r1 = 10
       1:       *(u16 *)(r10 - 8) = r1
       2:       r1 = 8441246879787806319 ll
       4:       *(u64 *)(r10 - 16) = r1
       5:       r1 = 2334956330918245746 ll
       7:       *(u64 *)(r10 - 24) = r1
       8:       call 8
       9:       r1 = r10
      10:       r1 += -24
      11:       r2 = 18
      12:       r3 = r0
      13:       call 6
      14:       r0 = 2
      15:       exit
In lines 0-7, we write to the stack the string running on CPU%un, and then on line 8 we call the familiar bpf_get_smp_processor_id. In lines 9-12, we prepare the arguments for the helper bpf_printk — registers r1, r2, r3. Why are there three, not two? Because bpf_printk — around the actual helper bpf_trace_printk, which requires the size of the format string to be passed.
Now let's add a couple of lines to xdp-simple.c, so that our program connects to the interface lo and runs for real!
$ cat xdp-simple.c
#include
#include
#include
#include "xdp-simple.skel.h"

int main(int argc, char **argv)
{
    __u32 flags = XDP_FLAGS_SKB_MODE;
    struct xdp_simple_bpf *obj;

    obj = xdp_simple_bpf__open_and_load();
    if (!obj)
        err(1, "failed to open and/or load BPF objectn");

    bpf_set_link_xdp_fd(1, -1, flags);
    bpf_set_link_xdp_fd(1, bpf_program__fd(obj->progs.simple), flags);

cleanup:
    xdp_simple_bpf__destroy(obj);
}
Here we use the function bpf_set_link_xdp_fd, which connects XDP-type BPF programs to network interfaces. We hardcoded the interface number lo, which is always equal to 1. We run the function twice to first detach the old program if it was attached. Note that we no longer need a call now pause or an infinite loop: our loader program will terminate, but the BPF program won’t be destroyed as it is attached to the event source. After a successful load and attachment, the program will run for each network packet coming to lo.
Let's load the program and take a look at the interface lo:
$ sudo ./xdp-simple
$ sudo bpftool p | grep simple
669: xdp  name simple  tag 4fca62e77ccb43d6  gpl
$ ip l show dev lo
1: lo:  mtu 65536 xdpgeneric qdisc noqueue state UNKNOWN mode DEFAULT group default qlen 1000
    link/loopback 00:00:00:00:00:00 brd 00:00:00:00:00:00
    prog/xdp id 669
The program we loaded has ID 669, and we see the same ID on the interface lo. Let's send a couple of packets to 127.0.0.1 (request + reply):
$ ping -c1 localhostand now let's check the content of the debug virtual file /sys/kernel/debug/tracing/trace_pipe, where bpf_printk writes its messages:
# cat /sys/kernel/debug/tracing/trace_pipe
ping-13937 [000] d.s1 442015.377014: bpf_trace_printk: running on CPU0
ping-13937 [000] d.s1 442015.377027: bpf_trace_printk: running on CPU0
Two packets were detected on lo and processed on CPU0 — our first complete meaningless BPF program has run!
It’s worth noting that bpf_printk doesn’t write to the debug file for nothing: it’s not the best helper for use in production, but our goal was to demonstrate something simple.
Accessing maps from BPF programs
Example: using a map from a BPF program
In the previous sections, we learned to create and use maps from user space, and now let’s take a look at the kernel part. As usual, we’ll start with an example. Let's rewrite our program xdp-simple.bpf.c as follows:
#include "vmlinux.h"
#include <bpf/bpf_helpers.h>

struct {
    __uint(type, BPF_MAP_TYPE_ARRAY);
    __uint(max_entries, 8);
    __type(key, u32);
    __type(value, u64);
} woo SEC(".maps");

SEC("xdp/simple")
int simple(void *ctx)
{
    u32 key = bpf_get_smp_processor_id();
    u32 *val;

    val = bpf_map_lookup_elem(&woo, &key);
    if (!val)
        return XDP_ABORTED;

    *val += 1;

    return XDP_PASS;
}

char LICENSE[] SEC("license") = "GPL";
At the beginning of the program, we added a map definition woo: this is an array of 8 elements that store values of type u64 (in C, we would define such an array as u64 woo[8]). In the program "xdp/simple" we get the current processor number into a variable respectively. It is advisable to place them on a shared resource accessible from all nodes in the cluster. and then, using the helper function bpf_map_lookup_element we obtain a pointer to the corresponding entry in the array, which we increment by one. In other words, we are counting statistics on which CPU processed the incoming packets. Let’s try to run the program:
$ clang -O2 -g -c -target bpf -I libbpf/src/root/usr/include xdp-simple.bpf.c -o xdp-simple.bpf.o
$ bpftool gen skeleton xdp-simple.bpf.o > xdp-simple.skel.h
$ clang -O2 -g -I ./libbpf/src/root/usr/include/ -o xdp-simple xdp-simple.c ./libbpf/src/root/usr/lib64/libbpf.a -lelf -lz
$ sudo ./xdp-simple
Let’s check that it is attached to lo and send some packets:
$ ip l show dev lo
1: lo:  mtu 65536 xdpgeneric qdisc noqueue state UNKNOWN mode DEFAULT group default qlen 1000
    link/loopback 00:00:00:00:00:00 brd 00:00:00:00:00:00
    prog/xdp id 108

$ for s in `seq 234`; do sudo ping -f -c 100 127.0.0.1 >/dev/null 2>&1; done
Now let's take a look at the array contents:
$ sudo bpftool map dump name woo
[
    { "key": 0, "value": 0 },
    { "key": 1, "value": 400 },
    { "key": 2, "value": 0 },
    { "key": 3, "value": 0 },
    { "key": 4, "value": 0 },
    { "key": 5, "value": 0 },
    { "key": 6, "value": 0 },
    { "key": 7, "value": 46400 }
]
Almost all processes were handled on CPU7. This doesn't matter to us, the important thing is that the program works and we understood how to access maps from BPF programs — using .
The mystical pointer
So, we can access the map from the BPF program using calls like
val = bpf_map_lookup_elem(&woo, &key);where the helper function looks like
void *bpf_map_lookup_elem(struct bpf_map *map, const void *key)but we are passing a pointer &woo to an unnamed structure struct { ... }…
If we look at the assembly of the program, we will see that the value &woo is actually undefined (line 4):
llvm-objdump -D --section xdp/simple xdp-simple.bpf.o

xdp-simple.bpf.o:       file format elf64-bpf

Disassembly of section xdp/simple:

0000000000000000 :
       0:       85 00 00 00 08 00 00 00 call 8
       1:       63 0a fc ff 00 00 00 00 *(u32 *)(r10 - 4) = r0
       2:       bf a2 00 00 00 00 00 00 r2 = r10
       3:       07 02 00 00 fc ff ff ff r2 += -4
       4:       18 01 00 00 00 00 00 00 00 00 00 00 00 00 00 00 r1 = 0 ll
       6:       85 00 00 00 01 00 00 00 call 1
...
and is contained in the relocations:
$ llvm-readelf -r xdp-simple.bpf.o | head -4

Relocation section '.relxdp/simple' at offset 0xe18 contains 1 entries:
    Offset             Info             Type               Symbol's Value  Symbol's Name
0000000000000020  0000002700000001 R_BPF_64_64            0000000000000000 woo
But if we look at the already loaded program, we can see a pointer to the correct map (line 4):
$ sudo bpftool prog dump x name simple
int simple(void *ctx):
   0: (85) call bpf_get_smp_processor_id#114128
   1: (63) *(u32 *)(r10 -4) = r0
   2: (bf) r2 = r10
   3: (07) r2 += -4
   4: (18) r1 = map[id:64]
...
Thus, we can conclude that at the time of running our loader program the reference to &woo was replaced with something by the library libbpf. First, let's look at the output strace:
$ sudo strace -e bpf ./xdp-simple
...
bpf(BPF_MAP_CREATE, {map_type=BPF_MAP_TYPE_ARRAY, key_size=4, value_size=8, max_entries=8, map_name="woo", ...}, 120) = 4
bpf(BPF_PROG_LOAD, {prog_type=BPF_PROG_TYPE_XDP, prog_name="simple", ...}, 120) = 5
We can see that libbpf created the map woo and then loaded our program simple. Let's take a closer look at how we load the program:
- calling
xdp_simple_bpf__open_and_loadfrom the filexdp-simple.skel.h - which calls
xdp_simple_bpf__loadfrom the filexdp-simple.skel.h - which calls
bpf_object__load_skeletonfrom the filelibbpf/src/libbpf.c - which calls
bpf_object__load_xattrfromlibbpf/src/libbpf.c
The last function, among other things, will call bpf_object__create_maps, which creates or opens existing maps, turning them into file descriptors. (This is where we see BPF_MAP_CREATE in the output strace.) Next, we call the function bpf_object__relocate and this is the one that interests us, as we recall that we saw woo in the relocation table. Exploring it, we ultimately end up in the function bpf_program__relocate, which is responsible for :
case RELO_LD64:
    insn[0].src_reg = BPF_PSEUDO_MAP_FD;
    insn[0].imm = obj->maps[relo->map_idx].fd;
    break;
So, we take our instruction
18 01 00 00 00 00 00 00 00 00 00 00 00 00 00 00 r1 = 0 lland replace the source register with BPF_PSEUDO_MAP_FD, and the first IMM with the file descriptor of our map, and if it is equal to, for example, 0xdeadbeef, then as a result we get the instruction
18 11 00 00 ef eb ad de 00 00 00 00 00 00 00 00 r1 = 0 llThis is how information about maps is passed to a specific loaded BPF program. The map can either be created using BPF_MAP_CREATE, or opened by ID using BPF_MAP_GET_FD_BY_ID.
In summary, when using libbpf the algorithm is as follows:
- during compilation, entries are created in the relocation table for references to maps
libbpfopens the ELF object, finds all used maps, and creates file descriptors for them- file descriptors are loaded into the kernel as part of the instruction
LD64
As you understand, this is not all, and we will need to delve into the kernel. Fortunately, we have a clue — we wrote the value BPF_PSEUDO_MAP_FD in the source register and can trace it, which will lead us to the holy of holies — kernel/bpf/verifier.c, where a function with a telling name replaces the file descriptor with the address of a structure of type struct bpf_map:
static int replace_map_fd_with_map_ptr(struct bpf_verifier_env *env) {
    ...

    f = fdget(insn[0].imm);
    map = __bpf_map_get(f);
    if (insn->src_reg == BPF_PSEUDO_MAP_FD) {
        addr = (unsigned long)map;
    }
    insn[0].imm = (u32)addr;
    insn[1].imm = addr >> 32;
(full code can be found ). So we can supplement our algorithm:
- during the program load, the verifier checks the correctness of map usage and writes the address of the corresponding structure
struct bpf_map
When loading an ELF binary using libbpf a lot more events occur, but we will discuss this in the context of other articles.
Loading programs and maps without libbpf
As promised, here is an example for readers who want to know how to create and load a program using maps without assistance libbpfThis can be useful when you are working in an environment where you cannot gather dependencies, are saving every bit, or are writing a program like that generates BPF binary code on the fly.
To make it easier to follow the logic, we will rewrite our example for this purpose xdp-simple.The full and slightly extended code of the program discussed in this example can be found in this .
The logic of our application is as follows:
- create a map of type
BPF_MAP_TYPE_ARRAY,using the commandBPF_MAP_CREATE, - create a program that uses this map,
- attach the program to the interface,
lo,
which translates to human language as
int main(void)
{
    int map_fd, prog_fd;

    map_fd = map_create();
    if (map_fd < 0)
        err(1, "bpf: BPF_MAP_CREATE");

    prog_fd = prog_load(map_fd);
    if (prog_fd < 0)
        err(1, "bpf: BPF_PROG_LOAD");

    xdp_attach(1, prog_fd);
}
Here map_create creates a map just like we did in the first example about the system call bpf — "kernel, please create me a new map in the form of an array of 8 elements of type __u64, and return me a file descriptor:"
static int map_create()
{
    union bpf_attr attr;

    memset(&attr, 0, sizeof(attr));
    attr.map_type = BPF_MAP_TYPE_ARRAY,
    attr.key_size = sizeof(__u32),
    attr.value_size = sizeof(__u64),
    attr.max_entries = 8,
    strncpy(attr.map_name, "woo", sizeof(attr.map_name));
    return syscall(__NR_bpf, BPF_MAP_CREATE, &attr, sizeof(attr));
}
The program is also loaded easily:
static int prog_load(int map_fd)
{
    union bpf_attr attr;
    struct bpf_insn insns[] = {
        ...
    };

    memset(&attr, 0, sizeof(attr));
    attr.prog_type = BPF_PROG_TYPE_XDP;
    attr.insns     = ptr_to_u64(insns);
    attr.insn_cnt  = sizeof(insns)/sizeof(insns[0]);
    attr.license   = ptr_to_u64("GPL");
    strncpy(attr.prog_name, "woo", sizeof(attr.prog_name));
    return syscall(__NR_bpf, BPF_PROG_LOAD, &attr, sizeof(attr));
}
The tricky part prog_load — is the definition of our BPF program in the form of an array of structures struct bpf_insn insns[].But since we are using a program that we have in C, we can cheat a little:
$ llvm-objdump -D --section xdp/simple xdp-simple.bpf.o

0000000000000000 :
       0:       85 00 00 00 08 00 00 00 call 8
       1:       63 0a fc ff 00 00 00 00 *(u32 *)(r10 - 4) = r0
       2:       bf a2 00 00 00 00 00 00 r2 = r10
       3:       07 02 00 00 fc ff ff ff r2 += -4
       4:       18 01 00 00 00 00 00 00 00 00 00 00 00 00 00 00 r1 = 0 ll
       6:       85 00 00 00 01 00 00 00 call 1
       7:       b7 01 00 00 00 00 00 00 r1 = 0
       8:       15 00 04 00 00 00 00 00 if r0 == 0 goto +4
       9:       61 01 00 00 00 00 00 00 r1 = *(u32 *)(r0 + 0)
      10:       07 01 00 00 01 00 00 00 r1 += 1
      11:       63 10 00 00 00 00 00 00 *(u32 *)(r0 + 0) = r1
      12:       b7 01 00 00 02 00 00 00 r1 = 2

0000000000000068 :
      13:       bf 10 00 00 00 00 00 00 r0 = r1
      14:       95 00 00 00 00 00 00 00 exit
In total, we need to write 14 instructions as structures of type struct bpf_insn. (tip: Take the dump above, read the section on instructions, open and and try to determine struct bpf_insn insns[]. on your own):
struct bpf_insn insns[] = {
    /* 85 00 00 00 08 00 00 00 call 8 */
    {
        .code = BPF_JMP | BPF_CALL,
        .imm = 8,
    },

    /* 63 0a fc ff 00 00 00 00 *(u32 *)(r10 - 4) = r0 */
    {
        .code = BPF_MEM | BPF_STX,
        .off = -4,
        .src_reg = BPF_REG_0,
        .dst_reg = BPF_REG_10,
    },

    /* bf a2 00 00 00 00 00 00 r2 = r10 */
    {
        .code = BPF_ALU64 | BPF_MOV | BPF_X,
        .src_reg = BPF_REG_10,
        .dst_reg = BPF_REG_2,
    },

    /* 07 02 00 00 fc ff ff ff r2 += -4 */
    {
        .code = BPF_ALU64 | BPF_ADD | BPF_K,
        .dst_reg = BPF_REG_2,
        .imm = -4,
    },

    /* 18 01 00 00 00 00 00 00 00 00 00 00 00 00 00 00 r1 = 0 ll */
    {
        .code = BPF_LD | BPF_DW | BPF_IMM,
        .src_reg = BPF_PSEUDO_MAP_FD,
        .dst_reg = BPF_REG_1,
        .imm = map_fd,
    },
    { }, /* placeholder */

    /* 85 00 00 00 01 00 00 00 call 1 */
    {
        .code = BPF_JMP | BPF_CALL,
        .imm = 1,
    },

    /* b7 01 00 00 00 00 00 00 r1 = 0 */
    {
        .code = BPF_ALU64 | BPF_MOV | BPF_K,
        .dst_reg = BPF_REG_1,
        .imm = 0,
    },

    /* 15 00 04 00 00 00 00 00 if r0 == 0 goto +4  */
    {
        .code = BPF_JMP | BPF_JEQ | BPF_K,
        .off = 4,
        .src_reg = BPF_REG_0,
        .imm = 0,
    },

    /* 61 01 00 00 00 00 00 00 r1 = *(u32 *)(r0 + 0) */
    {
        .code = BPF_MEM | BPF_LDX,
        .off = 0,
        .src_reg = BPF_REG_0,
        .dst_reg = BPF_REG_1,
    },

    /* 07 01 00 00 01 00 00 00 r1 += 1 */
    {
        .code = BPF_ALU64 | BPF_ADD | BPF_K,
        .dst_reg = BPF_REG_1,
        .imm = 1,
    },

    /* 63 10 00 00 00 00 00 00 *(u32 *)(r0 + 0) = r1 */
    {
        .code = BPF_MEM | BPF_STX,
        .src_reg = BPF_REG_1,
        .dst_reg = BPF_REG_0,
    },

    /* b7 01 00 00 02 00 00 00 r1 = 2 */
    {
        .code = BPF_ALU64 | BPF_MOV | BPF_K,
        .dst_reg = BPF_REG_1,
        .imm = 2,
    },

    /* : bf 10 00 00 00 00 00 00 r0 = r1 */
    {
        .code = BPF_ALU64 | BPF_MOV | BPF_X,
        .src_reg = BPF_REG_1,
        .dst_reg = BPF_REG_0,
    },

    /* 95 00 00 00 00 00 00 00 exit */
    {
        .code = BPF_JMP | BPF_EXIT
    },
};
An exercise for those who didn't write this themselves — find map_fd.
There is still one unexplored part in our program — xdp_attach. Unfortunately, XDP type programs cannot be attached using a system call bpf. The people who created BPF and XDP came from the Linux networking community, which means they used the interface they were most familiar with (but not for normal people) to interact with the kernel: , see also . The easiest way to implement this xdp_attach is to copy the code from libbpf, specifically from the file , which we did, shortening it a bit:
Welcome to the world of netlink sockets
Opening a netlink socket of type NETLINK_ROUTE:
int netlink_open(__u32 *nl_pid)
{
    struct sockaddr_nl sa;
    socklen_t addrlen;
    int one = 1, ret;
    int sock;

    memset(&sa, 0, sizeof(sa));
    sa.nl_family = AF_NETLINK;

    sock = socket(AF_NETLINK, SOCK_RAW, NETLINK_ROUTE);
    if (sock < 0)
        err(1, "socket");

    if (setsockopt(sock, SOL_NETLINK, NETLINK_EXT_ACK, &one, sizeof(one)) < 0)
        warnx("netlink error reporting not supported");

    if (bind(sock, (struct sockaddr *)&sa, sizeof(sa)) < 0)
        err(1, "bind");

    addrlen = sizeof(sa);
    if (getsockname(sock, (struct sockaddr *)&sa, &addrlen) < 0)
        err(1, "getsockname");

    *nl_pid = sa.nl_pid;
    return sock;
}
Reading from such a socket:
static int bpf_netlink_recv(int sock, __u32 nl_pid, int seq)
{
    bool multipart = true;
    struct nlmsgerr *errm;
    struct nlmsghdr *nh;
    char buf[4096];
    int len, ret;

    while (multipart) {
        multipart = false;
        len = recv(sock, buf, sizeof(buf), 0);
        if (len nlmsg_pid != nl_pid)
                errx(1, "wrong pid");
            if (nh->nlmsg_seq != seq)
                errx(1, "INVSEQ");
            if (nh->nlmsg_flags & NLM_F_MULTI)
                multipart = true;
            switch (nh->nlmsg_type) {
                case NLMSG_ERROR:
                    errm = (struct nlmsgerr *)NLMSG_DATA(nh);
                    if (!errm->error)
                        continue;
                    ret = errm->error;
                    // libbpf_nla_dump_errormsg(nh); too many code to copy...
                    goto done;
                case NLMSG_DONE:
                    return 0;
                default:
                    break;
            }
        }
    }
    ret = 0;
done:
    return ret;
}
Finally, here is our function that opens a socket and sends a special message containing a file descriptor:
static int xdp_attach(int ifindex, int prog_fd)
{
    int sock, seq = 0, ret;
    struct nlattr *nla, *nla_xdp;
    struct {
        struct nlmsghdr  nh;
        struct ifinfomsg ifinfo;
        char             attrbuf[64];
    } req;
    __u32 nl_pid = 0;

    sock = netlink_open(&nl_pid);
    if (sock nla_type = NLA_F_NESTED | IFLA_XDP;
    nla->nla_len = NLA_HDRLEN;

    /* add XDP fd */
    nla_xdp = (struct nlattr *)((char *)nla + nla->nla_len);
    nla_xdp->nla_type = IFLA_XDP_FD;
    nla_xdp->nla_len = NLA_HDRLEN + sizeof(int);
    memcpy((char *)nla_xdp + NLA_HDRLEN, &prog_fd, sizeof(prog_fd));
    nla->nla_len += nla_xdp->nla_len;

    /* if user passed in any flags, add those too */
    __u32 flags = XDP_FLAGS_SKB_MODE;
    nla_xdp = (struct nlattr *)((char *)nla + nla->nla_len);
    nla_xdp->nla_type = IFLA_XDP_FLAGS;
    nla_xdp->nla_len = NLA_HDRLEN + sizeof(flags);
    memcpy((char *)nla_xdp + NLA_HDRLEN, &flags, sizeof(flags));
    nla->nla_len += nla_xdp->nla_len;

    req.nh.nlmsg_len += NLA_ALIGN(nla->nla_len);

    if (send(sock, &req, req.nh.nlmsg_len, 0) < 0)
        err(1, "send");
    ret = bpf_netlink_recv(sock, nl_pid, seq);

cleanup:
    close(sock);
    return ret;
}
So, everything is ready for testing:
$ cc nolibbpf.c -o nolibbpf
$ sudo strace -e bpf ./nolibbpf
bpf(BPF_MAP_CREATE, {map_type=BPF_MAP_TYPE_ARRAY, map_name="woo", ...}, 72) = 3
bpf(BPF_PROG_LOAD, {prog_type=BPF_PROG_TYPE_XDP, insn_cnt=15, prog_name="woo", ...}, 72) = 4
+++ exited with 0 +++
Let's see if our program is connected to lo:
$ ip l show dev lo
1: lo:  mtu 65536 xdpgeneric qdisc noqueue state UNKNOWN mode DEFAULT group default qlen 1000
    link/loopback 00:00:00:00:00:00 brd 00:00:00:00:00:00
    prog/xdp id 160
Let's send pings and take a look at the map:
$ for s in `seq 234`; do sudo ping -f -c 100 127.0.0.1 >/dev/null 2>&1; done
$ sudo bpftool m dump name woo
key: 00 00 00 00  value: 90 01 00 00 00 00 00 00
key: 01 00 00 00  value: 00 00 00 00 00 00 00 00
key: 02 00 00 00  value: 00 00 00 00 00 00 00 00
key: 03 00 00 00  value: 00 00 00 00 00 00 00 00
key: 04 00 00 00  value: 00 00 00 00 00 00 00 00
key: 05 00 00 00  value: 00 00 00 00 00 00 00 00
key: 06 00 00 00  value: 40 b5 00 00 00 00 00 00
key: 07 00 00 00  value: 00 00 00 00 00 00 00 00
Found 8 elements
Hooray, everything works. By the way, notice that our map is displayed again in byte format. This happens because we did not load type information (BTF). libbpf But we will talk more about that next time.
Development tools
In this section, we will look at the minimal toolkit for BPF developers.
Generally speaking, you don't need anything special to develop BPF programs — BPF works on any decent distribution kernel, and programs are compiled using clang, which can be installed from the package. However, since BPF is under development, the kernel and tools are constantly changing. If you don't want to write BPF programs the old-fashioned way from 2019, you'll need to compile
llvm/clangpahole- your kernel
bpftool
(For reference: this section and all examples in the article were run on Debian 10.)
llvm/clang
BPF works well with LLVM and, although recently BPF programs can be compiled using gcc, all current development is focused on LLVM. Therefore, the first step is to compile the current version clang from git:
$ sudo apt install ninja-build
$ git clone --depth 1 https://github.com/llvm/llvm-project.git
$ mkdir -p llvm-project/llvm/build/install
$ cd llvm-project/llvm/build
$ cmake .. -G "Ninja" -DLLVM_TARGETS_TO_BUILD="BPF;X86"
                      -DLLVM_ENABLE_PROJECTS="clang"
                      -DBUILD_SHARED_LIBS=OFF
                      -DCMAKE_BUILD_TYPE=Release
                      -DLLVM_BUILD_RUNTIME=OFF
$ time ninja
... much time later
$
Now we can verify if everything was compiled correctly:
$ ./bin/llc --version
LLVM (http://llvm.org/):
  LLVM version 11.0.0git
  Optimized build.
  Default target: x86_64-unknown-linux-gnu
  Host CPU: znver1

  Registered Targets:
    bpf    - BPF (host endian)
    bpfeb  - BPF (big endian)
    bpfel  - BPF (little endian)
    x86    - 32-bit X86: Pentium-Pro and above
    x86-64 - 64-bit X86: EM64T and AMD64
(The build instruction clang was taken by me from .)
We won't be installing the newly built programs, but instead we'll simply add them to PATH, for example:
export PATH="`pwd`/bin:$PATH"(This can be added to .bashrc or to a separate file. Personally, I add such things to ~/bin/activate-llvm.sh and when needed, I do . activate-llvm.sh.)
Pahole and BTF
Utility pahole are used when building the kernel to create debugging information in BTF format. We won't delve into the details of BTF technology in this article, except to note that it's convenient and we want to use it. Therefore, if you're looking to compile your kernel, first compile pahole )" meaning we insert the advertiser's domain in the form of domainadvertiser.ru pahole you won't be able to compile the kernel with the option CONFIG_DEBUG_INFO_BTF:
$ git clone https://git.kernel.org/pub/scm/devel/pahole/pahole.git
$ cd pahole/
$ sudo apt install cmake
$ mkdir build
$ cd build/
$ cmake -D__LIB=lib ..
$ make
$ sudo make install
$ which pahole
/usr/local/bin/pahole
Kernels for experimenting with BPF
When exploring the capabilities of BPF, it's desirable to compile your own kernel. This isn't strictly necessary, as you can compile and load BPF programs on a distribution kernel, but having your own kernel allows you to use the most recent BPF features, which may only appear in your distribution months later or, in the case of some debugging tools, may not be packaged for the foreseeable future. Additionally, having your own kernel lets you feel free to experiment with code.
To build a kernel, you need, first of all, the kernel itself and, secondly, the kernel configuration file. For experimenting with BPF, we can use a regular kernel or one of the development kernels. Historically, BPF development occurs within the Linux networking community, and all changes eventually go through David Miller, the maintainer of the Linux networking subsystem. Depending on their nature — whether it's a patch or new features — networking changes are added to one of two kernels — or . Changes for BPF are similarly distributed among and , which are then merged into net and net-next, respectively. See more in the and . So choose a kernel based on your preferences and system stability needs on which you are testing (*-next kernels are the most unstable of those listed).
This article does not cover how to manage kernel configuration files — it is assumed that you either already know how to do this or are on your own. However, the following instructions should be more or less sufficient for you to get a working BPF-supported system.
Download one of the aforementioned kernels:
$ git clone git://git.kernel.org/pub/scm/linux/kernel/git/bpf/bpf-next.git
$ cd bpf-next
Compile a minimal working kernel configuration:
$ cp /boot/config-`uname -r` .config
$ make localmodconfig
Enable BPF options in the file .config of your choice (most likely, CONFIG_BPF will already be enabled, as it is used by systemd). Here’s a list of options from the kernel that was used for this article:
CONFIG_CGROUP_BPF=y
CONFIG_BPF=y
CONFIG_BPF_LSM=y
CONFIG_BPF_SYSCALL=y
CONFIG_ARCH_WANT_DEFAULT_BPF_JIT=y
CONFIG_BPF_JIT_ALWAYS_ON=y
CONFIG_BPF_JIT_DEFAULT_ON=y
CONFIG_IPV6_SEG6_BPF=y
# CONFIG_NETFILTER_XT_MATCH_BPF is not set
# CONFIG_BPFILTER is not set
CONFIG_NET_CLS_BPF=y
CONFIG_NET_ACT_BPF=y
CONFIG_BPF_JIT=y
CONFIG_BPF_STREAM_PARSER=y
CONFIG_LWTUNNEL_BPF=y
CONFIG_HAVE_EBPF_JIT=y
CONFIG_BPF_EVENTS=y
CONFIG_BPF_KPROBE_OVERRIDE=y
CONFIG_DEBUG_INFO_BTF=y
Next, we can easily build and install the modules and kernel (by the way, you can build the kernel using just the newly built one clang, by adding CC=clang):
$ make -s -j $(getconf _NPROCESSORS_ONLN)
$ sudo make modules_install
$ sudo make install
and reboot with the new kernel (I use kexec from the package kexec-tools):
v=5.8.0-rc6+ # if you are rebuilding the current kernel, you can do v=`uname -r`
sudo kexec -l -t bzImage /boot/vmlinuz-$v --initrd=/boot/initrd.img-$v --reuse-cmdline &&
sudo kexec -e
bpftool
The most commonly used utility in this article will be the utility bpftool, included with the Linux kernel. It is written and maintained by BPF developers for BPF developers, and it allows managing all types of BPF objects: loading programs, creating and modifying maps, exploring the BPF ecosystem, and so on. Documentation in the form of source files for the man pages can be found or, already compiled, .
At the time of writing this article, bpftool is available in ready-made form only for RHEL, Fedora, and Ubuntu (see, for example, , which discusses the unfinished story of packaging bpftool in Debian). But if you have already built your kernel, then building bpftool is quite straightforward:
$ cd ${linux}/tools/bpf/bpftool
# ... specify the paths to the latest clang, as described above
$ make -s

Auto-detecting system features:
...                        libbfd: [ on  ]
...        disassembler-four-args: [ on  ]
...                          zlib: [ on  ]
...                        libcap: [ on  ]
...               clang-bpf-co-re: [ on  ]

Auto-detecting system features:
...                        libelf: [ on  ]
...                          zlib: [ on  ]
...                           bpf: [ on  ]

$
(here ${linux} is your kernel directory.) After executing these commands bpftool it will be built in the directory ${linux}/tools/bpf/bpftool and you will be able to add it to your path (first of all for the user root) or just copy it to /usr/local/sbin.
It is best to build bpftool using the latest one clang, built as described above, and to check if it built correctly — for example, using the command
$ sudo bpftool feature probe kernel
Scanning system configuration...
bpf() syscall for unprivileged users is enabled
JIT compiler is enabled
JIT compiler hardening is disabled
JIT compiler kallsyms exports are enabled for root
...
which will show which BPF features are enabled in your kernel.
By the way, the previous command can be run like
# bpftool f p kThis is done similarly to utilities from the package iproute2, where we can, for example, say ip a s eth0 instead of ip addr show dev eth0.
Conclusion
BPF allows the flea to efficiently measure and dynamically alter kernel functionality. The system has turned out very successful, in the best UNIX traditions: a simple mechanism that allows (re)programming the kernel has enabled a vast number of people and organizations to experiment. And, although both the experiments and the development of the BPF infrastructure are far from over, the system already has a stable ABI that enables building reliable and, most importantly, efficient business logic.
I would like to note that, in my opinion, the technology has become so popular precisely because, on one hand, one can play (the machine architecture can be understood in about one evening), and on the other hand—solve tasks that could not be resolved (elegantly) before its emergence. These two components together compel people to experiment and dream, which leads to the emergence of more and more innovative solutions.
This article, although it turned out to be not particularly short, is just an introduction to the world of BPF and does not describe the 'advanced' opportunities and important parts of the architecture. The further plan is approximately as follows: the next article will review the types of BPF programs (as of kernel 5.8, 30 types of programs are supported), then we will finally look at how to write real applications on BPF using kernel tracing programs, then it will be time for a more in-depth course on BPF architecture, and finally—for examples of BPF network and security applications.
Previous articles in this series
Links
— documentation on BPF from cilium, specifically from Daniel Borkman, one of the creators and maintainers of BPF. This is one of the first serious descriptions that stands out from the others because Daniel knows exactly what he's talking about, and there are no blunders found. In particular, this document explains how to work with BPF programs of types XDP and TC using a well-known utility
ipfrom the packageiproute2.— the original file with documentation on classic and then extended BPF. It's useful to read if you want to delve into assembly and the technical details of the architecture.
. It is rarely updated but precisely so since Alexei Starovoitov (the author of eBPF) and Andrii Nakryiko—a maintainer write there.
libbpf).. An engaging Twitter thread by Quentin Monnet with examples and secrets of using bpftool.
. A massive (and still maintained) list of BPF documentation links from Quentin Monnet.
Source: habr.com
