

Hello, Habra people. As we have already mentioned, this month OTUS is launching two courses on machine learning, namely and . In this regard, we continue to share useful material.
The goal of this article is to talk about our first experience with .
We will start the review with its tracking server and will log all iterations of the research. We will then share our experience of connecting Spark with MLflow using UDF.
Context
We at uses machine learning and artificial intelligence to empower people to take care of their health and well-being. Therefore, machine learning models are the foundation of the data processing products we develop, which is why we were attracted to MLflow — an open-source platform that encompasses all aspects of the machine learning lifecycle.
MLflow
The main objective of MLflow is to provide an additional layer over machine learning that allows data science specialists to work with virtually any machine learning library (, , , , and ), taking its performance to the next level.
MLflow provides three components:
- Tracking – recording and querying experiments: code, data, configuration, and results. Monitoring the model development process is crucial.
- Projects – A packaging format for deployment on any platform (e.g., )
- Models – a common format for submitting models to various deployment tools.
MLflow (as of the writing of this article in alpha version) is an open-source platform that enables managing the machine learning lifecycle, including experiments, reuse, and deployment.
Setting up MLflow
To use MLflow, you first need to set up the entire Python environment, for this we will use (to install Python on Mac, check out ). This way we can create a virtual environment where we will install all the necessary libraries to launch.
```
pyenv install 3.7.0
pyenv global 3.7.0 # Use Python 3.7
mkvirtualenv mlflow # Create a Virtual Env with Python 3.7
workon mlflow
```
We will install the required libraries.
```
pip install mlflow==0.7.0
            Cython==0.29
            numpy==1.14.5
            pandas==0.23.4
            pyarrow==0.11.0
```
Note: We use PyArrow to run models like UDF. The versions of PyArrow and Numpy needed adjustment, as the latest versions conflicted with each other.
Launching Tracking UI
MLflow Tracking allows us to log and query experiments using Python and the API. Additionally, you can define where to store model artifacts (localhost, , , or ). Since we use AWS at Alpha Health, S3 will be used as the artifact storage.
# Running a Tracking Server
mlflow server
    --file-store /tmp/mlflow/fileStore
    --default-artifact-root s3://<bucket>/mlflow/artifacts/
    --host localhost
    --port 5000
MLflow recommends using persistent storage for files. A file storage is where the server will keep the metadata of runs and experiments. When starting the server, ensure it points to persistent storage. For this experiment, we will simply use /tmp.
Remember that if we want to use the mlflow server to run old experiments, they must be present in the file storage. However, even without this, we could use them in UDF, as we only need the path to the model.
Note: Keep in mind that both the Tracking UI and model client must have access to the artifact location. This means that regardless of the Tracking UI being located in an EC2 instance, when running MLflow locally, the machine must have direct access to S3 for writing model artifacts.
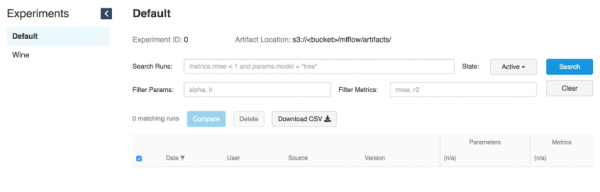
The Tracking UI stores artifacts in an S3 bucket
Running models
Once the Tracking server is up and running, you can start training models.
As an example, we will use the modified wine example from MLflow in .
MLFLOW_TRACKING_URI=http://localhost:5000 python wine_quality.py
  --alpha 0.9
  --l1_ratio 0.5
  --wine_file ./data/winequality-red.csv
As mentioned earlier, MLflow allows logging parameters, metrics, and model artifacts so that we can track their development over iterations. This feature is extremely useful as it enables us to reproduce the best model by referencing the Tracking server or understanding which code executed the necessary iteration using git commit logs.
with mlflow.start_run():

    ... model ...

    mlflow.log_param("source", wine_path)
    mlflow.log_param("alpha", alpha)
    mlflow.log_param("l1_ratio", l1_ratio)

    mlflow.log_metric("rmse", rmse)
    mlflow.log_metric("r2", r2)
    mlflow.log_metric("mae", mae)

    mlflow.set_tag('domain', 'wine')
    mlflow.set_tag('predict', 'quality')
mlflow.sklearn.log_model(lr, "model") 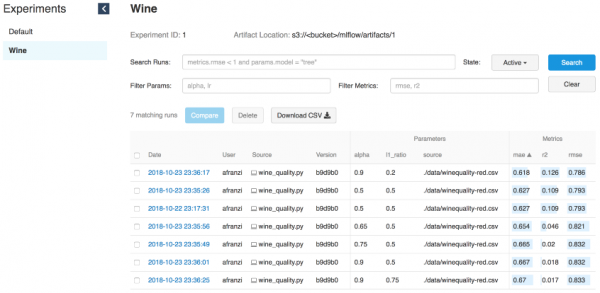
Wine iterations
Backend for the model
The MLflow tracking server, launched with the command “mlflow server,” has a REST API for tracking runs and recording data in the local file system. You can specify the address of the tracking server using the environment variable 'MLFLOW_TRACKING_URI', and the MLflow tracking API will automatically connect to the tracking server at this address to create/retrieve information about runs, log metrics, etc.
Source:
To serve the model, we need a running tracking server (see launch interface) and the model's Run ID.

Run ID
# Serve a sklearn model through 127.0.0.0:5005
MLFLOW_TRACKING_URI=http://0.0.0.0:5000 mlflow sklearn serve
  --port 5005
  --run_id 0f8691808e914d1087cf097a08730f17
  --model-path model
To serve models using the MLflow serve feature, we need access to the Tracking UI to obtain information about the model simply by specifying --run_id.
Once the model is connected to the tracking server, we can obtain a new model endpoint.
# Query Tracking Server Endpoint
curl -X POST
  http://127.0.0.1:5005/invocations
  -H 'Content-Type: application/json'
  -d '[
	{
		"fixed acidity": 3.42,
		"volatile acidity": 1.66,
		"citric acid": 0.48,
		"residual sugar": 4.2,
		"chloridessssss": 0.229,
		"free sulfur dsioxide": 19,
		"total sulfur dioxide": 25,
		"density": 1.98,
		"pH": 5.33,
		"sulphates": 4.39,
		"alcohol": 10.8
	}
]'

> {"predictions": [5.825055635303461]}
Running models from Spark
Although the tracking server is powerful enough to serve models in real-time, training them and using the serve feature (source: ), using Spark (batch or streaming) is an even more powerful solution due to its distributed nature.
Imagine you just completed training offline and then applied the output model to all your data. That's where Spark and MLflow excel.
Installing PySpark + Jupyter + Spark
Source:
To demonstrate how we apply MLflow models to Spark DataFrames, we need to set up collaboration between Jupyter notebooks and PySpark.
Start by installing the latest stable version :
cd ~/Downloads/
tar -xzf spark-2.4.3-bin-hadoop2.7.tgz
mv ~/Downloads/spark-2.4.3-bin-hadoop2.7 ~/
ln -s ~/spark-2.4.3-bin-hadoop2.7 ~/spark
Install PySpark and Jupyter in a virtual environment:
pip install pyspark jupyterSet up environment variables:
export SPARK_HOME=~/spark
export PATH=$SPARK_HOME/bin:$PATH
export PYSPARK_DRIVER_PYTHON=jupyter
export PYSPARK_DRIVER_PYTHON_OPTS="notebook --notebook-dir=${HOME}/Projects/notebooks"
By defining notebook-dir, we can store our notebooks in the desired folder.
Launching Jupyter from PySpark
Since we’ve been able to set up Jupyter as the PySpark driver, we can now launch a Jupyter notebook in the context of PySpark.
(mlflow) afranzi:~$ pyspark
[I 19:05:01.572 NotebookApp] sparkmagic extension enabled!
[I 19:05:01.573 NotebookApp] Serving notebooks from local directory: /Users/afranzi/Projects/notebooks
[I 19:05:01.573 NotebookApp] The Jupyter Notebook is running at:
[I 19:05:01.573 NotebookApp] http://localhost:8888/?token=c06252daa6a12cfdd33c1d2e96c8d3b19d90e9f6fc171745
[I 19:05:01.573 NotebookApp] Use Control-C to stop this server and shut down all kernels (twice to skip confirmation).
[C 19:05:01.574 NotebookApp]

    Copy/paste this URL into your browser when you connect for the first time,
    to login with a token:
http://localhost:8888/?token=c06252daa6a12cfdd33c1d2e96c8d3b19d90e9f6fc171745 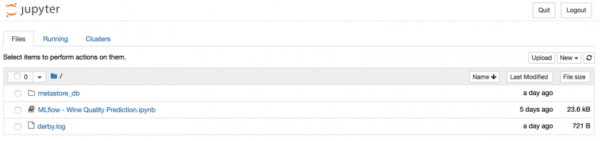
As mentioned above, MLflow provides the capability to log model artifacts to S3. Once we have the selected model in hand, we can import it as a UDF using the module mlflow.pyfunc.
import mlflow.pyfunc

model_path = 's3:///mlflow/artifacts/1/0f8691808e914d1087cf097a08730f17/artifacts/model'
wine_path = '/Users/afranzi/Projects/data/winequality-red.csv'
wine_udf = mlflow.pyfunc.spark_udf(spark, model_path)

df = spark.read.format("csv").option("header", "true").option('delimiter', ';').load(wine_path)
columns = [ "fixed acidity", "volatile acidity", "citric acid",
            "residual sugar", "chlorides", "free sulfur dioxide",
            "total sulfur dioxide", "density", "pH",
            "sulphates", "alcohol"
          ]

df.withColumn('prediction', wine_udf(*columns)).show(100, False) 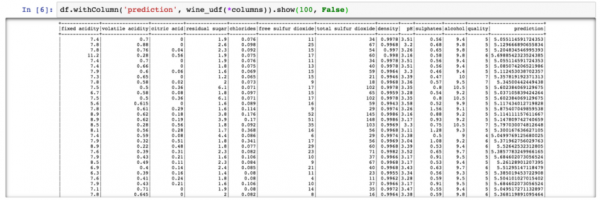
PySpark – Wine Quality Prediction Output
Up until now, we have discussed how to use PySpark with MLflow to run wine quality predictions on the entire wine dataset. But what if we need to use MLflow Python modules from Scala Spark?
We tested this by sharing the Spark context between Scala and Python. That is, we registered the MLflow UDF in Python and used it from Scala (yes, perhaps not the best solution, but it's what we have).
Scala Spark + MLflow
For this example, we will add to the existing Jupyter.
Installing Spark + Toree + Jupyter
pip install toree
jupyter toree install --spark_home=${SPARK_HOME} --sys-prefix
jupyter kernelspec list
```
```
Available kernels:
  apache_toree_scala    /Users/afranzi/.virtualenvs/mlflow/share/jupyter/kernels/apache_toree_scala
  python3               /Users/afranzi/.virtualenvs/mlflow/share/jupyter/kernels/python3
```
As can be seen from the attached notebook, UDF is used with both Spark and PySpark. We hope this section will be useful for those who love Scala and want to deploy machine learning models in production.
import org.apache.spark.sql.functions.col
import org.apache.spark.sql.types.StructType
import org.apache.spark.sql.{Column, DataFrame}
import scala.util.matching.Regex

val FirstAtRe: Regex = "^_".r
val AliasRe: Regex = "[\s_.:@]+".r

def getFieldAlias(field_name: String): String = {
    FirstAtRe.replaceAllIn(AliasRe.replaceAllIn(field_name, "_"), "")
}

def selectFieldsNormalized(columns: List[String])(df: DataFrame): DataFrame = {
    val fieldsToSelect: List[Column] = columns.map(field =>
        col(field).as(getFieldAlias(field))
    )
    df.select(fieldsToSelect: _*)
}

def normalizeSchema(df: DataFrame): DataFrame = {
    val schema = df.columns.toList
    df.transform(selectFieldsNormalized(schema))
}

FirstAtRe = ^_
AliasRe = [s_.:@]+

getFieldAlias: (field_name: String)String
selectFieldsNormalized: (columns: List[String])(df: org.apache.spark.sql.DataFrame)org.apache.spark.sql.DataFrame
normalizeSchema: (df: org.apache.spark.sql.DataFrame)org.apache.spark.sql.DataFrame
Out[1]:
[s_.:@]+
In [2]:
val winePath = "~\/Research\/mlflow-workshop\/examples\/wine_quality\/data\/winequality-red.csv"
val modelPath = "\/tmp\/mlflow\/artifactStore\/0\/96cba14c6e4b452e937eb5072467bf79\/artifacts\/model"

winePath = ~\/Research\/mlflow-workshop\/examples\/wine_quality\/data\/winequality-red.csv
modelPath = \/tmp\/mlflow\/artifactStore\/0\/96cba14c6e4b452e937eb5072467bf79\/artifacts\/model
Out[2]:
\/tmp\/mlflow\/artifactStore\/0\/96cba14c6e4b452e937eb5072467bf79\/artifacts\/model
In [3]:
val df = spark.read
              .format("csv")
              .option("header", "true")
              .option("delimiter", ";")
              .load(winePath)
              .transform(normalizeSchema)

df = [fixed_acidity: string, volatile_acidity: string ... 10 more fields]
Out[3]:
[fixed_acidity: string, volatile_acidity: string ... 10 more fields]
In [4]:
%%PySpark
import mlflow
from mlflow import pyfunc

model_path = "\/tmp\/mlflow\/artifactStore\/0\/96cba14c6e4b452e937eb5072467bf79\/artifacts\/model"
wine_quality_udf = mlflow.pyfunc.spark_udf(spark, model_path)

spark.udf.register("wineQuality", wine_quality_udf)
Out[4]:
<function spark_udf..predict at 0x1116a98c8>
In [6]:
df.createOrReplaceTempView("wines")
In [10]:
%%SQL
SELECT
    quality,
    wineQuality(
        fixed_acidity,
        volatile_acidity,
        citric_acid,
        residual_sugar,
        chlorides,
        free_sulfur_dioxide,
        total_sulfur_dioxide,
        density,
        pH,
        sulphates,
        alcohol
    ) AS prediction
FROM wines
LIMIT 10
Out[10]:
+-------+------------------+
|quality|        prediction|
+-------+------------------+
|      5| 5.576883967129615|
|      5|  5.50664776916154|
|      5| 5.525504822954496|
|      6| 5.504311247097457|
|      5| 5.576883967129615|
|      5|5.5556903912725755|
|      5| 5.467882654744997|
|      7| 5.710602976324739|
|      7| 5.657319539336507|
|      5| 5.345098606538708|
+-------+------------------+

In [17]:
spark.catalog.listFunctions.filter('name like "%wineQuality%").show(20, false)

+-----------+--------+-----------+---------+-----------+
|name       |database|description|className|isTemporary|
+-----------+--------+-----------+---------+-----------+
|wineQuality|null    |null       |null     |true       |
+-----------+--------+-----------+---------+-----------+
Next Steps
Despite the fact that as of the time of writing this article, MLflow is in Alpha version, it looks quite promising. The very ability to run multiple machine learning frameworks and use them from a single endpoint elevates recommendation systems to a new level.
Moreover, MLflow bridges the gap between Data Engineers and Data Science specialists, establishing a common layer between them.
After this MLflow research, we are confident that we will move forward and use it for our Spark pipelines and in recommendation systems.
It would be nice to synchronize the file storage with the database instead of the file system. This way, we should have multiple endpoints that can use the same file storage. For example, utilizing several instances and with the same Glue metastore.
In conclusion, we would like to thank the MLFlow community for making our data work more interesting.
If you're experimenting with MLflow, feel free to write to us and share how you're using it, especially if you're utilizing it in production.
Learn more about the courses:
Read more:
Source: habr.com
