

25 years ago, Java entered the realm of programmers to ultimately become one of the pillars around which application stacks are built. However, today many individuals and organizations who remained loyal to Java for years are transitioning or contemplating a move to the platform or its derivatives, such as or .
Unfortunately, Kubernetes has a steep learning curve and adds yet another operational layer to the development process familiar to Java programmers. Today, we'll discuss how to utilize , to simplify these additional operations associated with Kubernetes and containers, as well as ensure a seamless migration to the cloud platform while preserving the familiar Java ecosystem. Furthermore, we will demonstrate how to deploy Java applications on OpenShift using the OpenShift Maven plugin.
The traditional Java development process
The traditional development process (Fig. 1) involves the developer writing code, then creating deployment units in the form of JAR or WAR files, and finally deploying and running these files on a web server or application server. This is mainly done using Maven from the command line or utilizing an IDE, such as IntelliJ or Eclipse, to code and package applications. Developers are accustomed to making changes to the code and thoroughly testing everything before finalizing the code and submitting it to version control.
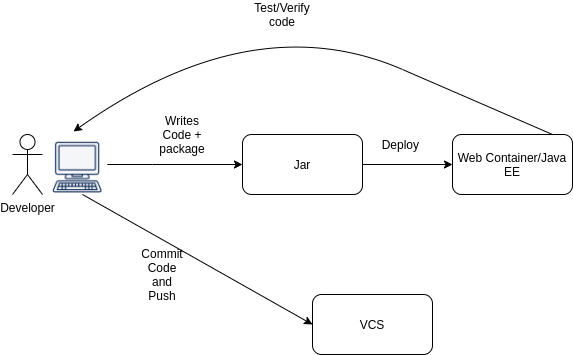
Fig. 1. Traditional Java development process.
The Java development process for the cloud
When transitioning to cloud applications, Kubernetes and are incorporated into the above schema. Therefore, the developer now needs to package Java applications into and create Kubernetes manifests describing these images. These manifests are then applied to the production server where Kubernetes operates. In turn, Kubernetes retrieves these images from the registry and deploys the applications according to the configurations specified in the manifests, which are usually YAML files.
The metamorphosis of the traditional Java development process when transitioning to the cloud is illustrated in Fig. 2.
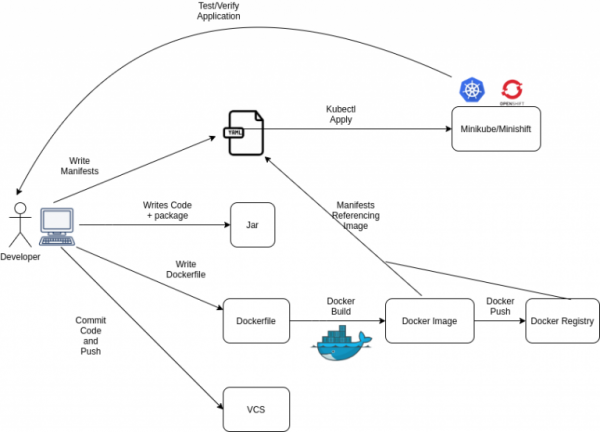
Fig. 2. Java development process for the cloud.
Eclipse JKube
Transitioning to Kubernetes adds another operational layer to the development process, which unsettles many developers as they wish to focus on their core work—application logic—rather than deployment concerns. This is where , which allows developers to utilize their libraries and plugins ( together with or ), comes into play, enabling effortless execution of container and Kubernetes-related operations, following the scheme shown in Fig. 2.
In the remainder of this article, we will demonstrate how to simplify the Java development process in a Kubernetes environment using Eclipse JKube with the Kubernetes Maven Plugin.
Cloud Development Process Using Eclipse JKube
Let’s consider a slightly modified cloud Java development scheme with Fig. 2, introducing Eclipse JKube and the Kubernetes Maven Plugin, as illustrated in Fig. 3.
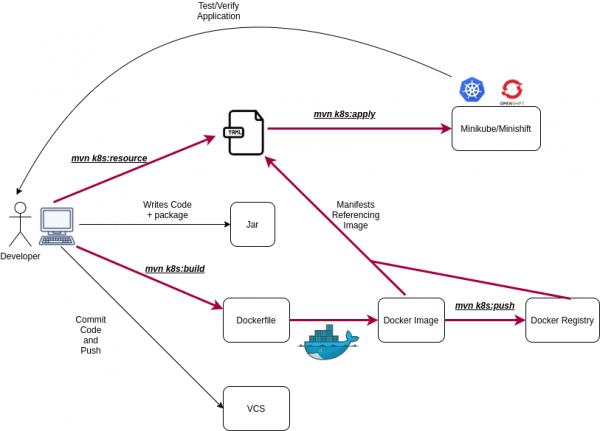
Fig. 3. Java Development Process for the Cloud Using Eclipse JKube.
As we can see, all operations interacting with Kubernetes and containers (highlighted in red in the diagram) are replaced by the default goal tasks of Eclipse JKube, listed in Table 1.
Table 1. Default Tasks of Eclipse JKube.
Task
The
Description
PRE_INTEGRATION_TEST
Building Docker Images
INSTALL
Pushing Docker Images to the Registry
PROCESS_RESOURCES
Generating K8s Manifests
COMPILE
Applying Generated Manifests to K8s
UNDEPLOY
Removing K8s Resources Deployed via k8s:apply and k8s:deploy
Note: If you prefer not to use these opinionated defaults, you can manually configure Eclipse JKube to suit your needs, as it supports configuration via and .
Now let's look at examples of using Eclipse JKube and the Kubernetes Maven Plugin with applications.
Deploying a Java Application to Kubernetes Using Eclipse JKube
In this example, we will deploy a simple Java application in a cluster using Eclipse JKube. By utilizing the Kubernetes Maven Plugin, we can specify the deployment parameters without needing to define any configuration.
For our application example, we will use , which outputs JSON at the endpoint /random:
~work/repos/eclipse-jkube-demo-project : $ curl localhost:8080/random | jq .
  % Total    % Received % Xferd  Average Speed   Time    Time     Time  Current
                                 Dload  Upload   Total   Spent    Left  Speed
100    45    0    45    0     0    818      0 --:--:-- --:--:-- --:--:--   818
{
  "id": "e80a4d10-c79b-4b9a-aaac-7c286cb37f3c"
}
Step 1. Uploading the Kubernetes Maven Plugin
The Kubernetes Maven Plugin is located in the repository . To use Eclipse JKube, you need to add the Kubernetes Maven Plugin to your pom.xml as a dependency:
org.eclipse.jkube
     kubernetes-maven-plugin
     ${jkube.version}
If OpenShift is used instead of pure Kubernetes, then pom.xml needs to be modified as follows:
org.eclipse.jkube
     openshift-maven-plugin
     ${jkube.version}
Step 2. Building the Docker Image
The application JAR file can be assembled with the command mvn package, and then you can use the goal task mvn k8s:build to build the Docker image of this application. Note that we have overridden the default image name with the following property:
docker.io/rohankanojia/random-generator:${project.version}
Before building the image, make sure that the Docker daemon is correctly exposed. This can be done with the following command:
$ eval $(minikube docker-env)
Next, we enter the command mvn k8s:build, and here is what we will see on the screen when building the Docker image with the Eclipse JKube build task:
~/work/repos/eclipse-jkube-demo-project : $ mvn k8s:build
[INFO] Scanning for projects...
[INFO]
[INFO] ---------------------------------------------
[INFO] Building random-generator 0.0.1
[INFO] --------------------------------[ jar ]---------------------------------
[INFO]
[INFO] --- kubernetes-maven-plugin:1.0.0-rc-1:build (default-cli) @ random-generator ---
[INFO] k8s: Running in Kubernetes mode
[INFO] k8s: Building Docker image in Kubernetes mode
[INFO] k8s: Running generator spring-boot
[INFO] k8s: spring-boot: Using Docker image quay.io/jkube/jkube-java-binary-s2i:0.0.7 as base / builder
[INFO] k8s: [docker.io/rohankanojia/random-generator:0.0.1] "spring-boot": Created docker-build.tar in 251 milliseconds
[INFO] k8s: [docker.io/rohankanojia/random-generator:0.0.1] "spring-boot": Built image sha256:a20e5
[INFO] ------------------------------------------------------------------------
[INFO] BUILD SUCCESS
[INFO] ------------------------------------------------------------------------
[INFO] Total time:  5.053 s
[INFO] Finished at: 2020-08-10T11:28:23+05:30
[INFO] ------------------------------------------------------------------------
~/work/repos/eclipse-jkube-demo-project : $
Step 3. Pushing the Image to the Docker Registry
After we have built the Docker image with the configured push registry (in our case this is docker.io), we can push this image to the registry. Here is what will be displayed on the screen after we ask Eclipse JKube to execute the push task mvn k8s:push:
~\/work\/repos\/eclipse-jkube-demo-project : $ mvn k8s:push
[INFO] Scanning for projects...
[INFO]
[INFO] ---------------------------------------------
[INFO] Building random-generator 0.0.1
[INFO] --------------------------------[ jar ]---------------------------------
[INFO]
[INFO] --- kubernetes-maven-plugin:1.0.0-rc-1:push (default-cli) @ random-generator ---
[INFO] k8s: Running in Kubernetes mode
[INFO] k8s: Building Docker image in Kubernetes mode
[INFO] k8s: Running generator spring-boot
[INFO] k8s: spring-boot: Using Docker image quay.io\/jkube\/jkube-java-binary-s2i:0.0.7 as base \/ builder
[INFO] k8s: The push refers to repository [docker.io\/rohankanojia\/random-generator]
5dcd9556710f: Layer already exists
b7139ad07aa8: Layer already exists
b6f081e4b2b6: Layer already exists
d8e1f35641ac: Layer already exists
[INFO] k8s: 0.0.1: digest: sha256:9f9eda2a13b8cab1d2c9e474248500145fc09e2922fe3735692f9bda4c76002d size: 1162
[INFO] k8s: Pushed docker.io\/rohankanojia\/random-generator:0.0.1 in 7 seconds
[INFO] ------------------------------------------------------------------------
[INFO] BUILD SUCCESS
[INFO] ------------------------------------------------------------------------
[INFO] Total time:  11.222 s
[INFO] Finished at: 2020-08-10T11:35:37+05:30
[INFO] ------------------------------------------------------------------------
~\/work\/repos\/eclipse-jkube-demo-project : $
After pushing the image, we need to verify that it has entered the registry. In our case, we can simply see it in Docker Hub, as shown in Fig. 4.
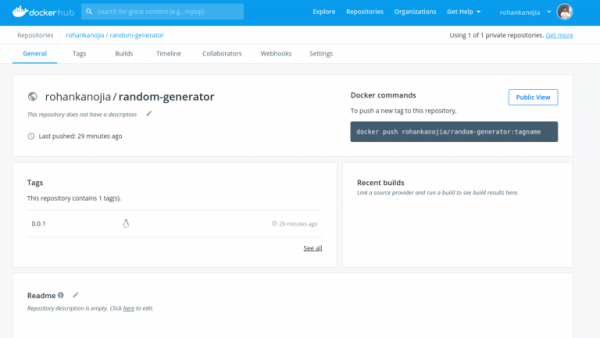
Fig. 4. The image pushed to the registry appeared in Docker Hub.
Step 4. Generating Kubernetes resource manifests for the application
Now that we have built the application image, we need to write the Kubernetes manifests. For this, Eclipse JKube has a task that generates strict resource manifests based on the underlying Java framework (, , Vert.x, or another one). You can also set up the manifest using a configuration XML file and placing raw fragments (the required resource manifest fragments) in the application folder src\/main\/jkube. In this case, your configuration will be injected into the generated manifests.
In our example, we will leave everything as is, and therefore Eclipse JKube generates a manifest for the default deployment and for a service with type ClusterIP. We will then modify the service manifest to change the service type to NodePort. You can override the default behavior using the following property:
NodePort
Here is what the console output looks like after we ask Eclipse JKube to execute the resource task mvn k8s:resource.
~\/work\/repos\/eclipse-jkube-demo-project : $ mvn k8s:resource
[INFO] Scanning for projects...
[INFO]
[INFO] ---------------------------------------------
[INFO] Building random-generator 0.0.1
[INFO] --------------------------------[ jar ]---------------------------------
[INFO]
[INFO] --- kubernetes-maven-plugin:1.0.0-rc-1:resource (default-cli) @ random-generator ---
[INFO] k8s: Running generator spring-boot
[INFO] k8s: spring-boot: Using Docker image quay.io\/jkube\/jkube-java-binary-s2i:0.0.7 as base \/ builder
[INFO] k8s: jkube-controller: Adding a default Deployment
[INFO] k8s: jkube-service: Adding a default service 'random-generator' with ports [8080]
[INFO] k8s: jkube-healthcheck-spring-boot: Adding readiness probe on port 8080, path='\/actuator\/health', scheme='HTTP', with initial delay 10 seconds
[INFO] k8s: jkube-healthcheck-spring-boot: Adding liveness probe on port 8080, path='\/actuator\/health', scheme='HTTP', with initial delay 180 seconds
[INFO] k8s: jkube-revision-history: Adding revision history limit to 2
[INFO] ------------------------------------------------------------------------
[INFO] BUILD SUCCESS
[INFO] ------------------------------------------------------------------------
[INFO] Total time:  3.344 s
[INFO] Finished at: 2020-08-10T11:38:11+05:30
[INFO] ------------------------------------------------------------------------
~\/work\/repos\/eclipse-jkube-demo-project : $ ls target\/classes\/META-INF\/jkube\/kubernetes
random-generator-deployment.yml  random-generator-service.yml
~\/work\/repos\/eclipse-jkube-demo-project : $ cat target\/classes\/META-INF\/jkube\/kubernetes\/random-generator-deployment.yml | head -n10
---
apiVersion: apps\/v1
kind: Deployment
metadata:
  annotations:
    jkube.io\/git-url: git@github.com:rohanKanojia\/eclipse-jkube-demo-project.git
    jkube.io\/git-commit: 1ef9ef2ef7a6fcbf8eb64c293f26f9c42d026512
    jkube.io\/git-branch: master
    jkube.io\/scm-url: https:\/\/github.com\/spring-projects\/spring-boot\/spring-boot-starter-parent\/random-generator
    jkube.io\/scm-tag: HEAD
~\/work\/repos\/eclipse-jkube-demo-project : $
Step 5. Deploying the application in the Kubernetes cluster
Now, we are all set to proceed with the application deployment: we generated its image and then automatically created the resource manifests. The only thing left is to apply all this to the Kubernetes cluster. To deploy the application, you can certainly use the kubectl apply -f command, but the plugin can do this for us as well. Here’s what will appear on the screen after we ask Eclipse JKube to execute the apply task mvn k8s:apply:
~\/work\/repos\/eclipse-jkube-demo-project : $ mvn k8s:apply
[INFO] Scanning for projects...
[INFO]
[INFO] ---------------------------------------------
[INFO] Building random-generator 0.0.1
[INFO] --------------------------------[ jar ]---------------------------------
[INFO]
[INFO] --- kubernetes-maven-plugin:1.0.0-rc-1:apply (default-cli) @ random-generator ---
[INFO] k8s: Using Kubernetes at https://192.168.39.145:8443/ in namespace default with manifest /home/rohaan/work/repos/eclipse-jkube-demo-project/target/classes/META-INF/jkube/kubernetes.yml
[INFO] k8s: Using namespace: default
[INFO] k8s: Creating a Service from kubernetes.yml namespace default name random-generator
[INFO] k8s: Created Service: target/jkube/applyJson/default/service-random-generator.json
[INFO] k8s: Creating a Deployment from kubernetes.yml namespace default name random-generator
[INFO] k8s: Created Deployment: target/jkube/applyJson/default/deployment-random-generator.json
[INFO] k8s: HINT: Use the command `kubectl get pods -w` to watch your pods start up
[INFO] ------------------------------------------------------------------------
[INFO] BUILD SUCCESS
[INFO] ------------------------------------------------------------------------
[INFO] Total time:  7.306 s
[INFO] Finished at: 2020-08-10T11:40:57+05:30
[INFO] ------------------------------------------------------------------------
~\/work\/repos\/eclipse-jkube-demo-project : $ kubectl get pods -w
NAME                                                     READY   STATUS             RESTARTS   AGE
random-generator-58b7847d7f-9m9df                        0\/1     Running            0          7s
random-generator-58b7847d7f-9m9df                        1\/1     Running            0          17s
^C~\/work\/repos\/eclipse-jkube-demo-project : $ kubectl get svc
NAME                                    TYPE        CLUSTER-IP      EXTERNAL-IP   PORT(S)           AGE
io-openliberty-sample-getting-started   NodePort    10.110.4.104            9080:30570\/TCP    44h
kubernetes                              ClusterIP   10.96.0.1               443\/TCP           18d
random-generator                        NodePort    10.97.172.147           8080:32186\/TCP    22s
~\/work\/repos\/eclipse-jkube-demo-project : $ curl `minikube ip`:32186\/random | jq .
  % Total    % Received % Xferd  Average Speed   Time    Time     Time  Current
                                 Dload  Upload   Total   Spent    Left  Speed
100    45    0    45    0     0   1800      0 --:--:-- --:--:-- --:--:--  1875
{
  "id": "42e5571f-a20f-44b3-8184-370356581d10"
}
Step 6. Undeploying the application from the Kubernetes cluster
This is done using the undeploy task, which simply removes all the resources that were applied in the previous step, i.e., during the execution of the apply task. Here's what we will see on the screen after we ask Eclipse JKube to execute the undeploy task mvn k8s:undeploy:
~\/work\/repos\/eclipse-jkube-demo-project : $ kubectl get all
NAME                                    READY   STATUS    RESTARTS   AGE
pod\/random-generator-58b7847d7f-9m9df   1\/1     Running   0          5m21s

NAME                       TYPE        CLUSTER-IP      EXTERNAL-IP   PORT(S)          AGE
service\/kubernetes         ClusterIP   10.96.0.1               443\/TCP          18d
service\/random-generator   NodePort    10.97.172.147           8080:32186\/TCP   5m21s

NAME                               READY   UP-TO-DATE   AVAILABLE   AGE
deployment.apps\/random-generator   1\/1     1            1           5m21s

NAME                                          DESIRED   CURRENT   READY   AGE
replicaset.apps\/random-generator-58b7847d7f   1         1         1       5m21s
~\/work\/repos\/eclipse-jkube-demo-project : $ mvn k8s:undeploy
[INFO] Scanning for projects...
[INFO]
[INFO] ---------------------------------------------
[INFO] Building random-generator 0.0.1
[INFO] --------------------------------[ jar ]---------------------------------
[INFO]
[INFO] --- kubernetes-maven-plugin:1.0.0-rc-1:undeploy (default-cli) @ random-generator ---
[INFO] k8s: Using Kubernetes at https:\/\/192.168.39.145:8443\/ in namespace default with manifest \/home\/rohaan\/work\/repos\/eclipse-jkube-demo-project\/target\/classes\/META-INF\/jkube\/kubernetes.yml
[INFO] k8s: Using namespace: default
[INFO] k8s: Deleting resource Deployment default\/random-generator
[INFO] k8s: Deleting resource Service default\/random-generator
[INFO] k8s: HINT: Use the command `kubectl get pods -w` to watch your pods start up
[INFO] ------------------------------------------------------------------------
[INFO] BUILD SUCCESS
[INFO] ------------------------------------------------------------------------
[INFO] Total time:  3.412 s
[INFO] Finished at: 2020-08-10T11:46:22+05:30
[INFO] ------------------------------------------------------------------------
~\/work\/repos\/eclipse-jkube-demo-project : $ kubectl get pods -w
^C~\/work\/repos\/eclipse-jkube-demo-project : $ kubectl get all
NAME                 TYPE        CLUSTER-IP   EXTERNAL-IP   PORT(S)   AGE
service\/kubernetes   ClusterIP   10.96.0.1            443\/TCP   18d
~\/work\/repos\/eclipse-jkube-demo-project : $
What else can be done with Eclipse JKube
So, we have covered the main goals of Eclipse JKube and the Kubernetes Maven Plugin that simplify the development of Java applications for the Kubernetes platform. If you prefer not to continuously input these goals from the keyboard, you can write them in the plugin configuration, like this:
org.eclipse.jkube
     kubernetes-maven-plugin
     ${project.version}


                  build
                  resource
                  apply
It should be noted that this article does not cover all the goals available in Eclipse JKube and the Kubernetes Maven Plugin, so we provide in Table 2 a list of additional tasks that may also be useful to you.
Table 2. Additional goals of Eclipse JKube.
Task
The
Description
VALIDATE
Retrieving logs from an application running on Kubernetes.
PACKAGE
Opening a debug port to debug the application running on Kubernetes directly from the IDE.
INSTALL
Creating a fork for the Install task and applying the generated manifests to the Kubernetes cluster just like in the case of the apply task.
PACKAGE
Automatic hot deployment of the application by monitoring its namespace.
Deploying Java applications on Red Hat OpenShift using the OpenShift Maven Plugin.
To deploy the application from our example on the Red Hat OpenShift platform, we will use the . The only difference will be that the task prefix will change from k8s to oc. By default, the Kubernetes Maven plugin performs -builds, while the OpenShift Maven plugin performs builds . We do not make any changes to our project, except for removing the property jkube.generator.name, as it is not required when pushing to the registry (at the build stage, OpenShift places the image in its internal registry). And this is what will appear on the screen when we run our example, where, by the way, we execute the goal tasks not one by one but all at once:
~\/work\/repos\/eclipse-jkube-demo-project : $ mvn oc:build oc:resource oc:apply
[INFO] Scanning for projects...
[INFO]
[INFO] ---------------------------------------------
[INFO] Building random-generator 0.0.1
[INFO] --------------------------------[ jar ]---------------------------------
[INFO]
[INFO] --- openshift-maven-plugin:1.0.0-rc-1:build (default-cli) @ random-generator ---
[INFO] oc: Using OpenShift build with strategy S2I
[INFO] oc: Running in OpenShift mode
[INFO] oc: Running generator spring-boot
[INFO] oc: spring-boot: Using Docker image quay.io\/jkube\/jkube-java-binary-s2i:0.0.7 as base \/ builder
[INFO] oc: [random-generator:0.0.1] "spring-boot": Created docker source tar \/home\/rohaan\/work\/repos\/eclipse-jkube-demo-project\/target\/docker\/random-generator\/0.0.1\/tmp\/docker-build.tar
[INFO] oc: Adding to Secret pullsecret-jkube
[INFO] oc: Using Secret pullsecret-jkube
[INFO] oc: Creating BuildServiceConfig random-generator-s2i for Source build
[INFO] oc: Creating ImageStream random-generator
[INFO] oc: Starting Build random-generator-s2i
[INFO] oc: Waiting for build random-generator-s2i-1 to complete...
[INFO] oc: Caching blobs under "\/var\/cache\/blobs".
[INFO] oc: Getting image source signatures
[INFO] oc: Copying blob sha256:cf0f3ebe9f536c782ab3835049cfbd9a663761ded9370791ef6ea3965c823aad
[INFO] oc: Copying blob sha256:57de4da701b511cba33bbdc424757f7f3b408bea741ca714ace265da9b59191a
[INFO] oc: Copying blob sha256:f320f94d91a064281f5127d5f49954b481062c7d56cce3b09910e471cf849050
[INFO] oc: Copying config sha256:52d6788fcfdd39595264d34a3959464a5dabc1d4ef0ae188802b20fc2d6a857b
[INFO] oc: Writing manifest to image destination
[INFO] oc: Storing signatures
[INFO] oc: Generating dockerfile with builder image quay.io\/jkube\/jkube-java-binary-s2i:0.0.7
[INFO] oc: STEP 1: FROM quay.io\/jkube\/jkube-java-binary-s2i:0.0.7
[INFO] oc: STEP 2: LABEL "io.openshift.build.source-location"="\/tmp\/build\/inputs"       "io.openshift.build.image"="quay.io\/jkube\/jkube-java-binary-s2i:0.0.7"
[INFO] oc: STEP 3: ENV JAVA_APP_DIR="\/deployments"     OPENSHIFT_BUILD_NAME="random-generator-s2i-1"     OPENSHIFT_BUILD_NAMESPACE="default"
[INFO] oc: STEP 4: USER root
[INFO] oc: STEP 5: COPY upload\/src \/tmp\/src
[INFO] oc: STEP 6: RUN chown -R 1000:0 \/tmp\/src
[INFO] oc: STEP 7: USER 1000
[INFO] oc: STEP 8: RUN \/usr\/local\/s2i\/assemble
[INFO] oc: INFO S2I source build with plain binaries detected
[INFO] oc: INFO S2I binary build from fabric8-maven-plugin detected
[INFO] oc: INFO Copying binaries from \/tmp\/src\/deployments to \/deployments ...
[INFO] oc: random-generator-0.0.1.jar
[INFO] oc: INFO Copying deployments from deployments to \/deployments...
[INFO] oc: '\/tmp\/src\/deployments\/random-generator-0.0.1.jar' -> '\/deployments\/random-generator-0.0.1.jar'
[INFO] oc: STEP 9: CMD \/usr\/local\/s2i\/run
[INFO] oc: STEP 10: COMMIT temp.builder.openshift.io\/default\/random-generator-s2i-1:48795e41
[INFO] oc: time="2020-08-10T06:37:49Z" level=info msg="Image operating system mismatch: image uses "", expecting "linux""
[INFO] oc: time="2020-08-10T06:37:49Z" level=info msg="Image architecture mismatch: image uses "", expecting "amd64""
[INFO] oc: Getting image source signatures
[INFO] oc: Copying blob sha256:d8e1f35641acb80b562f70cf49911341dfbe8c86f4d522b18efbf3732aa74223
[INFO] oc: Copying blob sha256:b6f081e4b2b6de8be4b1dec132043d14c121e968384dd624fb69c2c07b482edb
[INFO] oc: Copying blob sha256:b7139ad07aa8ce4ed5a132f7c5cc9f1de0f5099b5e155027a23d57f7fbe78b16
[INFO] oc: Copying blob sha256:98972fc90a1108315cc5b05b2c691a0849a149727a7b81e76bc847ac2c6d9714
[INFO] oc: Copying config sha256:27aaadaf28e24856a66db962b88118b8222b61d79163dceeeed869f7289bc230
[INFO] oc: Writing manifest to image destination
[INFO] oc: Storing signatures
[INFO] oc: --> 27aaadaf28e
[INFO] oc: 27aaadaf28e24856a66db962b88118b8222b61d79163dceeeed869f7289bc230
[INFO] oc: Getting image source signatures
[INFO] oc:
[INFO] oc: Pushing image image-registry.openshift-image-registry.svc:5000\/default\/random-generator:0.0.1 ...
[INFO] oc: Copying blob sha256:f320f94d91a064281f5127d5f49954b481062c7d56cce3b09910e471cf849050
[INFO] oc: Copying blob sha256:cf0f3ebe9f536c782ab3835049cfbd9a663761ded9370791ef6ea3965c823aad
[INFO] oc: Copying blob sha256:57de4da701b511cba33bbdc424757f7f3b408bea741ca714ace265da9b59191a
[INFO] oc: Copying blob sha256:98972fc90a1108315cc5b05b2c691a0849a149727a7b81e76bc847ac2c6d9714
[INFO] oc: Copying config sha256:27aaadaf28e24856a66db962b88118b8222b61d79163dceeeed869f7289bc230
[INFO] oc: Writing manifest to image destination
[INFO] oc: Storing signatures
[INFO] oc: Successfully pushed image-registry.openshift-image-registry.svc:5000\/default\/random-generator@sha256:aa9e1a380c04ef9174ba56459c13d44420ebe653ebf32884d60fe4306b17306d
[INFO] oc: Push successful
[INFO] oc: Build random-generator-s2i-1 in status Complete
[INFO] oc: Found tag on ImageStream random-generator tag: sha256:aa9e1a380c04ef9174ba56459c13d44420ebe653ebf32884d60fe4306b17306d
[INFO] oc: ImageStream random-generator written to \/home\/rohaan\/work\/repos\/eclipse-jkube-demo-project\/target\/random-generator-is.yml
[INFO]
[INFO] --- openshift-maven-plugin:1.0.0-rc-1:resource (default-cli) @ random-generator ---
[INFO] oc: Using docker image name of namespace: default
[INFO] oc: Running generator spring-boot
[INFO] oc: spring-boot: Using Docker image quay.io\/jkube\/jkube-java-binary-s2i:0.0.7 as base \/ builder
[INFO] oc: jkube-controller: Adding a default DeploymentConfig
[INFO] oc: jkube-service: Adding a default service 'random-generator' with ports [8080]
[INFO] oc: jkube-healthcheck-spring-boot: Adding readiness probe on port 8080, path='\/actuator\/health', scheme='HTTP', with initial delay 10 seconds
[INFO] oc: jkube-healthcheck-spring-boot: Adding liveness probe on port 8080, path='\/actuator\/health', scheme='HTTP', with initial delay 180 seconds
[INFO] oc: jkube-revision-history: Adding revision history limit to 2
[INFO]
[INFO] --- openshift-maven-plugin:1.0.0-rc-1:apply (default-cli) @ random-generator ---
[INFO] oc: Using OpenShift at https:\/\/api.crc.testing:6443\/ in namespace default with manifest \/home\/rohaan\/work\/repos\/eclipse-jkube-demo-project\/target\/classes\/META-INF\/jkube\/openshift.yml
[INFO] oc: OpenShift platform detected
[INFO] oc: Using project: default
[INFO] oc: Creating a Service from openshift.yml namespace default name random-generator
[INFO] oc: Created Service: target\/jkube\/applyJson\/default\/service-random-generator.json
[INFO] oc: Creating a DeploymentConfig from openshift.yml namespace default name random-generator
[INFO] oc: Created DeploymentConfig: target\/jkube\/applyJson\/default\/deploymentconfig-random-generator.json
[INFO] oc: Creating Route default:random-generator host: null
[INFO] oc: HINT: Use the command `oc get pods -w` to watch your pods start up
[INFO] ------------------------------------------------------------------------
[INFO] BUILD SUCCESS
[INFO] ------------------------------------------------------------------------
[INFO] Total time:  01:07 min
[INFO] Finished at: 2020-08-10T12:08:00+05:30
[INFO] ------------------------------------------------------------------------
~\/work\/repos\/eclipse-jkube-demo-project : $ oc get pods -w
NAME                           READY     STATUS      RESTARTS   AGE
random-generator-1-deploy      1\/1       Running     0          14s
random-generator-1-vnrm9       0\/1       Running     0          11s
random-generator-s2i-1-build   0\/1       Completed   0          1m
random-generator-1-vnrm9   1\/1       Running   0         24s
random-generator-1-deploy   0\/1       Completed   0         28s
~\/work\/repos\/eclipse-jkube-demo-project : $ oc get routes
NAME                HOST\/PORT                                    PATH      SERVICES            PORT      TERMINATION   WILDCARD
random-generator    random-generator-default.apps-crc.testing              random-generator    8080                    None
~\/work\/repos\/eclipse-jkube-demo-project : $ curl random-generator-default.apps-crc.testing\/random
  % Total    % Received % Xferd  Average Speed   Time    Time     Time  Current
                                 Dload  Upload   Total   Spent    Left  Speed
100    45    0    45    0     0   1666      0 --:--:-- --:--:-- --:--:--  1730
{
  "id": "d80052d9-2f92-43cb-b9eb-d7cffb879798"
}
~\/work\/repos\/eclipse-jkube-demo-project : $
Video Lesson
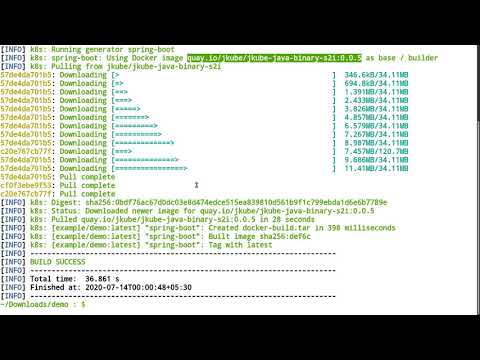
To learn more about simplifying Kubernetes development with Eclipse JKube, watch the video lesson on quickly deploying a simple Spring Boot application on Minikube:
Conclusion
In this article, we demonstrated how Eclipse JKube makes life easier for Java developers working with Kubernetes. You can find more information about Eclipse JKube at and on .
Source: habr.com
