


Hello! Recently, many great automation tools have been released for both building Docker images and deploying in Kubernetes. Because of this, I decided to experiment with GitLab, thoroughly explore its capabilities, and of course, set up a pipeline.
The inspiration for this work came from the site , which is generated from automatically, and for each submitted pull request, the bot automatically generates a preview version of the site with your changes and provides a link for viewing.
I tried to set up a similar process from scratch, but entirely built on GitLab CI and the free tools I’m used to using for deploying applications in Kubernetes. Today, I will finally tell you more about them.
This article will cover tools such as:
Hugo, qbec, kaniko, git-crypt and GitLab CI for creating dynamic environments.
Contents
1. Getting Acquainted with Hugo
As an example of our project, we will try to create a website for publishing documentation built on Hugo. Hugo is a static content generator.
For those unfamiliar with static generators, let me explain a bit more about them. Unlike regular site engines with a database and some PHP, which generate pages on the fly upon user request, static generators work a bit differently. They allow you to take the source files, usually a set of files in Markdown format and theme templates, and then compile them into a complete ready-to-go site.
So, in the end, you will get a directory structure and a set of generated HTML files, which you can simply upload to any cheap hosting and get a working site.
You can install Hugo locally and try it out:
Initialize a new site:
hugo new site docs.example.orgAnd also initialize a git repository:
cd docs.example.org
git init
For now, our site is pristine, and to start building it, we first need to connect a theme. A theme is essentially a collection of templates and rules that dictate how our site is generated.
As a theme, we will use , which, in my opinion, is perfectly suited for a documentation site.
It's worth noting that we don't need to save the theme files in our project's repository; instead, we can simply connect it using git submodule:
git submodule add https://github.com/matcornic/hugo-theme-learn themes/learnThis way, our repository will only include files directly related to our project, while the connected theme will remain as a link to a specific repository and commit, meaning we can always pull it from the original source without fear of compatibility issues.
Let's adjust the config config.toml:
baseURL = "http://docs.example.org/"
languageCode = "en-us"
title = "My Docs Site"
theme = "learn"
At this point, we can already run:
hugo serverAnd check our newly created site at , all changes made in the directory automatically refresh the open page in the browser, which is very convenient!
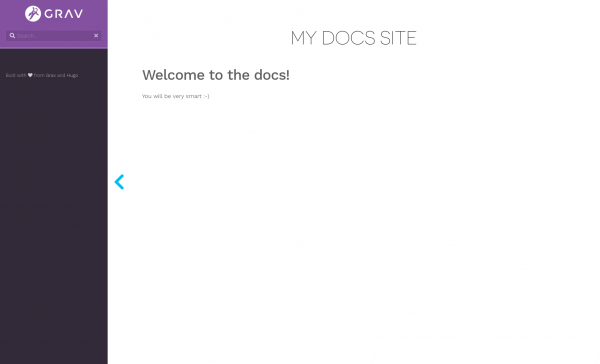
Let's try to create a homepage in content/_index.md:
# My docs site

## Welcome to the docs!

You will be very smart :-)
Screenshot of the newly created page
To generate the site, just run:
hugoThe content of the directory public/ will represent your site.
By the way, let's add it to .gitignore:
echo /public > .gitignoreDon't forget to commit our changes:
git add .
git commit -m "New site created"
2. Preparing the Dockerfile
It's time to define the structure of our repository. Typically, I use something like:
.
├── deploy
│   ├── app1
│   └── app2
└── dockerfiles
    ├── image1
└── image2- dockerfiles/ — contains directories with Dockerfiles and everything needed to build our Docker images.
- deploy/ — contains directories for deploying our applications to Kubernetes.
Thus, we will create our first Dockerfile at dockerfiles/website/Dockerfile
FROM alpine:3.11 as builder
ARG HUGO_VERSION=0.62.0
RUN wget -O- https://github.com/gohugoio/hugo/releases/download/v${HUGO_VERSION}/hugo_${HUGO_VERSION}_linux-64bit.tar.gz | tar -xz -C /usr/local/bin
ADD . /src
RUN hugo -s /src

FROM alpine:3.11
RUN apk add --no-cache darkhttpd
COPY --from=builder /src/public /var/www
ENTRYPOINT [ "/usr/bin/darkhttpd" ]
CMD [ "/var/www" ]
As you can see, the Dockerfile contains two FROM, this feature is called and allows us to exclude everything unnecessary from the final docker image.
Thus, our final image will only contain darkhttpd (a lightweight HTTP server) and public/ — the content of our statically generated site.
Don't forget to commit our changes:
git add dockerfiles/website
git commit -m "Add Dockerfile for website"
3. Getting acquainted with kaniko
As a Docker image builder, I chose to use , since it does not require the presence of a Docker daemon, and the build can be performed on any machine, storing the cache directly in the registry, thus eliminating the need for a full persistent storage.
To build the image, just run the container with kaniko executor and pass it the current build context, which can be done locally through Docker:
docker run -ti --rm
  -v $PWD:/workspace
  -v ~/.docker/config.json:/kaniko/.docker/config.json:ro
  gcr.io/kaniko-project/executor:v0.15.0
  --cache
  --dockerfile=dockerfiles/website/Dockerfile
  --destination=registry.gitlab.com/kvaps/docs.example.org/website:v0.0.1
Where registry.gitlab.com/kvaps/docs.example.org/website — the name of your Docker image, after building it will be automatically pushed to the Docker registry.
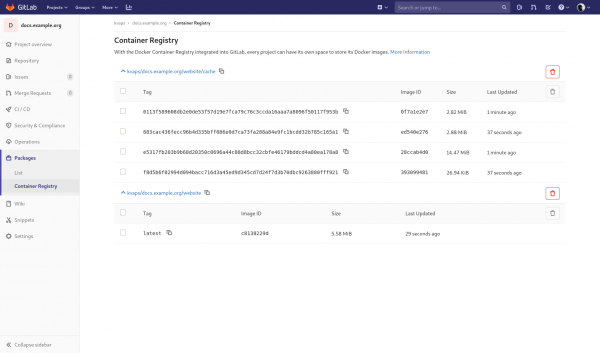
Parameter —cache allows caching layers in the Docker registry; for the example provided, they will be saved in registry.gitlab.com/kvaps/docs.example.org/website/cache, but you can specify a different path using the parameter —cache-repo.
Screenshot of docker-registry
4. Getting acquainted with qbec
— is a deployment tool that allows you to declaratively describe the manifests of your application and deploy them to Kubernetes. Using Jsonnet as the main syntax simplifies the description of differences for multiple environments and almost completely eliminates code repetition.
This can be especially relevant when you need to deploy an application to several clusters with different parameters, and you want to declaratively describe them in Git.
Qbec also allows you to render Helm charts by passing necessary parameters to them and then operate on them just like regular manifests, including applying various mutations, which, in turn, allows you to avoid the need for ChartMuseum. This means you can store and render charts directly from Git, where they truly belong.
As I mentioned earlier, we will store all deployments in the directory deploy/:
mkdir deploy
cd deploy
Let's initialize our first application:
qbec init website
cd website
Now the structure of our application looks like this:
.
├── components
├── environments
│   ├── base.libsonnet
│   └── default.libsonnet
├── params.libsonnet
└── qbec.yaml
let's look at the file qbec.yaml:
apiVersion: qbec.io/v1alpha1
kind: App
metadata:
  name: website
spec:
  environments:
    default:
      defaultNamespace: docs
      server: https://kubernetes.example.org:8443
  vars: {}
Here, we are primarily interested in spec.environments, qbec has already created the default environment for us and taken the server address as well as the namespace from our current kubeconfig.
Now when deploying in default the environment, qbec will always deploy only to the specified Kubernetes cluster and the specified namespace, meaning you won't have to switch between contexts and namespaces to perform the deployment.
If necessary, you can always update your settings in this file.
All your environments are described in qbec.yaml, and in the file params.libsonnet, where it's stated from where to pull the parameters for them.
Next, we see two directories:
- components/ — this is where all the manifests for our application will be stored, they can be described in both jsonnet and regular yaml files
- environments/ — this is where we will describe all the variables (parameters) for our environments.
By default, we have two files:
- environments/base.libsonnet — it will contain common parameters for all environments
- environments/default.libsonnet — contains parameters overridden for the environment default
Let's open environments/base.libsonnet and add parameters for our first component:
{
  components: {
    website: {
      name: 'example-docs',
      image: 'registry.gitlab.com/kvaps/docs.example.org/website:v0.0.1',
      replicas: 1,
      containerPort: 80,
      servicePort: 80,
      nodeSelector: {},
      tolerations: [],
      ingressClass: 'nginx',
      domain: 'docs.example.org',
    },
  },
}
Let's also create our first component components/website.jsonnet:
local env = {
  name: std.extVar('qbec.io/env'),
  namespace: std.extVar('qbec.io/defaultNs'),
};
local p = import '../params.libsonnet';
local params = p.components.website;

[
  {
    apiVersion: 'apps/v1',
    kind: 'Deployment',
    metadata: {
      labels: { app: params.name },
      name: params.name,
    },
    spec: {
      replicas: params.replicas,
      selector: {
        matchLabels: {
          app: params.name,
        },
      },
      template: {
        metadata: {
          labels: { app: params.name },
        },
        spec: {
          containers: [
            {
              name: 'darkhttpd',
              image: params.image,
              ports: [
                {
                  containerPort: params.containerPort,
                },
              ],
            },
          ],
          nodeSelector: params.nodeSelector,
          tolerations: params.tolerations,
          imagePullSecrets: [{ name: 'regsecret' }],
        },
      },
    },
  },
  {
    apiVersion: 'v1',
    kind: 'Service',
    metadata: {
      labels: { app: params.name },
      name: params.name,
    },
    spec: {
      selector: {
        app: params.name,
      },
      ports: [
        {
          port: params.servicePort,
          targetPort: params.containerPort,
        },
      ],
    },
  },
  {
    apiVersion: 'extensions/v1beta1',
    kind: 'Ingress',
    metadata: {
      annotations: {
        'kubernetes.io/ingress.class': params.ingressClass,
      },
      labels: { app: params.name },
      name: params.name,
    },
    spec: {
      rules: [
        {
          host: params.domain,
          http: {
            paths: [
              {
                backend: {
                  serviceName: params.name,
                  servicePort: params.servicePort,
                },
              },
            ],
          },
        },
      ],
    },
  },
]
In this file, we have described three Kubernetes entities at once, which are: Deployment, Service and Ingress. If desired, we could separate them into different components, but at this stage, one is sufficient for us.
Syntax jsonnet is very similar to regular json; in fact, regular json is already valid jsonnet, so at first, it may be easier for you to use online services like yaml2json to convert your familiar yaml to json, or if your components do not contain any variables, they can easily be described as regular yaml.
When working with jsonnet I highly recommend installing a plugin for your editor.
For example, there is a plugin for vim called vim-jsonnet, which provides syntax highlighting and automatically runs jsonnet fmt on every save (requires installed jsonnet).
Everything is ready, now we can start the deployment:
To see what we have done, we will run:
qbec show defaultIn the output, you will see the rendered yaml manifests that will be applied in the default cluster.
Great, now let's apply:
qbec apply defaultIn the output, you will always see what will be done in your cluster, and qbec will ask you to confirm the changes by typing y you will be able to confirm your intentions.
Our application is now deployed!
In case of making changes, you can always run:
qbec diff defaultto see how these changes will affect the current deployment
Don't forget to commit our changes:
cd ../../
git add deploy/website
git commit -m "Add deploy for website"
5. Testing Gitlab-runner with Kubernetes executor
Until recently, I only used the regular gitlab-runner on a preconfigured machine (LXC container) with shell or docker executors. Initially, we had several runners globally defined in our GitLab. They collected Docker images for all projects.
But as practice has shown, this option is not ideal in terms of practicality and security. It is much better and more ideologically correct to have separate runners deployed for each project, or even for each environment.
Fortunately, this is not a problem at all, as we will now deploy gitlab-runner directly as part of our project right into Kubernetes.
Gitlab provides a ready-made Helm chart for deploying gitlab-runner in Kubernetes. Thus, all you need to do is find out registration token for our project in Settings —> CI / CD —> Runners and pass it to Helm:
helm repo add gitlab https://charts.gitlab.io

helm install gitlab-runner
  --set gitlabUrl=https://gitlab.com
  --set runnerRegistrationToken=yga8y-jdCusVDn_t4Wxc
  --set rbac.create=true
  gitlab/gitlab-runner
Where:
- — the address of your Gitlab server.
- yga8y-jdCusVDn_t4Wxc — registration token for your project.
- rbac.create=true — gives the runner the necessary privileges to create pods for executing our tasks using the Kubernetes executor.
If everything is done correctly, you should see the registered runner in the Runnerssection of your project settings.
Screenshot of the added runner
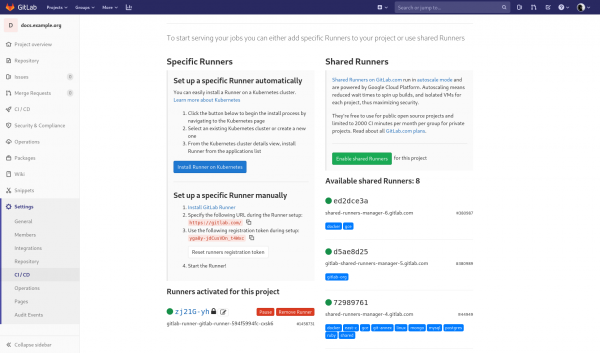
Is it really that easy? — Yes, it really is! No more hassle with manually registering runners; from now on, runners will be created and destroyed automatically.
6. Deploying Helm charts with QBEC
Since we decided to consider gitlab-runner part of our project, it is time to describe it in our Git repository.
We could describe it as a separate component website, but in the future, we plan to deploy different copies website very often, unlike gitlab-runner, which will only be deployed once per Kubernetes cluster. So let’s initialize a separate application for it:
cd deploy
qbec init gitlab-runner
cd gitlab-runner
This time we won't describe Kubernetes entities manually, but will use a ready-made Helm chart. One of the advantages of qbec is the ability to render Helm charts directly from a Git repository.
Let's connect it using git submodule:
git submodule add https://gitlab.com/gitlab-org/charts/gitlab-runner vendor/gitlab-runnerNow the directory vendor/gitlab-runner contains the repository with the chart for gitlab-runner.
Similarly, other repositories can be connected, for example, the entire repository with official charts.
Let’s describe the component components/gitlab-runner.jsonnet:
local env = {
  name: std.extVar('qbec.io/env'),
  namespace: std.extVar('qbec.io/defaultNs'),
};
local p = import '../params.libsonnet';
local params = p.components.gitlabRunner;

std.native('expandHelmTemplate')(
  '../vendor/gitlab-runner',
  params.values,
  {
    nameTemplate: params.name,
    namespace: env.namespace,
    thisFile: std.thisFile,
    verbose: true,
  }
)
The first argument to expandHelmTemplate is the path to the chart, then params.values, which we'll take from the environment parameters, followed by an object with
- nameTemplate — the release name
- namespace — the namespace passed to Helm
- thisFile — a required parameter that provides the path to the current file
- verbose — shows the command helm template with all arguments during the chart rendering
Now let's describe the parameters for our component in environments/base.libsonnet:
local secrets = import '../secrets/base.libsonnet';

{
  components: {
    gitlabRunner: {
      name: 'gitlab-runner',
      values: {
        gitlabUrl: 'https://gitlab.com/',
        rbac: {
          create: true,
        },
        runnerRegistrationToken: secrets.runnerRegistrationToken,
      },
    },
  },
}
Note that runnerRegistrationToken we take from the external file secrets/base.libsonnet, let’s create it:
{
  runnerRegistrationToken: 'yga8y-jdCusVDn_t4Wxc',
}
Let’s check if everything works:
qbec show defaultif everything is fine, we can delete our previously deployed release via Helm:
helm uninstall gitlab-runnerand redeploy it using qbec:
qbec apply default7. Introduction to git-crypt
is a tool that allows you to set up transparent encryption for your repository.
Currently, the structure of our directory for gitlab-runner looks like this:
.
├── components
│   ├── gitlab-runner.jsonnet
├── environments
│   ├── base.libsonnet
│   └── default.libsonnet
├── params.libsonnet
├── qbec.yaml
├── secrets
│   └── base.libsonnet
└── vendor
    └── gitlab-runner (submodule)
But storing secrets in Git is not safe, right? So we need to encrypt them properly.
Typically, for a single variable, it doesn’t always make sense. You can pass secrets in qbec and through environment variables of your CI system.
However, it is worth noting that there are more complex projects that may contain many more secrets, and passing all of them through environment variables would be extremely difficult.Furthermore, in this case, I wouldn't be able to tell you about such a wonderful tool as git-crypt.
git-crypt which is also convenient because it allows you to maintain the entire history of secrets, as well as compare, merge, and resolve conflicts just as we have become accustomed to doing with Git.
First things first, after installation git-crypt we need to generate keys for our repository:
git crypt initIf you have a PGP key, you can immediately add yourself as a collaborator for this project:
git-crypt add-gpg-user kvapss@gmail.comThis way, you will always be able to decrypt this repository using your private key.
If you do not have a PGP key and do not foresee getting one, you can take another route and export the project's key:
git crypt export-key /path/to/keyfileThus, anyone who has the exported keyfile will be able to decrypt your repository.
It's time to set up our first secret.
Just to remind you, we are still in the directory deploy/gitlab-runner/, where we have the directory secrets/, let's encrypt all the files in it, so we will create a file secrets/.gitattributes with the following content:
* filter=git-crypt diff=git-crypt
.gitattributes !filter !diff
As can be seen from the content, all files matching the pattern * will be processed through git-crypt, except for the .gitattributes
We can check this by running:
git crypt status -eThe output will give us a list of all files in the repository for which encryption is enabled.
That's it, now we can confidently commit our changes:
cd ../..
git add .
git commit -m "Add deploy for gitlab-runner"
To lock the repository, simply execute:
git crypt lockand immediately all encrypted files will turn into binary data, making them unreadable.
To decrypt the repository, execute:
git crypt unlock8. Creating a toolbox image
A toolbox image is an image with all the tools that we will use to deploy our project. It will be used by the GitLab runner to perform standard deployment tasks.
It's quite simple here; let's create a new dockerfiles/toolbox/Dockerfile with the following content:
FROM alpine:3.11

RUN apk add --no-cache git git-crypt

RUN QBEC_VER=0.10.3
 && wget -O- https://github.com/splunk/qbec/releases/download/v${QBEC_VER}/qbec-linux-amd64.tar.gz
     | tar -C /tmp -xzf -
 && mv /tmp/qbec /tmp/jsonnet-qbec /usr/local/bin/

RUN KUBECTL_VER=1.17.0
 && wget -O /usr/local/bin/kubectl
      https://storage.googleapis.com/kubernetes-release/release/v${KUBECTL_VER}/bin/linux/amd64/kubectl
 && chmod +x /usr/local/bin/kubectl

RUN HELM_VER=3.0.2
 && wget -O- https://get.helm.sh/helm-v${HELM_VER}-linux-amd64.tar.gz
     | tar -C /tmp -zxf -
 && mv /tmp/linux-amd64/helm /usr/local/bin/helm
As you can see, in this image we are installing all the utilities that we used for deploying our application. We don't need anything else here, kubectl, but you might want to experiment with it during the pipeline setup phase.
Also, to be able to communicate with Kubernetes and deploy to it, we need to set up a role for the pods generated by the gitlab-runner.
To do this, let's go to the directory with the gitlab-runner:
cd deploy/gitlab-runnerand add a new component components/rbac.jsonnet:
local env = {
  name: std.extVar('qbec.io/env'),
  namespace: std.extVar('qbec.io/defaultNs'),
};
local p = import '../params.libsonnet';
local params = p.components.rbac;

[
  {
    apiVersion: 'v1',
    kind: 'ServiceAccount',
    metadata: {
      labels: {
        app: params.name,
      },
      name: params.name,
    },
  },
  {
    apiVersion: 'rbac.authorization.k8s.io/v1',
    kind: 'Role',
    metadata: {
      labels: {
        app: params.name,
      },
      name: params.name,
    },
    rules: [
      {
        apiGroups: [
          '*',
        ],
        resources: [
          '*',
        ],
        verbs: [
          '*',
        ],
      },
    ],
  },
  {
    apiVersion: 'rbac.authorization.k8s.io/v1',
    kind: 'RoleBinding',
    metadata: {
      labels: {
        app: params.name,
      },
      name: params.name,
    },
    roleRef: {
      apiGroup: 'rbac.authorization.k8s.io',
      kind: 'Role',
      name: params.name,
    },
    subjects: [
      {
        kind: 'ServiceAccount',
        name: params.name,
        namespace: env.namespace,
      },
    ],
  },
]
We will also describe the new parameters in environments/base.libsonnet, which now looks like this:
local secrets = import '../secrets/base.libsonnet';

{
  components: {
    gitlabRunner: {
      name: 'gitlab-runner',
      values: {
        gitlabUrl: 'https://gitlab.com/',
        rbac: {
          create: true,
        },
        runnerRegistrationToken: secrets.runnerRegistrationToken,
        runners: {
          serviceAccountName: $.components.rbac.name,
          image: 'registry.gitlab.com/kvaps/docs.example.org/toolbox:v0.0.1',
        },
      },
    },
    rbac: {
      name: 'gitlab-runner-deploy',
    },
  },
}
Note that $.components.rbac.name refers to name for the component rbac
Let's check what has changed:
qbec diff defaultand apply our changes in Kubernetes:
qbec apply defaultAlso, don't forget to commit our changes in git:
cd ../../
git add dockerfiles/toolbox
git commit -m "Add Dockerfile for toolbox"
git add deploy/gitlab-runner
git commit -m "Configure gitlab-runner to use toolbox"
9. Our first pipeline and image builds by tags
In the root of the project we will create .gitlab-ci.yml with the following content:
.build_docker_image:
  stage: build
  image:
    name: gcr.io/kaniko-project/executor:debug-v0.15.0
    entrypoint: [""]
  before_script:
    - echo "{"auths":{"$CI_REGISTRY":{"username":"$CI_REGISTRY_USER","password":"$CI_REGISTRY_PASSWORD"}}}" > /kaniko/.docker/config.json

build_toolbox:
  extends: .build_docker_image
  script:
    - /kaniko/executor --cache --context $CI_PROJECT_DIR/dockerfiles/toolbox --dockerfile $CI_PROJECT_DIR/dockerfiles/toolbox/Dockerfile --destination $CI_REGISTRY_IMAGE/toolbox:$CI_COMMIT_TAG
  only:
    refs:
      - tags

build_website:
  extends: .build_docker_image
  variables:
    GIT_SUBMODULE_STRATEGY: normal
  script:
    - /kaniko/executor --cache --context $CI_PROJECT_DIR --dockerfile $CI_PROJECT_DIR/dockerfiles/website/Dockerfile --destination $CI_REGISTRY_IMAGE/website:$CI_COMMIT_TAG
  only:
    refs:
      - tags
Please note that we use GIT_SUBMODULE_STRATEGY: normal for those jobs where submodules need to be explicitly initialized before execution.
Don't forget to commit our changes:
git add .gitlab-ci.yml
git commit -m "Automate docker build"
I think we can safely call this version v0.0.1 and assign the tag:
git tag v0.0.1We will tag each time we need to release a new version. Tags in Docker images will be tied to Git tags. Each push with a new tag will trigger the build of images with that tag.
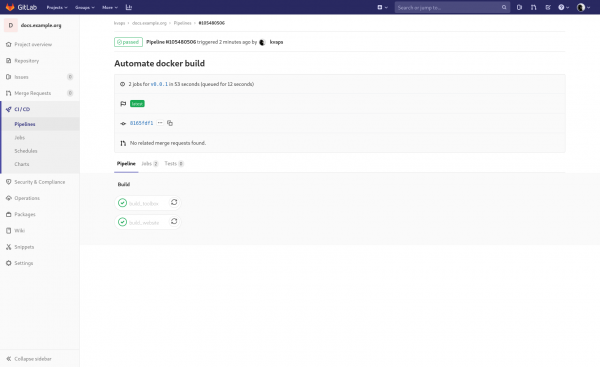
We will execute git push —tags, and take a look at our first pipeline:
Screenshot of the first pipeline
It's worth noting that building by tags is suitable for creating Docker images but not for deploying applications in Kubernetes. Since new tags can be assigned to old commits, initializing the pipeline for them would lead to deploying an older version.
To solve this problem, the Docker image builds are usually tied to tags, while application deployments are tied to the branch master, in which the versions of the built images are hardcoded. In this case, you can initialize a rollback simply by reverting master-the branch.
10. Automating Deployment
To enable the GitLab runner to decipher our secrets, we need to export the repository key and add it to our CI environment variables:
git crypt export-key /tmp/docs-repo.key
base64 -w0 /tmp/docs-repo.key; echo
we will save the obtained string in GitLab, for this we will go to the settings of our project:
Settings -> CI / CD -> Variables
And create a new variable:
Type
Key
Value
Protected
Masked
Scope
File
GITCRYPT_KEY
<your string>
true (for training purposes you can also use false)
true
All environments
Screenshot of the added variable
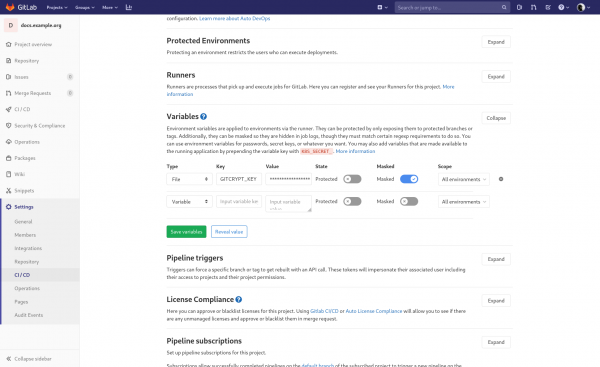
Now we will update our .gitlab-ci.yml by adding to it:
.deploy_qbec_app:
  stage: deploy
  only:
    refs:
      - master

deploy_gitlab_runner:
  extends: .deploy_qbec_app
  variables:
    GIT_SUBMODULE_STRATEGY: normal
  before_script:
    - base64 -d "$GITCRYPT_KEY" | git-crypt unlock -
  script:
    - qbec apply default --root deploy/gitlab-runner --force:k8s-context __incluster__ --wait --yes

deploy_website:
  extends: .deploy_qbec_app
  script:
    - qbec apply default --root deploy/website --force:k8s-context __incluster__ --wait --yes
Here we have utilized several new options for qbec:
- --root some/app -- allows specifying the directory of a specific application
- --force:k8s-context __incluster__ -- this is a magic variable that indicates the deployment will occur in the same cluster where the gitlab-runner is running. This is necessary because otherwise qbec will attempt to find a suitable Kubernetes server in your kubeconfig.
- --wait -- forces qbec to wait until the resources it creates are in the Ready state and only then exits with a successful exit code.
- --yes -- simply disables the interactive shell Are you sure? during deployment.
Don't forget to commit our changes:
git add .gitlab-ci.yml
git commit -m "Automate deploy"
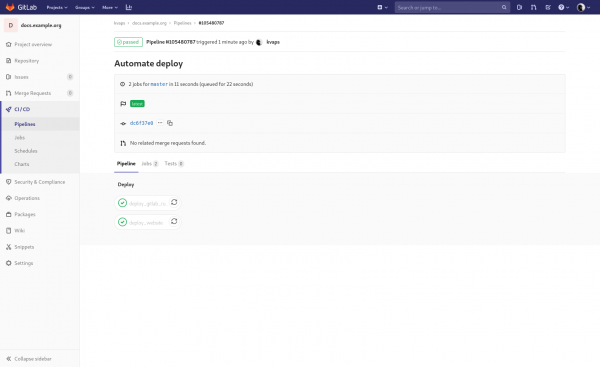
And afterwards git push we will see how our applications have been deployed:
Screenshot of the second pipeline
11. Artifacts and build on push to master
Typically, the aforementioned steps are sufficient for building and delivering nearly any microservice, but we don't want to tag every time we need to update the site. Therefore, we will take a more dynamic approach and configure deployment by digest in the master branch.
The idea is simple: now the image of our website will be rebuilt every time there's a push to master, and after that, it will be automatically deployed to Kubernetes.
Let's update these two jobs in our .gitlab-ci.yml:
build_website:
  extends: .build_docker_image
  variables:
    GIT_SUBMODULE_STRATEGY: normal
  script:
    - mkdir -p $CI_PROJECT_DIR/artifacts
    - /kaniko/executor --cache --context $CI_PROJECT_DIR --dockerfile $CI_PROJECT_DIR/dockerfiles/website/Dockerfile --destination $CI_REGISTRY_IMAGE/website:$CI_COMMIT_REF_NAME --digest-file $CI_PROJECT_DIR/artifacts/website.digest
  artifacts:
    paths:
      - artifacts/
  only:
    refs:
      - master
      - tags

deploy_website:
  extends: .deploy_qbec_app
  script:
    - DIGEST="$(cat artifacts/website.digest)"
    - qbec apply default --root deploy/website --force:k8s-context __incluster__ --wait --yes --vm:ext-str digest="$DIGEST"
Note that we added the branch master to refs for the job build_website and we are now using $CI_COMMIT_REF_NAME instead of $CI_COMMIT_TAG, which means we are decoupling from tags in Git and will now push the image with the name of the commit branch that triggered the pipeline. It's worth noting that this will also work with tags, allowing us to keep snapshots of the site with a specific version in the docker registry.
When the docker tag name for the new version of the site can remain unchanged, we still need to describe changes for Kubernetes; otherwise, it simply won't redeploy the application from the new image as it won't notice any changes in the deployment manifest.
Option —vm:ext-str digest="$DIGEST" For qbec — allows passing an external variable into jsonnet. We want our application to redeploy in the cluster with each release. We can no longer use a tag name that may remain unchanged, as we need to tie it to a specific image version and trigger deployment when it changes.
Here, the ability of Kaniko to save the image digest to a file (option —digest-file)
We will then pass this file and read it during deployment.
Let's update the parameters for our deploy/website/environments/base.libsonnet which will now look like this:
{
  components: {
    website: {
      name: 'example-docs',
      image: 'registry.gitlab.com/kvaps/docs.example.org/website@' + std.extVar('digest'),
      replicas: 1,
      containerPort: 80,
      servicePort: 80,
      nodeSelector: {},
      tolerations: [],
      ingressClass: 'nginx',
      domain: 'docs.example.org',
    },
  },
}
Done, now any commit in master will initialize the build of the docker image for website, and then its deployment in Kubernetes.
Don't forget to commit our changes:
git add .
git commit -m "Configure dynamic build"
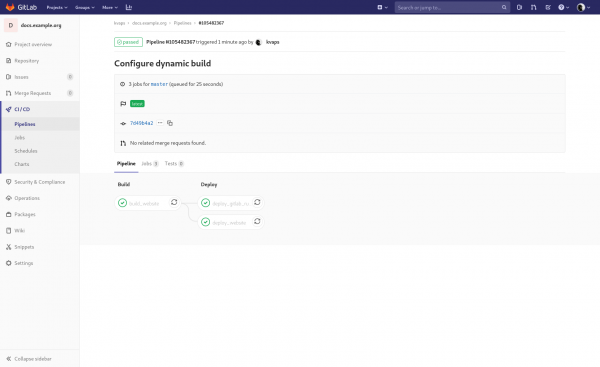
Let's check, after git push we should see something like this:
Screenshot of the pipeline for master
In principle, we don't need to redeploy the gitlab-runner on every push, unless, of course, there have been changes to its configuration; let's fix this in .gitlab-ci.yml:
deploy_gitlab_runner:
  extends: .deploy_qbec_app
  variables:
    GIT_SUBMODULE_STRATEGY: normal
  before_script:
    - base64 -d "$GITCRYPT_KEY" | git-crypt unlock -
  script:
    - qbec apply default --root deploy/gitlab-runner --force:k8s-context __incluster__ --wait --yes
  only:
    changes:
      - deploy/gitlab-runner/**/*
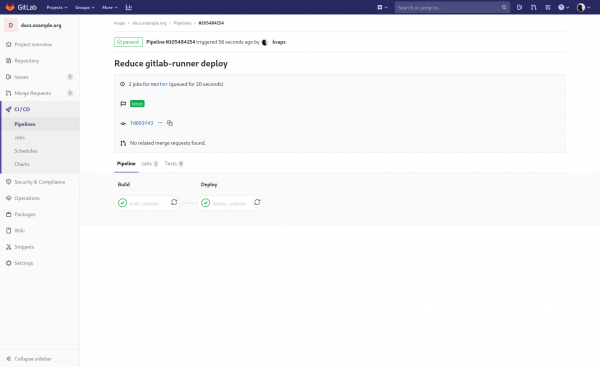
changes to track changes in deploy/gitlab-runner/ and trigger our job only when there are any
Don't forget to commit our changes:
git add .gitlab-ci.yml
git commit -m "Reduce gitlab-runner deploy"
git push, that's better:
Screenshot of the updated pipeline
12. Dynamic environments
It's time to diversify our pipeline with dynamic environments.
First, let's update the job build_website in our .gitlab-ci.yml, removing the onlyblock, which will make Gitlab trigger it on any commit to any branch:
build_website:
  extends: .build_docker_image
  variables:
    GIT_SUBMODULE_STRATEGY: normal
  script:
    - mkdir -p $CI_PROJECT_DIR/artifacts
    - /kaniko/executor --cache --context $CI_PROJECT_DIR --dockerfile $CI_PROJECT_DIR/dockerfiles/website/Dockerfile --destination $CI_REGISTRY_IMAGE/website:$CI_COMMIT_REF_NAME --digest-file $CI_PROJECT_DIR/artifacts/website.digest
  artifacts:
    paths:
      - artifacts/
Then we'll update the job deploy_website, let's add a block there environment:
deploy_website:
  extends: .deploy_qbec_app
  environment:
    name: prod
    url: https://docs.example.org
  script:
    - DIGEST="$(cat artifacts/website.digest)"
    - qbec apply default --root deploy/website --force:k8s-context __incluster__ --wait --yes --vm:ext-str digest="$DIGEST"
This will allow GitLab to associate the job with prod the environment and display the correct link to it.
Now, let's add two more jobs:
deploy_website:
  extends: .deploy_qbec_app
  environment:
    name: prod
    url: https://docs.example.org
  script:
    - DIGEST="$(cat artifacts/website.digest)"
    - qbec apply default --root deploy/website --force:k8s-context __incluster__ --wait --yes --vm:ext-str digest="$DIGEST"

deploy_review:
  extends: .deploy_qbec_app
  environment:
    name: review/$CI_COMMIT_REF_NAME
    url: http://$CI_ENVIRONMENT_SLUG.docs.example.org
    on_stop: stop_review
  script:
    - DIGEST="$(cat artifacts/website.digest)"
    - qbec apply review --root deploy/website --force:k8s-context __incluster__ --wait --yes --vm:ext-str digest="$DIGEST" --vm:ext-str subdomain="$CI_ENVIRONMENT_SLUG" --app-tag "$CI_ENVIRONMENT_SLUG"
  only:
    refs:
    - branches
  except:
    refs:
      - master

stop_review:
  extends: .deploy_qbec_app
  environment:
    name: review/$CI_COMMIT_REF_NAME
    action: stop
  stage: deploy
  before_script:
    - git clone "$CI_REPOSITORY_URL" master
    - cd master
  script:
    - qbec delete review --root deploy/website --force:k8s-context __incluster__ --yes --vm:ext-str digest="$DIGEST" --vm:ext-str subdomain="$CI_ENVIRONMENT_SLUG" --app-tag "$CI_ENVIRONMENT_SLUG"
  variables:
    GIT_STRATEGY: none
  only:
    refs:
    - branches
  except:
    refs:
      - master
  when: manual
They will be triggered on push to any branches except master and will deploy a preview version of the site.
We see a new option for qbec: —app-tag — it allows tagging the deployed versions of the application and only operating within that tag when creating and destroying resources in Kubernetes, qbec will only work with those.
Thus we do not need to create a separate environment for each review, but simply reuse the same one.
Here we also use qbec apply review, instead of qbec apply default — this is exactly the moment when we try to describe the differences for our environments (review and default):
Let's add the review environment in deploy/website/qbec.yaml
spec:
  environments:
    review:
      defaultNamespace: docs
      server: https://kubernetes.example.org:8443
Then we will declare it in deploy/website/params.libsonnet:
local env = std.extVar('qbec.io/env');
local paramsMap = {
  _: import './environments/base.libsonnet',
  default: import './environments/default.libsonnet',
  review: import './environments/review.libsonnet',
};

if std.objectHas(paramsMap, env) then paramsMap[env] else error 'environment ' + env + ' not defined in ' + std.thisFile
And we will write custom parameters for it in deploy/website/environments/review.libsonnet:
// this file has the param overrides for the default environment
local base = import './base.libsonnet';
local slug = std.extVar('qbec.io/tag');
local subdomain = std.extVar('subdomain');

base {
  components+: {
    website+: {
      name: 'example-docs-' + slug,
      domain: subdomain + '.docs.example.org',
    },
  },
}
Let's also take a closer look at the job stop_review, it will be triggered upon branch deletion and to prevent GitLab from attempting to checkout to it, we use GIT_STRATEGY: none, later we clone master-branch and delete the review through it.
It's a bit complicated, but I haven't found a more elegant way yet.
An alternative option could be to deploy each review in a separate namespace that can always be deleted entirely.
Don't forget to commit our changes:
git add .
git commit -m "Enable automatic review"
git push, git checkout -b test, git push origin test, checking:
Screenshot of created environments in GitLab
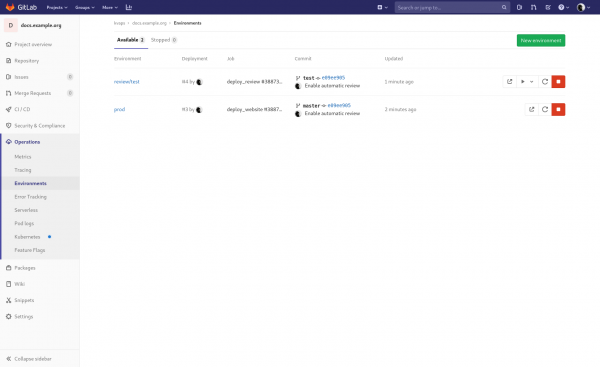
Is everything working? — great, let's delete our test branch: git checkout master, git push origin :test, check that the environment deletion jobs executed without errors.
Here it's important to clarify that any developer in the project can create branches; they can also modify .gitlab-ci.yml the file and gain access to secret variables.
Therefore, it is strongly recommended to allow their use only for protected branches, for instance in master, or create a separate variable set for each environment.
13. Review Apps
this is a feature of GitLab that allows adding a button for quickly previewing each file in the deployed environment.
In order for these buttons to appear, you need to create a file .gitlab/route-map.yml and describe all path transformations in it; in our case this will be very simple:
# Indices
- source: /content/(.+?)_index.(md|html)/
  public: '1'

# Pages
- source: /content/(.+?).(md|html)/
  public: '1/'
Don't forget to commit our changes:
git add .gitlab/
git commit -m "Enable review apps"
git push, and check:
Screenshot of the Review App button
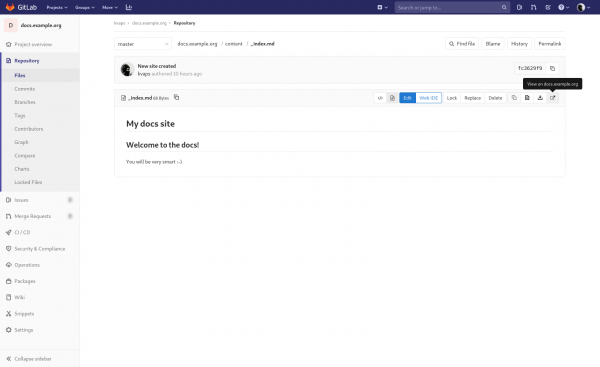
Job is done!
Project sources:
- on GitLab:
- on GitHub:
Thank you for your attention, I hope you enjoyed it. 
Source: habr.com
