


Some time after writing , where I skillfully handled jsonnet and GitLab, I realized that pipelines are good, but overly complex and inconvenient.
In most cases, a typical task is required: "generate YAML and place it in Kubernetes." Argo CD excels at this.
Argo CD allows you to connect a Git repository and sync its state in Kubernetes. By default, it supports several types of applications: Kustomize, Helm charts, Ksonnet, raw Jsonnet, or simply directories with YAML/JSON manifests.
Most users of this set will find it sufficient, but not everyone. To meet the needs of all, Argo CD offers the possibility of using custom tooling.
Firstly, the ability to add support is of interest. and , which were thoroughly covered in the previous article.
Before beginning the configuration, it's essential to understand how exactly Argo CD works.
For each added application, it has two phases:
- init — initial preparation before deployment, which can include anything: downloading dependencies, unpacking secrets, and more.
- generate — executing the actual manifest generation command, the output must be a valid YAML stream, which is precisely what will be applied in the cluster.
Notably, Argo applies this approach for any type of application, including Helm. In Argo CD, Helm does not handle the deployment of releases to the cluster but is used solely for generating manifests.
On its side, Argo can natively process Helm hooks, which allows maintaining the logic of applying releases.
QBEC
Qbec allows you to conveniently describe applications using jsonnet, and it also has the ability to render Helm charts. Since Argo CD can effectively handle Helm hooks, utilizing this feature with Argo CD allows for even more accurate results.
To add Qbec support in argocd, two things are needed:
- your custom plugin and commands for manifest generation must be defined in the Argo CD config.
- the required binaries must be available in the image argocd-repo-server.
The first task quite simply:
# cm.yaml
data:
  configManagementPlugins: |
    - name: qbec
      generate:
        command: [sh, -xc]
        args: ['qbec show "$ENVIRONMENT" -S --force:k8s-namespace "$ARGOCD_APP_NAMESPACE"']
(the command init is not used)
$ kubectl -n argocd patch cm/argocd-cm -p "$(cat cm.yaml)"To add binaries, it's suggested to , or use :
# deploy.yaml
spec:
  template:
    spec:
      # 1. Define an emptyDir volume which will hold the custom binaries
      volumes:
      - name: custom-tools
        emptyDir: {}
      # 2. Use an init container to download/copy custom binaries into the emptyDir
      initContainers:
      - name: download-tools
        image: alpine:3.12
        command: [sh, -c]
        args:
        - wget -qO- https://github.com/splunk/qbec/releases/download/v0.12.2/qbec-linux-amd64.tar.gz | tar -xvzf - -C /custom-tools/
        volumeMounts:
        - mountPath: /custom-tools
          name: custom-tools
      # 3. Volume mount the custom binary to the bin directory (overriding the existing version)
      containers:
      - name: argocd-repo-server
        volumeMounts:
        - mountPath: /usr/local/bin/qbec
          name: custom-tools
          subPath: qbec
        - mountPath: /usr/local/bin/jsonnet-qbec
          name: custom-tools
          subPath: jsonnet-qbec
$ kubectl -n argocd patch deploy/argocd-repo-server -p "$(cat deploy.yaml)"Now let's see what our application's manifest will look like:
apiVersion: argoproj.io/v1alpha1
kind: Application
metadata:
  name: qbec-app
  namespace: argocd
spec:
  destination:
    namespace: default
    server: https://kubernetes.default.svc
  project: default
  source:
    path: qbec-app
    plugin:
      env:
        - name: ENVIRONMENT
          value: default
      name: qbec
    repoURL: https://github.com/kvaps/argocd-play
  syncPolicy:
    automated:
      prune: true
In the variable ENVIRONMENT we pass the name of the environment for which the manifests need to be generated.
let's apply it and see what we've got:
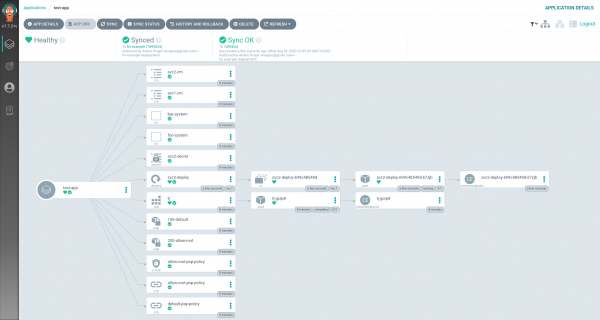
the application has been deployed, great!
git-crypt
Git-crypt allows setting up transparent encryption of the repository. This is a simple and secure way to store confidential data directly in git.
It turned out to be more complicated to implement git-crypt.
Theoretically, we could execute git-crypt unlock at the init stage of our custom plugin, but that is not very convenient, as it wouldn't allow using native deployment methods. For example, in the case of Helm and Jsonnet, we lose a flexible GUI interface that simplifies application setup (values files and more).
That's why we wanted to unlock the repository even earlier, during cloning.
Since Argo CD currently does not provide the ability to describe any hooks for repository synchronization, we had to work around this limitation with a clever shell wrapper script that replaces the git command:
#!/bin/sh
$(dirname $0)/git.bin "$@"
ec=$?
[ "$1" = fetch ] && [ -d .git-crypt ] || exit $ec
GNUPGHOME=/app/config/gpg/keys git-crypt unlock 2>/dev/null
exit $ec
Argo CD executes git fetch every time before the deployment operation. This is the command we will hook for unlocking the repository. git-crypt unlock for testing, you can use
my docker image $ kubectl -n argocd set image deploy/argocd-repo-server argocd-repo-server=docker.io/kvaps/argocd-git-crypt:v1.7.3
Now we need to think about how Argo will decrypt our repositories. Specifically, generate a gpg key for it:$ kubectl exec -ti deploy/argocd-repo-server -- bash$ printf "%sn" "%no-protection" "Key-Type: default" "Subkey-Type: default" "Name-Real: YOUR NAME" "Name-Email: YOUR EMAIL@example.com" "Expire-Date: 0" > genkey-batch$ gpg --batch --gen-key genkey-batch gpg: WARNING: unsafe ownership on homedir '/home/argocd/.gnupg' gpg: keybox '/home/argocd/.gnupg/pubring.kbx' created gpg: /home/argocd/.gnupg/trustdb.gpg: trustdb created gpg: key 8CB8B24F50B4797D marked as ultimately trusted gpg: directory '/home/argocd/.gnupg/openpgp-revocs.d' created gpg: revocation certificate stored as '/home/argocd/.gnupg/openpgp-revocs.d/9A1FF8CAA917CE876E2562FC8CB8B24F50B4797D.rev'
We will save the key name8CB8B24F50B4797D for the next steps. Let's export the key itself: for the next steps. We'll export the key itself:
$ gpg --list-keys
gpg: WARNING: unsafe ownership on homedir '/home/argocd/.gnupg'
/home/argocd/.gnupg/pubring.kbx
-------------------------------
pub   rsa3072 2020-09-04 [SC]
      9A1FF8CAA917CE876E2562FC8CB8B24F50B4797D
uid           [ultimate] YOUR NAME
sub   rsa3072 2020-09-04 [E]

$ gpg --armor --export-secret-keys 8CB8B24F50B4797D
And we will add it as a separate secret:
# argocd-gpg-keys-secret.yaml
apiVersion: v1
kind: Secret
metadata:
  name: argocd-gpg-keys-secret
  namespace: argocd
stringData:
  8CB8B24F50B4797D: |-
    -----BEGIN PGP PRIVATE KEY BLOCK-----

    lQVYBF9Q8KUBDACuS4p0ctXoakPLqE99YLmdixfF/QIvXVIG5uBXClWhWMuo+D0c
    ZfeyC5GvH7XPUKz1cLMqL6o/u9oHJVUmrvN/g2Mnm365nTGw1M56AfATS9IBp0HH
    O/fbfiH6aMWmPrW8XIA0icoOAdP+bPcBqM4HRo4ssbRS9y/i
    =yj11
    -----END PGP PRIVATE KEY BLOCK-----
$ kubectl apply -f argocd-gpg-keys-secret.yamlThe only thing left is to pass it into the container argocd-repo-server, for this we will edit the deployment:
$ kubectl -n argocd edit deploy/argocd-repo-serverAnd replace the existing gpg-keys volume with projected, where we will specify our secret:
   spec:
     template:
       spec:
         volumes:
         - name: gpg-keys
           projected:
             defaultMode: 420
             sources:
             - secret:
                 name: argocd-gpg-keys-secret
             - configMap:
                 name: argocd-gpg-keys-cm
Argo CD automatically loads gpg keys from this directory at the container startup, thus it will load our private key.
Let's check:
$ kubectl -n argocd exec -ti deploy/argocd-repo-server -- bash
$ GNUPGHOME=/app/config/gpg/keys gpg --list-secret-keys
gpg: WARNING: unsafe ownership on homedir '/app/config/gpg/keys'
/app/config/gpg/keys/pubring.kbx
--------------------------------
sec   rsa2048 2020-09-05 [SC] [expires: 2021-03-04]
      ED6285A3B1A50B6F1D9C955E5E8B1B16D47FFC28
uid           [ultimate] Anon Ymous (ArgoCD key signing key)

sec   rsa3072 2020-09-03 [SC]
      9A1FF8CAA917CE876E2562FC8CB8B24F50B4797D
uid           [ultimate] YOUR NAME
ssb   rsa3072 2020-09-03 [E]
Great, the key is loaded! Now we just need to add Argo CD as a collaborator in our repository and it will be able to automatically decrypt it on the fly.
Import the key to the local computer:
$ gpg --armor --export-secret 8CB8B24F50B4797D > 8CB8B24F50B4797D.pem
$ gpg --import 8CB8B24F50B4797D.pem
Set the trust level:
$ gpg --edit-key 8CB8B24F50B4797D
trust
5
Add argo as a collaborator to our project:
$ git-crypt add-gpg-user 8CB8B24F50B4797DRelated links:
Source: habr.com
