


When starting with Kubernetes, it's common to overlook container resource settings. At this stage, simply ensuring that the Docker image works and can be deployed in the Kubernetes cluster is sufficient.
However, later on, the application needs to be deployed in a production cluster alongside other applications. For this, resources must be allocated for the container, ensuring there’s enough to run and operate the application without causing issues in other running applications.
The command translated an article about container resources (CPU & MEM), requests, and resource limits. You will learn what advantages these settings provide and what happens if they are not set.
Compute Resources
We have two types of resources with the following units:
- Central Processing Unit (CPU) — cores;
- Memory (MEM) — bytes.
Resources are specified for each container. In the following Pod YAML file, you will see the resources section that contains requested and limit resources:
- Requested resources for Pod = sum of requested resources for all containers;
- Limit resources for Pod = sum of limit resources for all containers.
apiVersion: v1
kind: Pod
metadata:
  name: backend-pod-name
  labels:
    application: backend
spec:
  containers:
    - name: main-container
      image: my-backend
      tag: v1
      ports:
      - containerPort: 8080
      resources:
        requests:
          cpu: 0.2 # REQUESTED CPU: 200m cores
          memory: "1Gi" # REQUESTED MEM: 1Gi
        limits:
          cpu: 1 # MAX CPU USAGE: 1 core
          memory: "1Gi" # MAX MEM USAGE:  1Gi
    - name: other-container
      image: other-app
      tag: v1
      ports:
      - containerPort: 8000
      resources:
        requests:
          cpu: "200m" # REQUESTED CPU: 200m cores
          memory: "0.5Gi" # REQUESTED MEM: 0.5Gi
        limits:
          cpu: 1 # MAX CPU USAGE: 1 core
          memory: "1Gi" # MAX MEM USAGE:  1Gi
Example of Requested and Limit Resources
Field resources.requested from the Pod specification — one of the elements used to find the appropriate node. It can already be planned for deploying the Pod. How do you find the suitable node?
Kubernetes consists of several components, including a master node (Kubernetes Control Plane). The master node has several processes: kube-apiserver, kube-controller-manager, and kube-scheduler.
The kube-scheduler process is responsible for reviewing newly created pods and finding suitable worker nodes that meet all the pod's requests, including the amount of requested resources. The list of nodes identified by the kube-scheduler is ranked. The pod is scheduled on the node with the highest score.
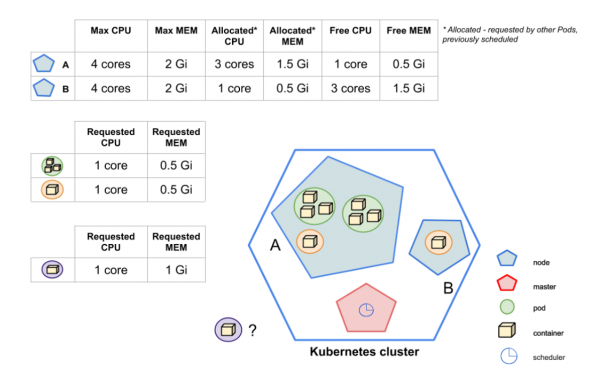 Where will the purple pod be placed?
In the image, you can see that the kube-scheduler needs to schedule a new purple pod. The Kubernetes cluster contains two nodes: A and B. As can be seen, the kube-scheduler cannot schedule the pod on node A — the available (unrequested) resources do not meet the requests of the purple pod. Thus, the 1 GB of memory requested by the purple pod cannot fit on node A, as the available amount of memory is 0.5 GB. However, node B has sufficient resources. Ultimately, the kube-scheduler determines that the destination for the purple pod is node B.
Now we know how requested resources impact the selection of a node for running a pod. But how do limits affect this?
Resource limits are the boundaries that CPU/MEM cannot exceed. However, CPU resources are flexible, so containers that reach CPU limits will not cause the pod to terminate. Instead, CPU throttling will occur. If the MEM usage limit is reached, the container will be stopped due to OOM-Killer and restarted if permitted by the RestartPolicy setting.
Requested and limit resources in detail
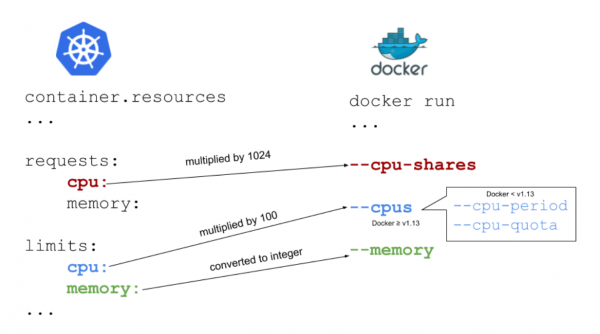 The relationship of resources between Docker and Kubernetes
The best way to explain how requested and limit resources work is to show the relationship between Kubernetes and Docker. In the diagram above, you can see how Kubernetes fields and Docker run flags are interconnected.
Memory: request and limit
containers:
...
 resources:
   requests:
     memory: "0.5Gi"
   limits:
     memory: "1Gi"
As mentioned above, memory is measured in bytes. Based on , we can specify memory as a number. Usually, it is an integer, for example 2678 — meaning 2678 bytes. You can also use suffixes G and Gi, it’s important to remember that they are not equivalent. The first is decimal, while the second is binary. For example, as mentioned in the k8s documentation: 128974848, 129e6, 129M, 123Mi — they are practically equivalent.
The Kubernetes parameter limits.memory corresponds to the flag --memory from Docker. In the case of request.memory The arrow for Docker is absent since Docker does not use this field. You might ask, is it necessary at all? Yes, it is. As I mentioned, this field is significant for Kubernetes. Based on the information from it, the kube-scheduler decides which node to schedule the Pod on.
What happens if insufficient memory is allocated for a request?
If the container reaches the requested memory limits, the Pod is placed in a group of Pods that are stopped when there is a memory shortage on the node.
What will happen if a too small memory limit is set?
If the container exceeds the memory limit, it will be terminated with an OOM-Killed reason. It will be restarted if possible based on the RestartPolicy, where the default value is Always.
What will happen if requested memory is not specified?
Kubernetes will take the memory limit and set it as the default value.
What can happen if memory limits are not specified?
The container has no restrictions; it can use as much memory as it wants. If it starts to consume all the available memory of the node, it will be killed by OOM. The container will then be restarted if feasible based on the RestartPolicy.
What will happen if memory limits are not defined?
This is the worst-case scenario: the scheduler does not know how many resources the container needs, which can cause serious issues on the node. In this case, it would be good to have default limits in the namespace (set by LimitRange). There are no default limits—Pods have no restrictions, and they can use as much memory as they wish.
If the requested memory is greater than what the node can provide, the Pod will not be scheduled. It's important to remember that Requests.memory is not a minimum value. It describes the amount of memory sufficient for the container to operate continuously.
It is generally recommended to set the same value for request.memory and limit.memory. By doing this, Kubernetes will not schedule a Pod on a node that has enough memory to launch the Pod but insufficient memory to operate it. Keep in mind: when scheduling a Pod, Kubernetes only considers requests.memory, and limits.memory and does not take into account.
CPU: request and limit
containers:
...
 resources:
   requests:
     cpu: 1
   limits:
     cpu: "1200m"
CPU is a bit more complex. Referring back to the diagram showing the relationship between Kubernetes and Docker, it can be seen that request.cpu corresponds to --cpu-shares, while limit.cpu corresponds to the flag cpus in Docker.
The CPU requested by Kubernetes is multiplied by 1024 — the ratio of CPU cycles. If you want to request 1 full core, you need to add cpu: 1, as shown above.
Requesting a full core (ratio = 1024) does not mean that your container will receive it. If your host machine has only one core and you're using more than one container, all containers must share the available CPU among themselves. How does this work? Let's take a look at the picture.
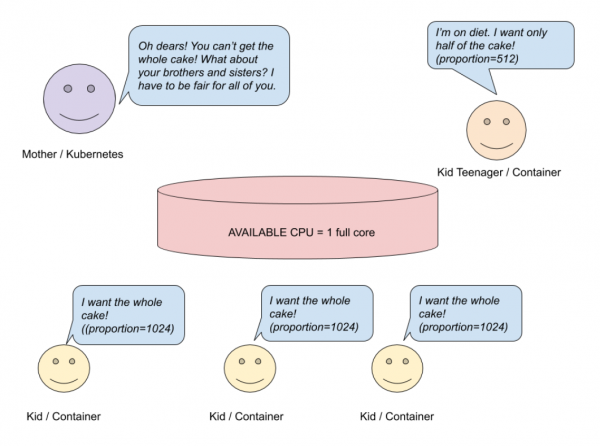
CPU request — single-core system
Imagine that you have a host system with one core running containers. Mom (Kubernetes) baked a pie (CPU) and wants to share it among the kids (containers). Three kids want a whole pie (ratio = 1024), while another child wants half a pie (512). Mom wants to be fair and does a simple calculation.
# Сколько пирогов хотят дети?
# 3 ребенка хотят по целому пирогу и еще один хочет половину пирога
cakesNumberKidsWant = (3 * 1) + (1 * 0.5) = 3.5
# Выражение получается так:
3 (ребенка/контейнера) * 1 (целый пирог/полное ядро) + 1 (ребенок/контейнер) * 0.5 (половина пирога/половина ядра)
# Сколько пирогов испечено?
availableCakesNumber = 1
# Сколько пирога (максимально) дети реально могут получить?
newMaxRequest = 1 / 3.5 =~ 28%
According to the calculation, three kids will receive 28% of the core each, rather than a whole core. The fourth child will get 14% of a full core instead of half. But everything will be different if you have a multi-core system.
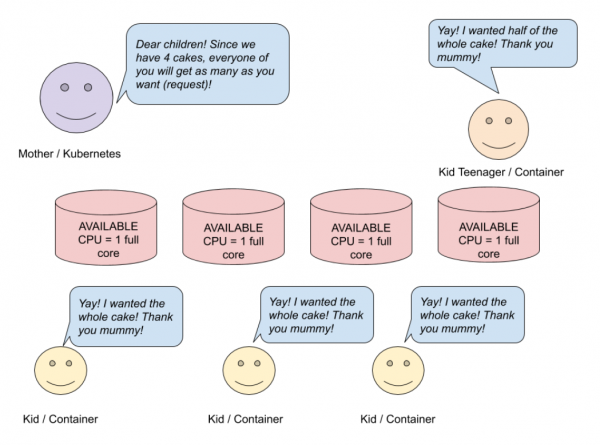
CPU request — multi-core (4) system
In the picture above, three kids want a whole pie, and one wants half. Since mom baked four pies, each of her children will get as much as they want. In a multi-core system, the processor resources are distributed across all available cores. If a container is limited to less than one full CPU core, it can still use it at 100%.
The calculations provided above are simplified for understanding how CPU is distributed among containers. Of course, besides the containers themselves, there are other processes that also use CPU resources. When processes in one container are idle, others can utilize its resources. CPU: "200m" corresponds to CPU: 0.2, which means approximately 20% of one core.
Now let's talk about limit.cpu. The CPU limited by Kubernetes is multiplied by 100. The result is the amount of time that the container can use every 100 ms (cpu-period).
limit.cpu corresponds to the Docker flag --cpus. This is a new combination of old --cpu-period and --cpu-quota. By setting it, we specify how much of the available CPU resources a container can maximally use before throttling begins:
- cpus — combination
cpu-periodandcpu-quota. cpus = 1.5is equivalent to settingcpu-period = 100000andcpu-quota = 150000; - cpu-period -- period , default 100 microseconds;
- cpu-quota -- the number of microseconds within
cpu-period, to which the container is restricted.
What happens if you request insufficient CPU?
If the container needs more than allocated, it will steal CPU from other processes.
What occurs if you set an insufficient CPU limit?
Since the CPU resource is regulated, throttling will kick in.
What happens if you do not specify a CPU request?
As with memory, the request value equals the limit.
What will happen if you do not specify a CPU limit?
The container will use as much CPU as it needs. If a default CPU policy (LimitRange) is defined in the namespace, that limit will also be used for the container.
What happens if neither a request nor a limit for CPU is specified?
As with memory, this is the worst-case scenario. The scheduler does not know how many resources your container needs, which can cause serious issues on the node. To avoid this, default limits should be set for namespaces (LimitRange).
Remember: if you request more CPU than the nodes can provide, then the Pod will not be scheduled. Requests.cpu -- not a minimum value, but a value sufficient for the Pod to run and operate without failures. If the application does not perform complex computations, the best option is to set request.cpu <= 1 and run as many replicas as needed.
The ideal amount of requested resources or resource limits
We have learned about computational resource limits. Now it's time to answer the question: “How many resources does my Pod need to run the application smoothly? What is the ideal amount?”.
Unfortunately, there are no clear answers to these questions. If you are unsure about how your application works or how much CPU or memory it requires, the best option is to provide the application with plenty of memory and CPU and then run performance tests.
In addition to performance testing, monitor the application’s behavior over the course of a week. If the graphs indicate that your application is consuming fewer resources than you requested, you can reduce the amount of CPU or memory requested.
As an example, take a look at this It shows the difference between requested resources or resource limits and current resource usage.
Conclusion
Resource requests and limits help maintain the operability of the Kubernetes cluster. Properly configured limits minimize costs and keep applications running consistently.
In brief, there are a few key points to remember:
- Requested resources are the configuration taken into account during startup (when Kubernetes plans the placement of the application). In contrast, resource limits are important during runtime — when the application is already running on a node.
- Compared to memory, CPU is a controllable resource. In case of CPU shortage, your Pod will not terminate; throttling will engage.
- Requested resources and resource limits are not minimum and maximum values! By defining requested resources, you ensure that the application will run smoothly.
- A good practice is to set the memory request equal to the memory limit.
- It is good to set the requested
CPU <=1, if the application does not perform complex calculations. - If you request more resources than are available on the node, the Pod will never be scheduled on that node.
- To determine the right amount of requested resources/limits, use load testing and monitoring.
I hope this article helps you understand the basic concept of resource limits. You can apply this knowledge in your work.
Good luck!
What else to read:
- .
- .
- .
Source: habr.com
