

You can configure application data storage in a Kubernetes cluster in several ways. Some of these methods are outdated, while others have recently emerged. This article will discuss the concept of three connection options for storage systems, including the most recent one — connecting via the Container Storage Interface.

Method 1. Specifying PV in the Pod Manifest
A typical manifest describing a pod in a Kubernetes cluster:
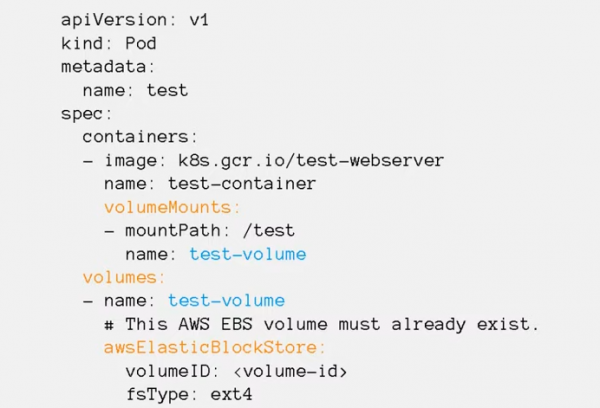
Highlighted in color are parts of the manifest that describe which volume is connected and where.
In the section volumeMounts specify the mount points (mountPath) — the directory within the container where the persistent volume will be mounted, as well as the name of the volume.
In the section x list all the volumes used in the pod. They specify the name of each volume, as well as the type (in our case: awsElasticBlockStore) and connection parameters. The specific parameters listed in the manifest depend on the type of volume.
The same volume can be mounted simultaneously in several containers of the pod. Thus, different application processes can access the same data.
This method of connection was invented at the very beginning, when Kubernetes was just emerging, and it has become outdated today.
Its use poses several problems:
- all volumes must be created manually, and Kubernetes cannot create anything for us;
- the access parameters for each volume are unique and must be specified in the manifests of all pods that use the volume;
- to change the storage system (for example, to switch from AWS to Google Cloud), one must change the settings and type of the attached volumes in all manifests.
All this is very inconvenient, so in practice, this method is only used for connecting certain special types of volumes: configMap, secret, emptyDir, hostPath:
configMap and secret are service volumes that allow you to create a volume with files from Kubernetes manifests inside the container.
emptyDir is a temporary volume that exists only for the lifetime of the pod. It is convenient for testing or storing temporary data. When the pod is deleted, the emptyDir volume is also deleted and all data disappears.
hostPath allows you to mount any directory from the local disk of the server on which the application is running into the application container, including /etc/kubernetes. This is an insecure feature, so security policies typically prohibit the use of volumes of this type. Otherwise, an attacker’s application could mount the Kubernetes directory into its container and steal all the cluster certificates. Generally, hostPath volumes are only permitted for system applications running in the kube-system namespace.
are detailed in the documentation.
Method 2. Connecting to pods SC/PVC/PV
An alternative connection method is the concept of Storage Class, PersistentVolumeClaim, PersistentVolume.
Storage Class stores parameters for connecting to the storage system.
PersistentVolumeClaim describes the requirements for the volume that the application needs.
PersistentVolume stores access parameters and the status of the volume.
The main idea: in the pod manifest, specify a volume of type PersistentVolumeClaim and indicate the name of this entity in the claimName parameter.

In the PersistentVolumeClaim manifest, the access requirements for the data volume necessary for the application are described. These include:
- disk size;
- access mode: ReadWriteOnce or ReadWriteMany;
- link to Storage Class — which storage system we want to create the volume in.
In the Storage Class manifest, the type and connection parameters to the storage system are stored. They are needed by the kubelet to mount the volume to its node.
In the PersistentVolume manifests, the Storage Class and access parameters to the specific volume (volume ID, path, etc.) are specified.
When creating a PVC, Kubernetes checks what size volume and which Storage Class will be required, and selects an available PersistentVolume.
If such PVs are not available, Kubernetes can run a special program — Provisioner (its name is specified in the Storage Class). This program connects to the storage system, creates a volume of the required size, retrieves the identifier, and creates a PersistentVolume manifest in the Kubernetes cluster that links to the PersistentVolumeClaim.
All these abstractions allow information about which storage system the application works with to be removed from the application manifest level to the administration level.
All connection parameters to the storage system are located in the Storage class, which is managed by the cluster administrators. To transition from AWS to Google Cloud, all that needs to be done is to change the Storage class name in the application's manifests within the PVC. Persistent Volumes for data storage will be automatically created in the cluster using the Provisioner.
Method 3. Container Storage Interface
All code that interacts with various storage systems is part of the Kubernetes core. The release of bug fixes or new features is tied to new releases, requiring code changes for all supported Kubernetes versions. This is challenging to maintain, especially when adding new functionality.
To address this issue, developers from Cloud Foundry, Kubernetes, Mesos, and Docker created the Container Storage Interface (CSI) — a simple, unified interface describing the interaction between the container management system and a specific driver (CSI Driver) that works with a particular storage system. The entire code for interacting with storage systems has been removed from the Kubernetes core and placed in a separate system.
.
Typically, a CSI Driver consists of two components: Node Plugin and Controller Plugin.
The Node Plugin runs on each node and is responsible for mounting volumes and performing operations on them. The Controller Plugin interacts with the storage system: creating or deleting volumes, assigning access rights, etc.
While old drivers remain in the Kubernetes core, their usage is no longer recommended, and everyone is advised to install the CSI Driver specifically for the system they will work with.
This innovation may scare those who are already used to configuring data storage through the Storage class, but there's actually nothing to worry about. For developers, nothing has changed — they will continue to work with the Storage class name as before. For administrators, the installation of the helm chart has been added, and the configuration structure has changed. Previously, settings were input directly into the Storage class; now they must first be defined in the helm chart and then in the Storage class. In essence, nothing dramatic has occurred.
Let's look at an example of the advantages that can be gained by connecting to the Ceph storage system using the CSI driver.
When working with Ceph, the CSI plugin provides more capabilities for interacting with storage systems than the built-in drivers.
- Dynamic disk creation. Typically, RBD disks are used only in RWO mode, but CSI for Ceph allows them to be used in RWX mode. Multiple pods on different nodes can mount the same RBD disk on their nodes and operate with it in parallel. To be fair, it's not all rosy — this disk can only be connected as a block device, meaning that the application will need to be adapted to work with it in a multi-access mode.
- Creating snapshots. In a Kubernetes cluster, you can create a manifest that requests a snapshot. The CSI plugin will see it and create a snapshot of the disk. Based on it, you can either make a backup or a copy of the PersistentVolume.
- Increasing disk size on storage systems and PersistentVolumes in the Kubernetes cluster.
- Quotas. Built-in CephFS drivers in Kubernetes do not support quotas, while new CSI plugins with the latest Ceph Nautilus can enable quotas on CephFS volumes.
- Metrics. The CSI plugin can provide a multitude of metrics to Prometheus regarding which volumes are connected, what interactions are happening, etc.
- Topology aware. Allows specifying in manifests how the cluster is geographically distributed, thereby avoiding connections to pods running in London when the storage system is located in Amsterdam.
To learn how to connect Ceph to a Kubernetes cluster through CSI, see . You can also sign up for , which will start on October 15.
Author of the article: Sergey Bondarev, practicing architect at Southbridge, Certified Kubernetes Administrator, one of the developers of kubespray.
A bit of Post Scriptum, not for advertising, but for the sake of usefulness...
P.S. Sergey Bondarev leads two intensives: the updated September 28-30 and the advanced from October 14 to 16.
Source: habr.com
