

If you are already familiar with the previous in this series, you already know how to create fully functional Telegram bots with a keyboard.
In this article, we will learn to write a bot that will support a sequential dialogue. That is, the bot will ask you questions and wait for you to provide some information. Depending on the data you enter, the bot will perform certain actions.
We will also learn to use a database under the hood of the bot; in our example, this will be SQLite, but you can use any other DBMS. I wrote more about interacting with databases in R in .

All articles from the "Writing a Telegram Bot in R" series
Content
If you're interested in data analysis, you might find my and channels interesting. Most of their content is devoted to the R language.
Introduction
For the bot to request data from you and wait for you to enter information, you will need to keep track of the current state of the dialogue. The best way to do this is to use some embedded database, like SQLite.
The logic will be as follows. We call the bot method, and the bot sequentially requests certain information from us, waiting for the input at each step, during which it can also perform validation checks.
We will write a very simple bot that first asks for your name, then your age, and saves the obtained data in the database. When asking for age, it will check to ensure that the input is a number, not text.
Such a simple dialogue will have only three states:
- start — the normal state of the bot in which it does not expect any information from you
- wait_name — the state during which the bot is waiting for you to enter your name
- wait_age — the state during which the bot is waiting for you to enter your age in complete years.
The Process of Building a Bot
In this article, we will build a bot step by step; the entire process can be schematically represented as follows:
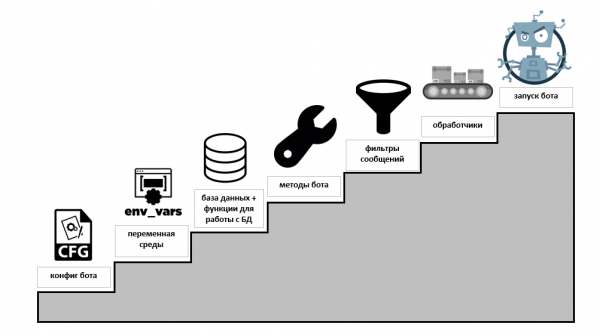
- We create the bot's configuration, where we will store some settings. In our case, the bot token and the path to the database file.
- We create an environment variable that will store the path to the project with the bot.
- We create the database itself and a number of functions that allow the bot to interact with it.
- We write the bot methods, i.e., functions that it will perform.
- We add message filters. These will allow the bot to call the necessary methods depending on the current state of the chat.
- We add handlers that will link commands and messages with the necessary bot methods.
- We start the bot.
Bot Project Structure
For convenience, we will break our bot code and other related files into the following structure.
- bot.R — main code of our bot
- db_bot_function.R — block of code with functions for database operations
- bot_methods.R — code for the bot's methods
- message_filters.R — message filters
- handlers.R — handlers
- config.cfg — bot configuration
- create_db_data.sql — SQL script to create the chat data table in the database
- create_db_state.sql — SQL script to create the current chat state table in the database
- bot.db — bot's database
You can view the entire bot project, or from my .
Bot Configuration
We will use a regular , of the following form:
[bot_settings]
bot_token=YOUR_BOT_TOKEN

[db_settings]
db_path=C:/PATH/TO/PROJECT/FOLDER/bot.db
In the config, we write the bot token and the database path, i.e., to the bot.db file, which we will create in the next step.
For more complex bots, you can create more sophisticated configs, and it's not necessary to write specifically ini config; you can use any other format, including JSON.
Creating an Environment Variable
On each PC, the folder with the bot project may be located in different directories and on different disks, so the path to the project folder in the code will be specified through the environment variable TG_BOT_PATH.
You can create an environment variable in several ways, the simplest is to write it in the file .Renviron.
You can create or edit this file using the command file.edit(path.expand(file.path("~", ".Renviron"))). Execute it and add a line to the file:
TG_BOT_PATH=C:/PATH/TO/YOUR/PROJECTThen save the file .Renviron and restart RStudio.
Creating a Database
The next step is to create the database. We will need 2 tables:
- chat_data — data requested by the bot from the user
- chat_state — the current state of all chats
You can create these tables using the following SQL query:
CREATE TABLE chat_data (
    chat_id BIGINT  PRIMARY KEY
                    UNIQUE,
    name    TEXT,
    age     INTEGER
);

CREATE TABLE chat_state (
    chat_id BIGINT PRIMARY KEY
                   UNIQUE,
    state   TEXT
);
If you downloaded the bot project from , you can use the following R code to create the database.
# Скрипт создания базы данных
library(DBI)     # интерфейс для работы с СУБД
library(configr) # чтение конфига
library(readr)   # чтение текстовых SQL файлов
library(RSQLite) # драйвер для подключения к SQLite

# директория проекта
setwd(Sys.getenv('TG_BOT_PATH'))

# чтение конфига
cfg <- read.config('config.cfg')

# подключение к SQLite
con <- dbConnect(SQLite(), cfg$db_settings$db_path)

# Создание таблиц в базе
dbExecute(con, statement = read_file('create_db_data.sql'))
dbExecute(con, statement = read_file('create_db_state.sql'))
Writing Functions to Work with the Database
We already have a configuration file and a database created. Now we need to write functions for reading and writing data to this database.
If you downloaded the project from , you can find the functions in the file db_bot_function.R.
Code for functions to work with the database
# ###########################################################
# Function for work bot with database

# получить текущее состояние чата
get_state <- function(chat_id) {

  con <- dbConnect(SQLite(), cfg$db_settings$db_path)

  chat_state <- dbGetQuery(con, str_interp("SELECT state FROM chat_state WHERE chat_id == ${chat_id}"))$state

  return(unlist(chat_state))

  dbDisconnect(con)
}

# установить текущее состояние чата
set_state <- function(chat_id, state) {

  con <- dbConnect(SQLite(), cfg$db_settings$db_path)

  # upsert состояние чата
  dbExecute(con,
            str_interp("
            INSERT INTO chat_state (chat_id, state)
                VALUES(${chat_id}, '${state}')
                ON CONFLICT(chat_id)
                DO UPDATE SET state='${state}';
            ")
  )

  dbDisconnect(con)

}

# запись полученных данных в базу
set_chat_data <- function(chat_id, field, value) {

  con <- dbConnect(SQLite(), cfg$db_settings$db_path)

  # upsert состояние чата
  dbExecute(con,
            str_interp("
            INSERT INTO chat_data (chat_id, ${field})
                VALUES(${chat_id}, '${value}')
                ON CONFLICT(chat_id)
                DO UPDATE SET ${field}='${value}';
            ")
  )

  dbDisconnect(con)

}

# read chat data
get_chat_data <- function(chat_id, field) {

  con <- dbConnect(SQLite(), cfg$db_settings$db_path)

  # upsert состояние чата
  data <- dbGetQuery(con,
                     str_interp("
            SELECT ${field}
            FROM chat_data
            WHERE chat_id = ${chat_id};
            ")
  )

  dbDisconnect(con)

  return(data[[field]])

}
We created 4 simple functions:
get_state()— retrieve the current state of the chat from the databaseset_state()— write the current state of the chat to the databaseget_chat_data()— retrieve data sent by the userset_chat_data()— write data received from the user
All functions are quite simple; they either read data from the database using the command dbGetQuery(), or perform UPSERT operations (modifying existing data or writing new data to the database), using the function dbExecute().
The syntax for the UPSERT operation looks as follows:
INSERT INTO chat_data (chat_id, ${field})
VALUES(${chat_id}, '${value}')
ON CONFLICT(chat_id)
DO UPDATE SET ${field}='${value}';
That is, in our tables, the field chat_id has a uniqueness constraint and is the primary key of the tables. Initially, we try to add information to the table and receive an error if data for the current chat already exists; in such a case, we simply update the information for this chat.
We will use these functions in the methods and filters of the bot.
Bot Methods
The next step in building our bot will be creating methods. If you downloaded the project from , all methods are located in the file bot_methods.R.
Code for the bot's methods
# ###########################################################
# bot methods

# start dialog
start <- function(bot, update) {

  #

  # Send query
  bot$sendMessage(update$message$chat_id,
                  text = "Введи своё имя")

  # переключаем состояние диалога в режим ожидания ввода имени
  set_state(chat_id = update$message$chat_id, state = 'wait_name')

}

# get current chat state
state <- function(bot, update) {

  chat_state <- get_state(update$message$chat_id)

  # Send state
  bot$sendMessage(update$message$chat_id,
                  text = unlist(chat_state))

}

# reset dialog state
reset <- function(bot, update) {

  set_state(chat_id = update$message$chat_id, state = 'start')

}

# enter username
enter_name <- function(bot, update) {

  uname <- update$message$text

  # Send message with name
  bot$sendMessage(update$message$chat_id,
                  text = paste0(uname, ", приятно познакомится, я бот!"))

  # Записываем имя в глобальную переменную
  #username <<- uname
  set_chat_data(update$message$chat_id, 'name', uname)

  # Справшиваем возраст
  bot$sendMessage(update$message$chat_id,
                  text = "Сколько тебе лет?")

  # Меняем состояние на ожидание ввода имени
  set_state(chat_id = update$message$chat_id, state = 'wait_age')

}

# enter user age
enter_age <- function(bot, update) {

  uage <- as.numeric(update$message$text)

  # проверяем было введено число или нет
  if ( is.na(uage) ) {

    # если введено не число то переспрашиваем возраст
    bot$sendMessage(update$message$chat_id,
                    text = "Ты ввёл некорректные данные, введи число")

  } else {

    # если введено число сообщаем что возраст принят
    bot$sendMessage(update$message$chat_id,
                    text = "ОК, возраст принят")

    # записываем глобальную переменную с возрастом
    #userage <<- uage
    set_chat_data(update$message$chat_id, 'age', uage)

    # сообщаем какие данные были собраны
    username <- get_chat_data(update$message$chat_id, 'name')
    userage  <- get_chat_data(update$message$chat_id, 'age')

    bot$sendMessage(update$message$chat_id,
                    text = paste0("Тебя зовут ", username, " и тебе ", userage, " лет. Будем знакомы"))

    # возвращаем диалог в исходное состояние
    set_state(chat_id = update$message$chat_id, state = 'start')
  }

}
We created 5 methods:
- start — Start the dialog
- state — Get the current state of the chat
- reset — Reset the current state of the chat
- enter_name — The bot asks for your name
- enter_age — The bot asks for your age
Element.getAnimations() start asks for your name and changes the state of the chat to wait_name, i.e., in the waiting mode for your name input.
Then, you send your name, and it is processed by the method enter_name, the bot greets you, records the received name in the database, and changes the chat state to wait_age.
At this stage, the bot is waiting for you to enter your age. You send your age, and the bot checks the message; if you sent something other than a number, it will say: You entered invalid data, please enter a number, and will wait for you to enter the data again. If you sent a number, the bot will confirm that it has accepted your age, will store the received data in the database, will inform you of all the data received from you, and will reset the chat to its initial state, i.e., start.
By calling the method state you can request the current state of the chat at any time, and by the method reset reset the chat to its initial state.
Message Filters
In our case, this is one of the most important parts of building the bot. It is through message filters that the bot will understand what information it is waiting for from you and how to process it.
In the project on the filters are defined in the file message_filters.R.
Message filter code:
# ###########################################################
# message state filters

# фильтр сообщений в состоянии ожидания имени
MessageFilters$wait_name <- BaseFilter(function(message) {
  get_state( message$chat_id )  == "wait_name"
}
)

# фильтр сообщений в состоянии ожидания возраста
MessageFilters$wait_age <- BaseFilter(function(message) {
  get_state( message$chat_id )   == "wait_age"
}
)
In the filters, we use the function written previously get_state(), to request the current state of the chat. This function requires just one argument, the chat ID.
Next, the filter wait_name processes messages when the chat is in the state wait_name, and correspondingly the filter wait_age processes messages when the chat is in the state wait_age.
Handlers
The file with handlers is called handlers.R, and has the following code:
# ###########################################################
# handlers

# command handlers
start_h <- CommandHandler('start', start)
state_h <- CommandHandler('state', state)
reset_h <- CommandHandler('reset', reset)

# message handlers
## !MessageFilters$command - означает что команды данные обработчики не обрабатывают,
## только текстовые сообщения
wait_age_h  <- MessageHandler(enter_age,  MessageFilters$wait_age  & !MessageFilters$command)
wait_name_h <- MessageHandler(enter_name, MessageFilters$wait_name & !MessageFilters$command)
First, we create command handlers that will allow you to launch methods to start the dialog, reset it, and request the current state.
Next, we create 2 message handlers using the filters created in the previous step, and add the filter !MessageFilters$command, so that we can use commands in any chat state.
Bot Launch Code
Now we are all set to launch; the main bot startup code is in the file bot.R.
library(telegram.bot)
library(tidyverse)
library(RSQLite)
library(DBI)
library(configr)

# enter the project folder
setwd(Sys.getenv('TG_BOT_PATH'))

# read the config
cfg <- read.config('config.cfg')

# create an instance of the bot
updater <- Updater(cfg$bot_settings$bot_token)

# Loading bot components
source('db_bot_function.R') # functions for working with the DB
source('bot_methods.R')     # bot methods
source('message_filters.R') # message filters
source('handlers.R') # message handlers

# Add handlers to the dispatcher
updater <- updater +
  start_h +
  wait_age_h +
  wait_name_h +
  state_h +
  reset_h

# Start the bot
updater$start_polling()
As a result, we ended up with the following bot:
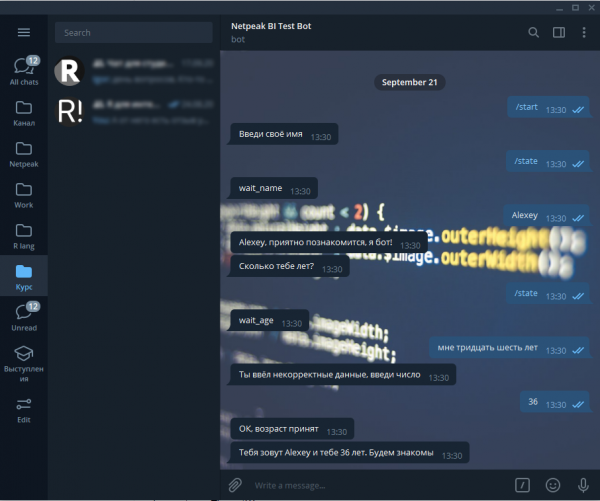
At any moment, using the command /state we can request the current state of the chat, and using the command /reset reset the chat to its original state and start the conversation anew.
Conclusion
In this article, we explored how to use databases within the bot and how to build sequential logical dialogues by capturing the chat state.
In this case, we examined the most primitive example to make it easier for you to understand the idea of building such bots; in practice, you can create much more complex dialogues.
In the next article in this series, we will learn how to restrict bot users' access to various methods.
Source: habr.com
