


Many believe that simply transferring an application to Kubernetes (either using Helm or manually) will bring happiness. However, it is not that simple.
The command I translated an article by DevOps engineer Julian Gindi. He discusses the pitfalls his company faced during the migration process, so you won't step on the same rakes.
Step One: Setting Pod Requests and Limits
Let's start with configuring a clean environment where our pods will operate. Kubernetes excels at scheduling pods and handling failure states. Yet, it turns out that the scheduler sometimes cannot place a pod if it struggles to assess how many resources it needs to operate successfully. This is where resource requests and limits come into play. There is much debate about the best approach to configuring requests and limits. Sometimes it seems more like an art than a science. Here is our approach.
Pod Requests — are the primary values used by the scheduler for optimal pod placement.
From : at the filtering stage, a set of nodes is identified where the pod can be scheduled. For instance, the PodFitsResources filter checks whether there are enough resources on the node to satisfy the specific pod's resource requests.
We utilize application requests to estimate how many resources actually the application needs for normal operation. This way, the scheduler will be able to realistically place the nodes. Initially, we intended to set requests with a buffer to ensure there were ample resources for each pod, but noticed that scheduling time significantly increased, and some pods were never fully scheduled, as if no resource requests were made for them.
In this case, the scheduler often "forced out" pods and could not reschedule them due to the control plane having no idea how many resources the application would require, which is a key component of the scheduling algorithm.
Pod Limits — are a clearer restriction for the pod. It represents the maximum amount of resources that the cluster allocates to the container.
Again, from : If the memory limit for the container is set to 4 GiB, then the kubelet (and the container runtime) will enforce it. The runtime does not allow the container to use more than the specified resource limit. For example, when a process in the container attempts to use more memory than allowed, the system kernel terminates that process with an 'out of memory' (OOM) error.
A container can always use more resources than specified in the resource request, but it can never exceed the set limit. This value can be challenging to set correctly, but it is very important.
Ideally, we want the resource requirements of the pod to change throughout the lifecycle of the process without interfering with other processes in the system — that is the goal of setting limits.
Unfortunately, I can't provide specific guidance on what values to set, but we adhere to the following rules:
- Using a load testing tool, we model the baseline traffic and observe the resource usage of the pod (memory and CPU).
- We set the pod requests to an arbitrarily low value (with a resource limit about 5 times higher than the request value) and observe. When requests are too low, the process cannot start, often causing mysterious runtime errors in Go.
I want to note that higher resource limits complicate scheduling, as the pod needs a target node with sufficient available resources.
Imagine a situation where you have a lightweight web server with a very high resource limit, for example, 4 GB of memory. This process will likely need to scale horizontally, and each new module will need to be scheduled on a node with at least 4 GB of available memory. If such a node does not exist, the cluster must introduce a new node to handle this pod, which may take some time. It is important to minimize the difference between resource requests and limits to ensure rapid and smooth scaling.
Step two: configure Liveness and Readiness tests.
This is another nuanced topic that is often discussed within the Kubernetes community. It's important to have a good understanding of Liveness and Readiness probes, as they provide a mechanism for the reliable operation of software and minimize downtime. However, if not configured correctly, they can significantly impact your application's performance. Below is a brief overview of what both probes entail.
Liveness indicates whether the container is running. If it fails, kubelet kills the container and the restart policy kicks in. If the container does not have a Liveness probe, the default state will be success — this is stated in .
Liveness probes must be inexpensive, meaning they should not consume a lot of resources, as they run frequently and are meant to inform Kubernetes that the application is up.
If you set the probe to run every second, that adds 1 request per second, so keep in mind that additional resources will be needed to handle this traffic.
In our company, Liveness tests check core components of the application, even if data (for example, from a remote database or cache) is not fully available.
We have configured an endpoint in the applications that simply returns a response code of 200. This indicates that the process is running and capable of handling requests (but not yet traffic).
Probe Readiness indicates whether the container is ready to handle requests. If the readiness probe fails, the endpoint controller removes the pod's IP address from the endpoints of all services corresponding to the pod. This is also mentioned in the Kubernetes documentation.
Readiness probes consume more resources, as they need to connect to the backend in a way that demonstrates the application's readiness to accept requests.
There is much debate in the community about whether to query the database directly. Considering the overhead (checks are performed frequently, but they can be regulated), we decided that for some applications, readiness to serve traffic is acknowledged only after verifying that records are returned from the database. Well-thought-out readiness checks provided a higher level of availability and eliminated downtime during deployment.
If you decide to make a database query to check the readiness of the application, ensure that it is as inexpensive as possible. Take this query as an example:
SELECT small_item FROM table LIMIT 1Here’s an example of how we set these two values in Kubernetes:
livenessProbe:
 httpGet:
   path: /api/liveness
   port: http
readinessProbe:
 httpGet:
   path: /api/readiness
   port: http  periodSeconds: 2
You can add some additional configuration parameters:
initialDelaySeconds— the number of seconds that will pass between the start of the container and the start of the checks.periodSeconds— the interval to wait between checks.timeoutSeconds— the number of seconds, after which the pod is considered unhealthy. A typical timeout.failureThreshold— the number of test failures before a restart signal is sent to the pod.successThreshold— the number of successful checks before the pod transitions to a ready state (after a failure, when the pod is starting or recovering).
Step three: configuring default pod network policies
In Kubernetes, the network topology is 'flat'; by default, all pods communicate with each other directly. In some cases, this is undesirable.
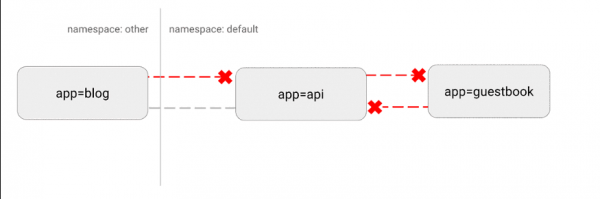
A potential security issue is that an attacker could leverage a single vulnerable application to send traffic to all pods in the network. As in many areas of security, the principle of least privilege applies here. Ideally, network policies should explicitly state which connections between pods are allowed and which are not.
For example, below is a simple policy that denies all incoming traffic for a specific namespace:
---
apiVersion: networking.k8s.io/v1
kind: NetworkPolicy
metadata:
 name: default-deny-ingress
spec:
 podSelector: {}
 policyTypes:
   - Ingress
Visualization of this configuration:
(https://miro.medium.com/max/875/1*-eiVw43azgzYzyN1th7cZg.gif)
More details .
Step four: Custom behavior with hooks and init containers
One of our main tasks was to ensure deployments in Kubernetes without downtime for developers. This is challenging because there are many ways to terminate applications and release their resources.
Particular difficulties arose with . We noticed that during the sequential deployment of these pods, active connections were interrupted before successfully completing.
After extensive research on the internet, it became clear that Kubernetes does not wait for Nginx connections to drain before terminating the pod. With the pre-stop hook, we implemented such functionality and completely eliminated downtime:
lifecycle:
 preStop:
   exec:
     command: ["/usr/local/bin/nginx-killer.sh"]
Here is nginx-killer.sh:
#!/bin/bash
sleep 3
PID=$(cat /run/nginx.pid)
nginx -s quit
while [ -d /proc/$PID ]; do
   echo "Waiting while shutting down nginx..."
   sleep 10
done
Another extremely useful paradigm is using init containers to handle the startup of specific applications. This is especially useful if you have a resource-intensive database migration process that needs to run before the application starts. For this process, you can also set a higher resource limit without applying such a limit to the main application.
Another common pattern is accessing secrets in the init container that supplies these credentials to the main module, preventing unauthorized access to the secrets from the main application module.
As usual, a quote from the documentation: init containers safely run user code or utilities that would otherwise decrease the security of the application container image. By keeping unnecessary tools separate, you limit the attack surface of the application container image.
Step five: Kernel configuration
Finally, we will discuss a more advanced technique.
Kubernetes is an exceptionally flexible platform that allows you to run workloads however you see fit. We have several high-performance applications that are extremely resource-intensive. After extensive load testing, we found that one of the applications struggles with the expected traffic load when using the default Kubernetes settings.
However, Kubernetes allows you to run a privileged container that changes kernel parameters only for a specific pod. Here’s what we used to change the maximum number of open connections:
initContainers:
  - name: sysctl
     image: alpine:3.10
     securityContext:
         privileged: true
      command: ['sh', '-c', "sysctl -w net.core.somaxconn=32768"]
This is a more advanced technique that is often unnecessary. But if your application is struggling under heavy load, you might consider tuning some of these parameters. More detailed information about this process and configuring various values can be found in the official documentation. .
In conclusion
Throughout the migration to Kubernetes, it is important to follow the "load testing cycle": you deploy the application, test it under load, observe metrics and behavior during scaling, configure settings based on this data, and then repeat the cycle.
Realistically assess the expected traffic and try to exceed it to see which components will break first. With such an iterative approach, a few of the recommendations may suffice for success. Alternatively, more in-depth tuning may be required.
Always ask yourself questions like:
How much resources do the applications consume and how will this change?
- What are the actual scaling requirements? How much traffic will the application handle on average? And what about peak traffic?
- How often will the service need horizontal scaling? How quickly do new pods need to be deployed to handle traffic?
- How gracefully do pods terminate? Is this even necessary? Can deployments be achieved without downtime?
- How can risks to security be minimized and the damage from any compromised pods limited? Are there any permissions or accesses that certain services have which they don’t require?
- How can we minimize security risks and limit damage from any compromised pods? Are there any services that have permissions or accesses that they do not require?
Kubernetes provides an incredible platform that allows the best practices for deploying thousands of services in a cluster. However, all applications are different. Sometimes, implementation requires a bit more work.
Fortunately, Kubernetes provides the necessary configurations to achieve all technical goals. By using a combination of resource requests and limits, Liveness and Readiness probes, init containers, network policies, and custom kernel configurations, you can achieve high performance alongside resilience and rapid scalability.
What else to read:
- .
- .
- .
Source: habr.com
