

In this article, we will explore what Terraform consists of and step by step launch our own infrastructure. We will prepare three VMs for different purposes: a proxy, a file storage, and a CMS.
All details broken down into three stages:
1. Terraform - description, advantages, and components.
Terraform is an IaC (Infrastructure-as-Code) tool for building and managing virtual infrastructure using code.
In working with the tool, we noted several advantages:
Rapid deployment of new tenants (user virtual environments). Generally, the more new clients, the more "clicks" the support staff must make to publish new resources. With Terraform, users can modify virtual machine parameters (e.g., automatically shutting down the OS and increasing the virtual disk partition) without support staff involvement or shutting down the machine itself.
Immediate verification of the activation plan of a new tenant. With the infrastructure code description, we can immediately check what and in what order will be added, as well as the final state of any virtual machine or virtual network with connections to virtual machines.
Ability to describe most popular cloud platforms. You can use the tool from Amazon and Google Cloud to private platforms based on VMware vCloud Director, offering services within IaaS, SaaS, and PaaS solutions.
Manage multiple cloud providers and distribute infrastructure across them for increased fault tolerance, using a single configuration to create, diagnose, and manage cloud resources.
Convenient use for creating demo environments for testing and debugging software. You can create and deliver environments for the testing department, simultaneously check software in different environments, as well as instantly change and remove resources by creating just one resource building plan.
Terraform's "Terrarium"
We briefly discussed the tool's advantages, now let's break it down into components.
Providers.
In Terraform, nearly any type of infrastructure can be represented as a resource. The connection between resources and the API platform is provided by provider modules, which allow for the creation of resources on a specific platform, such as Azure or VMware vCloud Director.
In the context of the project, you can interact with different providers on various platforms.
Resources (resource descriptions).
Resource descriptions enable management of platform components, such as virtual machines or networks.
You can create a resource description for the VMware vCloud Director provider and use this description to create resources with any hosting provider that uses vCloud Director. You only need to change the authentication parameters and the network connection details for the relevant hosting provider.
Provisioners.
This component allows you to perform initial setup and maintenance operations for the operating system after creating virtual machines. Once you have created a virtual machine resource, you can use provisioners to configure it and connect via SSH, perform operating system updates, as well as upload and execute a script.
Input and Output Variables.
Input variables are the incoming variables for any type of blocks.
Output variables allow you to retain values after resource creation and can be used as input variables in other modules, for example, within a Provisioners block.
States (states).
State files store information about the configuration of the provider's platform resources. When the platform is first created, there is no information about the resources, and before any Terraform operation, the state is updated to reflect the real infrastructure of the already described resources.
The main goal of states is to maintain the binding of already created resource objects to compare the configuration of new resources and objects, in order to avoid unnecessary recreation and changes to the platform.
By default, state information is stored in a local file named terraform.tfstate, but it is also possible to use remote storage for team collaboration.
You can also import the current platform resources into the state to further interact with other resources that were created without Terraform.
2. Creating Infrastructure
Now that we've covered the components, we will sequentially create the infrastructure using Terraform with three virtual machines. The first will have an nginx proxy server installed, the second will serve as a file storage based on Nextcloud, and the third will host the Bitrix CMS.
We will write and execute code using our . Users receive an account with Organization Administrator rights; if you use an account with the same rights in another VMware cloud, you will be able to reproduce the code from our examples. Let’s get started!
First, let's create a directory for our new project, where the infrastructure description files will be stored.
mkdir project01
Next, we will describe the infrastructure components. Terraform creates associations and processes files based on the descriptions in the files. The files can be named according to the intended purpose of the described blocks; for instance, network.tf describes network parameters for the infrastructure.
To describe the components of our infrastructure, we created the following files:
File list.
main.tf — description of parameters for the virtual environment — virtual machines, virtual containers;
network.tf — description of parameters for the virtual network and rules for NAT, Firewall;
variables.tf — list of variables that we use;
vcd.tfvars — project variable values for the VMware vCloud Director module.
The configuration language in Terraform is declarative, and the order of blocks does not matter, except for the provisioner blocks, as this is where we describe commands to execute when preparing the infrastructure, and they will be executed in order.
Structure of blocks.
"" "" {
# Block body
= # Argument
}
Blocks are described using their own programming language, HCL (HashiCorp Configuration Language), and it's also possible to describe infrastructure using JSON. More details about the syntax can be .
Configuration of the environment variable, variables.tf and vcd.tfvars
First, let's create two files that describe the list of all the variables used and their values for the VMware vCloud Director module. We will first create the variables.tf file.
Contents of the variables.tf file.
variable "vcd_org_user" {
description = "vCD Tenant User"
}
variable "vcd_org_password" {
description = "vCD Tenant Password"
}
variable "vcd_org" {
description = "vCD Tenant Org"
}
variable "vcd_org_vdc" {
description = "vCD Tenant VDC"
}
variable "vcd_org_url" {
description = "vCD Tenant URL"
}
variable "vcd_org_max_retry_timeout" {
default = "60"
}
variable "vcd_org_allow_unverified_ssl" {
default = "true"
}
variable "vcd_org_edge_name" {
description = "vCD edge name"
}
variable "vcd_org_catalog" {
description = "vCD public catalog"
}
variable "vcd_template_os_centos7" {
description = "OS CentOS 7"
default = "CentOS7"
}
variable "vcd_org_ssd_sp" {
description = "Storage Policies"
default = "Gold Storage Policy"
}
variable "vcd_org_hdd_sp" {
description = "Storage Policies"
default = "Bronze Storage Policy"
}
variable "vcd_edge_local_subnet" {
description = "Organization Network Subnet"
}
variable "vcd_edge_external_ip" {
description = "External public IP"
}
variable "vcd_edge_local_ip_nginx" {}
variable "vcd_edge_local_ip_bitrix" {}
variable "vcd_edge_local_ip_nextcloud" {}
variable "vcd_edge_external_network" {}
Variable values that we receive from the provider.
vcd_org_user — username with Organization Administrator rights,
vcd_org_password — user password,
vcd_org — organization name,
vcd_org_vdc — virtual data center name,
vcd_org_url — API URL,
vcd_org_edge_name — virtual router name,
vcd_org_catalog — name of the template catalog,
vcd_edge_external_ip — public IP address,
vcd_edge_external_network — name of the external network,
vcd_org_hdd_sp — name of the HDD storage policy,
vcd_org_ssd_sp — name of the SSD storage policy.
And we define our variables:
vcd_edge_local_ip_nginx — IP address of the virtual machine with NGINX,
vcd_edge_local_ip_bitrix — IP address of the virtual machine with 1C: Bitrix,
vcd_edge_local_ip_nextcloud — IP address of the virtual machine with Nextcloud.
In the second file, we create and specify variables for the VMware vCloud Director module in the vcd.tfvars file: Note that in our example we are using , if you are working with another provider, clarify the values with them.
Contents of the vcd.tfvars file.
vcd_org_url = "https://vcloud.mclouds.ru/api"
vcd_org_user = "orgadmin"
vcd_org_password = "*"
vcd = "org"
vcd_org_vdc = "orgvdc"
vcd_org_maxretry_timeout = 60
vcd_org_allow_unverified_ssl = true
vcd_org_catalog = "Templates"
vcd_templateos_centos7 = "CentOS7"
vcd_org_ssd_sp = "Gold Storage Policy"
vcd_org_hdd_sp = "Bronze Storage Policy"
vcd_org_edge_name = "MCLOUDS-EDGE"
vcd_edge_external_ip = "185.17.66.1"
vcd_edge_local_subnet = "192.168.110.0/24"
vcd_edge_local_ip_nginx = "192.168.110.1"
vcd_edge_local_ip_bitrix = "192.168.110.10"
vcd_edge_local_ip_nextcloud = "192.168.110.11"
vcd_edge_external_network = "NET-185-17-66-0"
Network configuration, network.tf.
Environment variables are set, now let's configure the connection scheme for virtual machines — we will assign a private IP address to each virtual machine and use Destination NAT to forward ports to the external network. To restrict access to management ports, we will allow access only for our IP address.
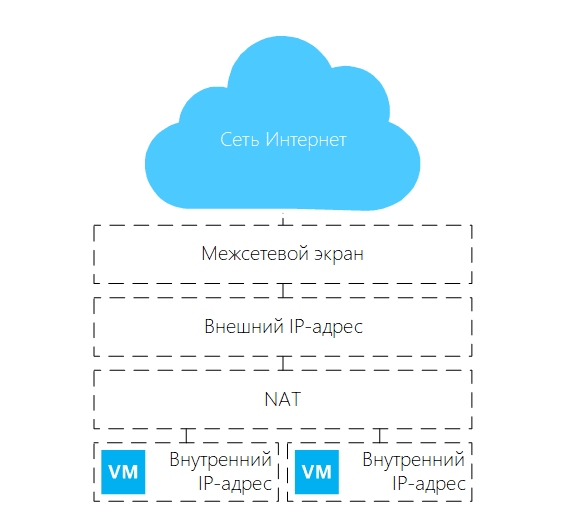 Network scheme for the Terraform platform being created
We are creating a virtual organizational network named net_lan01, with a default gateway of 192.168.110.254, and an address space of 192.168.110.0/24.
Describing the virtual network.
resource "vcd_network_routed" "net" {
name = "net_lan01"
edge_gateway = var.vcd_org_edge_name
gateway = "192.168.110.254"
dns1 = "1.1.1.1"
dns2 = "8.8.8.8"
static_ip_pool {
start_address = "192.168.110.1"
end_address = "192.168.110.253"
}
}
We will create rules for the firewall that will allow virtual machines access to the Internet. Within this block, all virtual resources in the cloud will have Internet access:
Describing rules for VM access to the Internet.
resource "vcd_nsxv_firewall_rule" "fw_internet_access" {
edge_gateway = var.vcdorgedgename
name = "Internet Access"
source {
gateway_interfaces = ["internal"]
}
destination {
gateway_interfaces = ["external"]
}
service {
protocol = "any"
}
depends_on = [vcdnetworkrouted.net]
}
By establishing a dependency, we ensure that after processing the vcdnetworkrouted.net block, we proceed to configure the vcdnsxvfirewallrule block., using dependson. We are using this option because some dependencies may not be recognized implicitly in the configuration.
Next, we will create rules allowing access to ports from the external network and specify our IP address for SSH connections to the servers. Any Internet user has access to ports 80 and 443 on the web server, and a user with the IP address 90.1.15.1 has access to the SSH ports of the virtual servers.
Allowing access to ports from the external network.
resource "vcd_nsxv_firewall_rule" "fwnatports" {
edge_gateway = var.vcd_org_edge_name
name = "HTTPs Access"
source {
gateway_interfaces = ["external"]
}
destination {
gateway_interfaces = ["internal"]
}
service {
protocol = "tcp"
port = "80"
}
service {
protocol = "tcp"
port = "443"
}
depends_on = [vcd_network_routed.net]
}
resource "vcd_nsxv_firewall_rule" "fw_nat_admin_ports" {
edge_gateway = var.vcd_org_edge_name
name = "Admin Access"
source {
ip_addresses = [ "90.1.15.1" ]
}
destination {
gateway_interfaces = ["internal"]
}
service {
protocol = "tcp"
port = "58301"
}
service {
protocol = "tcp"
port = "58302"
}
service {
protocol = "tcp"
port = "58303"
}
depends_on = [vcd_network_routed.net]
}
Creating Source NAT rules for Internet access from the cloud local network:
Describing Source NAT rules.
resource "vcd_nsxv_snat" "snat_local" {
edge_gateway = var.vcd_org_edge_name
network_type = "ext"
network_name = var.vcdedgeexternalnetwork
original_address = var.vcd_edge_local_subnet
translated_address = var.vcd_edge_external_ip
depends_on = [vcd_network_routed.net]
}
And at the end of the network block configuration, we add Destination NAT rules for accessing services from the external network:
Adding Destination NAT rules.
resource "vcd_nsxv_dnat" "dnat_tcp_nginx_https" {
edge_gateway = var.vcd_org_edge_name
network_name = var.vcd_edge_external_network
network_type = "ext"
description = "NGINX HTTPs"
original_address = var.vcd_edge_external_ip
original_port = 443
translated_address = var.vcd_edge_local_ip_nginx
translated_port = 443
protocol = "tcp"
depends_on = [vcd_network_routed.net]
}
resource "vcd_nsxv_dnat" "dnat_tcp_nginx_http" {
edge_gateway = var.vcd_org_edge_name
network_name = var.vcd_edge_external_network
network_type = "ext"
description = "NGINX HTTP"
original_address = var.vcd_edge_external_ip
original_port = 80
translated_address = var.vcd_edge_local_ip_nginx
translated_port = 80
protocol = "tcp"
depends_on = [vcd_network_routed.net]
}
We are adding a NAT rule for port translation to the SSH server under Nginx.
resource "vcd_nsxv_dnat" "dnat_tcp-nginx_ssh" {
edge_gateway = var.vcd_org_edge_name
network_name = var.vcd_edge_external_network
network_type = "ext"
description = "SSH NGINX"
original_address = var.vcd_edge_external_ip
original_port = 58301
translated_address = var.vcd_edge_local_ip_nginx
translated_port = 22
protocol = "tcp"
depends_on = [vcd_network_routed.net]
}
We are adding a NAT rule for port translation to the SSH server with 1C-Bitrix.
resource "vcd_nsxv_dnat" "dnat_tcp_bitrix_ssh" {
edge_gateway = var.vcd_org_edge_name
network_name = var.vcd_edge_external_network
network_type = "ext"
description = "SSH Bitrix"
original_address = var.vcd_edge_external_ip
original_port = 58302
translated_address = var.vcd_edge_local_ip_bitrix
translated_port = 22
protocol = "tcp"
depends_on = [vcd_network_routed.net]
}
We are adding a NAT rule for port translation to the SSH server with Nextcloud.
resource "vcd_nsxv_dnat" "dnat_tcp_nextcloud_ssh" {
edge_gateway = var.vcd_org_edge_name
network_name = var.vcd_edge_external_network
network_type = "ext"
description = "SSH Nextcloud"
original_address = var.vcd_edge_external_ip
original_port = 58303 translated_address = var.vcd_edge_local_ip_nextcloud
translated_port = 22
protocol = "tcp"
depends_on = [vcd_network_routed.net]
}
Configuration of the virtual environment main.tf
As we planned at the beginning of the article, we will create three virtual machines. They will be prepared using 'Guest Customization.' Network settings will be configured according to the specified settings, and the user password will be generated automatically.
We will describe a vApp in which the virtual machines and their configuration will be located.
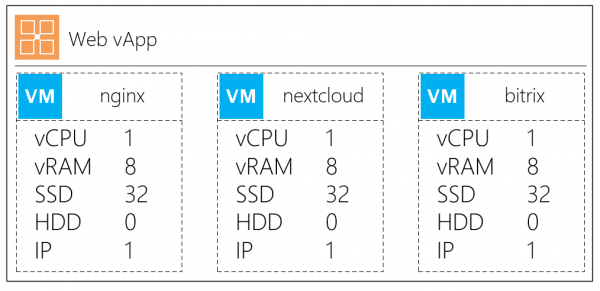 Configuration of the virtual machines
We will create a vApp container. So we can immediately connect the vApp and VMs to the virtual network, we also add the depends_on parameter:
Creating a container
resource "vcd_vapp" "vapp" {
name = "web"
power_on = "true" depends_on = [vcd_network_routed.net]
}
We will create a virtual machine with a description
resource "vcd_vapp_vm" "nginx" {
vapp_name = vcd_vapp.vapp.name
name = "nginx"
catalog_name = var.vcd_org_catalog
template_name = var.vcd_template_os_centos7
storage_profile = var.vcd_org_ssd_sp
memory = 8192
cpus = 1
cpu_cores = 1
network {
type = "org"
name = vcd_network_routed.net.name
is_primary = true
adapter_type = "VMXNET3"
ip_allocation_mode = "MANUAL"
ip = var.vcd_edge_local_ip_nginx
}
override_template_disk {
bus_type = "paravirtual"
size_in_mb = "32768"
bus_number = 0
unit_number = 0
storage_profile = var.vcd_org_ssd_sp
}
}
Main parameters in the VM description:
name — the name of the virtual machine,
vappname — the name of the vApp to add the new VM to,
catalogname / templatename — the name of the catalog and the name of the virtual machine template,
storageprofile — the default storage policy.
Network block parameters:
type — the type of the connected network,
name — which virtual network to connect the VM to,
isprimary — the primary network adapter,
ipallocation_mode — address allocation mode MANUAL / DHCP / POOL,
ip — the IP address for the virtual machine, to be specified manually.
Override template disk block:
sizeinmb — the size of the boot disk for the virtual machine
storage_profile — the storage policy for the disk
We will create a second VM with a description of the file storage for Nextcloud
resource "vcd_vapp_vm" "nextcloud" {
vapp_name = vcd_vapp.vapp.name
name = "nextcloud"
catalog_name = var.vcd_org_catalog
template_name = var.vcd_template_os_centos7
storage_profile = var.vcd_org_ssd_sp
memory = 8192
cpus = 1
cpu_cores = 1
network {
type = "org"
name = vcd_network_routed.net.name
is_primary = true
adapter_type = "VMXNET3"
ip_allocation_mode = "MANUAL"
ip = var.vcd_edge_local_ip_nextcloud
}
override_template_disk {
bus_type = "paravirtual"
size_in_mb = "32768"
bus_number = 0
unit_number = 0
storage_profile = var.vcd_org_ssd_sp
}
}
resource "vcd_vm_internal_disk" "disk1" {
vapp_name = vcd_vapp.vapp.name
vm_name = "nextcloud"
bus_type = "paravirtual"
size_in_mb = "102400"
bus_number = 0
unit_number = 1
storage_profile = var.vcd_org_hdd_sp
allow_vm_reboot = true
depends_on = [ vcd_vapp_vm.nextcloud ]
}
In the vcd_vminternal_disk section, we will describe a new virtual disk that connects to the virtual machine.
Explanation of the vcdvminternaldisk block:
bustype — type of disk controller
sizeinmb — size of the disk
busnumber / unitnumber — connection location in the adapter
storage_profile — the storage policy for the disk
Let's describe the last VM on Bitrix.
resource "vcd_vapp_vm" "bitrix" {
vapp_name = vcd_vapp.vapp.name
name = "bitrix"
catalog_name = var.vcd_org_catalog
template_name = var.vcd_template_os_centos7
storage_profile = var.vcd_org_ssd_sp
memory = 8192
cpus = 1
cpu_cores = 1
network {
type = "org"
name = vcd_network_routed.net.name
is_primary = true
adapter_type = "VMXNET3"
ip_allocation_mode = "MANUAL"
ip = var.vcd_edge_local_ip_bitrix
}
override_template_disk {
bus_type = "paravirtual"
size_in_mb = "81920"
bus_number = 0
unit_number = 0
storage_profile = var.vcd_org_ssd_sp
}
}
Operating system update and installation of additional scripts.
The network is prepared, the virtual machines are described. Before importing our infrastructure, we can pre-conduct initial provisioning using provisioners blocks and without using Ansible.
Let's look at how to update the OS and run the installation script for CMS Bitrix using a provisioner block.
First, we will carry out the installation of the CentOS update packages.
resource "null_resource" "nginx_update_install" {
provisioner "remote-exec" {
connection {
type = "ssh"
user = "root"
password = vcd_vapp_vm.nginx.customization[0].admin_password
host = var.vcd_edge_external_ip
port = "58301"
timeout = "30s"
}
inline = [
"yum -y update && yum -y upgrade",
"yum -y install wget nano epel-release net-tools unzip zip" ]
}
}
}
Designation of components:
provisioner "remote-exec" — we connect the block of remote provisioning.
In the connection block, we describe the type and parameters for connection:
type — protocol, in our case SSH;
user — username;
password — user password. In our case, we refer to the parameter vcdvappvm.nginx.customization[0].admin_password, which stores the generated password for the user.
host — external IP address for connection;
port — connection port, which was previously specified in the DNAT settings;
inline — we list the commands to be entered. The commands will be executed in order as specified in this section.
As an example, let's additionally execute the installation script for 1C-Bitrix. The output of the script execution will be available during the plan execution. To install the script, we first describe the block:
Let's describe the installation of 1C-Bitrix.
provisioner "file" {
source = "prepare.sh"
destination = "\/tmp\/prepare.sh"
connection {
type = "ssh"
user = "root"
password = vcd_vapp_vm.nginx.customization[0].admin_password
host = var.vcd_edge_external_ip
port = "58301"
timeout = "30s"
}
}
provisioner "remote-exec" {
inline = [
"chmod +x \/tmp\/prepare.sh", ".\/tmp\/prepare.sh"
]
}
And immediately describe the update of Bitrix.
Example of provisioning 1C-Bitrix.
resource "null_resource" "install_update_bitrix" {
provisioner "remote-exec" {
connection {
type = "ssh"
user = "root"
password = vcd_vapp_vm.bitrix.customization[0].admin_password
host = var.vcd_edge_external_ip
port = "58302"
timeout = "60s"
}
inline = [
"yum -y update && yum -y upgrade",
"yum -y install wget nano epel-release net-tools unzip zip",
"wget http:\/\/repos.1c-bitrix.ru\/yum\/bitrix-env.sh -O \/tmp\/bitrix-env.sh",
"chmod +x \/tmp\/bitrix-env.sh",
"\/tmp\/bitrix-env.sh"
]
}
}
Important! The script may not work if SELinux is not disabled beforehand! If you need a detailed article on installing and configuring the 1C-Bitrix CMS using bitrix-env.sh, you can .
3. Infrastructure Initialization
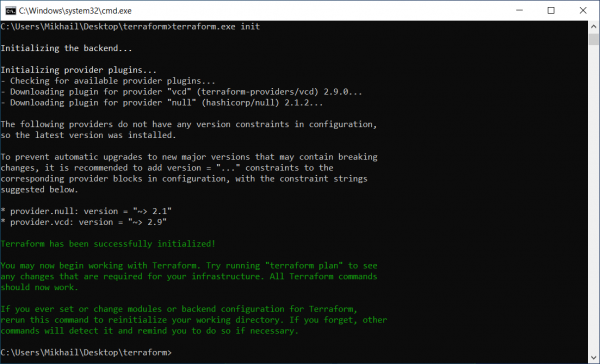 Initialization of modules and plugins
For this task, we use a simple 'gentleman's set': a laptop with Windows 10 and a distribution from the official site . Let's unpack and initialize it using the command: terraform.exe init
After describing the computing and networking infrastructure, we run the planning to check our configuration, where we can see what will be created and how it will be interconnected.
Executing the command
- terraform plan -var-file=vcd.tfvars.We receive the result
- Plan: 16 to add, 0 to change, 0 to destroy.So according to this plan, 16 resources will be created.We run the plan with the command
- terraform.exe apply -var-file=vcd.tfvars.
The virtual machines will be created, and then the packages we specified in the provisioner section will be executed — the OS will be updated and the Bitrix CMS will be installed.
Getting connection data
After executing the plan, we want to obtain the connection data to the servers in text format, so we will format the output section as follows:
output "nginxpassword" {
value = vcdvappvm.nginx.customization[0].adminpassword
}
And the following output tells us the password for the created virtual machine:
Outputs: nginx_password = F#4u8!!N
As a result, we gain access to virtual machines with the updated operating system and pre-installed packages for our further work. Everything is ready!
But what if you already have an existing infrastructure?
3.1. Terraform working with an existing infrastructure
It's simple, you can import the current virtual machines and their vApp containers using the import command.
Let's describe the vAPP resource and the virtual machine.
resource "vcd_vapp" "Monitoring" {
name = "Monitoring"
org = "mClouds"
vdc = "mClouds"
}
resource "vcd_vapp_vm" "Zabbix" {
name = "Zabbix"
org = "mClouds"
vdc = "mClouds"
vapp = "Monitoring"
}
The next step is to import the properties of the vApp resources in the format vcdvapp. .., where:
vApp — the name of the vApp;
org — the name of the organization;
org_vdc — the name of the virtual data center.
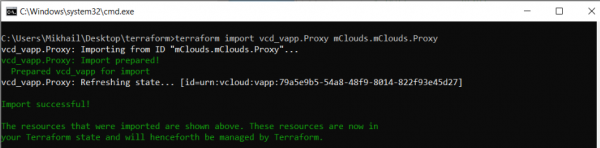 Importing the properties of the vAPP resource
We will import the properties of the VM resources in the format: vcdvappvm. ..., in which:
VM — the name of the VM;
vApp — the name of the vApp;
org — the name of the organization;
orgvdc — the name of the virtual data center.
Import completed successfully
C:UsersMikhailDesktopterraform>terraform import vcd_vapp_vm.Zabbix mClouds.mClouds.Monitoring.Zabbix
vcd_vapp_vm.Zabbix: Importing from ID "mClouds.mClouds.Monitoring.Zabbix"...
vcd_vapp_vm.Zabbix: Import prepared!
Prepared vcd_vapp_vm for import
vcd_vapp_vm.Zabbix: Refreshing state... [id=urn:vcloud:vm:778f4a89-1c8d-45b9-9d94-0472a71c4d1f]
Import successful!
The imported resources are displayed above. These resources are now part of
 your Terraform state and will be managed by Terraform from now on.
Now we can take a look at the newly imported resource:
Imported resource
> terraform show
...
# vcd_vapp.Monitoring:
resource "vcd_vapp" "Monitoring" {
guest_properties = {}
href = "https://vcloud.mclouds.ru/api/vApp/vapp-fe5db285-a4af-47c4-93e8-55df92f006ec"
id = "urn:vcloud:vapp:fe5db285-a4af-47c4-93e8-55df92f006ec"
ip = "allocated"
metadata = {}
name = "Monitoring"
org = "mClouds"
status = 4
status_text = "POWERED_ON"
vdc = "mClouds"
}
…
# vcd_vapp_vm.Zabbix:
resource "vcd_vapp_vm" "Zabbix" {
computer_name = "Zabbix"
cpu_cores = 1
cpus = 2
expose_hardware_virtualization = false
guest_properties = {}
hardware_version = "vmx-14"
href = "https://vcloud.mclouds.ru/api/vApp/vm-778f4a89-1c8d-45b9-9d94-0472a71c4d1f"
id = "urn:vcloud:vm:778f4a89-1c8d-45b9-9d94-0472a71c4d1f"
internal_disk = [
{
bus_number = 0
bus_type = "paravirtual"
disk_id = "2000"
iops = 0
size_in_mb = 122880
storage_profile = "Gold Storage Policy"
thin_provisioned = true
unit_number = 0
},
]
memory = 8192
metadata = {}
name = "Zabbix"
org = "mClouds"
os_type = "centos8_64Guest"
storage_profile = "Gold Storage Policy"
vapp_name = "Monitoring"
vdc = "mClouds"
customization {
allow_local_admin_password = true
auto_generate_password = true
change_sid = false
enabled = false
force = false
join_domain = false
join_org_domain = false
must_change_password_on_first_login = false
number_of_auto_logons = 0
}
network {
adapter_type = "VMXNET3"
ip_allocation_mode = "DHCP"
is_primary = true
mac = "00:50:56:07:01:b1"
name = "MCLOUDS-LAN01"
type = "org"
}
}
It's definitely ready now — we've completed the last step (import into the existing infrastructure) and reviewed all the key points of working with Terraform.
The tool turned out to be very convenient and allows you to describe your infrastructure as code, from virtual machines of a single cloud provider to the description of resources of network components.
Moreover, independence from the environment allows working with local and cloud resources, as well as managing the platform. If there is no supported platform and a desire to add a new one, you can write your own provider and use it.
Source: habr.com
