

Today, a network administrator or cybersecurity engineer spends a considerable amount of time and effort protecting the enterprise's network perimeter from various threats, mastering new intrusion prevention and event monitoring systems. However, even this does not guarantee complete security. Social engineering is actively utilized by criminals and can have serious consequences.
How often have you caught yourself thinking, "It would be good to conduct a literacy check for staff regarding cybersecurity"? Unfortunately, these thoughts often hit a wall of misunderstanding in the form of numerous tasks or limitations of the workday. We plan to tell you about modern products and technologies in the field of automation for staff training that won't require extensive preparation for pilots or implementation, but let’s go one step at a time.
Theoretical Foundation
Currently, more than 80% of malicious files are distributed via email (data taken from Check Point's reports over the past year using the Intelligence Reports service).
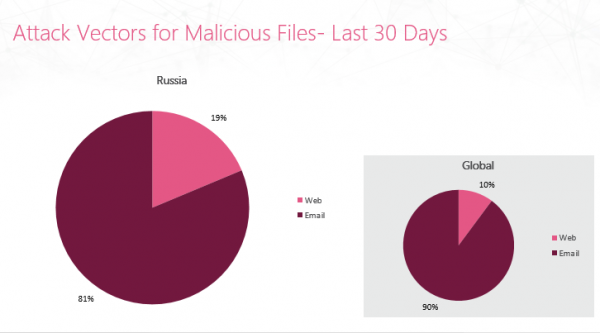 30-day report on the vector of attacks for the distribution of malicious files (Russia) — Check Point
This indicates that the content in email messages is quite vulnerable to exploitation by criminals. When considering the most popular malicious file formats in attachments (EXE, RTF, DOC), it should be noted that they typically contain automatic code execution elements (scripts, macros).
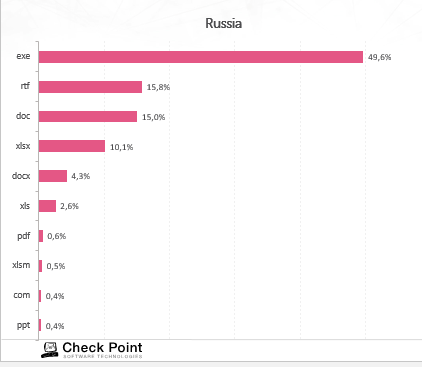 Annual report on file formats in received malicious messages — Check Point
How to combat this vector of attacks? Email security involves using security tools:
Antivirus — signature-based threat detection.
Emulation — a sandbox that allows attachments to be opened in an isolated environment.
Content Awareness — extraction of active elements from documents. The user receives a sanitized document (usually in PDF format).
AntiSpam — checking the recipient/sender's domain for reputation.
Ideally, this is sufficient, but there is another valuable resource for companies — corporate and personal data of employees. In recent years, the popularity of the following type of internet fraud has been actively growing:
Phishing (English phishing, from fishing — catching fish, drawing out) is a form of online fraud. Its goal is to acquire users' identification data. This includes theft of passwords, credit card numbers, bank account details, and other confidential information.
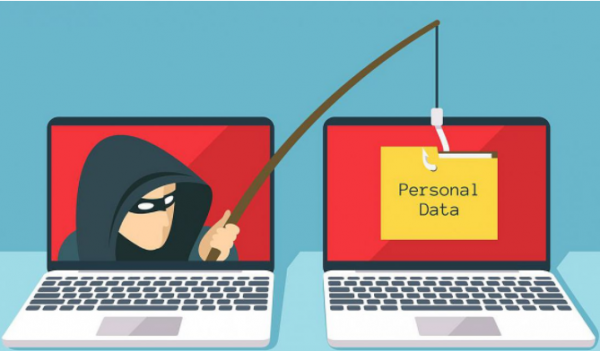
Malefactors are improving their phishing attack methods, redirecting DNS requests from popular sites, and launching entire campaigns using social engineering to send emails.
Thus, to protect your corporate email from phishing, it is recommended to apply two approaches, and their combined use yields the best results:
Technical Protection Tools. As mentioned earlier, various technologies are used to verify and only forward legitimate emails.
Theoretical Staff Training. This involves comprehensive testing of staff to identify potential victims. Subsequently, retraining is conducted, and statistics are continually recorded.
Trust but Verify
Today we will discuss the second approach to preventing phishing attacks, namely automated training of personnel aimed at increasing the overall security level of corporate and personal data. Why can this be so dangerous?
Social Engineering — psychological manipulation of people with the aim of performing certain actions or disclosing confidential information (in the context of information security).
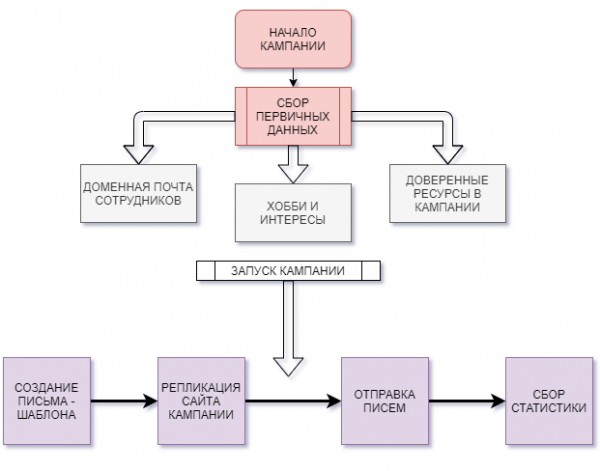 A Typical Phishing Attack Scenario
Let’s refer to an engaging flowchart that briefly outlines the process of conducting a phishing campaign. It includes various stages:
Collection of Primary Data.
In the 21st century, it is hard to find a person who is not registered on any social network or various thematic forums. Naturally, many of us leave detailed information about ourselves: current workplace, group for colleagues, phone, email, etc. Add to this personalized information about a person's interests and you will have data to create a phishing template. Even if it is hard to find people with such information, there is always the company's website, from which you can gather all the information of interest (domain email, contacts, connections).
Campaign Launch.
Once the "groundwork" is prepared, you can launch your own targeted phishing campaign using free or paid tools. During the mailing process, you will accumulate statistics: delivered emails, opened emails, link clicks, credential inputs, etc.
Products on the market
Phishing can be used by both attackers and company security staff to conduct continuous audits of employee behavior. What does the market for free and commercial solutions for automated employee training look like?
— an open-source project that allows you to deploy a phishing campaign to test your employees' IT literacy. I would consider its advantages to be the ease of deployment and minimal system requirements. Its disadvantages include the lack of ready-made mailing templates, tests, and training materials for staff.
— a platform with a large number of available products for employee testing.
— an automated system for testing and training employees. It has various product versions supporting from 10 to over 1000 employees. The training courses include theory and practical assignments, with the ability to identify needs based on the statistics obtained after a phishing campaign. This is a commercial solution with a trial option available.
— an automated training and security monitoring system. The commercial product offers periodic simulated attacks, employee training, etc. A demo version of the product includes a campaign that involves deploying templates and conducting three training attacks.
The solutions mentioned above are just a part of the available products on the market for automated employee training. Each has its own advantages and disadvantages. Today we will familiarize ourselves with , simulate a phishing attack, and explore the available options.
GoPhish
So, it's time for practice. GoPhish was chosen for a reason: it is a user-friendly tool with the following features:
Simplified installation and setup.
Support for REST API. Allows generating requests from and applying automated scripts.
User-friendly graphical management interface.
Cross-platform compatibility.
The development team has prepared an excellent for deploying and configuring GoPhish. In fact, you will just need to go to , download the ZIP archive for the corresponding OS, run the internal binary file, after which the tool will be installed.
IMPORTANT NOTE!
Ultimately, you should receive information about the deployed portal in the terminal, as well as login credentials (this is relevant for versions later than 0.10.1). Don't forget to write down the password!
msg="Please login with the username admin and the password "Setting up GoPhish
After installation, a configuration file (config.json) will be created in the application directory. Let's describe the parameters for modification:
— some characteristic of the node (for example, a number). The key is needed to identify the element of the tree corresponding to this key. Example of a binary search tree:
Value (default)
Description
admin_server.listen_url
127.0.0.1:3333
IP address of the GoPhish server
admin_server.use_tls
false
Is TLS used for connecting to the GoPhish server?
admin_server.cert_path
example.crt
Path to the SSL certificate for the GoPhish administration portal
admin_server.key_path
example.key
Path to the private SSL key
phish_server.listen_url
0.0.0.0:80
IP address and port for hosting the phishing page (by default, hosted on the GoPhish server on port 80)
→ Go to the management portal. In our case: https://127.0.0.1:3333
→ You will be prompted to change a fairly long password to something simpler or vice versa.
Creating a sender profile
Navigate to the 'Sending Profiles' tab and enter the details of the user from whom our mailing will originate:
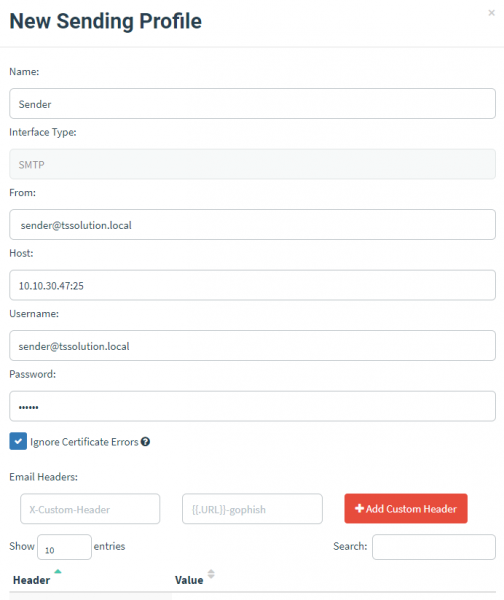
Where:
Name
Sender Name
From
Sender Email
Host
IP address of the mail server that will listen for incoming mail.
Username
Username for the mail server account.
Password
Password for the mail server account.
You can also send a test message to ensure successful delivery. Save the settings using the 'Save profile' button.
Creating a recipient group
Next, you should form a group of recipients for your 'happy emails'. Go to 'User & Groups' → 'New Group'. There are two ways to add recipients: manually or by importing a CSV file.
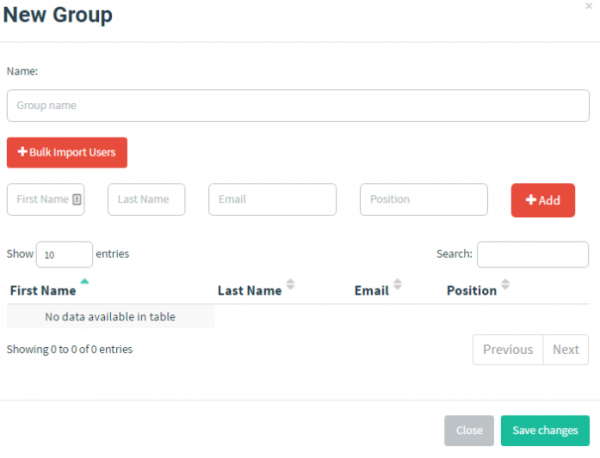
For the second method, the following fields are required:
First Name
Last Name
Email
Position
As an example:
First Name,Last Name,Position,Email
Richard,Bourne,CEO,rbourne@morningcatch.ph
Boyd,Jenius,Systems Administrator,bjenius@morningcatch.ph
Haiti,Moreo,Sales & Marketing,hmoreo@morningcatch.ph
Creating a phishing email template
After identifying the imagined attacker and potential victims, it is necessary to create a template with a message. For this, go to the 'Email Templates' → 'New Templates' section.
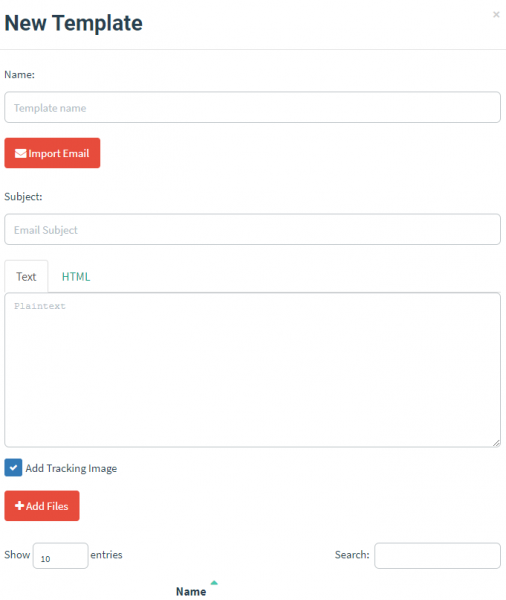
When creating the template, a technical and creative approach is used; the message from the service, which will be familiar to victim users or provoke a certain reaction, should be indicated. Possible options:
Name
Template Name
Subject
Email Subject
Text / HTML
Field for inputting text or HTML code
Gophish supports email import; we will create our own. To do this, we will simulate a scenario: a company user receives an email offering to change the password from his corporate email. Then we will analyze his reaction and see our 'catch.'
In the template, we will use built-in variables. More details can be found in the aforementioned in the section .
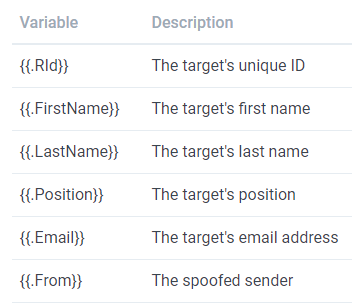
For starters, let's load the following text:
{{.FirstName}},

The password for {{.Email}} has expired. Please reset your password here.

Thanks,
IT Team
Accordingly, the username (as per the previously specified 'New Group' item) and its email address will be automatically inserted.
Next, we need to specify the link to our phishing resource. To do this, we will highlight the word 'here' in the text and select the 'Link' option from the control panel.
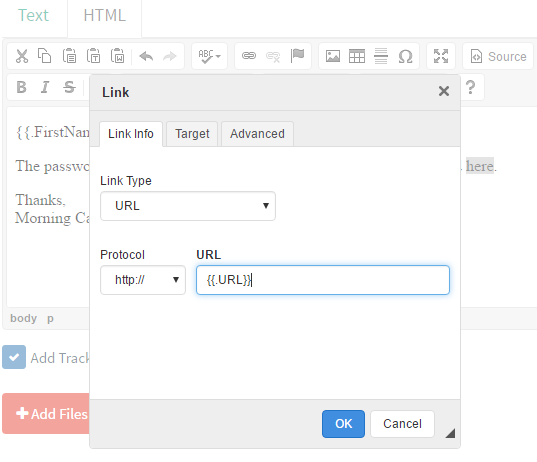
As the URL, we will indicate the built-in variable {{.URL}}, which we will fill in later. It will be automatically embedded in the text of the phishing email.
Before saving the template, don't forget to enable the 'Add Tracking Image' option. This will add a media element of size 1×1 pixel, which will track whether the email has been opened by the user.
So, there's just a bit left, but first, let's summarize the mandatory steps after logging in to the Gophish portal:
Create a sender profile;
Create a mailing group, indicating users;
Create a phishing email template.
Agree, the setup didn't take much time, and we are almost ready to launch our campaign. We just need to add the phishing page.
Creating the phishing page
Go to the 'Landing Pages' tab.
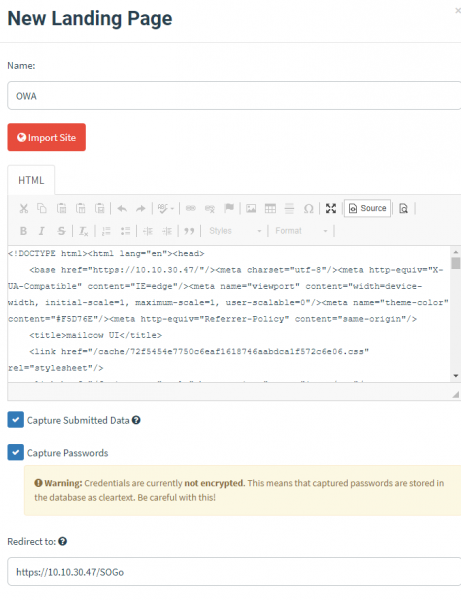
We will be prompted to specify the object name. There is an option to import the source site. In our example, I tried specifying a working web portal of the mail server. Accordingly, it was imported as HTML code (albeit not completely). Next, there are interesting options for capturing the user's submitted data:
Capture Submitted Data. If the specified site page contains various input forms, all data will be recorded.
Capture Passwords — capturing entered passwords. The data is recorded in the GoPhish database without encryption, as is.
Additionally, we can use the ‘Redirect to’ option, which will redirect the user to a specified page after they enter their credentials. I remind you that we set a scenario where the user is prompted to change their corporate email password. For this, they are presented with a fake email authorization portal page, after which the user can be sent to any accessible company resource.
Don't forget to save the filled page and move to the ‘New Campaign’ section.
Launching GoPhish Fishing
We have provided all the necessary data. In the ‘New Campaign’ tab, we will create a new campaign.
Launching Campaign
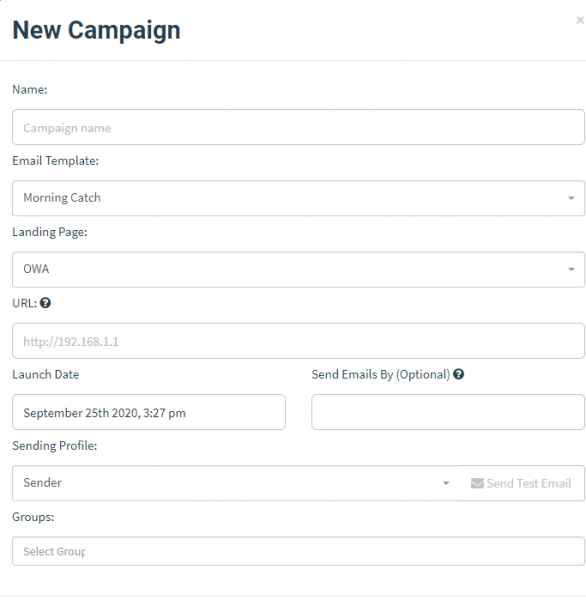
Where:
Name
Campaign Name
Email Template
Message Template
Landing Page
Phishing Page
URL
IP address of your GoPhish server (must be network accessible by the victim's host)
Launch Date
Campaign Start Date
Send Emails By
Campaign End Date (sending is distributed evenly)
Sending Profile
Sender Profile
Groups
Recipient Mailing Group
After the start, we can always check the statistics, which indicates: messages sent, messages opened, link clicks, data submitted, and move to spam.
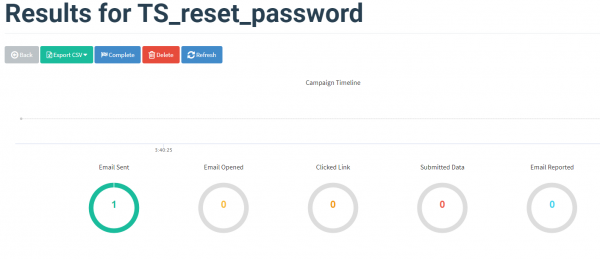
From the statistics, we see that 1 message was sent; let's check the email from the recipient's side:
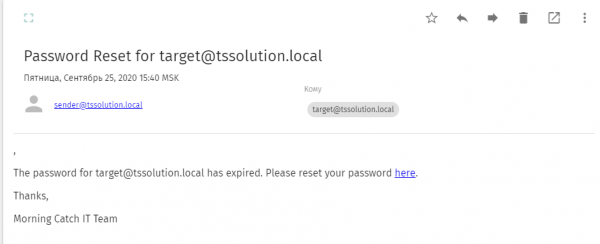
Indeed, the victim successfully received the phishing email with a request to click the link to change the password for the corporate account. We execute the requested actions; it sends us to the Landing Pages, what about the statistics?
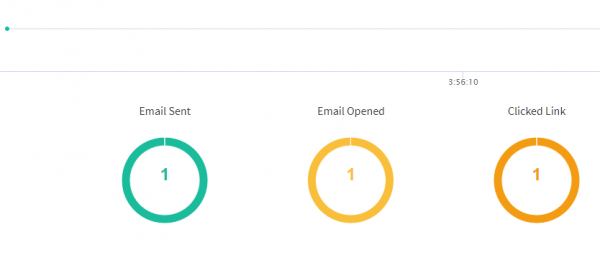
As a result, our user clicked on the phishing link, where they could potentially leave their account details.
Author's Note: The data entry process was not recorded due to the use of a test template, but such an option exists. At the same time, the content is not encrypted and is stored in the GoPhish database, keep this in mind.
In conclusion
Today, we touched on the relevant topic of conducting automated employee training to protect them from phishing attacks and to foster IT literacy. As an accessible solution, Gophish has been deployed, demonstrating good performance in terms of deployment time and results. With this tool, you can assess your employees and generate reports on their behavior. If you're interested in this product, we offer assistance in its deployment and auditing your staff.sales@tssolution.ru).
However, we do not intend to stop at just one solution and plan to continue a series where we will discuss enterprise solutions for automating training processes and monitoring employee security. Stay with us and remain vigilant!
Source: habr.com
