

IT environments are becoming increasingly complex. In these conditions, it is crucial for IT automation systems to have up-to-date information about the nodes present in the network that need to be managed. In the Red Hat Ansible Automation Platform, this issue is addressed through so-called inventory () – lists of managed nodes.

In its simplest form, an inventory is a static file. This is ideal when you start working with Ansible, but as automation expands, it becomes insufficient.
And here's why:
- How do you update and maintain an up-to-date list of controlled nodes when things are constantly changing, with workloads – and the nodes where they run – emerging and disappearing all the time?
- How do you classify IT infrastructure components to selectively choose nodes for applying a specific automation?
Answers to both of these questions are provided by dynamic inventory () – a script or plugin that searches for nodes eligible for automation by referencing a source of truth. In addition, dynamic inventory automatically classifies nodes into groups so you can more accurately select target systems for executing specific Ansible automation.
allow Ansible users to access external platforms for dynamic searching of target nodes and use these platforms as a source of truth when forming the inventory. The standard list of sources in Ansible includes cloud platforms AWS EC2, Google GCP, and Microsoft Azure, as well as many other inventory plugins available for Ansible.
Ansible Tower comes with a number of , which work right "out of the box" and, in addition to the aforementioned cloud platforms, provide integration with VMware vCenter, Red Hat OpenStack Platform, and Red Hat Satellite. For these plugins, it's sufficient to provide credentials to connect to the target platform, after which they can be used as a source of inventory data in Ansible Tower.
In addition to the standard plugins included with Ansible Tower, there are also other inventory plugins supported by the Ansible community. With the transition to , these plugins began to be included in the corresponding collections.
In this post, we will examine the use of the inventory plugin for ServiceNow, a popular IT service management platform, in whose CMDB clients often store information about all their devices. Additionally, the CMDB can contain context useful for automation, such as information about server owners, service levels (production/non-production), installed updates, and maintenance windows. The Ansible inventory plugin works with the ServiceNow CMDB and is part of a collection. on the portal .
Git repository
To use the inventory plugin from the collection in Ansible Tower, it must be specified as a project source. In Ansible Tower, a project is an integration with a version control system, such as a git repository, that can be used to synchronize not only automation playbooks but also variables and inventory lists.
Our repository is actually very simple:
├── collections
│   └── requirements.yml
└── servicenow.yml
The servicenow.yml file contains details for the inventory plugin. In our case, we simply specify the table in the ServiceNow CMDB that we want to use. We also define the fields that will be added as node variables, plus certain information about the groups we want to create.
$ cat servicenow.yml
plugin: servicenow.servicenow.now
table: cmdb_ci_linux_server
fields: [ip_address,fqdn,host_name,sys_class_name,name,os]
keyed_groups:
  - key: sn_sys_class_name | lower
	prefix: ''
	separator: ''
  - key: sn_os | lower
	prefix: ''
	separator: ''
Note that there is no specification here for the ServiceNow instance we will be connecting to, nor any credentials for the connection. We will configure all of this later in Ansible Tower.
is required so that Ansible Tower can download the necessary collection and thereby obtain the required inventory plugin. Otherwise, we would have to manually install and maintain this collection on all of our Ansible Tower nodes.
$ cat collections/requirements.yml
---
collections:

- name: servicenow.servicenow
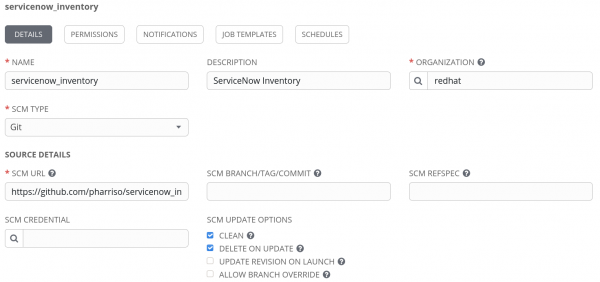
After we have sent this configuration to version control, a project can be created in Ansible Tower that references the corresponding repository. In the example below, Ansible Tower is linked to our repository on GitHub. Note the SCM URL: it allows you to specify an account to connect to a private repository, as well as to set a specific branch, tag, or commit for extraction.
Creating credentials for ServiceNow
As mentioned earlier, the configuration in our repository does not contain credentials for connecting to ServiceNow and does not specify the ServiceNow instance we will be communicating with. Therefore, we will create credentials in Ansible Tower to provide this information. According to , there are several environment variables that we will use to set the connection parameters, for example, like this:
= username
    	The ServiceNow user account, it should have rights to read cmdb_ci_server (default), or the table specified by SN_TABLE

    	set_via:
      	env:
      	- name: SN_USERNAME
In this case, if the environment variable SN_USERNAME is set, the inventory plugin will use it as the account for connecting to ServiceNow.
We also need to set the SN_INSTANCE and SN_PASSWORD variables.
However, there are no credentials of this type in Ansible Tower where these data can be specified for ServiceNow. Instead, Ansible Tower allows us to define , which can be read about in the article .
In our case, the input configuration for custom credentials for ServiceNow looks like this:
fields:
  - id: SN_USERNAME
	type: string
	label: Username
  - id: SN_PASSWORD
	type: string
	label: Password
	secret: true
  - id: SN_INSTANCE
	type: string
	label: Snow Instance
required:
  - SN_USERNAME
  - SN_PASSWORD
  - SN_INSTANCE
These credentials will be exposed as environment variables with the same name. This is described in the injector configuration:
env:
  SN_INSTANCE: '{{ SN_INSTANCE }}'
  SN_PASSWORD: '{{ SN_PASSWORD }}'
  SN_USERNAME: '{{ SN_USERNAME }}'
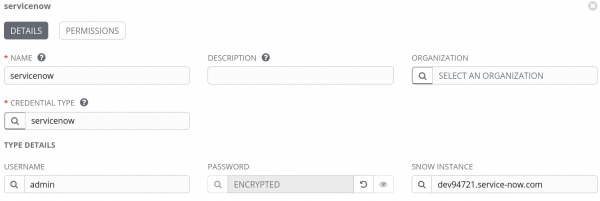
So, we have defined the required credential type, now we can add the ServiceNow account and specify the instance, username, and password like this:
Creating the inventory
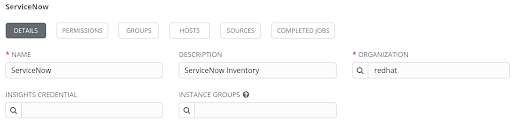
So, now we are ready to create an inventory in Ansible Tower. We will name it ServiceNow:
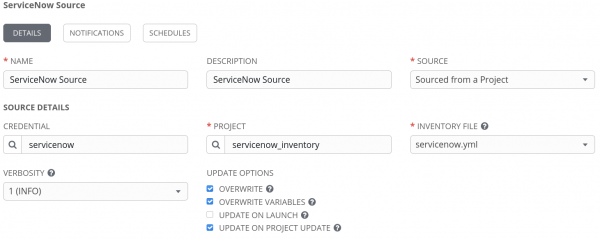
After creating the inventory, we can attach a data source to it. Here we specify the project we created earlier and enter the path to our YAML inventory file in the version control system, in our case, it is servicenow.yml at the root of the project. Additionally, we need to link the ServiceNow account.
To check how everything works, let's try to synchronize with the data source by clicking the 'Sync all' button. If everything is set up correctly, the nodes should be imported into our inventory:
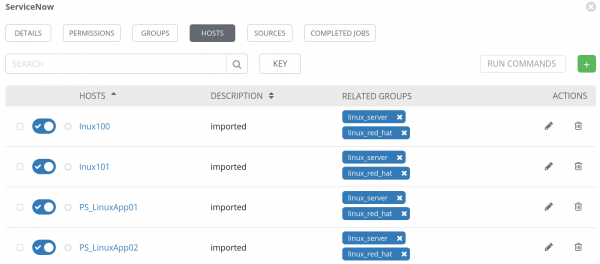
Please note that the required groups have also been created.
Conclusion
In this post, we explored how to use inventory plugins from collections in Ansible Tower, taking the ServiceNow plugin as an example. We also securely specified credentials for connecting to our ServiceNow instance. The linking of the inventory plugin from the project works not only with third-party or customizable plugins but can also be applied to modify the behavior of some built-in inventories. As a result, Ansible Automation Platform integrates easily and seamlessly with existing tools while automating IT environments that are becoming increasingly complex.
You can find additional information on the topics discussed in this post, as well as on other aspects of using Ansible, here:
- Blog on .
- .
- List of supported Red Hat collections on the Automation Hub website ().
- .
*Red Hat makes no guarantees regarding the accuracy of the code provided here. All materials are offered on an as-is basis unless otherwise stated explicitly.
Source: habr.com
