

Hello, friends! Welcome to the third lesson. Today we will prepare the layout where we will practice. An important point!
Do you need a layout, or can we just get by with watching the course?
Personally, I believe that without practice, this course will be absolutely useless. You will simply not remember anything. Therefore, before moving on to the next lessons, be sure to complete this one!
Laboratory stand topology
So, I have already shown you the topology of the layout. It looks as follows:
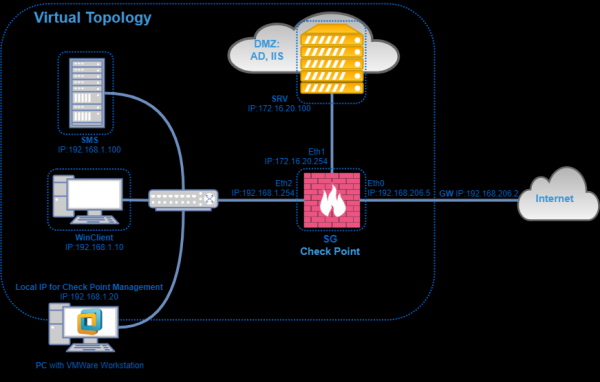
It consists of:
- Management Server (SMS), which is located in the local network;
- Security Gateway (Security Gateway), which is located on the imaginary perimeter of the network. The gateway has three interfaces: External, Internal, and DMZ;
- User Computer — User PC. It will connect to the Internet through the SG;
- A computer with SmartConsol. We will manage the settings from it;
- Windows Server in the DMZ, which performs the roles of Domain Controller and Web Server (i.e., the IIS service is running).
Where will we deploy all this? In general, there are three options:
- ESXi;
- VMware Workstation;
- VirtualBox.
Personally, I will use VMware Workstation, as it is slightly more convenient and available to everyone.
Then we will need two images:
- Check Point Gaia R80.20 for the management server;
- Check Point Gaia R80.20 for the gateway.
Yes, unlike 80.10, these two images are different. .
System requirements
Regarding system requirements, there is a document called Check Point R80.20 Release notes. It includes a table with the minimum system requirements for the OpenServer version:
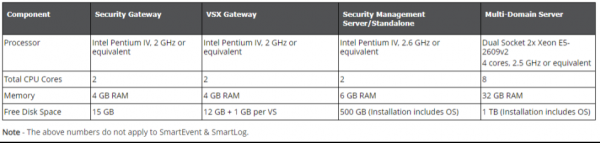
As you can see, for the gateway we need at least 2 cores, 4GB of RAM, and 15GB of hard disk space. For the management system, the requirements are significantly higher: it is 2 cores, 6GB of RAM, and 500GB of hard disk space. We will naturally use less since we do not need large storage for logs. It is just a layout.
Below are the parameters of the 'virtual machines' that we will create:
- SMS: 6GB RAM, 2 vCPU Cores, 50GB HDD;
- SG: 4GB RAM, 2 vCPU Cores, 50GB HDD;
- 3 virtual adapters.
If you remember our layout, the gateway has three interfaces.
My computer, on which the layout will be deployed, will also be virtual, with the following characteristics — CPU — 4 vCPU Cores, RAM — 16GB, HDD — 200GB
Why is it virtual? Simply because my laptop "can't handle" such a setup. That's why I created a "virtual machine" with Windows 10 on ESXi, within which I will build the layout on VMware Workstation. Why am I not designing the whole layout on ESXi? A valid question, perhaps it would have been more convenient. But, I fear many course participants do not have a virtualization server at hand, while installing VMware Workstation is always an option.
Returning to our diagram, the computer — PC with VMware Workstation and that is my virtual workstation. I will connect to it via RDP and there I will deploy the layout.
Of course, you can deploy the layout directly on your computer if it meets the specified requirements. However, if your computer is weaker and you don't have a virtualization server available, you can again reach out to the NTC training center and . Next, there will be a video lesson where we will review the layout and show how to create a virtual adapter.
Video lesson

In the next lesson, we will proceed with the installation and initialization of devices. As usual, the lesson will first appear on our .
Source: habr.com
