


Hi all. I work as a lead system administrator at OK and am responsible for the stable operation of the portal. I want to talk about how we built the process of automatic disk replacement, and then how we excluded the administrator from this process and replaced him with a bot.
This article is a kind of transliteration at HighLoad+ 2018
Building a disk replacement process
First some numbers
OK is a giant service used by millions of people. It is served by about 7 thousand servers located in 4 different data centers. There are more than 70 thousand disks in the servers. If you stack them on top of each other, you get a tower with a height of more than 1 km.
Hard drives are the server component that fails most often. At this volume, we have to change about 30 disks a week, and this procedure has become a not very pleasant routine.

Incidents
We have introduced a full-fledged incident management in our company. We record each incident in Jira, and then we solve and analyze it. If the incident had an effect on users, then we will definitely get together and think about how to respond faster in such cases, how to reduce the effect and, of course, how to prevent a recurrence.
Storage is no exception. Zabbix monitors their status. We monitor messages in Syslog for write/read errors, analyze the status of HW/SW raids, monitor SMART, calculate wear for SSDs.
How did the discs change before
When a trigger fires in Zabbix, an incident is created in Jira and automatically put on the appropriate engineers in the data centers. We do this with all HW incidents, that is, those that require some kind of physical work on the equipment in the data center.
A data center engineer is a person who solves issues related to hardware, is responsible for installing, maintaining, and dismantling servers. Having received a ticket, the engineer gets to work. In disk shelves, it changes disks on its own. But if he does not have access to the desired device, the engineer turns to the duty system administrators for help. First of all, you need to take the disk out of rotation. To do this, you need to make the necessary changes on the server, stop applications, unmount the disk.
The system administrator on duty is responsible for the operation of the entire portal during the work shift. He investigates incidents, does repairs, helps developers with small tasks. It does not deal only with hard drives.
In the past, data center engineers chatted with the system administrator. Engineers sent links to Jira tickets, the administrator went through them, kept a log of work in some notebook. But for such tasks, chats are inconvenient: the information there is not structured and is quickly lost. Yes, and the administrator could simply move away from the computer and not respond to requests for some time, and the engineer stood at the server with a pack of disks and waited.
But the worst thing was that the administrators did not see the whole picture: what disk incidents exist, where a problem could potentially arise. This is due to the fact that we give all HW incidents to engineers. Yes, it was possible to display all incidents on the admin dashboard. But there are a lot of them, and the administrator was involved only in some of them.
In addition, the engineer could not correctly prioritize, because he does not know anything about the purpose of specific servers, about the distribution of information among drives.
New replacement procedure
The first thing we did was move all disk incidents into a separate type “HW disk” and add the “block device name”, “size” and “disk type” fields to it so that this information is saved in the ticket and does not have to be chat constantly.
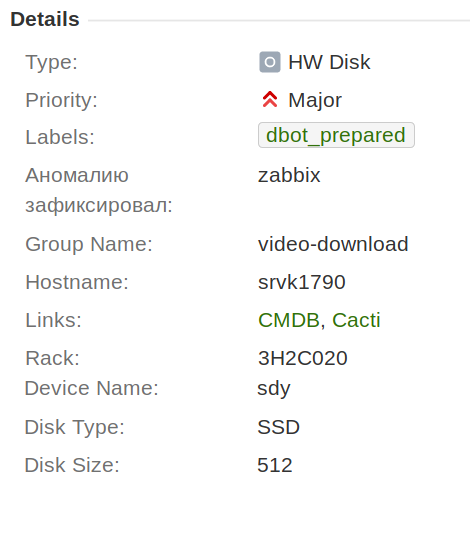
We also agreed that within the framework of one incident we will change only one disk. This greatly simplified the automation process, the collection of statistics and work in the future.
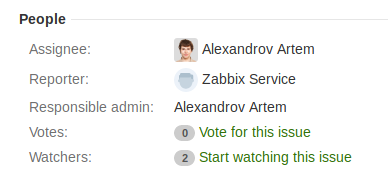
In addition, the field "responsible administrator" was added. The system administrator on duty is automatically substituted there. This is very convenient, because now the engineer always sees who is responsible. No need to go to the calendar and look. It was this field that made it possible to display tickets on the administrator's dashboard, in which his help may be needed.
In order for all participants to get the maximum benefit from innovations, we created filters and dashboards and told the guys about them. When people understand change, they don't distance themselves from it as something unnecessary. It is important for the engineer to know the rack number where the server is located, the size and type of disk. The administrator needs, first of all, to understand what kind of group of servers it is, what effect it can have when replacing a disk.
The presence of fields and their display is convenient, but this did not save us from the need to use chats. To do this, we had to change the workflow.
It used to be like this:
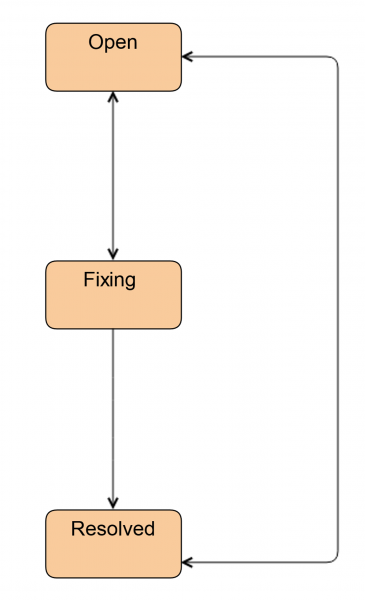
Today, this is how engineers continue to work when they do not need the help of an administrator.
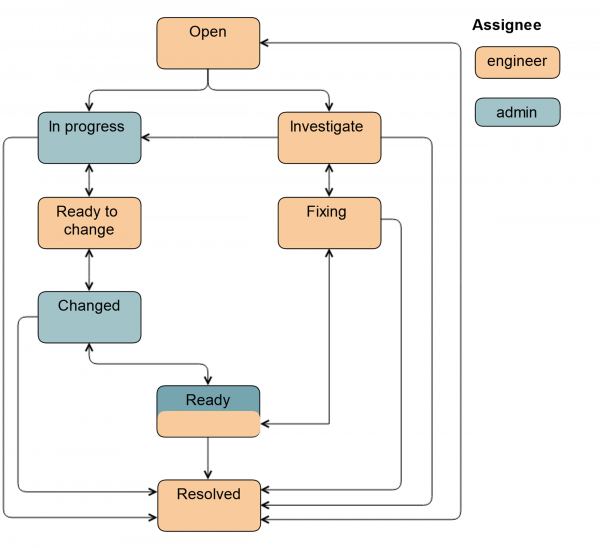
The first thing we did was introduce a new status Investigative. The ticket is in this status when the engineer has not yet decided whether he will need an administrator or not. Through this status, the engineer can transfer the ticket to the administrator. In addition, we mark tickets with this status when a disk replacement is required, but the disk itself is not on site. This happens in the case of CDN and remote sites.
We have also added a status Ready. The ticket is transferred to it after the disk is replaced. That is, everything has already been done, but HW / SW RAID is synchronized on the server. This can take quite a long time.
If an administrator is involved in the work, the scheme becomes a little more complicated.
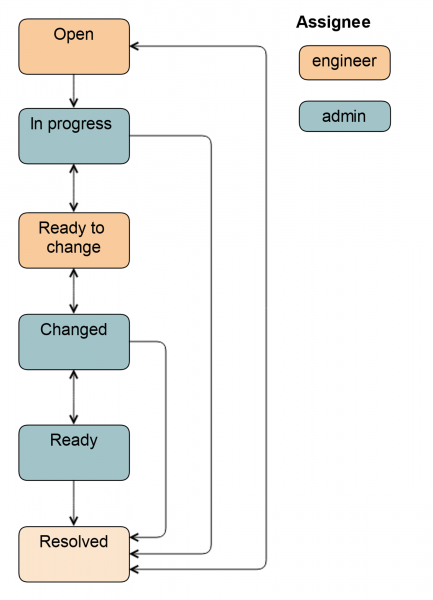
Out of status Open The ticket can be translated by both the system administrator and the engineer. in status progress the administrator removes the disk from rotation so that the engineer can simply pull it out: turns on the backlight, unmounts the disk, stops applications, depending on the specific group of servers.
The ticket is then translated into Ready to change: This is a signal to the engineer that the disk can be pulled out. All fields in Jira are already filled in, the engineer knows what type and size of disk. This data is entered either on the previous status automatically or by the administrator.
After replacing the disk, the ticket is transferred to the status Changed. It is checked that the correct disk has been inserted, partitioning is done, the application is launched and some data recovery tasks are started. Also, the ticket can be transferred to the status Ready, in this case the administrator will remain responsible, because he started the disk in rotation. The complete scheme looks like this.
The addition of new fields has made life much easier for us. The guys began to work with structured information, it became clear what needs to be done and at what stage. Priorities have become much more relevant, as they are now set by the administrator.
No need for chats. Of course, the administrator can write to the engineer “here you need to replace faster”, or “it’s already evening, will you have time to replace it?”. But we no longer communicate daily in chats on these issues.
Disks began to change in batches. If the administrator came to work a little early, he has free time, and nothing has happened yet, he can prepare a number of servers for replacement: fill in the fields, remove disks from rotation and transfer the task to an engineer. An engineer comes to the data center a little later, sees the task, takes the necessary drives from the warehouse and immediately changes them. As a result, the replacement rate has increased.
Learned experience when building Workflow
- When building a procedure, you need to collect information from different sources.
Some of our administrators didn't know that the engineer changes disks himself. Some people thought that the MD RAID was kept in sync by the engineers, even though some of them didn't even have access to it. Some leading engineers did this, but not always, because the process was not described anywhere. - The procedure should be simple and understandable.
It is difficult for a person to keep many steps in his head. The most important neighboring statuses in Jira should be placed on the main screen. You can rename them, for example, In progress we call Ready to change. And the rest of the statuses can be hidden in the drop-down menu so that they do not an eyesore. But it is better not to limit people, to give them the opportunity to make the transition.
Explain the value of innovation. When people understand, they better accept the new procedure. It was very important for us that people do not click through the whole process, but follow it. Then we built on this automation. - Wait, analyze, understand.
It took us about a month to build the procedure, technical implementation, meetings and discussions. And for implementation - more than three months. I saw how people slowly begin to use the innovation. There was a lot of negativity in the early stages. But it was completely independent of the procedure itself, its technical implementation. For example, one administrator used not Jira, but a Jira plugin in Confluence, and some things were not available to him. We showed him Jira, the admin increased productivity both in general tasks and in disk replacements.
Disk replacement automation
We approached automation of replacement of disks several times. We already had developments, scripts, but they all worked either in interactive or manual mode, they required launching. And only after the introduction of the new procedure, we realized that it was exactly what we needed.
Since now the replacement process is divided into stages, each of which has an executor and a list of actions, we can enable automation in stages, and not all at once. For example, the simplest stage - Ready (checking RAID / data synchronization) can be easily delegated to a bot. When the bot learns a little, you can give it a more responsible task - putting the disk into rotation, etc.
Setup Zoo
Before talking about the bot, let's take a short tour of our installation zoo. First of all, it is due to the gigantic size of our infrastructure. Secondly, for each service we try to choose the optimal hardware configuration. We have about 20 models of hardware RAID, mainly LSI and Adaptec, but there are also HP and DELL of different versions. Each RAID controller has its own management utility. The set of commands and their output may differ from version to version for each RAID controller. Where HW-RAID is not used, there may be mdraid.
We do almost all new installations without disk redundancy. We are trying to stop using hardware and software RAIDs anymore, as we back up our systems at the level of data centers, not servers. But of course there are many legacy servers that need to be maintained.
Somewhere disks in RAID controllers are thrown raw devices, somewhere JBODs are used. There are configurations with one system disk in the server, and if it needs to be replaced, then you have to re-roll the server with the installation of the OS and applications, and the same versions, then add configuration files, run applications. There are also a lot of server groups where redundancy is carried out not at the level of the disk subsystem, but directly in the applications themselves.
In total, we have over 400 unique server groups running about 100 different applications. To cover such a huge number of options, we needed a feature rich automation tool. Preferably with a simple DSL, so that not only the one who wrote it could support it.
We chose Ansible because it is agentless: there was no need to prepare the infrastructure, a quick start. In addition, it is written in Python, which is accepted as a standard in the team.
General scheme
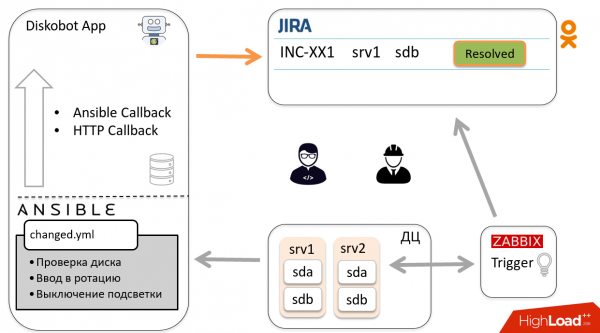
Let's look at the general automation scheme using the example of one incident. Zabbix detects that the sdb disk has failed, the trigger fires, and a ticket is created in Jira. The administrator looked at it, realized that this is not a duplicate and not a false positive, that is, the disk needs to be changed, and transfers the ticket to In progress.
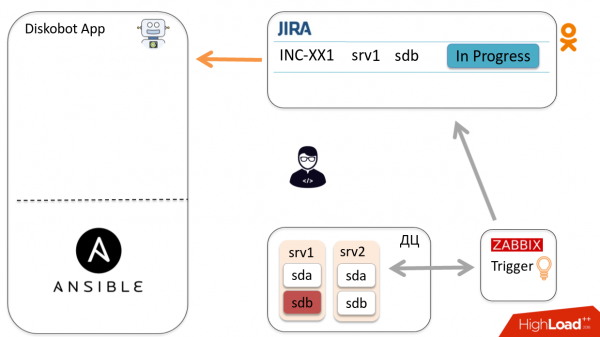
The DiskoBot application, written in Python, periodically polls Jira for new tickets. It notices that a new In progress ticket has appeared, the corresponding thread is triggered, which launches the playbook in Ansible (this is done for each status in Jira). In this case, Prepare2change is run.
Ansible goes to the host, removes the disk from rotation and reports the status to the application via Callbacks.
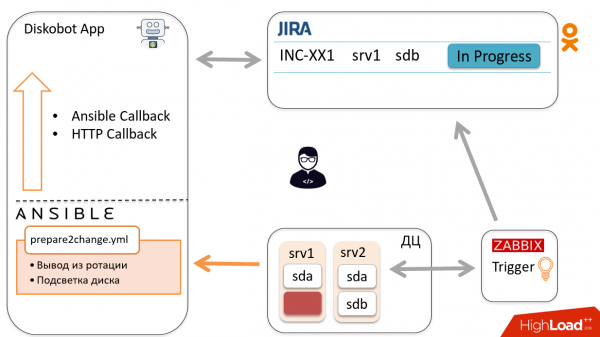
Based on the results, the bot automatically changes the ticket to Ready to change. The engineer receives a notification and goes to change the disk, after which he transfers the ticket to Changed.
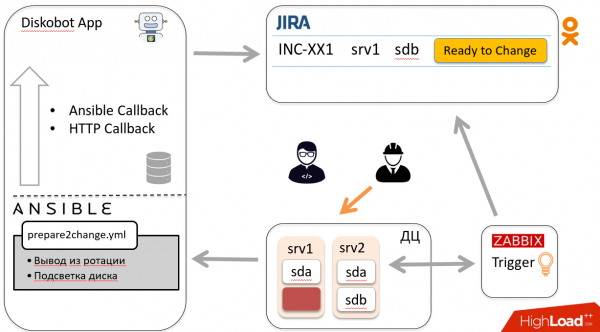
According to the above scheme, the ticket goes back to the bot, which launches another playbook, goes to the host and puts the disk into rotation. The bot closes the ticket. Hooray!
Now let's talk about some components of the system.
Diskobot
This application is written in Python. It selects tickets from Jira according to JQL. Depending on the status of the ticket, the latter gets to the corresponding handler, which in turn launches the Ansible playbook corresponding to the status.
JQL and polling intervals are defined in the application configuration file.
jira_states:
  investigate:
    jql: '… status = Open and "Disk Size" is EMPTY'
    interval: 180

  inprogress:
    jql: '…  and "Disk Size" is not EMPTY and "Device Name" is not EMPTY'

  ready:
    jql: '… and (labels not in ("dbot_ignore") or labels is EMPTY)'
    interval: 7200
For example, among tickets in the In progress status, only those with the Disk size and Device name fields filled in are selected. Device name is the name of the block device needed to execute the playbook. Disk size is needed so that the engineer knows what size disk is needed.
And among tickets with the Ready status, tickets with the dbot_ignore label are filtered out. By the way, we use Jira labels both for such filtering, and for marking duplicate tickets, and collecting statistics.
In the event of a playbook failure, Jira assigns the dbot_failed label so that it can be sorted out later.
Interaction with Ansible
The application interacts with Ansible through . In playbook_executor we pass a filename and a set of variables. This allows you to keep the Ansible project in the form of ordinary yml files, and not describe it in Python code.
Also, the name of the block device, the status of the ticket, as well as the callback_url, in which the issue key is hardcoded, are transmitted to Ansible via *extra_vars* - it is used for callback in HTTP.
For each run, a temporary inventory is generated, consisting of one host and the group that this host belongs to, so that group_vars are applied.
Here is an example of a task that implements an HTTP callback.
We get the result of the playbook's execution using callaback(s). They are of two types:
- , it provides data on the results of the playbook's execution. It describes the tasks that were launched, completed successfully or unsuccessfully. This callback is called when the playbook has finished playing.
- HTTP callback to get information while the playbook is playing. In the Ansible task, we perform a POST / GET request to the side of our application.
Through the HTTP callback(s), variables are passed that were defined during the execution of the playbook and that we want to save and use in subsequent runs. We write this data in sqlite.
Also via HTTP callback we leave comments and change the ticket status.
HTTP callback
# Make callback to Diskobot App
# Variables:
#    callback_post_body: # A dict with follow keys. All keys are optional
#       msg: If exist it would be posted to Jira as comment
#       data: If exist it would be saved in Incident.variables
#       desire_state: Set desire_state for incident
#       status: If exist Proceed issue to that status

  - name: Callback to Diskobot app (jira comment/status)
    uri:
      url: "{{ callback_url }}/{{ devname }}"
      user: "{{ diskobot_user }}"
      password: "{{ diskobot_pass }}"
      force_basic_auth: True
      method: POST
      body: "{{ callback_post_body | to_json }}"
      body_format: json
    delegate_to: 127.0.0.1
Like many tasks of the same type, we moved it to a separate common file and turn it on if necessary, so as not to repeat it constantly in playbooks. The callback_ url appears here, in which the issue key and host name are protected. When Ansible performs this POST request, the bot understands that it came as part of such and such an incident.
And here is an example from a playbook in which we ejected a disc from an MD device:
  # Save mdadm configuration
  - include: common/callback.yml
    vars:
      callback_post_body:
        status: 'Ready to change'
        msg: "Removed disk from mdraid {{ mdadm_remove_disk.msg | comment_jira }}"
        data:
          mdadm_data: "{{ mdadm_remove_disk.removed }}"
          parted_info: "{{ parted_info | default() }}"
    when:
      - mdadm_remove_disk | changed
      - mdadm_remove_disk.removed
This task changes the Jira ticket status to "Ready to change" and adds a comment. The mdam_data variable also contains a list of md devices from which the disk was removed, and parted_info contains a partition dump from parted.
When the engineer inserts a new disk, we can use these variables to restore the partition dump, as well as get the disk into the md devices from which it was removed.
Ansible check mode
Turning on the automation was scary. Therefore, we decided to run all playbooks in the mode
, in which Ansible does not perform any actions on the servers, but only emulates them.
Such a launch is run through a separate callback module, and the result of the playbook's execution is saved in Jira as a comment.
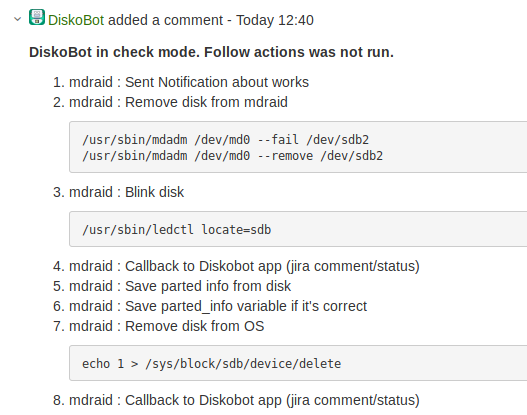
Firstly, it allowed to validate the work of the bot and playbooks. Secondly, it increased the confidence of administrators in the bot.
When we passed the validation and realized that it was possible to run Ansible not only in dry run mode, we made a Run Diskobot button in Jira to run the same playbook with the same variables on the same host, but in normal mode.
Also, the button is used to restart the playbook if it crashes.
Structure of Playbooks
I already mentioned that depending on the status of the Jira ticket, the bot launches different playbooks.
Firstly, it is much easier to organize the entrance.
Secondly, in some cases it is simply necessary.
For example, when replacing the system disk, you first need to go to the deployment system, create a task, and after the correct deployment, the server will become available via ssh, and you can roll the application onto it. If we did all this in one playbook, then Ansible would not be able to execute it due to the unavailability of the host.
We use Ansible roles for each group of servers. Here you can see how the playbook(s) are organized in one of them.
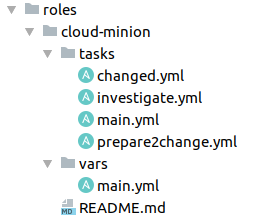
This is convenient, because it is immediately clear where which tasks are located. In main.yml, which is the input for the Ansible role, we can simply include on the status of the ticket, or general tasks that are necessary for everyone, for example, passing identification or obtaining a token.
investigation.yml
Launched for tickets in the Investigation and Open statuses. The most important thing for this playbook is the name of the block device. This information is not always available.
To get it, we analyze the Jira summary, the last value from the Zabbix trigger. It may contain the name of the block device - lucky. And it may contain a mount point - then you need to go to the server, parse and calculate the required disk. Also, the trigger can send a scsi address or some other information. But it also happens that there are no clues, and you have to analyze.
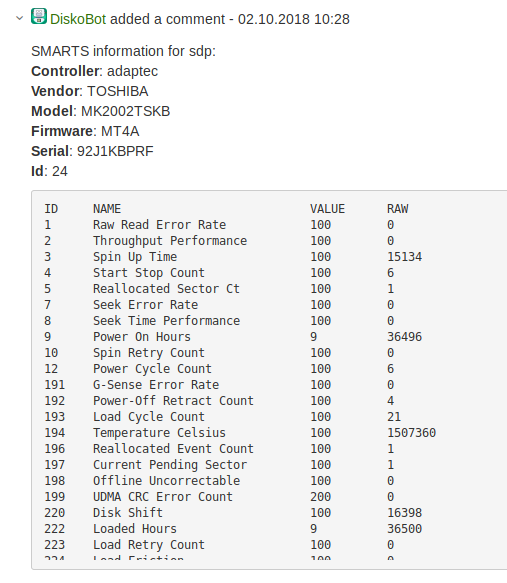
After finding out the name of the block device, we collect information about the type and size of the disk from it to fill in the fields in Jira. We also remove information about the vendor, model, firmware, ID, SMART, and paste all this into a comment in the Jira ticket. The administrator and engineer no longer need to look for this data. 🙂
prepare2change.yml
Drive out of rotation, preparation for replacement. The most difficult, responsible stage. This is where you can stop the application when it cannot be stopped. Or pull out a disk that lacked replicas, and thereby have an effect on users, lose some data. Here we have the most checks and notifications in the chat.
In the simplest case, we are talking about removing a disk from an HW/MD RAID.
In more complex situations (in our storage systems), when the backup is done at the application level, you need to go to the application via the API, report the ejection of the disk, deactivate it and start the restore.
We are now migrating en masse to , and if the server is cloudy, then Diskobot accesses the cloud API, says that it is going to work with this minion - the server on which the containers are running - and asks "migrate all containers from this minion". And at the same time turns on the backlight of the disk, so that the engineer can immediately see which one needs to be pulled out.
changed.yml
After replacing a disk, we first check its availability.
Engineers don't always install new disks, so we've added a check for SMART values that we're happy with.
What attributes are we looking atReallocated Sectors Count (5) < 100
Current Pending Sector Count (107) == 0
If the drive fails the test, the engineer is told to re-replace. If everything is in order, the backlight turns off, markings are applied and the disk is put into rotation.
ready.yml
The simplest case: checking the synchronization of HW / SW raid or the end of data synchronization in the application.
Application APIs
I mentioned several times that often the bot accesses the application API. Of course, not all applications had the necessary methods, so they had to be finalized. Here are the most important methods we use:
- status. The status of a cluster or disk to see if it is possible to work with it;
- start/stop. Disk activation-deactivation;
- Migrate/restore. Migration and recovery of data during and after replacement.
Rendered experience by Ansible
I really love Ansible. But often, when I look at different open source projects and see how people write playbooks, I get a little scared. Complex logical interweaving of when / loop, lack of flexibility and idempotency due to the frequent use of shell / command.
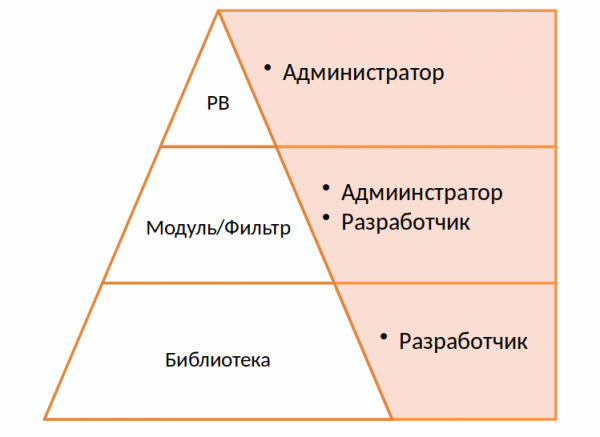
We decided to simplify everything as much as possible, taking advantage of the advantage of Ansible - modularity. At the highest level are playbooks, they can be written by any administrator, third-party developer who knows a little about Ansible.
- name: Blink disk
  become: True
  register: locate_action
  disk_locate:
      locate: '{{ locate }}'
      devname: '{{ devname }}'
      ids: '{{ locate_ids | default(pd_id) | default(omit) }}'
If some logic is difficult to implement in playbooks, we move it to an Ansible module or filter. Scripts can be written in Python or any other language.
They are easy and quick to write. For example, the disk illumination module shown above has 265 lines.
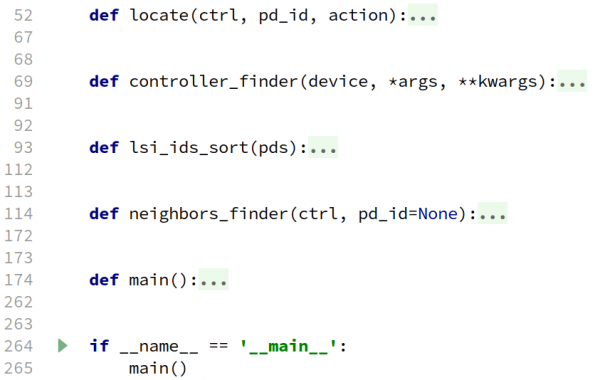
At the bottom level is the library. For this project, we wrote a separate application, a kind of abstraction over hardware and software RAIDs that perform the corresponding requests.
Ansible's greatest strengths are its simplicity and easy-to-understand playbooks. I think that you need to use this and not generate terrible yaml files and a huge number of conditions, shell code and loops.
If you want to repeat our Ansible API experience, keep two things in mind:
- Playbook_executor and playbook in general cannot be passed a timeout. There is a timeout on the ssh session, but no timeout on the playbook. If we try to unmount a disk that no longer exists in the system, the playbook will run indefinitely, so we had to wrap its launch in a separate wrapper and kill it by timeout.
- Ansible works on the basis of fork processes, so its API is not thread safe. We run all of our playbooks in a single thread.
As a result, we were able to automate the replacement of about 80% of the disks. In general, the replacement rate has doubled. Today, the administrator only looks at the incident and decides whether to change the disk or not, and then makes one click.
But now we're starting to run into another problem: some new admins don't know how to change drives. 🙂
Source: habr.com
