

Hello, Habr! Specifically, those who are looking for how to set up a Minecraft server to play with friends.
This article is aimed at non-programmers, non-system administrators, in general, not the core audience of Habr. The article is a step-by-step guide on creating a Minecraft server with a dedicated IP, tailored for people who are not familiar with IT. If this doesn't apply to you, it’s better to skip this article.
What is a server?
So, what is a server? If we rely on the concept of "server" as a component of software, a server is a program that can receive, process, and transmit data received from users (clients) who connect to this server. For example, a website is hosted on a web server that you access through your browser. In our case, the Minecraft server generates a world that players (clients) can connect to, where they can walk, break blocks, and so on. The Minecraft server is responsible for player connections and any of their actions.
It is obvious that the server must be running on a computer (machine). You can set up a server on your home computer, but in that case:
- You jeopardize the security of your own computer by opening ports on it.
- The server will load your computer, which may interfere with its usage.
- You cannot keep your home computer running 24/7: sometimes you turn it off, sometimes your computer loses internet connection, etc.
- To access your server from the outside world, you will have to connect to the computer via IP address, which for "home" internet service providers is dynamic, meaning it can change every 2-3 days for reasons beyond your control.
And how do we solve these problems?
The solution to all these issues is the use of a virtual machine with static, meaning an unchanging IP address.
Complicated terminology? Let's break it down.
Let's refer to Wikipedia.
A virtual machine (VM) is a software and/or hardware system that emulates the hardware of a certain platform...To explain it in very simple terms — it's a computer within a computer. You can also install an operating system on it and use it just like a regular computer.
Where do we get one?
The answer is simple — This is a platform that offers a variety of cloud services useful for anyone working on the web and beyond. To create a Minecraft server, one of the AWS products will be a great fit — Amazon EC2 — a cloud virtual machine that is available 24/7. AWS offers a minimal virtual machine (10GB SSD, 1GB RAM) for free for a year, and also allows you to attach a free static IP address for constant access to your VM (virtual machine) at the same address.
Creating and configuring a VM
Visit the site and sign up. Then go to the management console.
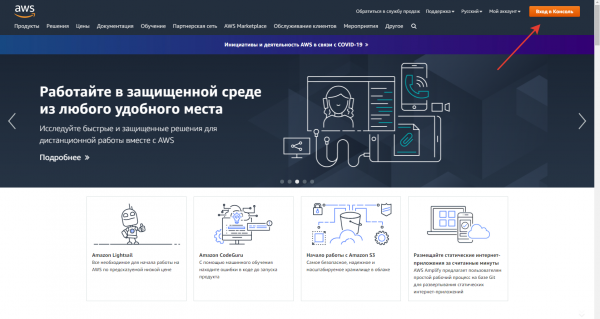
In the console, find among the services EC2 and navigate to it.
It is important to choose a data center, in simpler terms, a location where Amazon's servers are located. You should choose based on your location, as internet communication speed varies, and select a data center that will provide the fastest connection from your city.
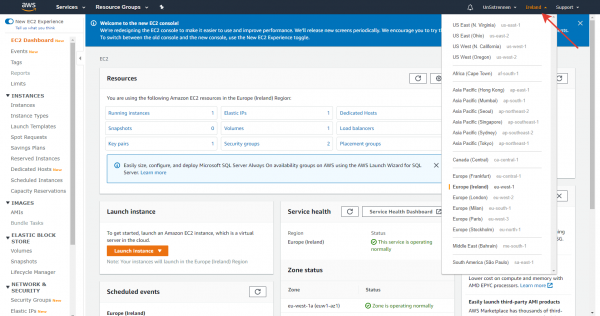
To choose a data center, I recommend using the service , which measures packet transfer speed to other cities.
In my case (Moscow), the Irish data center worked well.
It's time to create a virtual machine. For this, go to the tab Launch instance
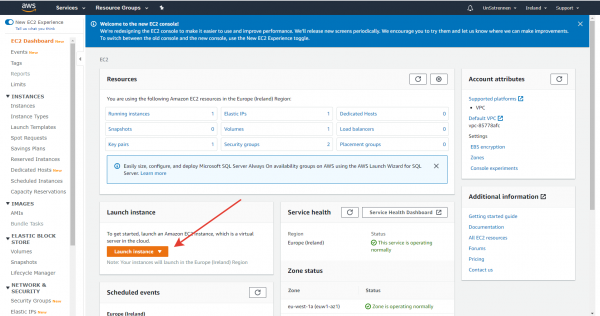
Let's start configuring the VM.
1) Choose the operating system image. For setting up servers, Linux is very convenient; we will use the distribution CentOS7
It should be noted that your virtual machine will not have a graphical interface; access will be through the console. This means managing the VM via commands rather than a mouse. Don't be afraid: this shouldn't stop you now or make you give up on the idea of setting up your Minecraft server because it seems 'too complicated.' Working with the machine through the console is not difficult — you will soon see for yourself.
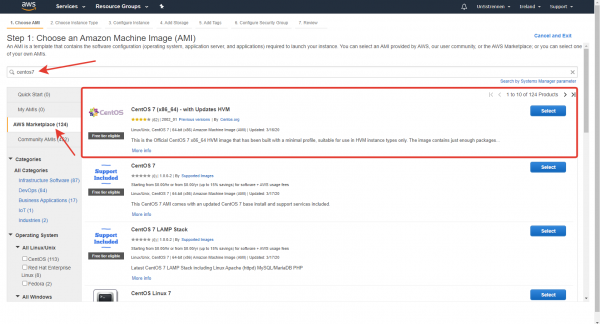
2) Now let's determine the technical configuration of the VM. For free usage, Amazon offers the configuration t2.micro, which is a bit small for a full-fledged large Minecraft server, but enough to play with friends.

3) We leave the other settings at default, but stop at the tab Configure Security groups.
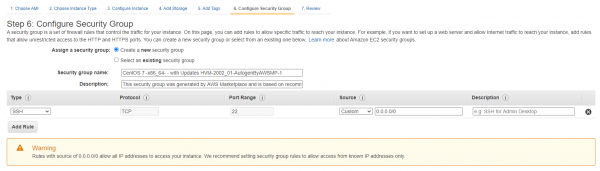
Here we need to configure access to the ports for the Minecraft server.
In simple terms, a port is a non-negative number that indicates to whom the incoming data from the outside world is addressed. A virtual machine can host many different services and servers, so all incoming data packets include a port (number) in their header that identifies the recipient (service, server) within the VM.
For Minecraft servers, the de facto standard is the use of the port 25565. Let's add a rule indicating that access to your VM through this port is allowed.
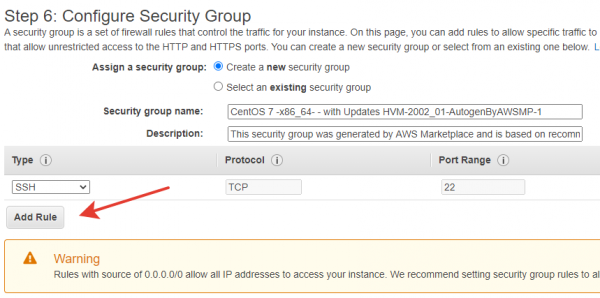
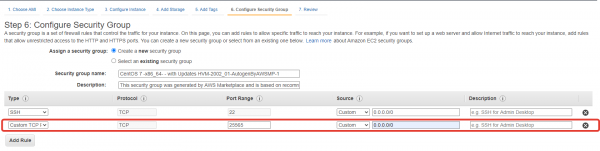
We're moving to the window for completing VM creation by clicking the button 2.1.6. Reviewing all settings
Setting up the SSH key pair for the VM
So, the connection to the machine will be made using the SSH protocol.
The SSH protocol works as follows: a key pair (public and private) is generated, with the public key stored on the VM and the private key on the user's computer (the client) connecting to the VM. When connecting, the VM checks for the appropriate private key with the client.
Click the button 2.1.7. Creating access keys. You will see the following window:
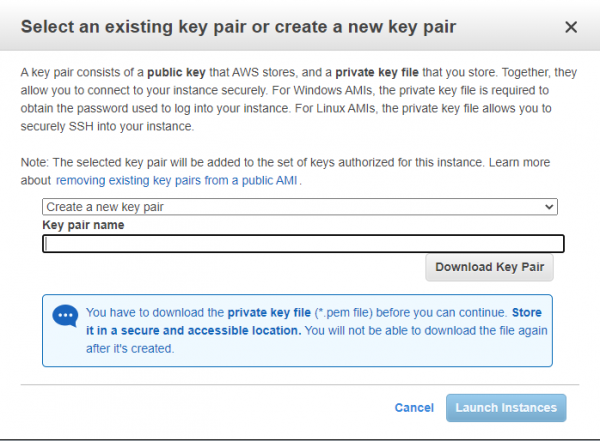
Enter a name for the key pair (for your convenience) and click Download key pair. You should download a .pem file that contains your private key. Click the button Launch instances. You have just created a virtual machine where the server will be set up.
Acquiring a static IP
Now we need to acquire and bind a static IP to our VM. In the menu, find the tab Elastic IPs and go to it. On the tab, click the button Allocate Elastic IP address to get a static IP.
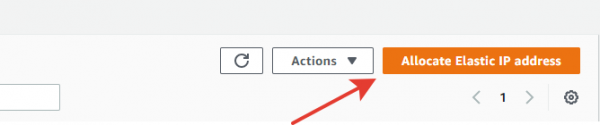
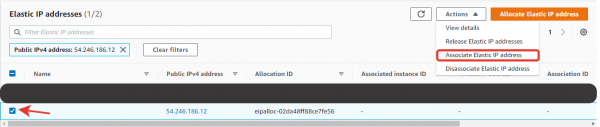
Now, the obtained IP address needs to be bound to our VM. To do this, select it from the list and in the menu Actions choose Associate IP address
Next, we will bind the VM to our IP address.
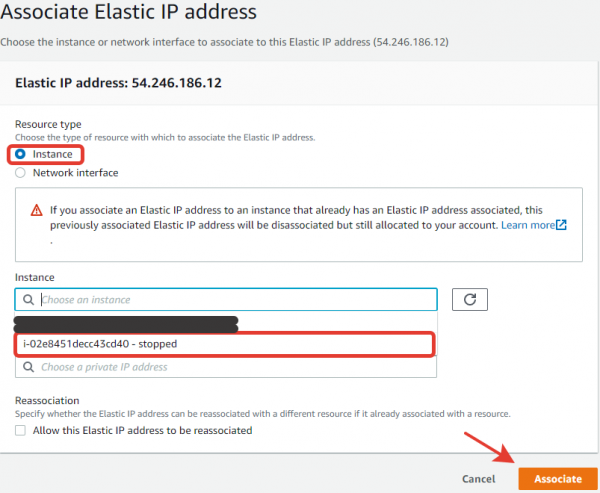
Done!
Accessing the VM
Now that the VM is set up and the IP address is bound, let's connect to it and install our Minecraft server.
To connect to the VM via SSH, use the program . Immediately install PuTTYgen from this same page.
After installing PuTTY, open it. Now you need to configure the connection.
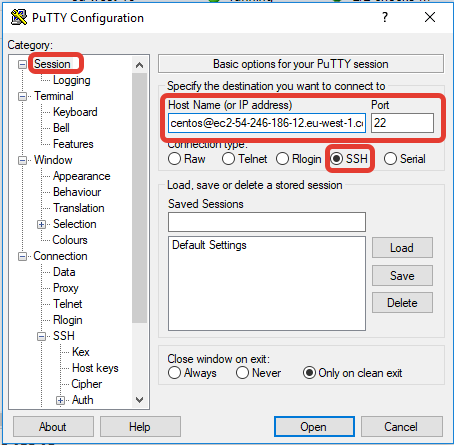
- In the tab Session select the connection type SSH, port 22. Specify a name for the connection. The hostname for SSH connection is a string like:
username@public_dns.
The default username in AWS for CentOS is centos. You can view your public DNS here:
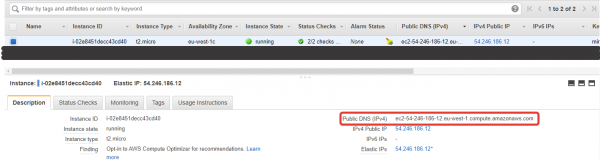
I got the string centos@ec2-54-246-186-12.eu-west-1.compute.amazonaws.com
- In the tab SSH -> Auth specify your private SSH key. It is stored in a file.
.pem, which we downloaded earlier. However, PuTTY cannot work with files.pem, it needs a specific format.ppk. We will use PuTTYgen for the conversion. . The generated file.ppkWe will save it and specify it here:
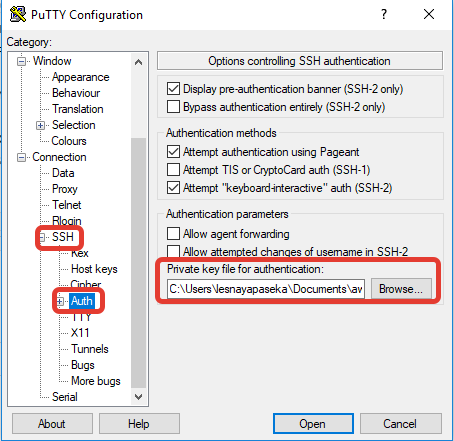
- We connect to the VM by opening the connection button Open.
Congratulations! We have just connected to your VM's console. Now we need to set up our server on it.
Installing and configuring a Minecraft server
Let’s start configuring our server. First, we need to install several packages on our VM.
sudo yum install -y wget mc iptables iptables-services java screenLet’s break down what each package is for.
- wget — a utility for downloading files in Linux. We will use it to download the server files.
- mc — a console text editor. It is known for its simplicity and ease of use for untrained users.
- iptables — a utility for managing and configuring the firewall, which we will use to open a port for the server on our VM.
- java — Minecraft runs on Java, so it is necessary for the server to operate.
- screen — a window manager for Linux. It will allow us to duplicate our console to run the server. The thing is, the server must be started through the console, if you disconnect from your VM, the server process will stop. Therefore, we will run it in a separate console window.
Now, let’s configure the firewall.
A firewall is a software or hardware element of a computer network that performs control and filtering of network traffic passing through it according to specified rules. (Wikipedia)
Simply put: imagine a fortress city. It is constantly attacked from outside, while ordinary life goes on inside. To access the city, there are gates in the fortress wall, where guards check the lists to see if a person can enter the fortress. The wall and gates in computer networks are represented by the firewall.
sudo mcedit /etc/sysconfig/iptablesWe have just created the firewall configuration file. Let’s fill it with standard configuration data, including a rule for the port 25565, which is the standard port for a Minecraft server.
*filter
:INPUT ACCEPT [0:0]
:FORWARD ACCEPT [0:0]
:OUTPUT ACCEPT [0:0]
-A INPUT -m state --state RELATED,ESTABLISHED -j ACCEPT
-A INPUT -p icmp -j ACCEPT
-A INPUT -p tcp -m state --state NEW -m tcp --dport 25565 -j ACCEPT
-A INPUT -i lo -j ACCEPT
-A INPUT -p tcp -m state --state NEW -m tcp --dport 22 -j ACCEPT
-A INPUT -j REJECT --reject-with icmp-host-prohibited
-A FORWARD -j REJECT --reject-with icmp-host-prohibited
COMMIT
We will close the file by pressing F10, saving changes.
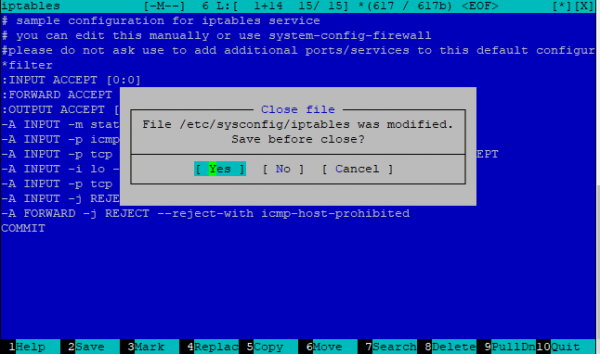
Now let's start the firewall and enable it to launch at startup:
sudo systemctl enable iptables
sudo systemctl restart iptables
We will store the server files in a separate folder, create it, navigate to it, and download the server files. For this, we should use wget
mkdir minecraft
cd minecraft
wget
You need to find the direct link for downloading .jar the server file. For example, the link to the server file version 1.15.2:
wget https://launcher.mojang.com/v1/objects/bb2b6b1aefcd70dfd1892149ac3a215f6c636b07/server.jarView the contents of the folder using the command ls, make sure the files are downloaded.
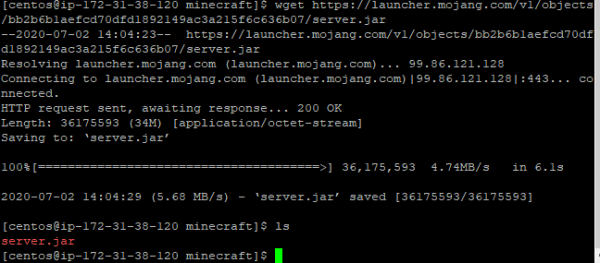
Let's run the server file. Right now the server will not be operational: it will create all the necessary files for operation and complain that you have not agreed to the EULA license terms. We will accept the terms by opening the file eula.txt
sudo mcedit eula.txtConfirm your agreement by changing the entry to:
eula=trueOpen the file server.properties: this is your server's configuration file.
You must make the following change:
online-mode=falseThe other settings are up to you.
Server Launch
It's time to start the server. As I mentioned, the server is launched directly from the console, but if we close the main console, the server process will stop. So let's create one more console:
screenIn this console, we will start the server:
sudo java -Xms512M -Xmx1024M -jar .jar --noguiThe server starts in about 45 seconds; do not interrupt the process. When the server is initialized and started, you will see something like:

Congratulations! You have just set up and started your Minecraft server. Now it’s important to exit the second console correctly so it can continue working with the running server. To do this, press Ctrl+A, then D. You should find yourself in the main console and see a message like [detached from 1551.pts-0.ip-172-31-37-146]. If you need to return to the console where the server is running, use screen -r
Now you can disconnect from your VM. Your server will be available at the static IP address we obtained earlier, on port 25565.

Thus, the address to join the server will be :25565.
Conclusion
With this guide, you will be able to easily set up a free Minecraft server with a dedicated IP. The article is written in the simplest language and is aimed at non-specialists. With that in mind, I would be interested to hear comments from experienced users, as simplifying the material may lead to factual errors in terminology.
Source: habr.com
