


pfSense+Squid with HTTPS filtering + Single Sign-On (SSO) technology with filtering by Active Directory groups
Brief Background
The company has a need to implement a proxy server with the ability to filter access to websites (including HTTPS) by groups from AD, so that users do not have to enter any additional passwords, and administration can be done via a web interface. Quite a request, isn't it?
A correct response would be to purchase solutions such as Kerio Control or UserGate, but as always, there is no money, yet the need persists.
This is where our reliable old friend Squid comes to the rescue, but again — where to get a web interface? SAMS2? It's outdated. This is where pfSense comes to the rescue.
Description
This article will describe the method for configuring the Squid proxy server.
Kerberos will be used for user authentication.
SquidGuard will be used for filtering by domain groups.
For monitoring, Lightsquid, sqstat, and internal pfSense monitoring systems will be used.
It will also address a common problem associated with implementing Single Sign-On (SSO) technology, namely applications attempting to access the internet under their system account.
Preparation for installing Squid
The basis will be pfSense, Installation Instructions.
Inside, we will set up authentication on the firewall itself using domain accounts. Instructions.
Very Important!
Before starting the Squid installation, DNS must be configured server in pfSense, creating an A record and PTR records on our DNS server, and configuring NTP so that the time does not differ from the time on the domain controller.
And in your network, allow the WAN interface of pfSense to access the internet, while users on the local network connect to the LAN interface, including ports 7445 and 3128 (in my case, 8080).
Is everything ready? Is the connection to the domain via LDAP for authentication on pfSense established and the time synchronized? Great. It's time to proceed with the main process.
Installation and Preliminary Configuration
We will install Squid, SquidGuard, and LightSquid from the pfSense package manager in the ‘System/Package Manager’ section.
After a successful installation, we proceed to "Services/Squid Proxy server/" and first configure caching in the Local Cache tab. I set everything to 0, as I don't see much point in caching websites, which browsers handle perfectly. After configuration, click the "Save" button at the bottom of the screen to allow us to make the main proxy settings.
We set the main configuration as follows:
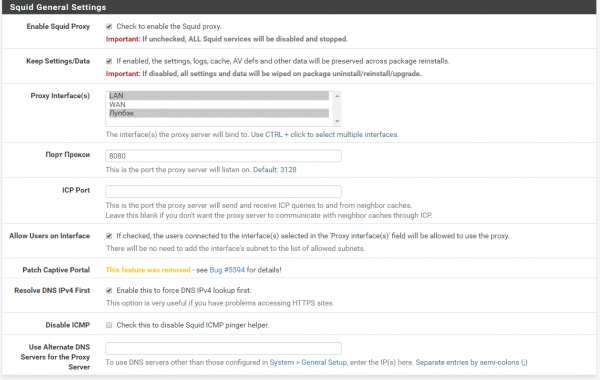
The default port is 3128, but I prefer to use 8080.
The selected parameters in the Proxy Interface tab determine which interfaces our proxy will listen to. serverSince this firewall is designed in such a way that it accesses the internet via the WAN interface, even though LAN and WAN may be in the same local subnet, I recommend using the LAN specifically for the proxy.
The loopback is needed for sqstat to work.
Below you will find the settings for the Transparent proxy and SSL Filter, but we don't require them; our proxy will not be transparent, and for HTTPS filtering, we will not engage in certificate substitution (since we have document flow, bank clients, etc.); we will simply observe the handshake.
At this stage, we need to go to our domain controller and create an account for authentication (you can also use the one you set up for authentication to pfSense itself). A very important factor here is that if you intend to use AES128 or AES256 encryption, make sure to check the corresponding boxes in the account settings.
If your domain represents a rather complex forest with many directories or your domain is .local, then possibly, though not certainly, you will have to use a simple password for this account; this bug is known, but it may simply not work with a complex password, so it needs to be checked on a specific case.
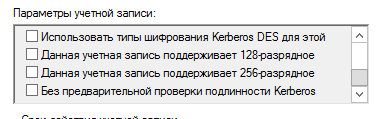
After all this, we create a key file for Kerberos; on the domain controller, open the command line with administrator rights and enter:
# ktpass -princ HTTP/pfsense.domain.local@DOMAIN.LOCAL -mapuser pfsense -pass 3EYldza1sR -crypto {DES-CBC-CRC|DES-CBC-MD5|RC4-HMAC-NT|AES256-SHA1|AES128-SHA1|All} -ptype KRB5_NT_PRINCIPAL -out C:keytabsPROXY.keytabWhere we specify our FQDN pfSense, strictly adhering to the case, in the mapuser parameter we input our domain account and its password, and in crypto we choose the encryption method. I used rc4 for operation, and in the -out field, we select where to send our finished key file.
After successfully creating the key file, we will send it to our pfSense. I used Far for this, but it can also be done using commands, Putty, or through the pfSense web interface in the 'Diagnostics Command Line' section.
Now we can edit/create /etc/krb5.conf
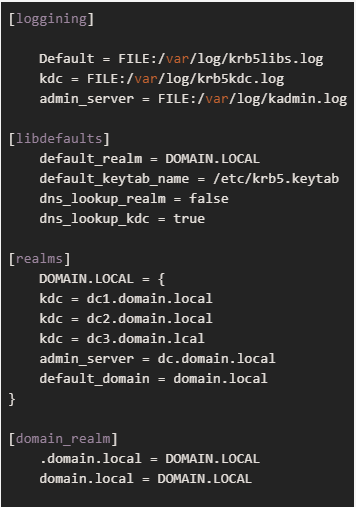
where /etc/krb5.keytab is the key file we created.
Make sure to check Kerberos functionality using kinit; if it doesn’t work, there’s no point in reading further.
Configuring Squid authentication and access list without authentication
Having successfully configured Kerberos, we will attach it to our Squid.
To do this, go to Services > Squid Proxy Server, and in the main settings scroll to the very bottom where we will find the ‘Advanced Settings’ button.
In the Custom Options (Before Auth) field, we will enter:
#Хелперы
auth_param negotiate program /usr/local/libexec/squid/negotiate_kerberos_auth -s GSS_C_NO_NAME -k /usr/local/etc/squid/squid.keytab -t none
auth_param negotiate children 1000
auth_param negotiate keep_alive on
#Списки доступа
acl auth proxy_auth REQUIRED
acl nonauth dstdomain "/etc/squid/nonauth.txt"
#Разрешения
http_access allow nonauth
http_access deny !auth
http_access allow auth
uде auth_param negotiate program /usr/local/libexec/squid/negotiate_kerberos_auth — selects the required Kerberos authentication helper.
— some characteristic of the node (for example, a number). The key is needed to identify the element of the tree corresponding to this key. Example of a binary search tree: -s with the value GSS_C_NO_NAME — specifies the use of any account from the key file.
— some characteristic of the node (for example, a number). The key is needed to identify the element of the tree corresponding to this key. Example of a binary search tree: -k with the value /usr/local/etc/squid/squid.keytab — specifies to use this particular keytab file. In my case, it's the same keytab file we created, which I copied to the directory /usr/local/etc/squid/ and renamed because Squid didn’t want to cooperate with that directory, possibly due to insufficient permissions.
— some characteristic of the node (for example, a number). The key is needed to identify the element of the tree corresponding to this key. Example of a binary search tree: -t with the value -t none — disables cyclical requests to the domain controller, which significantly reduces the load on it if you have more than 50 users.
During testing, you can also add the key -d — i.e., diagnostics, which will show more logs.
auth_param negotiate children 1000 — defines how many simultaneous authentication processes can be run
auth_param negotiate keep_alive on — keeps the connection alive during the authorization chain polling
acl auth proxy_auth REQUIRED — creates and requires an access control list that includes users who have passed authentication
acl nonauth dstdomain '/etc/squid/nonauth.txt' — informs Squid about the nonauth access list, which contains the destination domains that everyone will always be allowed access to. We create the file and write the domains inside it in the format
.whatsapp.com
.whatsapp.net
WhatsApp is used as an example for a reason — it is very particular about proxies with authentication and will not work unless allowed before authentication.
http_access allow nonauth — allows access to this list for everyone
http_access deny !auth — denies access to unauthorized users to other sites
http_access allow auth — allows access to authorized users.
Everything, you have configured Squid, now it's time to start filtering by groups.
Configuring SquidGuard
Go to Services > SquidGuard Proxy Filter.
In the LDAP Options, enter the details of our account used for Kerberos authentication in the following format:
CN=pfsense,OU=service-accounts,DC=domain,DC=localIf there are spaces or non-Latin characters, the entire entry should be enclosed in single or double quotes:
'CN=sg,OU=service-accounts,DC=domain,DC=local'
"CN=sg,OU=service-accounts,DC=domain,DC=local"
Next, make sure to check these boxes:

To cut off unnecessary DOMAINpfsense DOMAIN.LOCAL to which the entire system is very sensitive.
Now go to Group Acl and bind our domain access groups, I use simple names like group_0, group_1, etc., up to 3, where 3 means access to the whitelist only, and 0 means everything is allowed.
Groups are attached as follows:
ldapusersearch ldap://dc.domain.local:3268/DC=DOMAIN,DC=LOCAL?sAMAccountName?sub?(&(sAMAccountName=%s)(memberOf=CN=group_0,OU=squid,OU=service-groups,DC=DOMAIN,DC=LOCAL))Save our group, go to Times, where I created one interval that means always on, then go to Target Categories and create lists as you wish, after creating the lists return to our groups and within the group use the buttons to select who can go where and who cannot.
LightSquid and sqstat
If during the setup process we selected loopback in Squid settings and opened access to port 7445 in the firewall both in our network and on pfSense itself, then when going to Diagnostics > Squid Proxy Reports, we can easily access both sqstat and LightSquid; for the latter, you'll need to create a username and password there, and you can also choose a theme.
Completion
pfSense is a very powerful tool that can do a lot — from traffic proxying to controlling user access to the internet, this is just a fraction of its functionality; nevertheless, in an enterprise with 500 machines, it solved the problem and saved on purchasing a proxy.
I hope this article helps someone solve a relevant task for medium to large enterprises.
Source: habr.com
