

RabbitMQ is a message broker written in Erlang, enabling the setup of a fault-tolerant cluster with full data replication across multiple nodes, where each node can handle read and write requests. Having numerous Kubernetes clusters in production, we manage a large number of RabbitMQ installations and faced the need to migrate data from one cluster to another without downtime.
This operation was necessary for us in at least two cases:
- Transferring data from a RabbitMQ cluster that is not in Kubernetes to a new 'Kubernetesized' cluster (i.e., functioning in K8s pods).
- Migrating RabbitMQ within Kubernetes from one namespace to another (for instance, if boundaries are defined by namespaces, for transferring infrastructure from one boundary to another).
The recipe proposed in this article is aimed at situations (but not limited to them) where there is an old RabbitMQ cluster (for example, consisting of 3 nodes) that is either already in K8s or on some old servers. An application running in Kubernetes (either already there or potentially) interacts with it:
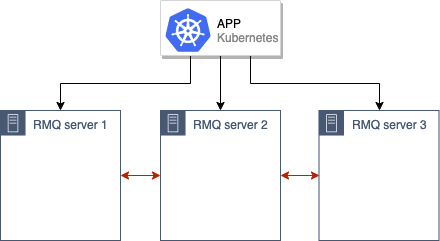
… and we need to migrate it to a new production environment in Kubernetes.
First, a general approach to the migration will be described, followed by technical details on its implementation.
Migration Algorithm
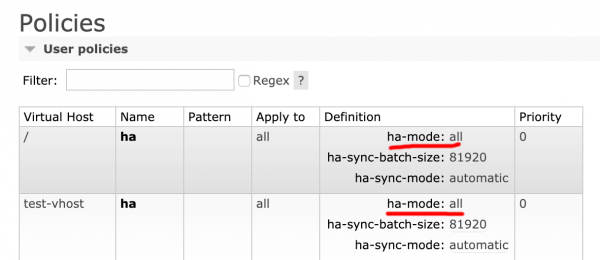
The first, preliminary stage before any actions is to check that the old RabbitMQ installation has high availability mode enabled (). The reason is obvious—we don’t want to lose any data. To perform this check, one can access the RabbitMQ admin panel and verify in the Admin → Policies tab that the value is set to ha-mode: all:
The next step is to set up a new RabbitMQ cluster in Kubernetes pods (in our case, for example, consisting of 3 nodes, though the number can vary).
After that, we merge the old and new RabbitMQ clusters, forming a single cluster (comprising 6 nodes):
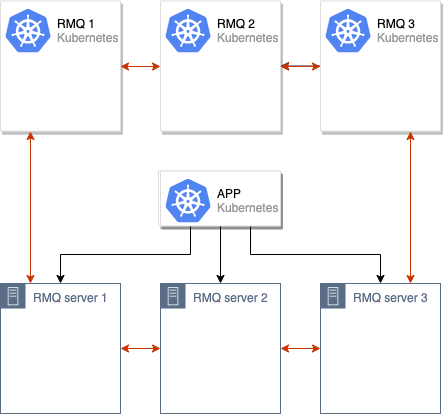
The process of synchronizing data between the old and new RabbitMQ clusters is initiated. Once all data is synchronized across all nodes in the cluster, we can switch the application to use the new cluster:
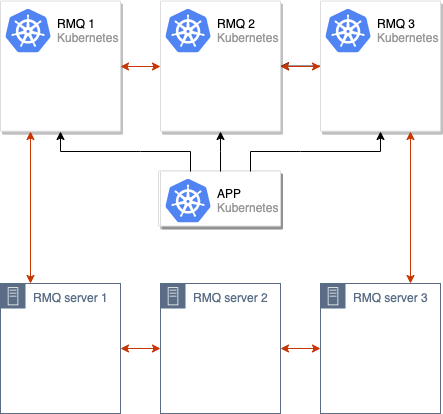
After these operations, it is sufficient to remove the old nodes from the RabbitMQ cluster, and the migration can be considered complete:
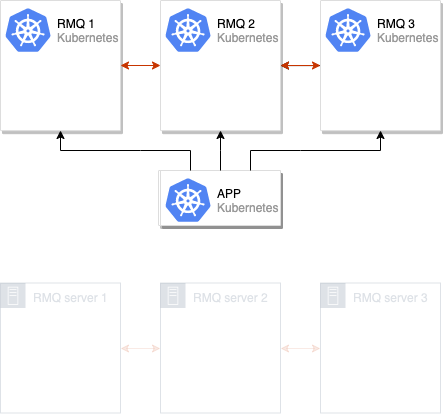
We have repeatedly applied this scheme in our production. However, for our convenience, we implemented it within a specialized system that disseminates standard RMQ configurations across multiple Kubernetes clusters. (for those curious: this is about , which we ). Below you will find specific instructions that anyone can apply to their installations to try the proposed solution in action.
Let's try it in practice
Requirements
The prerequisites are very simple:
- A Kubernetes cluster (minikube will also work);
- A RabbitMQ cluster (it can be deployed on bare metal or created as a regular cluster in Kubernetes using the official Helm chart).
For the example described below, I deployed RMQ in Kubernetes and named it rmq-old.
Preparing the environment
1. Download the Helm chart and make some edits:
helm fetch --untar stable/rabbitmq-ha For convenience, we set the password, ErlangCookie and create a policy ha-all, so that by default, queues are synchronized between all nodes of the RMQ cluster:
rabbitmqPassword: guest
rabbitmqErlangCookie: mae9joopaol7aiVu3eechei2waiGa2we
definitions:
policies: |-
  {
    "name": "ha-all",
    "pattern": ".*",
    "vhost": "\/",
2. Install the chart:
helm install . --name rmq-old --namespace rmq-old3. Access the RabbitMQ admin panel, create a new queue, and add some messages. These will be necessary to ensure that all data is preserved after migration and nothing is lost:

The test environment is ready: we have the 'old' RabbitMQ containing the data to be migrated.
Migrating the RabbitMQ cluster
1. First, let's deploy a new RabbitMQ in a friend the namespace with the same ErlangCookie and a password for the user. To do this, we will perform the operations described above, changing the final command for installing RMQ to the following:
helm install . --name rmq-new --namespace rmq-new2. Now, we need to merge the new cluster with the old one. For this, we enter each of the pods of the new RabbitMQ and execute the commands:
export OLD_RMQ=rabbit@rmq-old-rabbitmq-ha-0.rmq-old-rabbitmq-ha-discovery.rmq-old.svc.cluster.local &&
  rabbitmqctl stop_app &&
  rabbitmqctl join_cluster $OLD_RMQ &&
  rabbitmqctl start_app
In the variable OLD_RMQ is the address of one of the nodes of the old RMQ cluster.
These commands will stop the current node of the new of the RMQ cluster, join it to the old cluster, and then restart it.
3. The RMQ cluster with 6 nodes is ready:

You need to wait for messages to synchronize between all nodes. It’s easy to guess that the message synchronization time depends on the hardware capabilities of the cluster and the number of messages. In the scenario described, there are only 10 messages, so the data synchronized instantly, but with a sufficiently large number of messages, synchronization can take hours.
So, the synchronization status:

Here +5 means that the messages are already present still on 5 nodes (in addition to the one specified in the field Node). Thus, the synchronization was successful.
4. All that remains is to switch the RMQ address in the application to the new cluster (the specific actions here depend on the technology stack you are using and other specifics of your application), after which you can say goodbye to the old one.
For the last operation (i.e., already after switching the application to the new cluster), we go to each node of the old of the cluster and execute the commands:
rabbitmqctl stop_app
rabbitmqctl reset
The cluster has 'forgotten' about the old nodes: you can delete the old RMQ, and the migration will be complete.
Note: If you are using RMQ with certificates, then fundamentally nothing changes—the migration process will proceed exactly the same way.
Conclusions
The scheme described is suitable for almost all cases where we need to move RabbitMQ or simply migrate to a new cluster.
In our case, difficulties arose only once when RMQ was accessed from multiple locations, and we couldn’t change the RMQ address everywhere. At that point, we launched a new RMQ in the same namespace with the same labels so that it would fall under the already existing services and Ingresses, and when starting the pod manually, we manipulated the labels, removing them at first so that requests would not go to the empty RMQ, and adding them back after message synchronization.
We applied the same strategy when upgrading RabbitMQ to a new version with altered configuration—it worked like a charm.
P.S.
As a logical continuation of this material, we are preparing articles about MongoDB (migration from a physical server to Kubernetes) and MySQL (how we set up this DBMS inside Kubernetes). They will be published in the coming months.
P.P.S.
Also read in our blog:
- «»;
- «».
Source: habr.com
