

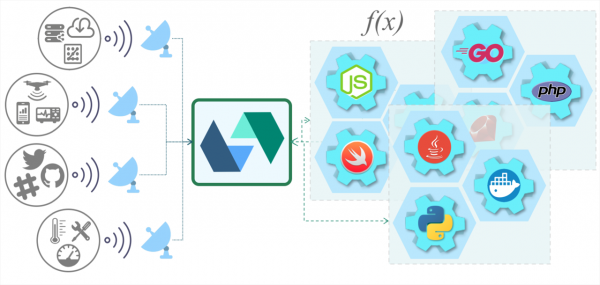
This article concludes the series of translated notes about OpenWhisk by the author . Today, we will look at the process of deploying OpenWhisk on Kubernetes with corrected commands for compatibility with the current versions of the applications. The process of launching OpenWhisk functions using Knative and TektonCD in Kubernetes with a Node.js runtime environment will also be described.
Deploying OpenWhisk on Kubernetes
Over the course of a few days, I conducted an experiment to deploy OpenWhisk in Kubernetes to create a simple and fast testing ground for working on tasks. Since I am new to Kubernetes, I estimate that one and a half days were spent on a successful deployment. In the repository, there are very clear instructions for deploying OpenWhisk in Kubernetes. Here, there will be deployment instructions written for Mac (I will also be doing everything on Linux because I prefer Linux. — editor's note).
- Installing the package manager
asdf, after which we automatically fix~/.bash_profileor its equivalent like this:
$ brew install asdf
$ [ -s "/usr/local/opt/asdf/asdf.sh" ] && . /usr/local/opt/asdf/asdf.sh
$ source ~/.bash_profile[On Linux, this step is not needed, although brew is available. — translator's note]
- Adding plugins
minikubeandkubelet:
$ asdf plugin-add kubectl
$ asdf plugin-add minikube[Again, we skip this step on Linux. — translator's note]
- Installing minikube and kubelet:
$ asdf install kubectl 1.9.0
$ asdf global kubectl 1.9.0
$ asdf install minikube 0.25.2
$ asdf global minikube 0.25.2[specific versions are installed, but I checked everything with the latest available versions for Linux; I suspect it's safe to install the latest. — translator's note]
On Linux, this step is done roughly like this (everything is installed in ~/bin, which I have listed in PATH, editor's note):
$ curl -L0 minikube https://storage.googleapis.com/minikube/releases/latest/minikube-linux-amd64 && chmod +x minikube && mv minikube ~/bin/
$ curl -L0 https://storage.googleapis.com/kubernetes-release/release/$(curl -s https://storage.googleapis.com/kubernetes-release/release/stable.txt)/bin/linux/amd64/kubectl && chmod +x kubectl && mv kubectl ~/bin/- Creating the minikube virtual machine (VirtualBox must be installed beforehand):
$ minikube start --cpus 2 --memory 4096 --kubernetes-version=v1.9.0 --extra-config=apiserver.Authorization.Mode=RBAC[Everything works for me with the command minikube start , with no parameters and default values. — translator's note]
$ minikube start
  minikube v1.5.2 on Debian 8.11
  Automatically selected the 'virtualbox' driver
  Downloading VM boot image ...
    > minikube-v1.5.1.iso.sha256: 65 B / 65 B [--------------] 100.00% ? p/s 0s
    > minikube-v1.5.1.iso: 143.76 MiB / 143.76 MiB [-] 100.00% 5.63 MiB p/s 26s
  Creating virtualbox VM (CPUs=2, Memory=4096MB, Disk=20000MB) ...
  Preparing Kubernetes v1.16.2 on Docker '18.09.9' ...
  Downloading kubelet v1.16.2
  Downloading kubeadm v1.16.2
  Pulling images ...
  Launching Kubernetes ...  Waiting for: apiserver
Done! kubectl is now configured to use "minikube"- Switching the Docker network to promiscuous mode:
$ minikube ssh -- sudo ip link set docker0 promisc on- Creating a namespace and labeling the worker node:
$ kubectl create namespace openwhisk
$ kubectl label nodes --all openwhisk-role=invoker- Getting the repository contents and overriding the type for ingress in the mycluster.yaml file:
$ git clone https://github.com/apache/incubator-openwhisk-deploy-kube.git
$ cd incubator-openwhisk-deploy-kube/
$ cat < mycluster.yaml
whisk:
    ingress:
        type: NodePort
            api_host_name: 192.168.99.100
            api_host_port: 31001
nginx:
    httpsNodePort: 31001
EOF- Installing Helm and deploying with it:
$ brew install kubernetes-helm
$ helm init # init Helm Tiller, not needed for Helm v3+
$ kubectl get pods -n kube-system # verify that tiller-deploy is in the running state, not needed for helm v3+
$ kubectl create clusterrolebinding tiller-cluster-admin --clusterrole=cluster-admin --serviceaccount=kube-system:default
$ helm install ./openwhisk/helm/ --namespace=openwhisk -f mycluster.yaml[On Linux with recent versions (v3.0.1 was available), it will be slightly different. — translator's note]
$ curl -L0 https://get.helm.sh/helm-v3.0.1-linux-amd64.tar.gz | tar -xzvf - linux-amd64/helm --strip-components=1; sudo mv helm /usr/local/bin
$ kubectl create clusterrolebinding tiller-cluster-admin --clusterrole=cluster-admin --serviceaccount=kube-system:default
$ helm install ./openwhisk/helm/ --namespace=openwhisk --generate-name -f mycluster.yaml- Checking that everything is up (STATUS = Running or Completed):
$ kubectl get pods -n openwhisk
NAME                                                              READY   STATUS      RESTARTS   AGE
openwhisk-1576070780-alarmprovider-6868dc694-plvpf                1/1     Running     1          1d5h
openwhisk-1576070780-apigateway-8d56f4979-825hf                   1/1     Running     1          1d5h
openwhisk-1576070780-cloudantprovider-544bb46596-9scph            1/1     Running     1          1d5h
openwhisk-1576070780-controller-0                                 1/1     Running     2          1d5h
openwhisk-1576070780-couchdb-7fd7f6c7cc-42tw6                     1/1     Running     1          1d5h
openwhisk-1576070780-gen-certs-z9nsb                              0/1     Completed   0          1d5h
openwhisk-1576070780-init-couchdb-r2vmt                           0/1     Completed   0          1d5h
openwhisk-1576070780-install-packages-27dtr                       0/1     Completed   0          1d4h
openwhisk-1576070780-invoker-0                                    1/1     Running     1          1d5h
openwhisk-1576070780-kafka-0                                      1/1     Running     1          1d5h
openwhisk-1576070780-kafkaprovider-f8b4cf4fc-7z4gt                1/1     Running     1          1d5h
openwhisk-1576070780-nginx-6dbdbf69bc-5x76n                       1/1     Running     1          1d5h
openwhisk-1576070780-redis-cfd8756f4-hkrt6                        1/1     Running     1          1d5h
openwhisk-1576070780-wskadmin                                     1/1     Running     1          1d5h
openwhisk-1576070780-zookeeper-0                                  1/1     Running     1          1d5h
wskopenwhisk-1576070780-invoker-00-1-prewarm-nodejs10             1/1     Running     0          61s
wskopenwhisk-1576070780-invoker-00-2-prewarm-nodejs10             1/1     Running     0          61s
wskopenwhisk-1576070780-invoker-00-3-whisksystem-invokerhealtht 1/1 Running 0 59s- Setting up wsk for operation:
$ wsk property set --apihost 192.168.99.100:31001
$ wsk property set --auth 23bc46b1-71f6-4ed5-8c54-816aa4f8c502:123zO3xZCLrMN6v2BKK1dXYFpXlPkccOFqm12CdAsMgRU4VrNZ9lyGVCGuMDGIwP
Checking:
$ wsk -i list
Entities in namespace: default
packages
actions
triggers
rules
Issues and their solutions
getsockopt: connection refused
$ wsk -i list
error: Unable to obtain the list of entities for namespace 'default': Get http://192.168.99.100:31001/api/v1/namespaces/_/actions?limit=0&skip=0: dial tcp 192.168.99.100:31001: getsockopt: connection refused
Checking that the containers in the namespace openwhisk are in status Running, as it sometimes crashes with errors CreateContainerConfigError.
Invoker still initializing — Init:1/2
The process of downloading various runtimes can take a long time. To speed it up, you can specify a shortened minimal list in the file mycluster.yaml:
whisk:
  runtimes: "runtimes-minimal-travis.json"
Container named -install-packages- exits with Error
Simply increase the timeouts for liveness tests.
Installing OpenWhisk on top of Knative
Priti Desai conducted the installation on top of the IBM cloud cluster as well as on a regular minikube, using Knative Build and BuildTemplates. I will also install it on top of minikube, based on how In our previous blog — using the latest software versions. As Knative Build and BuildTemplates have been officially deprecated, I will use the recommended replacement in the form of Tekton Pipelines. The rest of the article is written after reading the Tekton Pipelines documentation but is based on the ideas of Priti. Access to a Docker Registry is required — I, like the original author, will use DockerHub.
$ curl -L0 https://github.com/solo-io/gloo/releases/download/v1.2.10/glooctl-linux-amd64; chmod +x glooctl-linux-amd64; mv glooctl-linux-amd64 ~/bin
$ glooctl install knative
$ kubectl get pods -n knative-serving
NAME                              READY   STATUS    RESTARTS   AGE
activator-77fc555665-rvrst        1/1     Running   0          2m23s
autoscaler-5c98b7c9b6-x8hh4       1/1     Running   0          2m21s
autoscaler-hpa-5cfd4f6845-w87kq   1/1     Running   0          2m22s
controller-7fd74c8f67-tprm8       1/1     Running   0          2m19s
webhook-74847bb77c-txr2g          1/1     Running   0          2m17s
$ kubectl get pods -n gloo-system
NAME                                      READY   STATUS    RESTARTS   AGE
discovery-859d7fbc9c-8xhvh                1/1     Running   0          51s
gloo-545886d9c6-85mwt                     1/1     Running   0          51s
ingress-67d4996d75-lkkmw                  1/1     Running   0          50s
knative-external-proxy-767dfd656c-wwv2z   1/1     Running   0          50s
knative-internal-proxy-6fdddcc6b5-7vqd8   1/1     Running   0          51s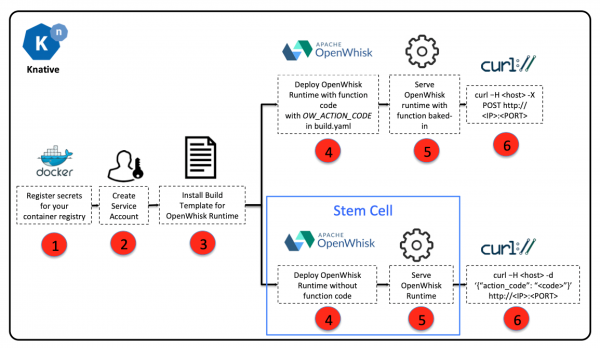
Building and Running OpenWhisk on Top of Knative
- Getting the Content :
$ git clone https://github.com/tektoncd/catalog/
$ cd catalog/openwhisk- Set environment variables for Docker Registry access and save them as a Kubernetes secret:
$ export DOCKER_USERNAME=
$ export DOCKER_PASSWORD=
$ sed -e 's/${DOCKER_USERNAME}/"$DOCKER_USERNAME"/' -e 's/${DOCKER_PASSWORD}/"$DOCKER_PASSWORD"/' docker-secret.yaml.tmpl > docker-secret.yaml
$ kubectl apply -f docker-secret.yaml
Checking:
$ kubectl get secret
NAME                    TYPE                                  DATA      AGE
dockerhub-user-pass kubernetes.io/basic-auth 2 21s- Create an account for building environments:
$ kubectl apply -f service-account.yamlChecking:
$ kubectl get serviceaccount/openwhisk-runtime-builder
NAME                        SECRETS   AGE
openwhisk-runtime-builder 2 31m- Create a task to build the image for OpenWhisk
$ kubectl apply -f openwhisk.yaml
task.tekton.dev/openwhisk created- Run the task to build the image (using NodeJS as an example):
Create the taskrun.yaml file with the content:
# Git Pipeline Resource for OpenWhisk NodeJS Runtime
apiVersion: tekton.dev/v1alpha1
kind: PipelineResource
metadata:
    name: openwhisk-nodejs-runtime-git
spec:
    type: git
    params:
        - name: revision
          value: master
        - name: url
          value: https://github.com/apache/openwhisk-runtime-nodejs.git
---

# Image Pipeline Resource for OpenWhisk NodeJS Sample Application
apiVersion: tekton.dev/v1alpha1
kind: PipelineResource
metadata:
    name: openwhisk-nodejs-helloworld-image
spec:
    type: image
    params:
        - name: url
          value: docker.io/${DOCKER_USERNAME}/openwhisk-nodejs-helloworld
---

# Task Run to build NodeJS image with the action source
apiVersion: tekton.dev/v1alpha1
kind: TaskRun
metadata:
    name: openwhisk-nodejs-helloworld
spec:
    serviceAccountName: openwhisk-runtime-builder
    taskRef:
        name: openwhisk
    inputs:
        resources:
            - name: runtime-git
              resourceRef:
                name: openwhisk-nodejs-runtime-git
        params:
            - name: DOCKERFILE
              value: "./runtime-git/core/nodejs10Action/knative/Dockerfile"
            - name: OW_ACTION_NAME
              value: "nodejs-helloworld"
            - name: OW_ACTION_CODE
              value: "function main() {return {payload: 'Hello World!'};}"
            - name: OW_PROJECT_URL
              value: ""
    outputs:
        resources:
            - name: runtime-image
              resourceRef:
                name: openwhisk-nodejs-helloworld-image
---
Apply the updated data for this file:
$ sed 's/${DOCKER_USERNAME}/"$DOCKER_USERNAME"/' -i taskrun.yamlApply:
$ kubectl apply -f taskrun.yaml
pipelineresource.tekton.dev/openwhisk-nodejs-runtime-git created
pipelineresource.tekton.dev/openwhisk-nodejs-helloworld-image created
taskrun.tekton.dev/openwhisk-nodejs-helloworld created
Checking the operation involves getting the pod name and viewing its status. You can also check the log of each step, for example:
$ kubectl get taskrun
NAME                          SUCCEEDED   REASON      STARTTIME   COMPLETIONTIME
openwhisk-nodejs-helloworld   True        Succeeded   5m15s       44s
$ kubectl get pod openwhisk-nodejs-helloworld-pod-4640d3
NAME                                     READY   STATUS      RESTARTS   AGE
openwhisk-nodejs-helloworld-pod-4640d3   0/6     Completed   0          5m20s
$ kubectl logs openwhisk-nodejs-helloworld-pod-4640d3 -c step-git-source-openwhisk-nodejs-runtime-git-r8vhr
{"level":"info","ts":1576532931.5880227,"logger":"fallback-logger","caller":"logging/config.go:69","msg":"Fetch GitHub commit ID from kodata failed: open "/var/run/ko/refs/heads/master: no such file or directory"}
{"level":"info","ts":1576532936.538926,"logger":"fallback-logger","caller":"git/git.go:81","msg":"Successfully cloned https://github.com/apache/openwhisk-runtime-nodejs.git @ master in path /workspace/runtime-git"}
{"level":"warn","ts":1576532936.5395331,"logger":"fallback-logger","caller":"git/git.go:128","msg":"Unexpected error: creating symlink: symlink /tekton/home/.ssh /root/.ssh: file exists"}
{"level":"info","ts":1576532936.8202565,"logger":"fallback-logger","caller":"git/git.go:109","msg":"Successfully initialized and updated submodules in path /workspace/runtime-git"}
After completion, we will have an image in the Registry that can be deployed using the kn utility, which is designed for working with Knative services, for example:
kn service create nodejs-helloworld --image docker.io/${DOCKER_USERNAME}/openwhisk-nodejs-helloworld
Service 'nodejs-helloworld' successfully created in namespace 'default'.
Waiting for service 'nodejs-helloworld' to become ready ... OK

Service URL:
http://nodejs-helloworld.default.example.com
If using Gloo, functionality can be checked as follows:
$ curl -H "Host: nodejs-helloworld.default.example.com" -X POST $(glooctl proxy url --name knative-external-proxy)
{"OK":true}
$ curl -H "Host: nodejs-helloworld.default.example.com" -X POST $(glooctl proxy url --name knative-external-proxy)
{"payload":"Hello World!"}
Other cycle articles,
Source: habr.com
