

Virus analysts and cybersecurity researchers strive to collect as many samples of new botnets as possible. They use honeypots for this purpose.… But what if you want to observe malware in real-world conditions? Put your server or router at risk? What if you don't have a suitable device? These questions led me to create bhunter — a tool for gaining access to botnet nodes.
The main idea
There are many ways to spread malicious software to expand bot networks, ranging from phishing to exploiting 0-day vulnerabilities. However, the most common method remains brute-forcing SSH passwords.
The idea is very simple. If a node of the botnet is attempting to brute-force your server's password, it's likely that this node was itself compromised through simple password brute-forcing. Thus, to gain access to it, you need to respond in kind.
This is exactly how bhunter works. It listens on port 22 (the SSH service) and collects all the login attempts and passwords that try to connect to it. Then, using the collected passwords, it attempts to connect to the attacking nodes.
Operating Algorithm
The program can be conventionally divided into two main parts that operate in separate threads. The first part is the honeypot. It processes login attempts, collects unique logins and passwords (in this case, a login-password pair is considered a whole), and adds to a queue the IP addresses that attempted to connect for further attack.
The second part is directly responsible for the attack. The attack is performed in two modes: BurstAttack (queue-based attack) — brute-forcing logins and passwords from a common list, and SingleShotAttack (single shot attack) — brute-forcing passwords that were used by the attacked node but have not yet been added to the common list.
To have some base of logins and passwords immediately after startup, bhunter is initialized with a list from the file /etc/bhunter/defaultLoginPairs.
The PerformanceResourceTiming
Several ways to run bhunter are provided:
Simply with the command
sudo bhunterWhen launched this way, there is the option to manage bhunter through its text menu: add logins and passwords for the attack, export the database of logins and passwords, specify the target for the attack. All hacked nodes can be seen in the file /var/log/bhunter/hacked.log
Using tmux
sudo bhunter-ts # command to start bhunter via tmux
sudo tmux attach -t bhunter # connect to the session where bhunter is running
Tmux is a terminal multiplexer, a very convenient tool. It allows you to create multiple windows within a single terminal and split those windows into panes. By using it, you can exit the terminal and then re-enter without interrupting running processes.
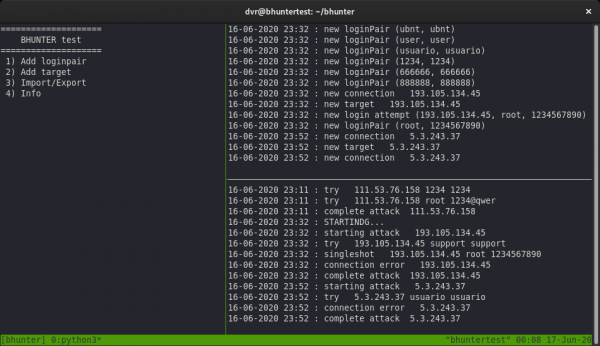
The bhunter-ts script creates a tmux session and splits the window into three panes. The largest one contains a text menu. The upper right pane displays the honeypot logs, where you can see messages about login attempts on the honeypot. The lower right pane shows information about the progress of attacks on botnet nodes and successful breaches.
The advantage of this method over the first one is that we can comfortably close the terminal and return to it later, while bhunter will continue its operation. For those who are not familiar with tmux, I suggest .
As a service
systemctl enable bhunter
systemctl start bhunter
In this case, we are enabling the autostart of bhunter when the system starts. This method does not allow interaction with bhunter, and the list of hacked nodes can be obtained from /var/log/bhunter/hacked.log
Effectiveness
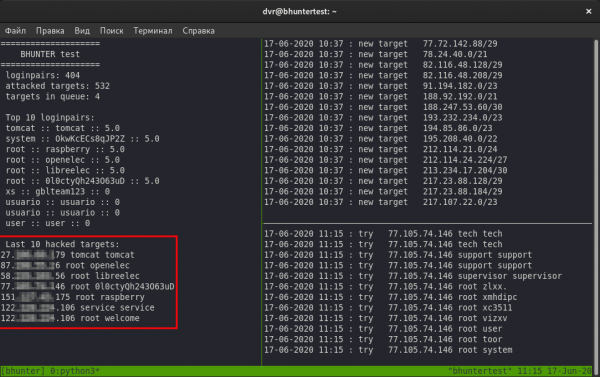
During my work on bhunter, I have managed to find and gain access to completely different devices: raspberry pi, routers (especially mikrotik), web servers, and once even a mining farm (unfortunately, access to it was only for a day, so no interesting story came from it). Here's a screenshot of the program showing the list of hacked nodes after several days of operation:
Unfortunately, the effectiveness of this tool did not meet my expectations: bhunter can spend several days brute-forcing passwords on nodes without success, or it can compromise several targets within a couple of hours. But for a regular influx of new botnet samples, this is sufficient.
Effectiveness is influenced by such parameters as: the country in which the server with bhunter is located, the hosting, and the range from which the IP address is allocated. In my experience, there was a case when I rented two virtual servers from the same host, and one of them was attacked by botnets twice as often.
Bugs that I haven't fixed yet
When attacking infected nodes, in some situations it's not possible to definitively determine whether the password was correct or not. Logging of such cases is maintained in the file /var/log/debug.log.
The Paramiko module, used for working with SSH, sometimes misbehaves: it goes into an infinite wait for a response from the node when trying to connect. I experimented with timers but did not achieve the desired result.
What else needs to be worked on?
Service name
According to RFC-4253, the client and server exchange service names implementing the SSH protocol before establishing a connection. This name is contained in the "SERVICE NAME" field, present in both the client request and server response. The field is a string, and its value can be obtained using Wireshark or Nmap. Here’s an example for OpenSSH:
$ nmap -p 22 ***.**.***.** -sV
Starting Nmap ...
PORT   STATE SERVICE VERSION
22/tcp open  ssh     <b>OpenSSH 7.9p1 Debian 10+deb10u2</b> (protocol 2.0)
Nmap done: 1 IP address (1 host up) scanned in 0.47 seconds
However, in the case of Paramiko, this field contains a string like "Paramiko Python sshd 2.4.2", which may deter botnets that are programmed to "avoid" traps. Therefore, I believe it is necessary to replace this string with something more neutral.
Other vectors
SSH is not the only means of remote administration. There are also Telnet and RDP. It’s worth taking a look at them as well.
Extension
It would be great to have several traps in different countries and centrally collect login credentials, passwords, and compromised nodes into a common database.
Where to download?
At the time of writing, only a test version is available for download from .
Source: habr.com
