

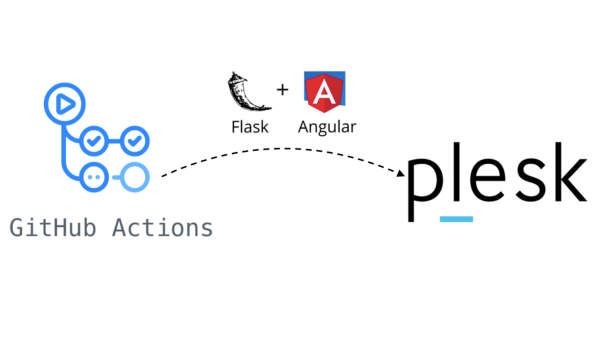
In this article, I will share my experience of setting up CI/CD using the Plesk Control Panel and Github Actions. Today we will learn how to deploy a simple project with the uncomplicated name "Helloworld". It is written in the Flask Python framework, with Celery workers and an Angular 8 frontend.
Links to repositories: , .
In the first part of the article, we will look at our project and its parts. In the second, we will figure out how to set up Plesk and install the necessary extensions and components (DB, RabbitMQ, Redis, Docker, etc.).
In the third part, we will finally figure out how to set up a pipeline for deploying our project to a server in a dev and prod environment. And then we will launch the site on the server.
And yes, I forgot to introduce myself. My name is Oleg Borzov, I'm a fullstack developer in the CRM team for mortgage managers at Domclick.
project Overview
First, let's look at two project repositories - backend and front - and go over the code.
Backend: Flask+Celery
For the back part, I took a bunch that is quite popular among Python developers: the Flask framework (for the API) and Celery (for the task queue). SQLAchemy is used as ORM. Alembic is used for migrations. For JSON validation in handles - Marshmallow.
В there is a Readme.md file with a detailed description of the structure and instructions for running the project.
quite uncomplicated, consists of 6 pens:
/ping- to check availability;- handles for registration, authorization, de-authorization and obtaining an authorized user;
- an email handle that puts a task in the Celery queue.
even easier, there is only one problem send_mail_task.
In the folder there are two subfolders:
dockerwith two Dockerfiles (base.dockerfileto build a rarely changing base image andDockerfilefor main assemblies);.env_files- with files with environment variables for different environments.
There are four docker-compose files at the root of the project:
docker-compose.local.db.ymlto raise a local database for development;docker-compose.local.workers.ymlfor local raising of the worker, database, Redis and RabbitMQ;docker-compose.test.ymlto run tests during deployment;docker-compose.ymlfor deployment.
And the last folder we are interested in - . It contains shell scripts for deployment:
deploy.sh— launch of migration and deployment. Runs on the server after building and running tests in Github Actions;rollback.sh- rollback of containers to the previous version of the assembly;curl_tg.sh- sending deployment notifications to Telegram.
Frontend on Angular
much simpler than Beck's. The front consists of three pages:
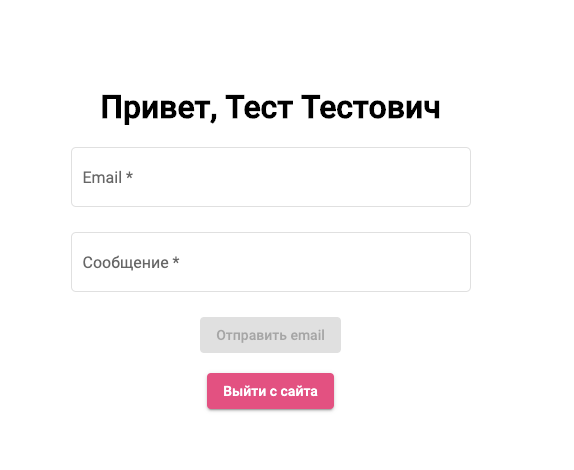
- Main page with a form for sending email and an exit button.
- Login page.
- Registration page.
The main page looks ascetic:
There are two files at the root Dockerfile и docker-compose.yml, as well as the familiar folder .ci-cd with slightly fewer scripts than in the back repository (removed scripts for running tests).
Starting a project in Plesk
Let's start by setting up Plesk and creating a subscription for our site.
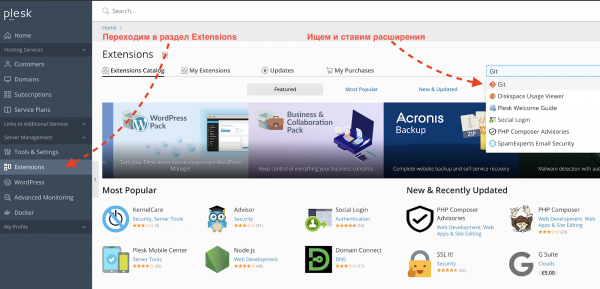
Installing extensions
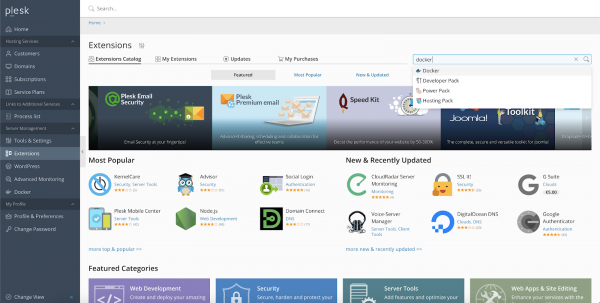
In Plesk, we need four extensions:
Dockerto manage and visually display the status of containers in the Plesk admin panel;Gitto configure the deployment step on the server;Let's Encryptto generate (and auto-renew) free TLS certificates;Firewallto configure filtering of incoming traffic.
You can install them through the Plesk admin panel in the Extensions section:
We will not consider the detailed settings for extensions, the default settings will do for our demo purposes.
Create a subscription and site
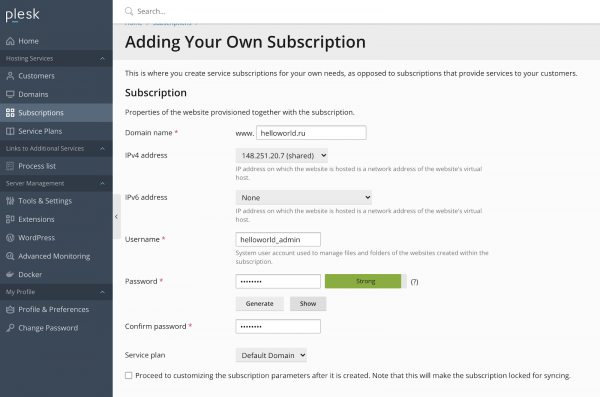
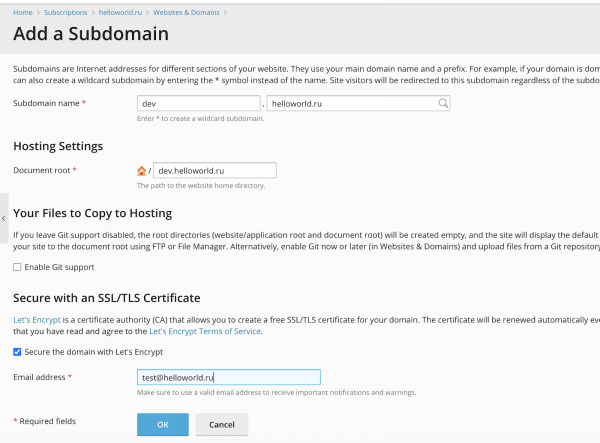
Next, we need to create a subscription for our helloworld.ru website and add the dev.helloworld.ru subdomain there.
- Create a subscription for the helloworld.ru domain and specify the login-password for the system user:
Check the box at the bottom of the page Secure the domain with Let's Encryptif we want to set up HTTPS for the site:
- Next, in this subscription, create a subdomain dev.helloworld.ru (for which you can also issue a free TLS certificate):
Installing Server Components
We have a server with OS Debian Stretch 9.12 and installed control panel Plesk Obsidian 18.0.27.
We need to install and configure for our project:
- PostgreSQL (in our case, there will be one server with two databases for dev and prod environments).
- RabbitMQ (same, same instance with different vhosts for environments).
- Two Redis instances (for dev and prod environments).
- Docker Registry (for local storage of built Docker images).
- UI for Docker registry.
PostgreSQL
Plesk already comes with PostgreSQL DBMS, but not the latest version (at the time of writing Plesk Obsidian Postgres versions 8.4–10.8). We want the latest version for our application (12.3 at the time of this writing), so we will install it manually.
Detailed instructions on installing Postgres on Debian there's plenty of it on the internet (), so I won’t describe them in detail, I’ll just give the commands:
wget -q https://www.postgresql.org/media/keys/ACCC4CF8.asc -O - | sudo apt-key add -
sudo sh -c 'echo "deb http://apt.postgresql.org/pub/repos/apt/ stretch-pgdg main" >> /etc/apt/sources.list.d/pgdg.list'

sudo apt-get update
sudo apt-get install postgresql postgresql-contrib
Considering that PostgreSQL has rather mediocre default settings, it is necessary to correct the configuration. This will help us : you need to drive in the parameters of your server and replace the settings in the file /etc/postgresql/12/main/postgresql.confto those offered. It should be noted here that such calculators are not a magic bullet, and the base should be tuned more precisely, based on your hardware, application, and query complexity. But this is enough to get started.
In addition to the settings proposed by the calculator, we also change in postgresql.confthe default port 5432 to another (in our example - 53983).
After changing the configuration file, restart postgresql-server with the command:
service postgresql restart
We have installed and configured PostgreSQL. Now let's create a database, users for dev and prod environments, and give users rights to manage the database:
$ su - postgres
postgres:~$ create database hw_dev_db_name;
CREATE DATABASE
postgres:~$ create user hw_dev_db_user with password 'hw_dev_db_password';
CREATE ROLE
postgres:~$ grant ALL privileges ON database hw_dev_db_name to hw_dev_db_user;
GRANT
postgres:~$ create database hw_prod_db_name;
CREATE DATABASE
postgres:~$ create user hw_prod_db_user with password 'hw_prod_db_password';
CREATE ROLE
postgres:~$ grant ALL privileges ON database hw_prod_db_name to hw_prod_db_user;
GRANT
Rabbit MQ
Let's move on to installing RabbitMQ, a message broker for Celery. It's installed on Debian It's quite simple:
wget https://packages.erlang-solutions.com/erlang-solutions_1.0_all.deb
sudo dpkg -i erlang-solutions_1.0_all.deb

sudo apt-get update
sudo apt-get install erlang erlang-nox

sudo add-apt-repository 'deb http://www.rabbitmq.com/debian/ testing main'
wget -O- https://www.rabbitmq.com/rabbitmq-release-signing-key.asc | sudo apt-key add -

sudo apt-get update
sudo apt-get install rabbitmq-server
After installation, we need to create vhosts, users and grant the necessary rights:
sudo rabbitmqctl add_user hw_dev_amqp_user hw_dev_amqp_password
sudo rabbitmqctl set_user_tags hw_dev_amqp_user administrator
sudo rabbitmqctl add_vhost hw_dev_vhost
sudo rabbitmqctl set_permissions -p hw_dev_vhost hw_dev_amqp_user ".*" ".*" ".*"

sudo rabbitmqctl add_user hw_prod_amqp_user hw_prod_amqp_password
sudo rabbitmqctl set_user_tags hw_prod_amqp_user administrator
sudo rabbitmqctl add_vhost hw_prod_vhost
sudo rabbitmqctl set_permissions -p hw_prod_vhost hw_prod_amqp_user ".*" ".*" ".*"
Redis
Now let's install and configure the last component for our application - Redis. It will be used as a backend for storing the results of Celery tasks.
We will raise two Docker containers with Redis for dev and prod environments using the extension Docker for Plesk.
- We go to Plesk, go to the Extensions section, look for the Docker extension and install it (we need a free version):
- Go to the installed extension, find the image through the search
redis bitnamiand install the latest version: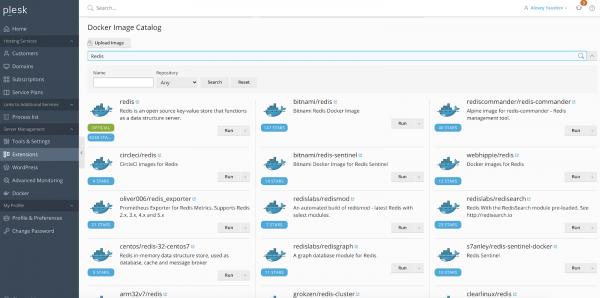
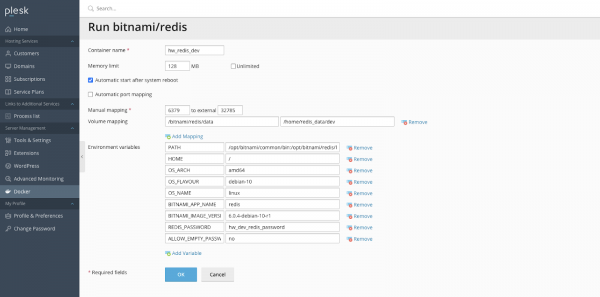
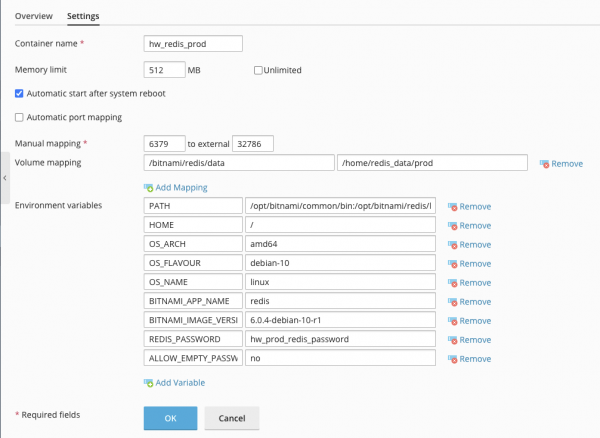
- We go into the downloaded container and adjust the configuration: specify the port, the maximum allocated RAM size, the password in the environment variables, and mount the volume:
- We perform steps 2-3 for the prod container, in the settings we only change the parameters: port, password, RAM size and path to the volume folder on the server:
Docker Registry
In addition to basic services, it would be nice to put your own Docker image repository on the server. Fortunately, server space is now quite cheap (certainly cheaper than a DockerHub subscription), and the process of setting up a private repository is very simple.
We want to have:
- password-protected Docker repository accessible on a subdomain ;
- UI for viewing images in the repository, available at .
To do this:
- Let's create two subdomains in Plesk in our subscription: docker.helloworld.ru and docker-ui.helloworld.ru, and configure Let's Encrypt certificates for them.
- Add the file to the docker.helloworld.ru subdomain folder
docker-compose.ymlwith content like this:version: "3" services: docker-registry: image: "registry:2" restart: always ports: - "53985:5000" environment: REGISTRY_AUTH: htpasswd REGISTRY_AUTH_HTPASSWD_REALM: basic-realm REGISTRY_AUTH_HTPASSWD_PATH: /auth/.htpasswd REGISTRY_STORAGE_FILESYSTEM_ROOTDIRECTORY: /data volumes: - ./.docker-registry.htpasswd:/auth/.htpasswd - ./data:/data docker-registry-ui: image: konradkleine/docker-registry-frontend:v2 restart: always ports: - "53986:80" environment: VIRTUAL_HOST: '*, https://*' ENV_DOCKER_REGISTRY_HOST: 'docker-registry' ENV_DOCKER_REGISTRY_PORT: 5000 links: - 'docker-registry' - Under SSH, we will generate the .htpasswd file for Basic authorization in the Docker repository:
htpasswd -bBc .htpasswd hw_docker_admin hw_docker_password - Collect and lift containers:
docker-compose up -d - And we need to redirect Nginx to our containers. This can be done through Plesk.
The following steps need to be done for the docker.helloworld.ru and docker-ui.helloworld.ru subdomains:
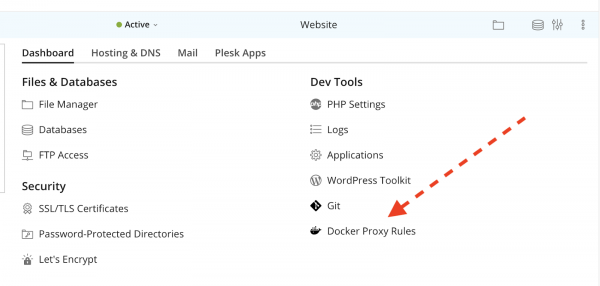
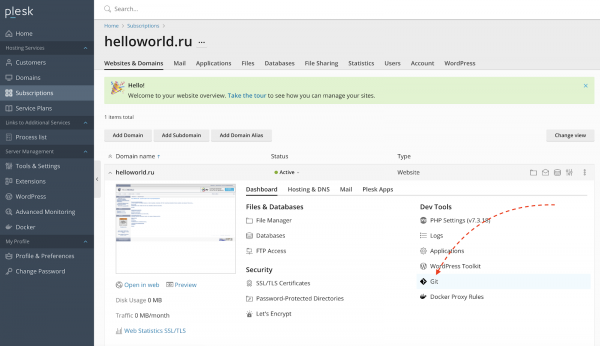
In the DevTools our site go to Docker Proxy Rules:
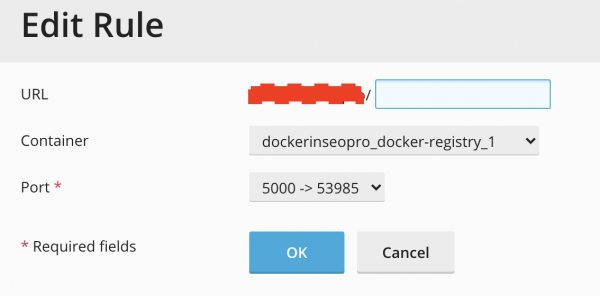
And add a rule to proxy incoming traffic to our container:
- We check that we can log in to our container from the local machine:
$ docker login docker.helloworld.ru -u hw_docker_admin -p hw_docker_password WARNING! Using --password via the CLI is insecure. Use --password-stdin. Login Succeeded - Let's also check the operation of the docker-ui.helloworld.ru subdomain:
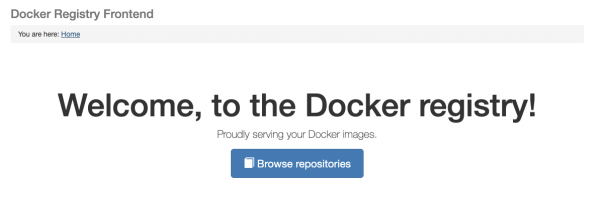
When you click on Browse repositories, the browser will display an authorization window where you will need to enter the username and password for the repository. After that, we will be transferred to a page with a list of repositories (for now, it will be empty for you):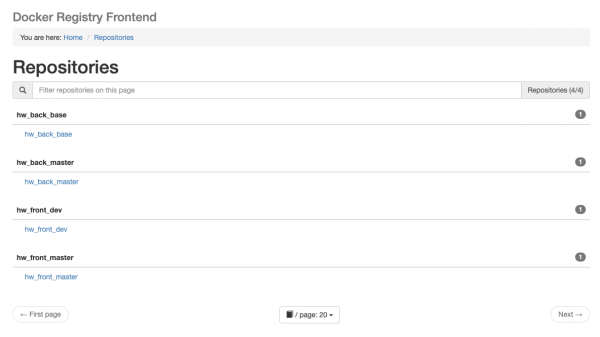
Opening ports in Plesk Firewall
After installing and configuring the components, we need to open ports so that the components are accessible from Docker containers and the external network.
Let's see how to do this using the Firewall extension for Plesk that we installed earlier.
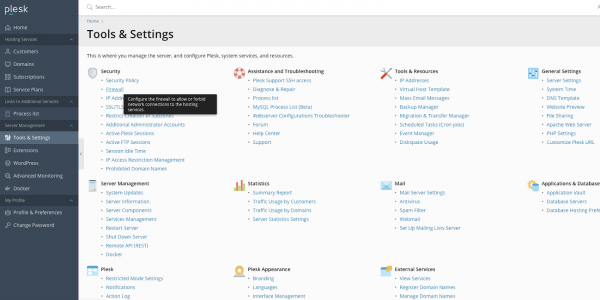
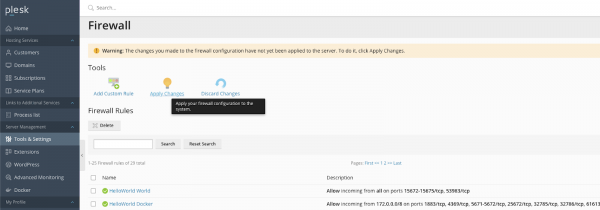
- We pass to Tools & Settings > Settings > Firewall:
- We pass to Modify Plesk Firewall Rules > Add Custom Rule and open the following TCP ports for the Docker subnet (172.0.0.0 / 8):
RabbitMQ: 1883, 4369, 5671-5672, 25672, 61613-61614
Redis: 32785, 32786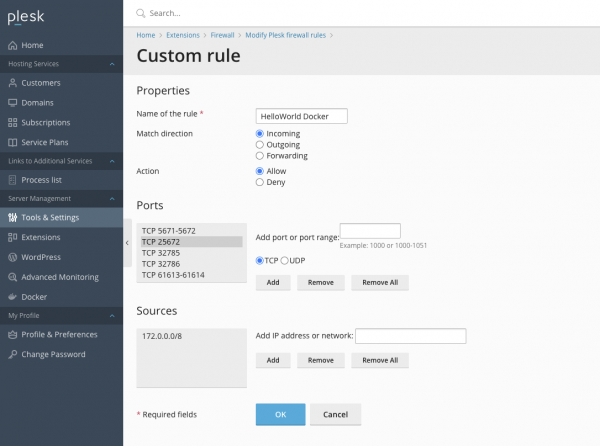
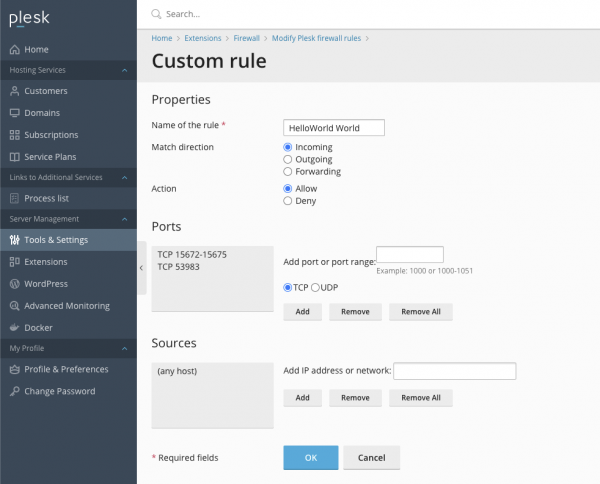
- We will also add a rule that will open PostgreSQL ports and RabbitMQ management panels to the outside world:
- Apply the rules using the Apply Changes button:
Setting up CI/CD in Github Actions
Let's get down to the most interesting part - setting up a continuous integration pipeline and delivering our project to the server.
This pipeline will consist of two parts:
- building an image and running tests (for the backend) - on the Github side;
- running migrations (for the backend) and deploying containers - on the server.
Deploy to Plesk
Let's deal with the second point first (because the first one depends on it).
We will configure the deployment process using the Git extension for Plesk.
Consider an example with a Prod environment for a Backend repository.
- We go to the subscription of our Helloworld website and go to the Git subsection:
- Insert a link to our Github repository into the "Remote Git repository" field and change the default folder
httpdocsto another (eg./httpdocs/hw_back):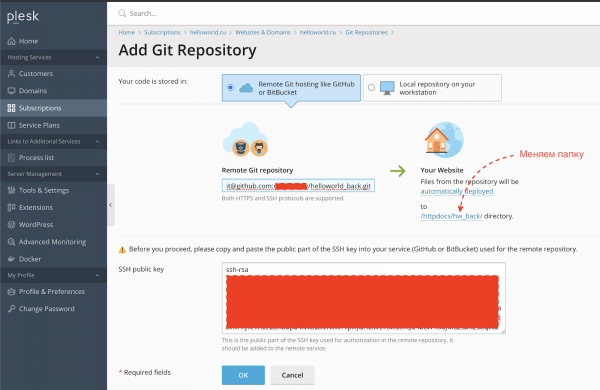
- Copy the SSH Public key from the previous step and its in Github settings.
- Click OK on the screen in step 2, after which we will be redirected to the repository page in Plesk. Now we need to configure the repository to be updated on commits to the master branch. To do this, go to Repository Settings and save the value
Webhook URL(we will need it later when setting up Github Actions):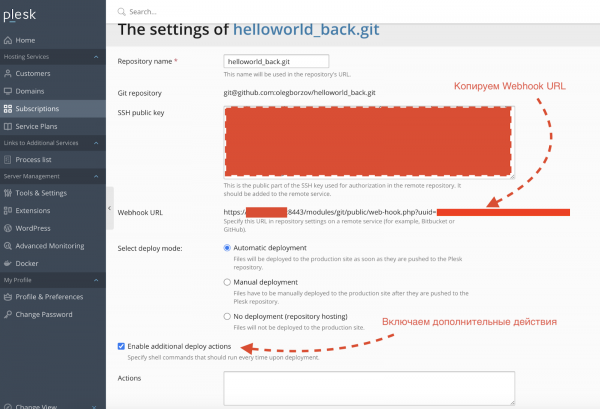
- In the Actions field on the screen from the previous paragraph, enter the script to launch the deployment:
cd {REPOSITORY_ABSOLUTE_PATH}
.ci-cd/deploy.sh {ENV} {DOCKER_REGISTRY_HOST} {DOCKER_USER} {DOCKER_PASSWORD} {TG_BOT_TOKEN} {TG_CHAT_ID}
where:
{REPOSITORY_ABSOLUTE_PATH}- path to the prod folder of the backend repository on the server;
{ENV}- environment (dev / prod), in our caseprod;
{DOCKER_REGISTRY_HOST}- the host of our docker repository
{TG_BOT_TOKEN}— Telegram bot token;
{TG_CHAT_ID}— ID of the chat/channel for sending notifications.Sample script:
cd /var/www/vhosts/helloworld.ru/httpdocs/hw_back/ .ci-cd/deploy.sh dev docker.helloworld.ru docker_user docker_password 12345678:AAbcdEfghCH1vGbCasdfSAs0K5PALDsaw -1001234567890 - We add a user from our subscription to the Docker group (so that he can manage containers):
sudo usermod -aG docker helloworld_admin
The dev environment for the backend repository and the frontend are set up in the same way.
Deployment pipeline in Github Actions
Let's move on to setting up the first part of our CI/CD pipeline in Github Actions.
Backend
The pipeline is described in .
But before parsing it, let's fill in the Secret variables we need in Github. To do this, go to Settings -> Secrets:
DOCKER_REGISTRY- the host of our Docker repository (docker.helloworld.ru);DOCKER_LOGIN- login to the Docker repository;DOCKER_PASSWORD- password to it;DEPLOY_HOST— host where the Plesk admin panel is available (example: : 8443 or :8443);DEPLOY_BACK_PROD_TOKEN- a token for deployment to the prod-repository on the server (we got it in Deployment in Plesk p. 4);DEPLOY_BACK_DEV_TOKEN- token for deployment to the dev repository on the server.
The deployment process is simple and consists of three main steps:
- building and publishing the image in our repository;
- running tests in a container based on a freshly built image;
- deployment to the desired environment depending on the branch (dev/master).
Frontend
little different from Beck's. It lacks a step with running tests and changes the names of tokens for deployment. Secrets for the front repository, by the way, need to be filled out separately.
Site setup
Proxying traffic through Nginx
Well, we've come to the end. It remains only to configure the proxying of incoming and outgoing traffic to our container through Nginx. We have already covered this process in step 5 of the Docker Registry setup. The same should be repeated for the back and front parts in dev and prod environments.
I will provide screenshots of the settings.
Backend

Frontend
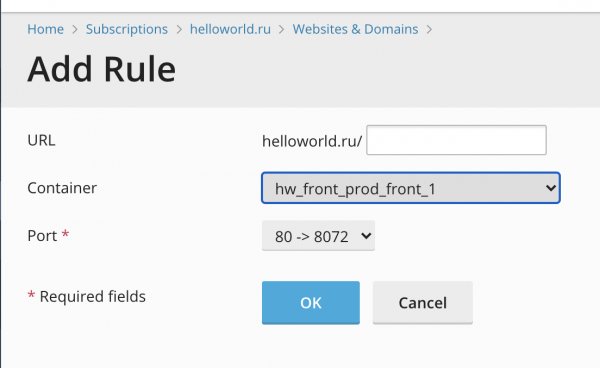
IMPORTANT UPDATE. All URLs will be proxied to the frontend container, except those starting with /api/ - they will be proxied to the back container (so in the back container, all handlers must start with /api/).
Conclusion
Now our site should be available at helloworld.ru and dev.helloworld.ru (prod- and dev-environments, respectively).
In total, we learned how to prepare a simple application in Flask and Angular and set up a pipeline in Github Actions to roll it out to a server running Plesk.
I will duplicate the links to the repositories with the code: , .
Source: habr.com
