

Welcome to the third post in the Cisco ISE series. Links to all articles in the series are given below:
In this post, you will dive into guest access, as well as a step-by-step guide to integrating Cisco ISE and FortiGate to configure FortiAP, an access point from Fortinet (in general, any device that supports RADIUS CoA — Change of Authorization).
Attached are our articles. .
NoteA: Check Point SMB devices do not support RADIUS CoA.
Wonderful describes in English how to create a guest access using Cisco ISE on a Cisco WLC (Wireless Controller). Let's figure it out!
1. Introduction
Guest access (portal) allows you to provide access to the Internet or to internal resources for guests and users that you do not want to let into your local network. There are 3 predefined types of guest portal (Guest portal):
Hotspot Guest portal - Access to the network is provided to guests without login data. Users are generally required to accept the company's "Use and Privacy Policy" before accessing the network.
Sponsored-Guest portal - access to the network and login data must be issued by the sponsor - the user responsible for creating guest accounts on Cisco ISE.
Self-Registered Guest portal - in this case, guests use existing login details, or create an account for themselves with login details, but sponsor confirmation is required to gain access to the network.
Multiple portals can be deployed on Cisco ISE at the same time. By default, in the guest portal, the user will see the Cisco logo and standard common phrases. All this can be customized and even set to view mandatory ads before gaining access.
Guest access setup can be broken down into 4 main steps: FortiAP setup, Cisco ISE and FortiAP connectivity, guest portal creation, and access policy setup.
2. Configuring FortiAP on FortiGate
FortiGate is an access point controller and all settings are made on it. FortiAP access points support PoE, so once you have connected it to the network via Ethernet, you can start setting up.
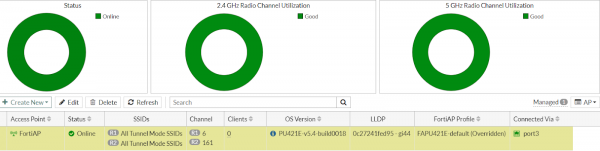
1) On FortiGate, go to the tab WiFi & Switch Controller > Managed FortiAPs > Create New > Managed AP. Using the access point's unique serial number, which is printed on the access point itself, add it as an object. Or it can show itself and then press Authorize using the right mouse button.
2) FortiAP settings can be default, for example, leave as in the screenshot. I highly recommend turning on the 5 GHz mode, because some devices do not support 2.4 GHz.
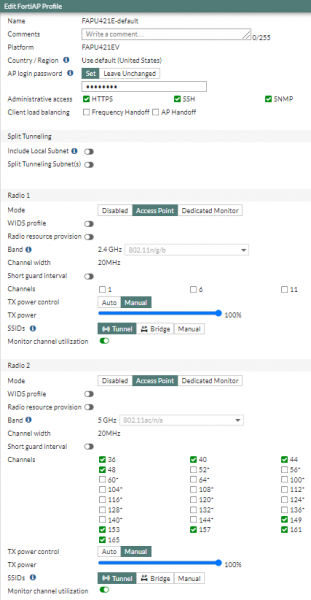
3) Then in tab WiFi & Switch Controller > FortiAP Profiles > Create New we are creating a settings profile for the access point (version 802.11 protocol, SSID mode, channel frequency and their number).
FortiAP settings example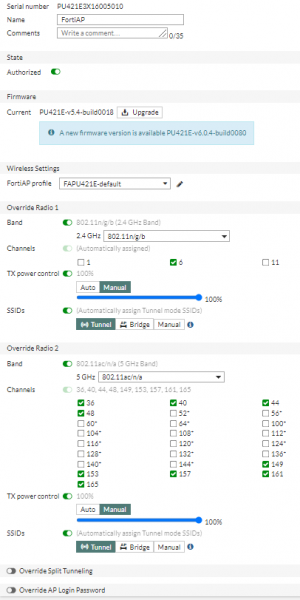
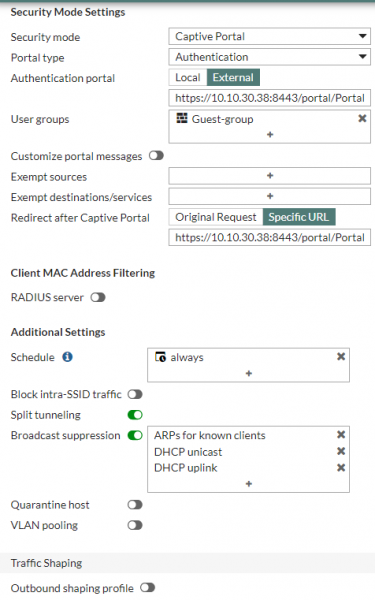
4) The next step is to create an SSID. Go to tab WiFi & Switch Controller > SSIDs > Create New > SSID. Here from the important one should be configured:
address space for guest WLAN - IP/Netmask
RADIUS Accounting and Secure Fabric Connection in the Administrative Access field
Device Detection option
SSID and Broadcast SSID option
Security Mode Settings > Captive Portal
Authentication Portal - External and insert a link to the created guest portal from Cisco ISE from step 20
User Group - Guest Group - External - add RADIUS to Cisco ISE (p. 6 onwards)
SSID setting example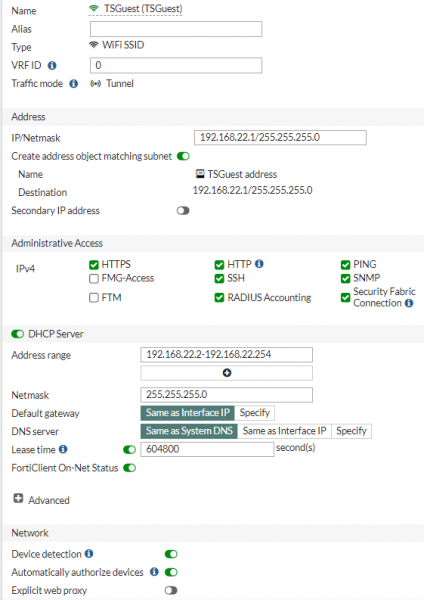
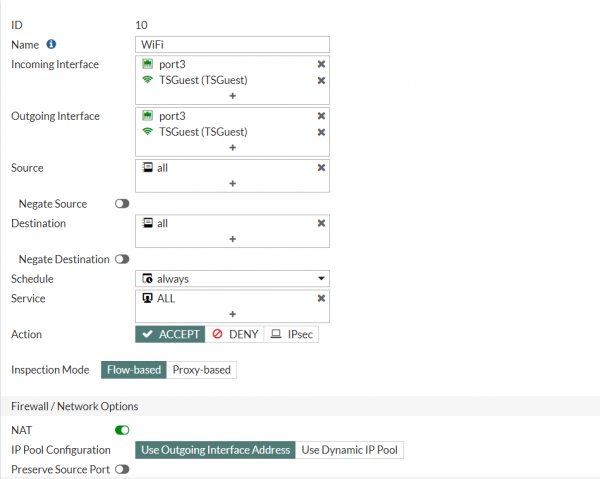
5) Then you should create rules in the access policy on FortiGate. Go to tab Policy & Objects > Firewall Policy and create a rule like this:
3. RADIUS setting
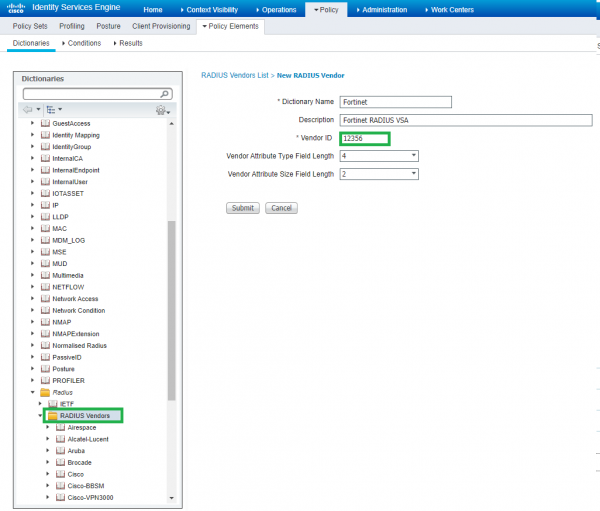
6) Go to the Cisco ISE web interface to the tab Policy > Policy Elements > Dictionaries > System > Radius > RADIUS Vendors > Add. In this tab, we will add Fortinet RADIUS to the list of supported protocols, since almost every vendor has its own specific attributes - VSA (Vendor-Specific Attributes).
A list of Fortinet RADIUS attributes can be found . VSAs are distinguished by their unique Vendor ID number. Fortinet has this ID = 12356... Full The VSA has been published by the IANA.
7) Set the name of the dictionary, specify Vendor ID (12356) and press Submit.
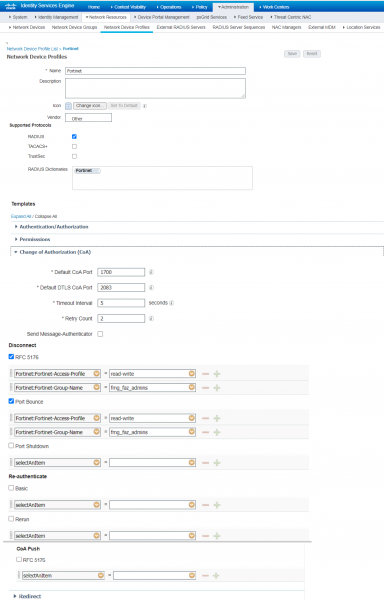
8) After we go to Administration > Network Device Profiles > Add and create a new device profile. In the RADIUS Dictionaries field, select the previously created Fortinet RADIUS dictionary and select the CoA methods to use later in the ISE policy. I chose RFC 5176 and Port Bounce (shutdown/no shutdown network interface) and the corresponding VSAs:
Fortinet-Access-Profile=read-write
Fortinet-Group-Name = fmg_faz_admins
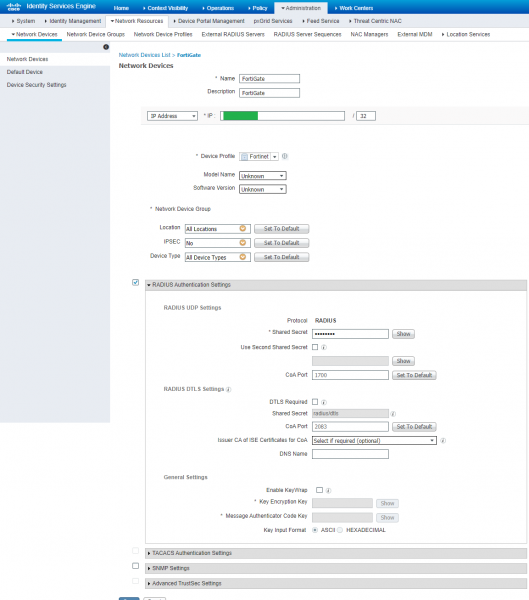
9) Next, add FortiGate for connectivity with ISE. To do this, go to the tab Administration > Network Resources > Network Device Profiles > Add. Fields to be changed Name, Vendor, RADIUS Dictionaries (IP Address is used by FortiGate, not FortiAP).
Example of configuring RADIUS from the ISE side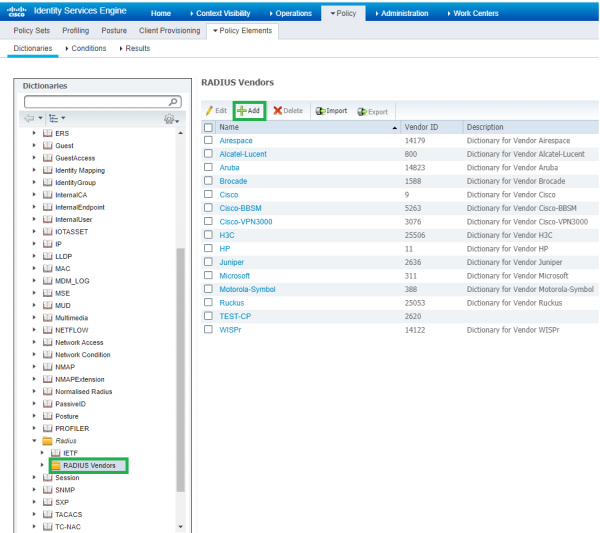
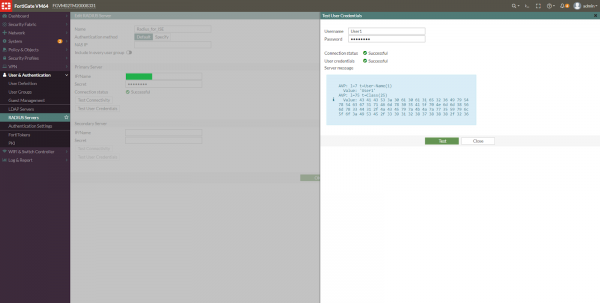
10) After that, you should configure RADIUS on the FortiGate side. In the FortiGate web interface, go to User & Authentication > RADIUS Servers > Create New. Specify the name, IP address and Shared secret (password) from the previous paragraph. Next click Test User Credentials and enter any credentials that can be pulled up via RADIUS (for example, a local user on the Cisco ISE).
11) Add a RADIUS server to the Guest-Group (if it doesn't exist) as well as an external source of users.
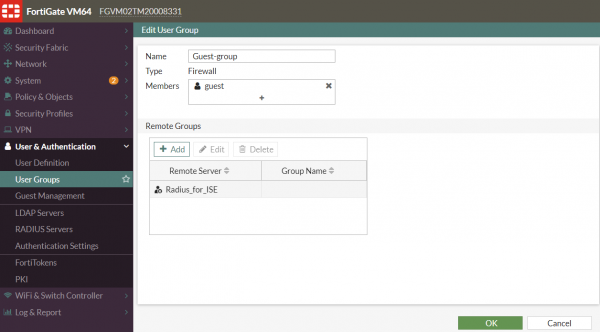
12) Don't forget to add the Guest-Group to the SSID we created earlier in step 4.
4. User Authentication Setting
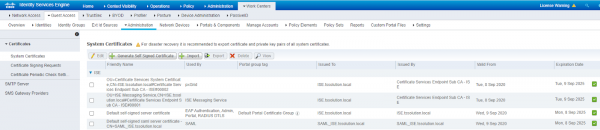
13) Optionally, you can import a certificate to the ISE guest portal or create a self-signed certificate in the tab Work Centers > Guest Access > Administration > Certification > System Certificates.
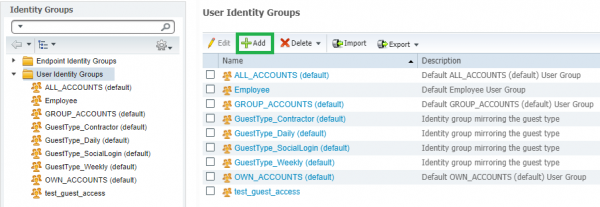
14) After in tab Work Centers > Guest Access > Identity Groups > User Identity Groups > Add create a new user group for guest access, or use the default ones.
15) Further in the tab Administration > Identities create guest users and add them to the groups from the previous paragraph. If you want to use third-party accounts, then skip this step.

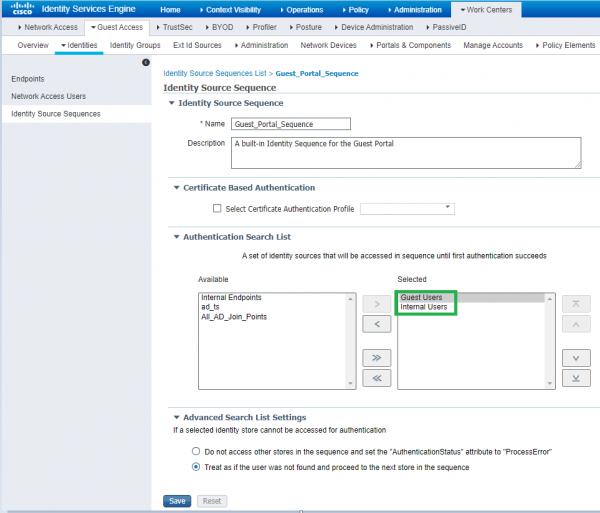
16) After we go to the settings Work Centers > Guest Access > Identities > Identity Source Sequence > Guest Portal Sequence this is the default authentication sequence for guest users. And in the field Authentication Search List select the user authentication order.
17) To notify guests with a one-time password, you can configure SMS providers or an SMTP server for this purpose. Go to tab Work Centers > Guest Access > Administration > SMTP Server or SMS Gateway Providers for these settings. In the case of an SMTP server, you need to create an account for the ISE and specify the data in this tab.
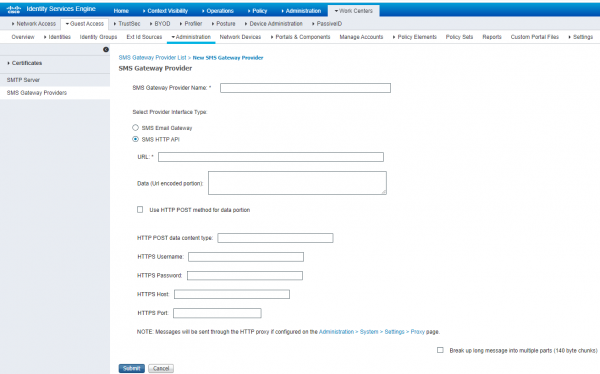
18) For SMS notifications, use the appropriate tab. ISE has pre-installed profiles of popular SMS providers, but it's better to create your own. Use these profiles as an example of setting SMS Email Gatewayy or SMS HTTP API.
An example of setting up an SMTP server and an SMS gateway for a one-time password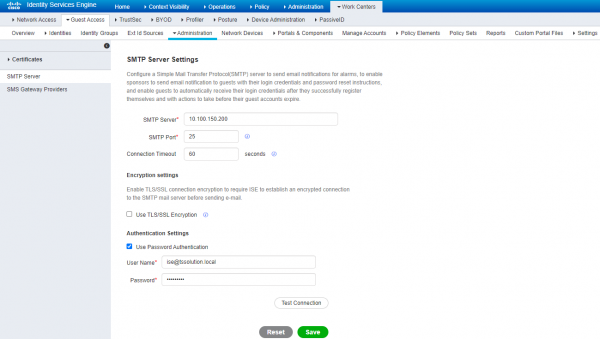
5. Setting up the guest portal
19) As mentioned at the beginning, there are 3 types of pre-installed guest portals: Hotspot, Sponsored, Self-Registered. I suggest choosing the third option, as it is the most common. Either way, the settings are largely identical. So let's go to the tab. Work Centers > Guest Access > Portals & Components > Guest Portals > Self-Registered Guest Portal (default).
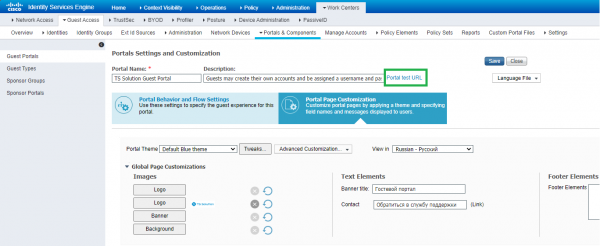
20) Next, in the Portal Page Customization tab, select “View in Russian - Russian”, so that the portal is displayed in Russian. You can change the text of any tab, add your logo, and more. On the right in the corner is a preview of the guest portal for a better view.
Example of configuring a guest portal with self-registration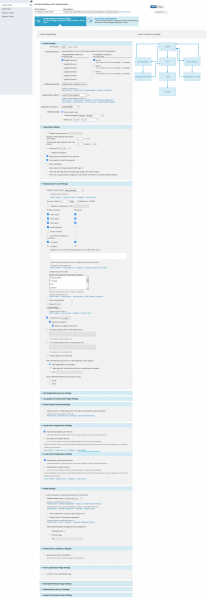

21) Click on a phrase Portal test URL and copy the portal URL to the SSID on the FortiGate in step 4. Sample URL
To display your domain, you must upload the certificate to the guest portal, see step 13.
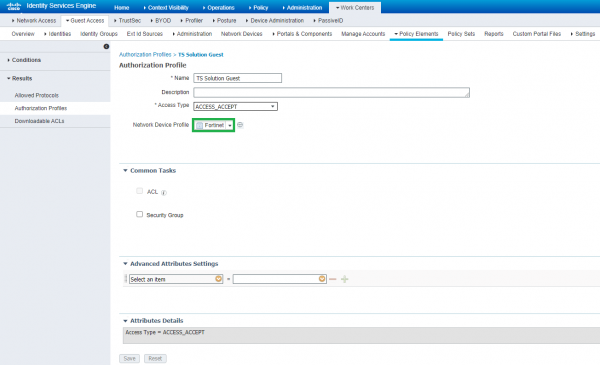
22) Go to tab Work Centers > Guest Access > Policy Elements > Results > Authorization Profiles > Add to create an authorization profile under the previously created one Network Device Profile.
23) In a tab Work Centers > Guest Access > Policy Sets edit the access policy for WiFi users.

![]()
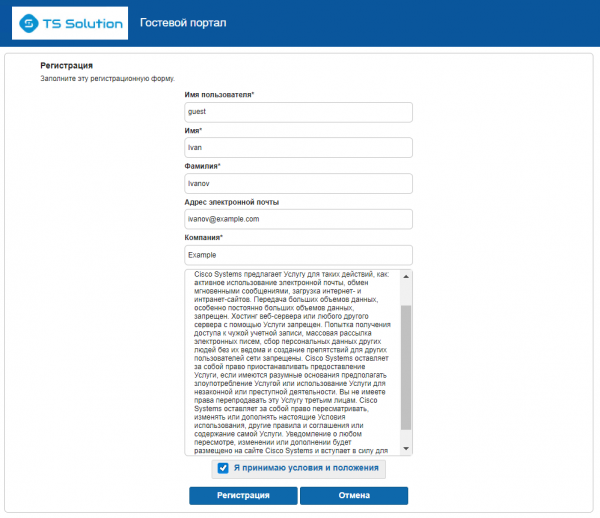
24) Let's try to connect to the guest SSID. It immediately redirects me to the login page. Here you can log in with the guest account created locally on the ISE, or register as a guest user.

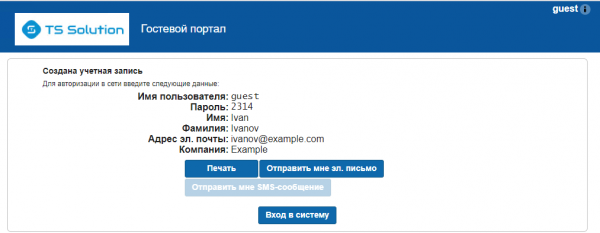
25) If you have chosen the self-registration option, then one-time login data can be sent by mail, via SMS, or printed.
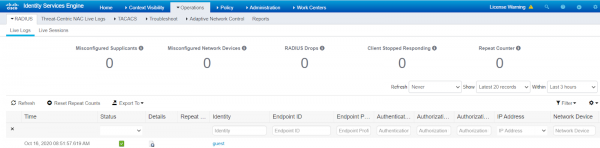
26) In the RADIUS > Live Logs tab on the Cisco ISE, you will see the corresponding login logs.
6. Заключение
In this long article, we have successfully configured guest access on Cisco ISE, where FortiGate acts as the access point controller, and FortiAP acts as the access point. It turned out a kind of non-trivial integration, which once again proves the widespread use of ISE.
To test Cisco ISE, contact and also stay tuned in our channels (, , , , ).
Source: habr.com
