

1. Introduction
Every company, even the smallest ones, needs to conduct authentication, authorization, and accounting for users (the AAA protocols). At the initial stage, AAA is quite well implemented using protocols like RADIUS, TACACS+, and DIAMETER. However, as the number of users and the company grows, so do the challenges: maximum visibility of hosts and BYOD devices, multifactor authentication, creating multilayered access policies, and much more.
For such tasks, the NAC (Network Access Control) solutions class is a perfect fit — controlling network access. In this series of articles dedicated to (Identity Services Engine) — a NAC solution for providing context-aware access control to users in the internal network, we will thoroughly examine the architecture, initialization, configuration, and licensing of the solution.
Just to remind you, Cisco ISE allows you to:
Quickly and easily create guest access in a dedicated WLAN;
Detect BYOD devices (e.g., employees' home PCs they bring to work);
Centralize and apply security policies to both domain and non-domain users using SGT (Security Group Tag) group labels technology of );
Check computers for the presence of specific software and compliance with standards (posturing);
Classify and profile endpoint and network devices;
Provide visibility into endpoint devices;
Send logon/logoff event logs of users, their identities to the NGFW to create user-based policies;
Natively integrate with Cisco StealthWatch and quarantine suspicious hosts involved in security incidents ();
And other standard features for an AAA server.
Colleagues in the industry have already written about Cisco ISE, so I recommend checking out: ,.
2. Architecture
In the architecture of the Identity Services Engine, there are four entities (nodes): the Policy Administration Node (PAN), the Policy Service Node (PSN), the Monitoring Node (MnT), and the PxGrid Node. Cisco ISE can be installed as standalone or distributed. In the standalone configuration, all entities reside on a single virtual machine or physical server (Secure Network Servers — SNS), while in the distributed setup, the nodes are spread across different devices.
The Policy Administration Node (PAN) is a mandatory node that allows for all administrative operations on Cisco ISE. It handles all system configurations related to AAA. In a distributed configuration (nodes can be installed as separate virtual machines), you can have a maximum of two PANs for redundancy — Active/Standby mode.
The Policy Service Node (PSN) is a mandatory node that provides network access, state, guest access, client service provisioning, and profiling. The PSN evaluates and applies the policies. Typically, multiple PSNs are installed, especially in a distributed configuration, for redundancy and distributed operation. These nodes are generally installed in different segments to ensure authenticated and authorized access at all times.
The Monitoring Node (MnT) is a mandatory node that stores event logs, logs from other nodes, and policies in the network. The MnT node provides advanced tools for monitoring and troubleshooting, collects and correlates various data, and also provides comprehensive reports. Cisco ISE allows for a maximum of two MnT nodes, thus establishing redundancy — Active/Standby mode. However, both nodes collect logs, both the active and the passive.
The PxGrid Node (PXG) is a node that implements the PxGrid protocol and facilitates communication between other devices that support PxGrid.
A protocol that provides integration of IT and security infrastructure products from different vendors: monitoring systems, intrusion detection and prevention systems, security policy management platforms, and many other solutions. Cisco PxGrid allows for one-way or two-way context exchange with multiple platforms without the need for using APIs, thereby facilitating the technology. (SGT tags), modify and apply ANC (Adaptive Network Control) policy, and perform profiling – determining device model, OS, location, and more.
In a high availability configuration, PxGrid nodes replicate information between nodes via PAN. If the PAN is disconnected, the PxGrid node stops authenticating, authorizing, and accounting users.
The schematic below illustrates the operation of various Cisco ISE entities in a corporate network.
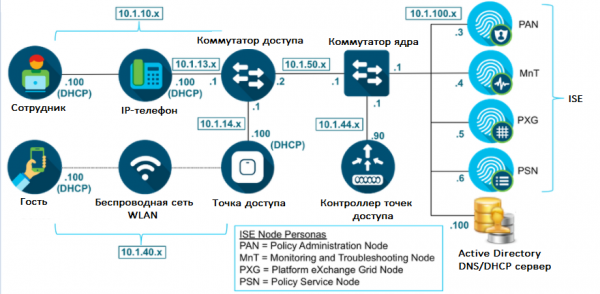 Figure 1. Cisco ISE Architecture
3. Requirements
Cisco ISE can be deployed, like most modern solutions, either virtually or physically as a standalone server.
Physical devices with Cisco ISE software installed are called SNS (Secure Network Server). There are three models: SNS-3615, SNS-3655, and SNS-3695 for small, medium, and large businesses. See the information in Table 1 from SNS.
Table 1. Comparative table of SNS for different scales
Parameter
SNS 3615 (Small)
SNS 3655 (Medium)
SNS 3695 (Large)
Number of supported endpoints in Standalone installation
10000
25000
50000
Number of supported endpoints for each PSN
10000
25000
100000
CPU (Intel Xeon 2.10 GHz)
8 cores
12 cores
12 cores
RAM
32 GB (2 x 16 GB)
96 GB (6 x 16 GB)
256 GB (16 x 16 GB)
HDD
1 x 600 GB
4 x 600 GB
8 x 600 GB
Hardware RAID
No
RAID 10, presence of RAID controller
RAID 10, presence of RAID controller
Network Interfaces
2 x 10Gbase-T
4 x 1Gbase-T
2 x 10Gbase-T
4 x 1Gbase-T
2 x 10Gbase-T
4 x 1Gbase-T
Regarding virtual deployments, VMware ESXi hypervisors are supported (minimum VMware version 11 recommended for ESXi 6.0), Microsoft Hyper-V, and Linux KVM (RHEL 7.0). Resources should be approximately the same as in the table above or greater. However, the minimum virtual machine requirements for small businesses are: 2 CPUs with a frequency of 2.0 GHz and above, 16 GB RAM and 200 GB HDD.
For further details on deploying Cisco ISE, please contact or refer to , .
4. Installation
Like most other Cisco products, ISE can be tested in several ways:
– cloud service with pre-installed lab templates (a Cisco account is required);
– request from Cisco for specific software (method for partners). You create a case with the following typical description: Product type [ISE], ISE Software [ise-2.7.0.356.SPA.x8664], ISE Patch [ise-patchbundle-2.7.0.356-Patch2-20071516.SPA.x8664];
— contact any authorized partner to conduct a free pilot project.
1) After creating a virtual machine, if you requested an ISO file instead of an OVA template, a window will appear where ISE requires you to choose an installation. For this, instead of a login and password, you should type “setup«!
Note: if you deployed ISE from an OVA template, then the login details admin / MyIseYPass2 (this and much more is specified in the official ).
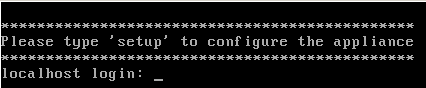 Figure 2. Installing Cisco ISE
2) Next, you should fill in the necessary fields, such as IP address, DNS, NTP, and others.
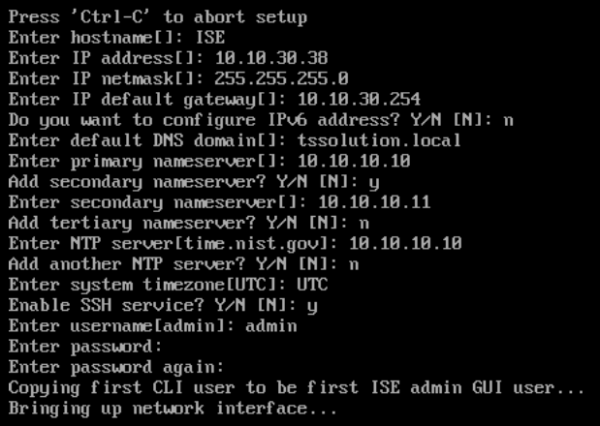 Figure 3. Initializing Cisco ISE
3) After that, the device will restart, and you will be able to connect via the web interface using the previously assigned IP address.
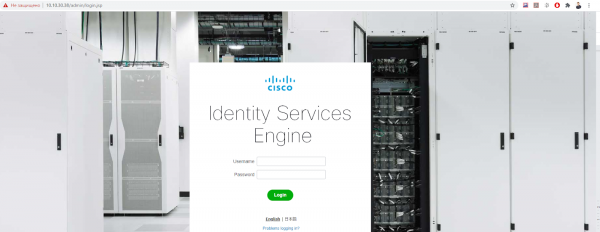 Figure 4. Cisco ISE Web Interface
4) In the tab Administration > System > Deployment you can select which nodes (entities) are included on each device. The PxGrid node is enabled here.
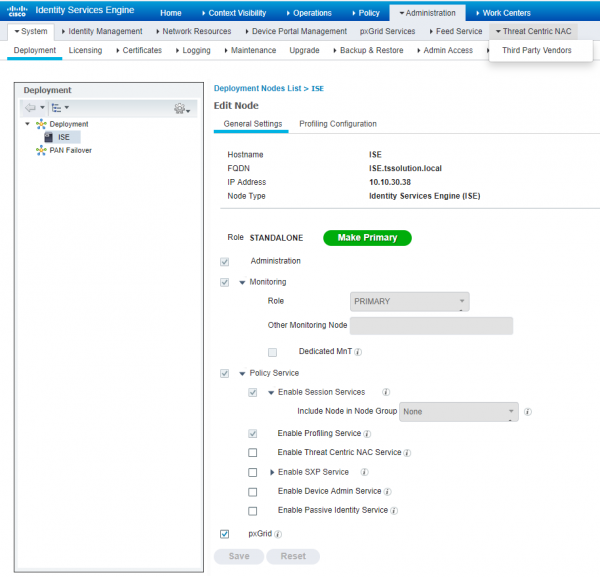 Figure 5. Cisco ISE Entity Management
5) Then in the tab Administration > System > Admin Access > Authentication I recommend configuring the password policy, authentication method (certificate or password), account expiration, and other settings.
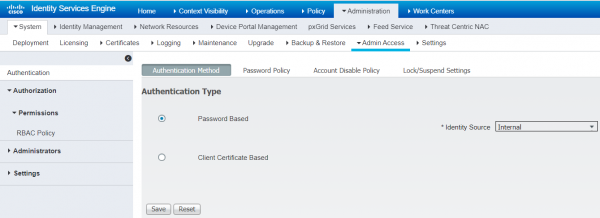 Figure 6. Configuring Authentication Type
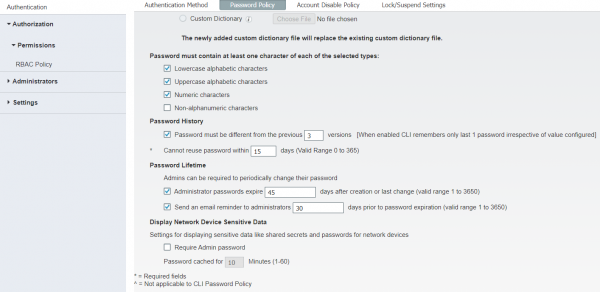 Figure 7. Password Policy Settings
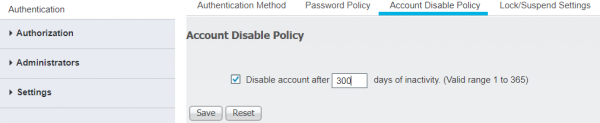 Figure 8. Configuring Account Disablement after Expiration
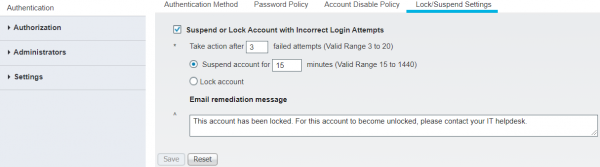 Figure 9. Configuring Account Lockout
6) In the tab Administration > System > Admin Access > Administrators > Admin Users > Add you can create a new administrator.
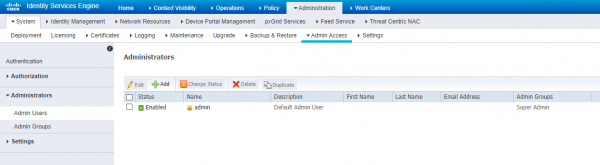 Figure 10. Creating a Local Administrator for Cisco ISE
7) The new administrator can be made part of a new group or already pre-installed groups. Managing administrator groups is done in the same panel under the tab Admin Groups. Table 2 provides information about ISE administrators, their rights, and roles.
Table 2. Cisco ISE Administrator Groups, Access Levels, Permissions, and Restrictions
Administrator Group Name
Permissions
Restrictions
Customization Admin
Customization of guest and sponsor portals, administration and customization
Inability to modify policies, view reports
Helpdesk Admin
Ability to view the main dashboard, all reports, alarms, and troubleshoot streams
Cannot modify, create, or delete reports, alarms, and authentication logs
Identity Admin
Management of users, privileges, and roles, ability to view logs, reports, and alarms
Cannot modify policies, perform OS-level tasks
MnT Admin
Full monitoring, reports, alarms, logs, and management
Inability to modify any policies
Network Device Admin
Rights to create, modify ISE objects, view logs, reports, and the main dashboard
Cannot modify policies, perform OS-level tasks
Policy Admin
Complete management of all policies, modification of profiles, settings, and viewing reports
Inability to perform settings with credentials, ISE objects
RBAC Admin
All settings in the Operations tab, ANC policy configuration, report management
Cannot modify any policies other than ANC, perform OS-level tasks
Super Admin
Rights to all settings, reporting and management, can delete and modify administrator credentials
Cannot change or delete another profile from the Super Admin group
System Admin
All settings in the Operations tab, system settings management, ANC policy, report viewing
Cannot modify any policies other than ANC, perform OS-level tasks
External RESTful Services (ERS) Admin
Full access to Cisco ISE REST API
For authorization only, management of local users, hosts, and security groups (SG)
External RESTful Services (ERS) Operator
Read rights to Cisco ISE REST API
For authorization only, management of local users, hosts, and security groups (SG)
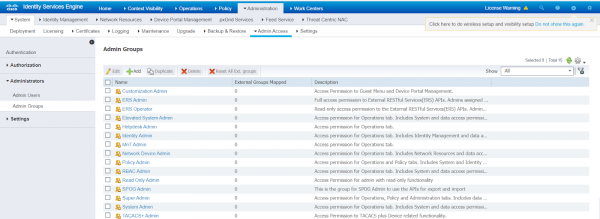 Figure 11. Predefined administrator groups in Cisco ISE
8) Additionally in the tab Authorization > Permissions > RBAC Policy you can edit the rights of predefined administrators.
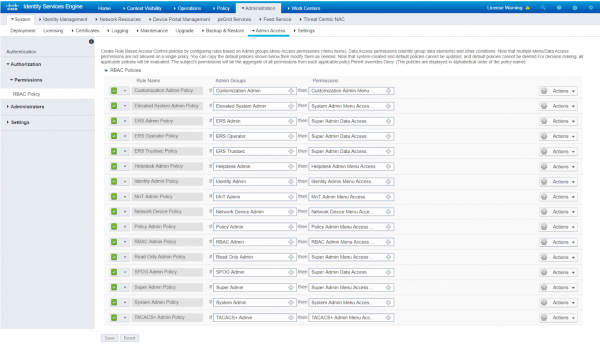 Figure 12. Management of rights for predefined administrator profiles in Cisco ISE
9) In the tab Administration > System > Settings all system settings (DNS, NTP, SMTP, and others) are available. You can fill them in here if you missed them during the initial device initialization.
5. Conclusion
This concludes the first article. We discussed the effectiveness of the Cisco ISE NAC solution, its architecture, minimum requirements, and deployment options, as well as the initial installation.
In the next article, we will look at account creation, integration with Microsoft Active Directory, and guest access creation.
If you have any questions on this topic or need assistance in testing the product, feel free to reach out at .
Stay updated through our channels (, , , , ).
Source: habr.com
