

Hello! My name is Sergey, I'm a DevOps at Surf. The DevOps department at Surf aims not only to establish interaction between specialists and integrate workflows but also to actively research and implement contemporary technologies both in its own infrastructure and in the client's infrastructure.
Below, I will tell you a bit about the changes in the technology stack for containers that we encountered while studying the distribution. CentOS 8 and what CRI-O is and how to quickly set up an execution environment for Kubernetes.
Why Docker is missing from the standard installation of CentOS 8
After installing the latest major releases, RHEL 8 or CentOS 8 one cannot help but notice: in these distributions and official repositories, the application Docker, which ideologically and functionally replaces the packages Podman, Buildah (available in the distribution by default) and CRI-O. This is related to the practical implementation of standards developed, including by Red Hat, within the Open Container Initiative (OCI) project.
The goal of OCI, part of The Linux Foundation, is to create open industry standards for container formats and execution environments that address several tasks at once. First, they should not contradict the philosophy of Linux (for instance, in that aspect where each program should perform a single action, rather than being a Docker jack-of-all-trades). Second, they should eliminate existing shortcomings in the software. DockerThird, they should be fully compatible with the business requirements posed by leading commercial platforms for deploying, managing, and maintaining containerized applications (e.g., Red Hat OpenShift).
Disadvantages Docker The advantages of the new software have already been quite thoroughly described in , and detailed descriptions of everything offered within the OCI project stack and its architectural features can be found in the official documentation and articles from Red Hat itself (a good in the Red Hat blog), as well as in third-party .
It is important to note the functionalities of the components of the proposed stack:
- Podman — direct interaction with containers and image storage via the runC process;
- Buildah — building and uploading images to the registry;
- CRI-O — an execution environment for container orchestration systems (e.g., Kubernetes).
I think it makes sense to provide here a diagram of the relationships for understanding the overall interaction scheme between the stack components. Kubernetes c runC and low-level libraries using CRI-O:
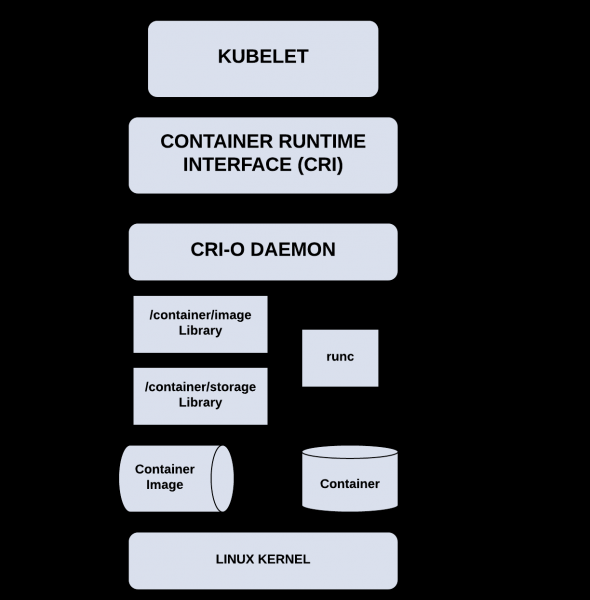
CRI-O and Kubernetes are aligned to the same release and support cycle (the compatibility matrix is very simple: major versions Kubernetes and CRI-O match), and considering the focus on comprehensive testing of this stack by the developers, we are entitled to expect maximum achievable stability in operation under any usage scenarios (the relative lightweight nature CRI-O compared to Docker due to a purposeful limitation of functionality).
During the installation Kubernetes the "right way" (according to OCI, of course) using CRI-O to CentOS 8 we faced some minor difficulties that we successfully overcame. I would be happy to share with you the installation and configuration instructions, which will take about 10 minutes in total.
How to deploy Kubernetes on CentOS 8 using the CRI-O environment
Prerequisites: at least one host (2 cores, 4 GB RAM, at least 15 GB storage) with installed CentOS 8 (the "Server" installation profile is recommended), as well as an entry for it in the local DNS (in extreme cases, an entry in /etc/hosts will suffice). And don't forget to .
All operations on the host are performed as the root user; please be careful.
- In the first step, we will configure the OS, install and set up the prerequisites for CRI-O.
- Let's update the OS:
dnf -y update
- Next, we need to configure the firewall and SELinux. Here, everything depends on the environment in which our host or hosts will operate. You can either configure the firewall according to the recommendations from , or if you are on a trusted network or are using a third-party firewall, change the default zone to trusted or disable the firewall:
firewall-cmd --set-default-zone trusted

firewall-cmd --reload
To disable the firewall, you can use the following command:
systemctl disable --now firewalldSELinux needs to be disabled or set to "permissive" mode:
setenforce 0

sed -i 's/^SELINUX=enforcing$/SELINUX=permissive/' /etc/selinux/config
- we will load the necessary kernel modules and packages, and configure the automatic loading of the "br_netfilter" module at system start:
modprobe overlay

modprobe br_netfilter

echo "br_netfilter" >> /etc/modules-load.d/br_netfilter.conf

dnf -y install iproute-tc
- To activate packet forwarding and ensure correct traffic processing, we will make the appropriate settings:
cat > /etc/sysctl.d/99-kubernetes-cri.conf <<EOF
net.bridge.bridge-nf-call-iptables = 1
net.ipv4.ip_forward = 1
net.bridge.bridge-nf-call-ip6tables = 1
EOF
We will apply the made settings:
sysctl --system
- We will set the required version CRI-O (major version CRI-O, as previously mentioned, matches the required version Kubernetes), since the latest stable version Kubernetes currently is 1.18:
export REQUIRED_VERSION=1.18We will add the necessary repositories:
dnf -y install 'dnf-command(copr)'

dnf -y copr enable rhcontainerbot/container-selinux

curl -L -o /etc/yum.repos.d/devel:kubic:libcontainers:stable.repo https://download.opensuse.org/repositories/devel:kubic:libcontainers:stable/CentOS_8/devel:kubic:libcontainers:stable.repo

curl -L -o /etc/yum.repos.d/devel:kubic:libcontainers:stable:cri-o:$REQUIRED_VERSION.repo https://download.opensuse.org/repositories/devel:kubic:libcontainers:stable:cri-o:$REQUIRED_VERSION/CentOS_8/devel:kubic:libcontainers:stable:cri-o:$REQUIRED_VERSION.repo
- now we can install CRI-O:
dnf -y install cri-oNote the first nuance we encounter during installation: it is necessary to edit the configuration CRI-O before starting the service, as the required component conmon is located in a different place than specified:
sed -i 's//usr/libexec/crio/conmon//usr/bin/conmon/' /etc/crio/crio.confNow we can activate and start the daemon CRI-O:
systemctl enable --now crioYou can check the daemon status:
systemctl status crio
- Let's update the OS:
- Installation and activation Kubernetes.
- We will add the required repository:
cat < /etc/yum.repos.d/kubernetes.repo
[kubernetes]
name=Kubernetes
baseurl=https://packages.cloud.google.com/yum/repos/kubernetes-el7-$basearch
enabled=1
gpgcheck=1
repo_gpgcheck=1
gpgkey=https://packages.cloud.google.com/yum/doc/yum-key.gpg https://packages.cloud.google.com/yum/doc/rpm-package-key.gpg
exclude=kubelet kubeadm kubectl
EOF
Now we can install Kubernetes (version 1.18, as mentioned above):
dnf install -y kubelet-1.18* kubeadm-1.18* kubectl-1.18* --disableexcludes=kubernetes
- The second important nuance: since we are not using the daemon Docker, but using the daemon CRI-O, before starting and initializing Kubernetes it is necessary to make the corresponding settings in the configuration file /var/lib/kubelet/config.yaml, after creating the required directory:
mkdir /var/lib/kubelet

cat < /var/lib/kubelet/config.yaml
apiVersion: kubelet.config.k8s.io/v1beta1
kind: KubeletConfiguration
cgroupDriver: systemd
EOF
- The third important point we encounter during installation: despite the fact that we specified the used driver cgroup, and its configuration through the arguments provided kubelet is deprecated (as clearly stated in the documentation), we need to add arguments to the file, otherwise our cluster will not initialize:
cat /dev/null > /etc/sysconfig/kubelet

cat < /etc/sysconfig/kubelet
KUBELET_EXTRA_ARGS=--container-runtime=remote --cgroup-driver=systemd --container-runtime-endpoint='unix:///var/run/crio/crio.sock'
EOF
- Now we can activate the daemon kubelet:
sudo systemctl enable --now kubeletTo configure control-plane or worker nodes in just a few minutes, you can use .
- We will add the required repository:
- It's time to initialize our cluster.
- To initialize the cluster, run the command:
kubeadm init --pod-network-cidr=10.244.0.0/16Be sure to write down the cluster join command "kubeadm join …" provided at the end of the output, or at least the specified tokens.
- Let's install a CNI plugin for Pod network functionality. I recommend using Calico. Perhaps a more popular Flannel has compatibility issues with nftables, and Calico is the only CNI implementation recommended and fully tested by the Kubernetes:
kubectl --kubeconfig /etc/kubernetes/admin.conf apply -f https://docs.projectcalico.org/v3.15/manifests/calico.yaml
- To connect the worker node to our cluster, it needs to be configured according to steps 1 and 2, or use , then execute the command from the output "kubeadm init …" that we wrote down in the previous step:
kubeadm join $CONTROL_PLANE_ADDRESS:6443 --token $TOKEN
    --discovery-token-ca-cert-hash $TOKEN_HASH
- Let's check that our cluster is initialized and up and running:
kubectl --kubeconfig=/etc/kubernetes/admin.conf get pods -A
Done! You can now run workloads on your K8s cluster.
- To initialize the cluster, run the command:
What's next
I hope the above guide has saved you some time and stress.
The outcome of processes occurring in the industry often depends on how they are received by the majority of end users and developers of other software in the corresponding niche. It’s still unclear what the initiatives from OCI will lead to in a few years, but we will happily keep an eye on that. You can share your thoughts right now in the comments.
Stay tuned!
This article was made possible by the following sources:
- The section on Container runtimes in
- Articles on Red Hat blogs:
- like this one , Hello! My name is Sergey, I am a DevOps at Surf.
Source: habr.com
