

Hello everyone!
It so happened that our small team, not to say recently, and certainly not suddenly, has grown to the point of transferring some (and eventually all) products to Kubernetes.
There were many reasons for this, but our story isn't about the controversy.
We had a limited selection for the infrastructure foundation. We chose between vCloud Director and vCloud Director. We picked the newer one and decided to start.
Once again flipping through 'The Hard Way,' I quickly concluded that a tool for automating at least basic processes, such as deployment and sizing, was needed yesterday. A deep dive into Google revealed a product called VMware Container Service Extension (CSE) — an open-source product that automates the creation and sizing of k8s clusters for those in vCloud.
Disclaimer: CSE has its limitations, but it fit our needs perfectly. The solution must also be supported by the cloud provider, but since the server part is also open-source, demand its availability from your nearest manager 🙂.
To begin using it, an administrator account in the vCloud organization is required, along with a pre-created routed network for the cluster (internet access is necessary from this network during the deployment, so don't forget to configure Firewall/NAT). Addressing doesn't matter. In this example, we'll take 10.0.240.0/24.

Since the cluster will need to be managed post-creation, it's advisable to have a VPN with routing to the created network. We use a standard SSL-VPN configured on our organization's Edge Gateway.
Next, you need to install the CSE client from which the k8s clusters will be managed. In my case, it's my work laptop and a couple of well-hidden containers that handle automation.
The client requires Python version 3.7.3 or higher and the installed module , so let's install both.
pip3 install vcd-cli

pip3 install container-service-extension
After installation, we check the version of CSE and get the following:
# vcd cse version
Error: No such command "cse".
Unexpectedly, but fixable. It turned out that CSE needs to be hooked as a module to vcd-cli.
To do this, you first need to log in to vcd-cli in our organization:
# vcd login MyCloud.provider.com org-dev admin
Password:
admin logged in, org: 'org-dev', vdc: 'org-dev_vDC01'
After that, vcd-cli will create a configuration file ~/.vcd-cli/profiles.yaml
You need to add the following at the end:
extensions:
  - container_service_extension.client.cse
After that, we check again:
# vcd cse version
CSE, Container Service Extension for VMware vCloud Director, version 2.5.0
The client installation stage is complete. Let's try to deploy the first cluster.
CSE has several sets of usage parameters, all of which can be viewed
First, let's create keys for passwordless access to the future cluster. This is important because by default, password login to the nodes will be disabled, and if keys are not set, it can lead to a lot of work through the virtual machines' consoles, which is not exactly convenient.
# ssh-keygen
Generating public/private rsa key pair.
Enter file in which to save the key (/root/.ssh/id_rsa):
Created directory '/root/.ssh'.
Enter passphrase (empty for no passphrase):
Enter same passphrase again:
Your identification has been saved in /root/.ssh/id_rsa.
Your public key has been saved in /root/.ssh/id_rsa.pub.
Let's try to start creating the cluster:
vcd cse cluster create MyCluster --network k8s_cluster_net --ssh-key ~/.ssh/id_rsa.pub --nodes 3 --enable-nfsIf we receive an error Error: Session has expired or user not logged in. Please re-login. — re-login to vcd-cli in vCloud as described above and try again.
This time everything is fine, and the cluster creation task has started.
cluster operation: Creating cluster vApp 'MyCluster' (38959587-54f4-4a49-8f2e-61c3a3e879e0) from template 'photon-v2_k8-1.12_weave-2.3.0' (revision 1)
The task will take about 20 minutes to complete, in the meantime, let's discuss the main launch parameters.
—network — the network we created earlier.
—ssh-key — the keys we created, which will be written to the cluster nodes
—nodes n — The number of Worker nodes in the cluster. There will always be one Master, this is a CSE limitation.
—enable-nfs — create an additional node for NFS share for persistent volumes. A somewhat advanced option; we will return to configuring what it does a bit later.
In the meantime, in vCloud, you can visually observe the cluster creation.
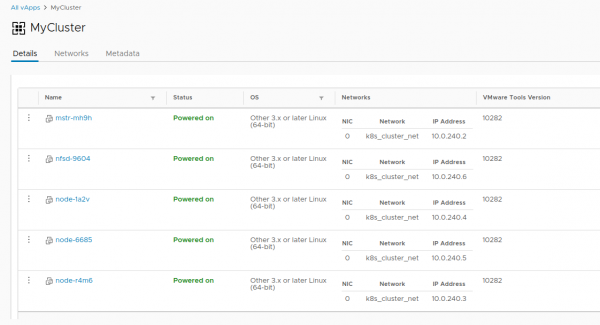
Once the cluster creation task is complete, it is ready for operation.
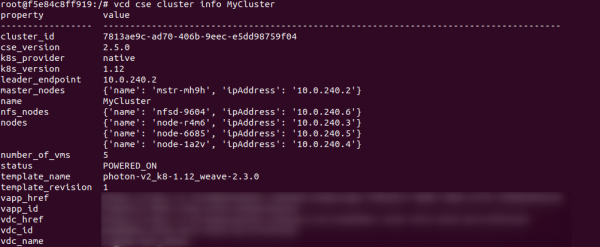
Let's check the deployment correctness with the command vcd cse cluster info MyCluster
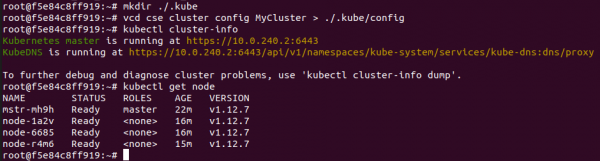
Next, we need to get the cluster configuration for use. kubectl
# vcd cse cluster config MyCluster > ./.kube/config
And we can check the cluster's status using it:
At this point, the cluster can be considered conditionally operational, if it weren't for the persistent volumes issue. Since we are in vCloud, using the vSphere Provider won't work. The option —enable-nfs is intended to smooth over this inconvenience, but it was not completely successful. Manual reconfiguration is required.
First, our node needs to create a separate Independent disk in vCloud. This guarantees that our data will not disappear along with the cluster if it is deleted. We will also connect the disk to NFS.
# vcd disk create nfs-shares-1 100g --description 'Kubernetes NFS shares'
# vcd vapp attach mycluster nfsd-9604 nfs-shares-1
After that, let's SSH (you did create keys, right?) into our NFS node and finally connect the disk:
root@nfsd-9604:~# parted /dev/sdb
(parted) mklabel gpt
Warning: The existing disk label on /dev/sdb will be destroyed and all data on
this disk will be lost. Do you want to continue?
Yes/No? yes
(parted) unit GB
(parted) mkpart primary 0 100
(parted) print
Model: VMware Virtual disk (scsi)
Disk /dev/sdb: 100GB
Sector size (logical/physical): 512B/512B
Partition Table: gpt
Disk Flags:

Number  Start   End    Size   File system  Name     Flags
 1      0.00GB  100GB  100GB               primary

(parted) quit
root@nfsd-9604:~# mkfs -t ext4 /dev/sdb1
Creating filesystem with 24413696 4k blocks and 6111232 inodes
Filesystem UUID: 8622c0f5-4044-4ebf-95a5-0372256b34f0
Superblock backups stored on blocks:
	32768, 98304, 163840, 229376, 294912, 819200, 884736, 1605632, 2654208,
	4096000, 7962624, 11239424, 20480000, 23887872

Allocating group tables: done
Writing inode tables: done
Creating journal (32768 blocks): done
Writing superblocks and filesystem accounting information: done
Creating a directory for data and mounting the new partition there:
mkdir /export
echo '/dev/sdb1  /export   ext4  defaults   0 0' >> /etc/fstab
mount -a
Let's create five test volumes and share them for the cluster:
>cd /export
>mkdir vol1 vol2 vol3 vol4 vol5
>vi /etc/exports
#Add this to the end of the file
/export/vol1 *(rw,sync,no_root_squash,no_subtree_check)
/export/vol2 *(rw,sync,no_root_squash,no_subtree_check)
/export/vol3 *(rw,sync,no_root_squash,no_subtree_check)
/export/vol4 *(rw,sync,no_root_squash,no_subtree_check)
/export/vol5 *(rw,sync,no_root_squash,no_subtree_check)
#:wq! ;)
#Next - export the volumes
>exportfs -r
After all this magic, we can create a PV and PVC in our cluster like this:
PV:
cat <<EOF | kubectl apply -f -
apiVersion: v1
kind: PersistentVolume
metadata:
  name: nfs-vol1
spec:
  capacity:
    storage: 10Gi
  accessModes:
    - ReadWriteMany
  nfs:
    # Same IP as the NFS host we SSH'ed to earlier.
    server: 10.150.200.22
    path: "/export/vol1"
EOF
PVC:
cat <<EOF | kubectl apply -f -
apiVersion: v1
kind: PersistentVolumeClaim
metadata:
  name: nfs-pvc
spec:
  accessModes:
    - ReadWriteMany
  storageClassName: ""
  resources:
    requests:
      storage: 10Gi
EOF
This concludes the story of creating one cluster and begins the story of its life cycle. As a bonus, here are two useful CSE commands that can help save resources at times:
#Увеличиваем размер кластера до 8 воркер нод
>cse cluster resize MyCluster --network k8s_cluster_net --nodes 8

#Выводим ненужные ноды из кластера с их последующим удалением
>vcd cse node delete MyCluster node-1a2v node-6685 --yes
Thank you all for your time, if you have any questions - feel free to ask in the comments.
Source: habr.com
