

Let's start with the fact that there are situations where you need to create an application with a database connection. This is done to avoid delving into backend development and focus on the frontend due to a lack of resources and skills. I don't claim that my solution will be secure, but it works.
Since I don't like paying for hosting, I used the network at my job, which has a white IP. Here is its structure:
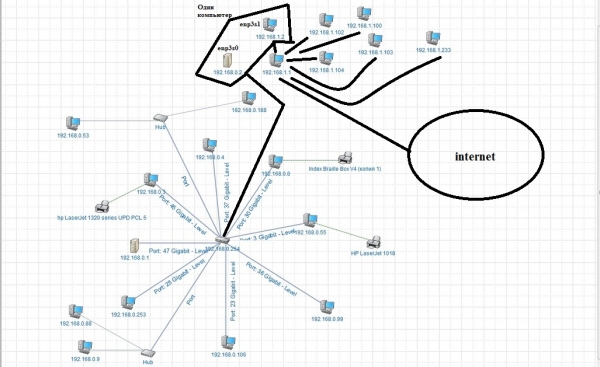
I have access to several computers, specifically to 192.168.1.2 (also known as 192.168.0.2), which runs Linux, and to 192.168.0.3 with Windows. Overall, for my application I chose MySQL and checked what was available on Linux. It was already installed there, but nobody knows the password, and those who did have forgotten it (those who worked before me). Upon learning that it was not needed by anyone, I deleted it and tried to reinstall it. There wasn't enough memory, and since fixing this error would require connecting a monitor, keyboard, and mouse, I decided to abandon it. Moreover, the Windows machine is much more powerful, and besides, I have it on my home laptop. I won't describe the installation process itself; there are plenty of manuals and videos about it. After installing MySQL on the Windows machine, I decided to back up the tables from my laptop to the workstation.
This is done like this (in my case):
mysqldump -uroot -p your_base > dump_file.sql
Next, on the new database, we create a database and restore the backup on the 'new' machine.
mysql -h localhost -u root -p
create database your_base;
use your_base;
mysql -uroot -p your_base < dump_file.sql
show tables;
The backup file must be placed on the new machine, and possibly if not in the utility's directory, then the full path to it. (I just uploaded the backup to GitHub and cloned it to the new machine). I would add how to create the tables themselves, but I didn't save the screenshots, and I think this is not complicated even for a 2nd or 3rd-year student.
Once I restored all the tables, it was time to make remote access to the database available. Overall, such commands did not lead to success (it only granted read permissions).
create user 'client'@'%' IDENTIFIED by 'client';
grant select on your_base . * to 'client'@'%';
flush privileges;
Specifically, I could only connect to the database with the command,
mysql -h localhost -u client -pclient
but I could not do so with this command
mysql -h 192.168.0.3 -u client -pclient
this did not work for me either, and I could not connect through this address as root.
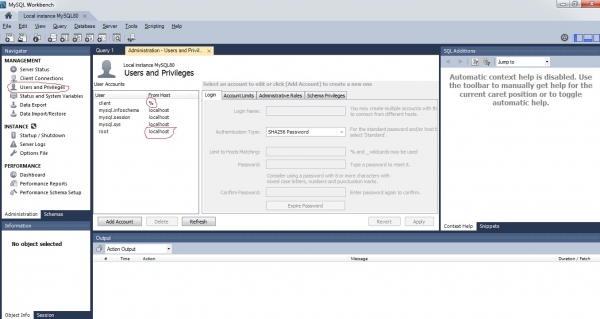
The mysql workbench helped; there, you change localhost to % in the settings and it works, although for the client this didn't help. Now you can connect to the database from the console or from code from any address.
You also need to set the network to private or business and turn off the Windows firewall; otherwise, you won't even be able to ping this machine (let alone connect to the database).
Half the work is done; next, I need to be able to connect to the database from home.
As seen from the network diagram, to get to the internet, you need to traverse the path from 192.168.0.3 to 192.168.1.1 (the router) going backwards. Let's set the route from 192.168.1.1 to 192.168.1.2 like this:

In general, since the image isn't displayed, I'll write it out:
route add 192.168.0.0 mask 255.255.255.0 gateway 192.168.1.2
This can only be done within one subnet, so you cannot directly forward to the address 192.168.0.2 or 192.168.0.3.
This is necessary so that the router knows where the subnet 192.168.0.0/24 is located (learn the basics of networking, it's useful).
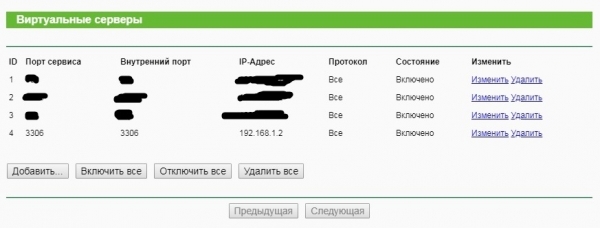
Now let's add port forwarding for port 3306 (the default mysql port, unless you changed it during installation) to the address 192.168.1.2.
Now we need to do the most complicated part—set up forwarding on the Linux machine (which has two network cards: 192.168.1.2 (interface enp3s1) and 192.168.0.2 (interface enp3s0)) so that the network interfaces know to forward from 192.168.1.2 to 192.168.0.2, and then to our Windows machine with MySQL.
sudo iptables -A FORWARD -i enp3s1 -o enp3s0 -p tcp --syn --dport 3306 -m conntrack --ctstate NEW -j ACCEPT
sudo iptables -A FORWARD -i enp3s1 -o enp3s0 -m conntrack --ctstate ESTABLISHED,RELATED -j ACCEPT
sudo iptables -A FORWARD -i enp3s0 -o enp3s1 -m conntrack --ctstate ESTABLISHED,RELATED -j ACCEPT
sudo iptables -t nat -A PREROUTING -i enp3s1 -p tcp --dport 3306 -j DNAT --to-destination 192.168.0.3
sudo iptables -t nat -A POSTROUTING -o enp3s0 -p tcp --dport 3306 -d 192.168.0.3 -j SNAT --to-source 192.168.1.2
and the last line saves the entered commands so that they aren't erased when the OS restarts
sudo service iptables-persistent save
That is, the first line means we accept the first connection, the second and third mean that packets can flow in both directions, and the fourth and fifth mean the replacement of the destination and source addresses. And voila, you can connect from home via MySQL. Lastly, here’s my C++ code that does this:
//DataBaseConnection.cpp
#include "DataBaseConnection.h"

DataBaseConnection::DataBaseConnection()
{
}
void DataBaseConnection::Connect()
{
	// Получаем дескриптор соединения
	conn = mysql_init(NULL);
	if (conn == NULL)
	{
		// Если дескриптор не получен – выводим сообщение об ошибке
		fprintf(stderr, "Error: can'tcreate MySQL-descriptorn");
		//exit(1); //Если используется оконное приложение
	}
	// Подключаемся к server
	if (!mysql_real_connect(conn, "192.168.0.3", "root", "password", "your_base", NULL, NULL, 0))
	{
		// If unable to establish a connection with proxy server
		// базы данных выводим сообщение об ошибке
		fprintf(stderr, "Error: can't connect to database: %sn", mysql_error(conn));
	}
	else
	{
		// Если соединение успешно установлено выводим фразу - "Success!"
		fprintf(stdout, "Success!n");
	}
}
std::vector<std::string> DataBaseConnection::Query()
{
	vectordrum.clear();
	std::string query = "SELECT * FROM drum where id=0";
	const char * q = query.c_str();
	qstate = mysql_query(conn, q);
	if (!qstate)
	{
		res = mysql_store_result(conn);
		while (row = mysql_fetch_row(res))
		{
			//printf("ID: %s,Position: %s, Image: %sn", row[0], row[1], row[2]);
			vectordrum.push_back(row[2]);
		}
	}
	else
	{
		std::cout << "Query failed:" << mysql_error(conn) << std::endl;
	}
	return vectordrum;
}
void DataBaseConnection::Close()
{
	// Закрываем соединение с сервером базы данных
	mysql_close(conn);
}
DataBaseConnection::~DataBaseConnection()
{
	vectordrum.clear();
}
//DataBaseConnection.h
#pragma once
#include <iostream>
#include <mysql.h>
#include <vector>
#pragma comment(lib,"mysqlcppconn.lib")
#pragma comment(lib,"libmysql.lib")
class DataBaseConnection
{
public:
	DataBaseConnection();
	void Connect();
	std::vector<std::string> Query();
	void Close();
	~DataBaseConnection();
	MYSQL *conn;
	MYSQL_ROW row;
	MYSQL_RES *res;
	int qstate;
	std::vector<std::string> vectordrum;
};
Now you can freely share this program with anyone, and there's no need to rewrite it to make it work locally.
Source: habr.com
