

Hello everyone! My name is Pavel Agaletsky. I work as a team lead in the group that develops the Lamoda delivery system. In 2018, I spoke at the HighLoad++ conference, and today I want to present a transcript of my talk.
My topic is dedicated to our company's experience in deploying systems and services in different environments. Starting from our prehistoric times when we deployed all systems on regular virtual servers, to our gradual transition from Nomad to deployment in Kubernetes. I will share why we did this and what challenges we faced during the process.

Application Deployment on VMs
Let's start with the fact that three years ago, all of the company's systems and services were deployed on regular virtual servers. Technically, it was organized so that all the code of our systems was stored and built through automated build tools using Jenkins. With Ansible, it was deployed from our version control system to virtual servers. Each system in our company was deployed on at least two servers: one of them was the head, and the second one was the tail. These two systems were absolutely identical in all their settings, power, configuration, and others. The only difference between them was that the head received user traffic, while the tail never received user traffic.
What was the purpose of this?
When we deployed new releases of our application, we wanted to ensure seamless rollout, meaning without noticeable consequences for users. This was achieved by deploying the next assembled release using Ansible on the tail. There, the people responsible for the deployment could check and make sure everything was working well: all metrics, sections, and applications were functional; the required scripts were running. Only after they confirmed that everything was okay, the traffic was switched. It started going to the server that was previously the tail. Meanwhile, the server that was the head remained without user traffic but continued to operate with the previous version of our application.
Thus, for users, it was seamless. The switch was instantaneous, as it was simply a load balancer switch. It was very easy to roll back to the previous version by just switching the load balancer back. We could also verify the application's production capability before any user traffic would flow to it, which was quite convenient.
What advantages did we see in all of this?
- First of all, it just works. It's clear to everyone how such a deployment scheme functions since most people have deployed on regular virtual servers at some point. It's quite reliable
- , as the deployment technology is simple, tried and tested by thousands of companies. Millions of servers are deployed this way. It's hard to break anything. And finally, we could achieveatomic deployments.
- Deployments that happen instantaneously for users, without a noticeable phase of switching between the old version and the new one. But along with all this, we also saw some drawbacks:Besides the production environment and the development environment, there are other environments. For example, QA and pre-production. At that time, we had many servers and around 60 services. For this reason, we had to
maintain a version of the virtual machine relevant to each service.
- Moreover, if you want to update libraries or install new dependencies, you need to do this in all environments. You also had to synchronize the time when you plan to deploy the next version of your application with the time when DevOps performs the necessary environment configurations. In this case, it's easy to end up in a situation where our environment differs slightly across all consecutive environments. For example, the QA environment might have one version of libraries while production has another, leading to issues. The complexity of updating the dependencies of your application. This doesn't depend on you, but on another team, namely the DevOps team that maintains the servers. You need to set the appropriate task for them and provide a description of what you want to do.
- The challenge in updating dependencies of your application. This does not depend on you, but on another team. Specifically, the devops team that supports the servers. You need to set the appropriate task for them and provide a description of what you want to accomplish.
- At that time, we also wanted to break down our large monoliths into smaller services, as we understood that their number would continue to grow. We already had over 100 of them at that point. It was necessary to create a new virtual machine for each new service, which also needed maintenance and deployment. Additionally, we needed more than one machine, but at least two. On top of that, a QA environment was required. This creates issues and makes the creation and launch of new systems more complex, costly, and time-consuming.
Therefore, we decided that it would be more convenient to transition from deploying regular virtual machines to deploying our applications in Docker containers. With Docker, you need a system that can run applications in a cluster since you can’t just start a container casually. Usually, you want to monitor how many containers are running so that they can start automatically. For this reason, we needed to choose a management system.
We pondered for a long time about which one to choose. The thing is, at that time our deployment stack on standard virtual servers was somewhat outdated, as it used not the most recent versions of operating systems. At one point, it even had FreeBSD installed, which was not very convenient to maintain. We understood that we needed to migrate to Docker as quickly as possible. Our DevOps team considered their existing experience with various solutions and chose a system called Nomad.
Transition to Nomad
Nomad is a product from HashiCorp. They are also known for their other solutions:
«Consul» — a tool for service discovery.
«Terraform» — a server management system that allows you to configure them through what is known as infrastructure-as-code.
«Vagrant» allows you to deploy virtual machines locally or in the cloud through specific configuration files.
At that time, Nomad seemed like a straightforward solution that could be transitioned to quickly without altering the entire infrastructure. Moreover, it is relatively easy to learn. That's why we chose it as the system to orchestrate our container.
What is needed to deploy your system in Nomad?
- First and foremost, you need a docker image your application. It is necessary to build it and place it in a Docker image repository. In our case, this is Artifactory — a system that allows you to push various types of artifacts into it. It can store archives, Docker images, PHP Composer packages, NPM packages, and so on.
- It is also necessary configuration file, which will inform Nomad what, where, and in what quantity you want to deploy.
When we talk about Nomad, it uses the HCL format for the configuration file, which stands for HashiCorp Configuration Language. This is a superset of YAML that allows you to describe your service in terms of Nomad.
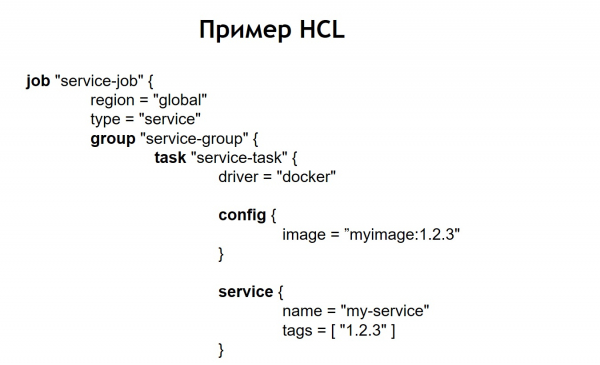
It allows you to specify how many containers you want to deploy, from which images, and pass them various parameters during deployment. Thus, you feed this file to Nomad, and it launches containers in production according to it.
In our case, we realized that simply writing absolutely identical HCL files for each service would not be very convenient, because there are many services, and sometimes you want to update them. It happens that one service is deployed not in one instance, but in many. For example, one of the systems we have in production has over 100 instances running. They are started from the same images but differ in configuration settings and configuration files.
Therefore, we decided it would be convenient to store all our configuration files for deployment in one common repository. This way, they became viewable: easy to maintain, and you could see what systems we have. If necessary, it is also not difficult to update or change something. Adding a new system would also not be a problem — just create a configuration file inside a new directory. Inside, there are files: service.hcl, which contains the description of our service, and some env files, which allow this service, when deployed to production, to be configured.
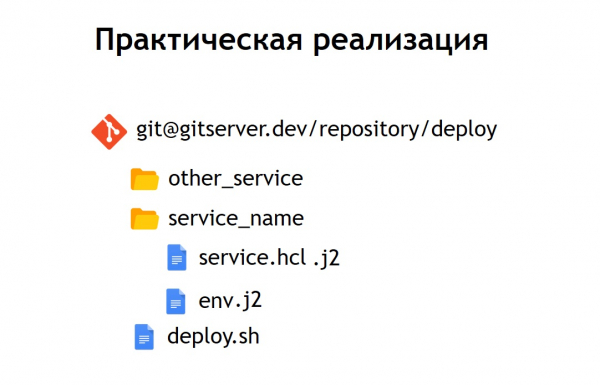
However, some of our systems are deployed in production not as a single instance, but in several at once. Therefore, we decided it would be convenient to store not the configs in pure form, but their templated version. And as the templating language, we chose jinja 2In this format, we store both the configs of the service itself and the env files required for it.
Additionally, we placed a deployment script in the repository common to all projects, which allows you to launch and deploy your service to production, in the desired environment, targeting the right instance. When we converted our HCL config into a template, the HCL file, which was previously a regular Nomad config, looked somewhat different in this case.
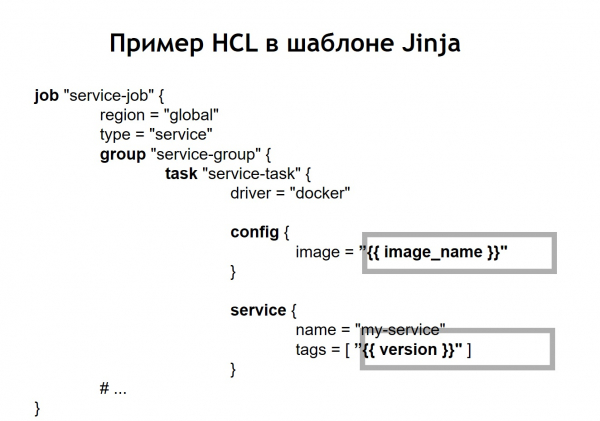
That is, we replaced certain configuration variable placeholders with variable inserts taken from env files or other sources. Moreover, we gained the ability to compile HCL files dynamically, meaning we can apply not just regular variable inserts. Since Jinja supports loops and conditions, we can also create configuration files that change depending on where exactly you are deploying your applications.
For example, you want to deploy your service to pre-production and production. Suppose that in pre-production, you do not want to run cron scripts, but simply want to see the service on a separate domain to ensure it functions. For anyone deploying the service, the process looks very simple and transparent. You just need to execute the deploy.sh file, specify which service you want to deploy and in which target. For instance, if you want to deploy a system in Russia, Belarus, or Kazakhstan, you only need to change one of the parameters, and the correct configuration file will be generated.
Once the Nomad service is deployed in your cluster, it looks as follows.
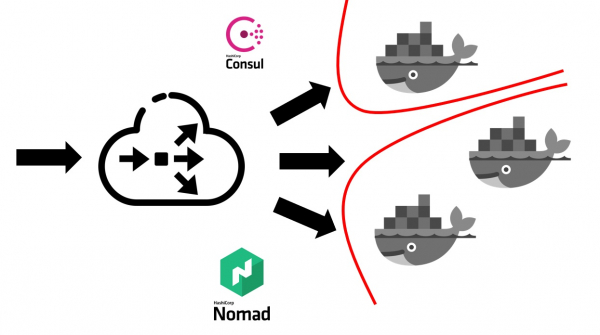
First, you need some external load balancer that will accept all incoming user traffic. It will work alongside Consul and inquire about where, on which node, and by which IP address specific service corresponding to a particular domain name can be found. Services in Consul emerge from Nomad itself. As these are products of the same company, they are well integrated with one another. One could say that Nomad natively registers all services launched within it inside Consul.
Once your external load balancer knows which service it needs to direct traffic to, it redirects it to the corresponding container or to several containers that match your application. Naturally, security must also be considered during this process. Even though all services run on the same virtual machines in containers, it is usually necessary to restrict free access from any service to any other. We achieved this through segmentation. Each service was launched in its own virtual network, which had routing rules and access control rules defined for other systems and services. These could be located both inside and outside of this cluster. For example, if you want to prevent a service from connecting to a certain database, this can be done by segmenting at the network level. That is, even by mistake, you cannot accidentally connect from a test environment to your production database.
What did the transition process cost us in terms of human resources?
The transition of the entire company to Nomad took approximately 5-6 months. We transitioned service by service, but at a fairly rapid pace. Each team had to create its own containers for their services.
We have adopted an approach where each team is responsible for the Docker images of their systems independently. DevOps provides the common infrastructure necessary for deployment, including support for the cluster, CI system support, and so on. At that time, over 60 systems had moved to Nomad, totaling about 2,000 containers.
DevOps is responsible for the overall infrastructure relating to deployment and servers. Each development team, in turn, is responsible for implementing containers for their specific system, as the team knows exactly what is needed in any given container.
Reasons for abandoning Nomad
What advantages did we gain by transitioning to deployment using Nomad and Docker in particular?
- We ensured equal conditions for all environments. In development, QA, pre-production, and production, the same container images are used, with the same dependencies. Therefore, you practically have no chance of deploying something in production that you haven’t previously tested locally or in a testing environment.
- We also found that it is quite easy to add a new service. Any new systems are deployed very simply. You just need to go to the repository that stores the configurations, add a new config for your system, and you're good to go. You can deploy your system to production with no extra effort from the DevOps team.
- All configuration files in a single shared repository were reviewable. At the moment when we deployed our systems using of virtual servers, we used Ansible, which stored the configs in the same repository. However, for most developers, working with this was somewhat more complicated. The volume of configs and code that you need to add to deploy the service became much smaller. Plus, it was very easy for DevOps to correct or change it. In the case of transitions, for example, to a new version of Nomad, they could mass-update all operational files located in the same place.
But we also encountered several drawbacks:
It turned out that we could not achieve seamless deployments in the case of Nomad. During the rollout of containers from different environments, it could happen that a container was running, and Nomad perceived it as ready to accept traffic. This occurred even before the application inside it had time to start. Because of this, the system would briefly begin to return 500 errors, as traffic started going to a container that wasn't ready to accept it yet.
We encountered some bugsThe most significant bug is that Nomad does not handle large clusters very well if you have many systems and containers. When you want to take one of the servers that is part of the Nomad cluster offline for maintenance, there is a considerable chance that the cluster will not respond well and may fall apart. Some containers may, for instance, crash and not restart, which can become quite costly if all your production systems reside in the cluster managed by Nomad.
Therefore, we decided to think about where to go next. By that time, we had a much clearer understanding of what we wanted to achieve. Specifically, we wanted reliability, a few more features than Nomad provides, and a more mature, stable system.
In this regard, we chose Kubernetes as the most popular platform for running clusters. Especially given that the size and number of our containers were quite large. For these purposes, Kubernetes appeared to be the most suitable system among those we explored.
Transition to Kubernetes
Let me briefly explain the main concepts of Kubernetes and how they differ from Nomad.
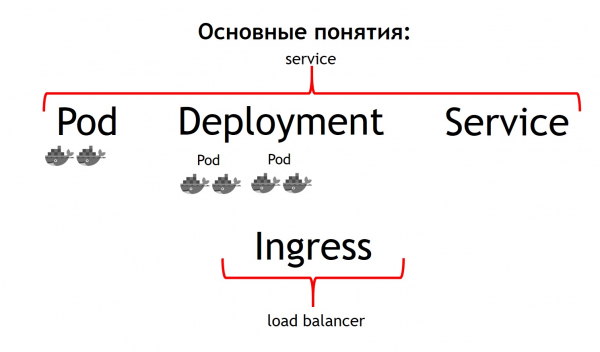
First and foremost, the most basic concept in Kubernetes is the concept of a pod. Pod is a group of one or more containers that always run together. They operate as if they are always strictly on the same virtual machine. They are accessible to each other via the IP address 127.0.0.1 on different ports.
Suppose you have a PHP application that consists of nginx and php-fpm – a classic setup. You will likely want both the nginx and php-fpm containers to always be together. Kubernetes allows you to achieve this by defining them as a single shared pod. This is precisely what we could not accomplish with Nomad.
The second concept is deployment. The thing is, a pod in itself is an ephemeral entity; it starts and disappears. Whether you want to kill all your previous containers first and then launch new versions immediately, or if you prefer to roll them out gradually – it is this process that the concept of deployment handles. It describes how you deploy your pods, in what quantity, and how to update them.
The third concept is cat << EOF | sudo tee -a /etc/systemd/system/lxd-hddpool.service [Unit] Description=Losetup LXD Storage Pool (hddpool) After=local-fs.target[Service] Type=oneshot ExecStart=/sbin/losetup /dev/loop1 /mnt/work/lxd/hddpool.img RemainAfterExit=true[Install] WantedBy=local-fs.target EOFYour service is essentially your system that accepts a certain traffic and then directs it to one or more pods corresponding to your service. This means it allows you to specify that all incoming traffic for a particular service with a specific name must be sent to these particular pods. And it also provides you with traffic balancing, meaning you can run two pods of your application, and all incoming traffic will be evenly distributed among those pods related to this service.
The fourth main concept is IngressThis is a service that runs in a Kubernetes cluster. It acts as an external load balancer that takes on all incoming requests. Thanks to the Kubernetes Ingress API, it can determine where to send these requests. Moreover, it does this very flexibly. You can specify that all requests to this host and a certain URL should be sent to this service. And those requests coming to this host at another URL can be sent to a different service.
The most amazing thing from the perspective of an application developer is that you can manage all of this independently. By setting up an Ingress configuration, you can send all incoming traffic to a specific API to separate containers, for example, written in Go. And send traffic coming to the same domain but another URL to containers written in PHP, which contain a lot of logic but are not very fast.
If you compare all these concepts with Nomad, you can say that the first three concepts together make up a Service. The last concept is absent in Nomad. We used an external load balancer for that: it can be haproxy, nginx, nginx+, etc. In the case of Kubernetes, you don’t need to introduce this additional concept separately. However, when looking at Ingress from the inside, it’s either nginx, haproxy, or traefik, but built into Kubernetes.
All the concepts I described are essentially resources that exist within the Kubernetes cluster. To describe them in Kubernetes, the yaml format is used, which is more readable and familiar than HCL files in the case of Nomad. However, structurally they describe, for example, a pod in the same way. They state: I want to deploy these pods there, with these images, in this quantity.
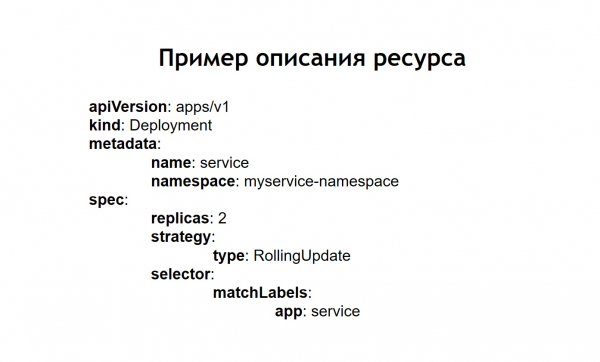
Additionally, we realized that we did not want to manually create each individual resource: deployment, services, Ingress, and so on. Instead, we wanted to describe each of our systems in terms of Kubernetes during deployment, so we wouldn’t have to manually recreate all the necessary resource dependencies in the required order. Helm was chosen as the system that allowed us to do this.
Key Concepts in Helm
Helm is a package manager for Kubernetes. It is very similar to how package managers work in programming languages. They allow you to store a service consisting of, for example, an nginx deployment, a php-fpm deployment, a config for Ingress, and configmaps (this is an entity that allows you to set env and other parameters for your system) in the form of what are called charts. At the same time, Helm works on top of Kubernetes. So, it is not some kind of standalone system, but just another service running inside the pod. You interact with it via its API using a command-line interface. Its convenience and beauty lie in the fact that even if Helm breaks or you remove it from the cluster, your services do not disappear, as Helm essentially only serves to launch the system. Kubernetes itself is responsible for the functionality and state of the services.
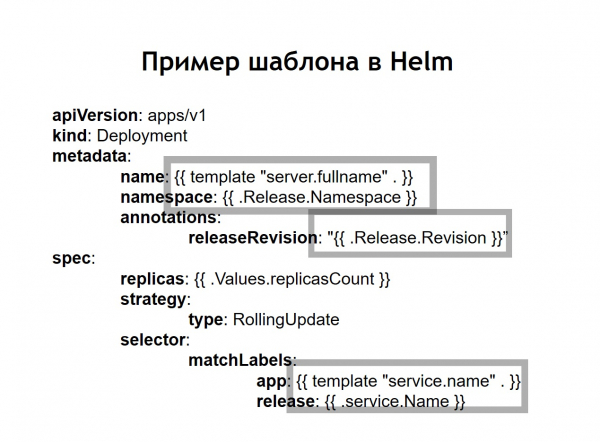
We also realized that templating, which we had previously been forced to do ourselves through the introduction of Jinja into our configs, is one of Helm’s core capabilities. All the configs you create for your systems are stored in Helm as templates, somewhat similar to Jinja, but actually using templating from the Go language, which is what Helm, like Kubernetes, is written in.
Helm adds a few more concepts for us.
Chart — is a description of your service. In other package managers, it would be called a package, bundle, or something similar. Here, it is called a chart.
Values – are the variables you want to use to build your configs from the templates.
ReleaseEach time a service deployed with Helm receives an incremental release version. Helm remembers the configuration of the service from the previous and the one before that release, and so on. Therefore, if you need to roll back, you just need to execute the helm callback command, specifying the previous release version. Even if the corresponding configuration is not available in your repository at the time of the rollback, Helm still remembers what it was and will revert your system to the state it was in during the previous release.
When using Helm, the usual configurations for Kubernetes also turn into templates that allow the use of variables, functions, and conditional operators. This way, you can assemble your service configuration based on the environment.
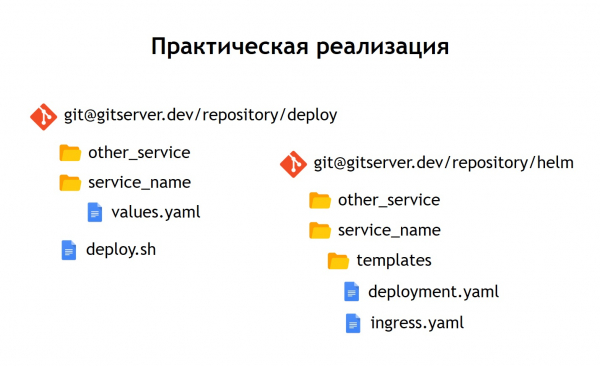
In practice, we decided to do things a bit differently than we did with Nomad. In Nomad, both deployment configurations and the necessary variables to deploy our service were stored in one repository; here, we chose to split them into two separate repositories. The 'deploy' repository contains only the variables needed for deployment, while the 'helm' repository holds the configurations or charts.
What has this given us?
Although we do not store any truly sensitive data in the configuration files themselves, such as database passwords—which are kept as secrets in Kubernetes—there are still certain aspects we do not want to grant access to everyone. Therefore, access to the 'deploy' repository is more restricted, whereas the 'helm' repository simply contains the service description. For this reason, it can be safely accessed by a wider group of people.
Since we have not only production but also other environments, this separation allows us to reuse our Helm charts to deploy services not only in production but also, for example, in a QA environment. Even for deploying them locally, using Minikube — this is a tool for local Kubernetes startup.
Inside each repository, we have maintained a separation into individual directories for each service. This means that within each directory are templates related to the corresponding chart, describing the resources that need to be deployed to launch our system. In the 'deploy' repository, we have left only the environment variables. In this case, we did not use templating with jinja, because helm provides templating out of the box – this is one of its main features.
We have left a deployment script – deploy.sh, which simplifies and standardizes the launch for deployment using helm. Thus, for anyone who wants to deploy, the deployment interface looks exactly the same as it did when deploying via Nomad. The same deploy.sh, the name of your service, and where you want to deploy it. This results in helm being launched internally. It, in turn, collects configurations from the templates, substitutes the necessary values files, and then deploys them into Kubernetes.
Conclusions
The Kubernetes service appears more complex than Nomad.
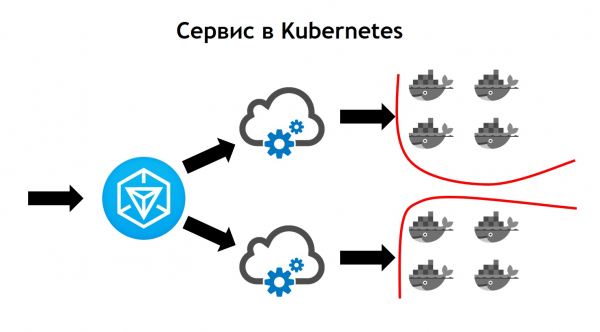
Here, outgoing traffic arrives at the Ingress. This acts as a front controller, which takes on all requests and subsequently forwards them to the relevant services based on the request data. It determines them based on configurations that are part of your application's description in helm and which the developers specify themselves. The service then sends requests to its pods, meaning specific containers, balancing incoming traffic among all containers that relate to the given service. And, of course, we must not forget that when it comes to network-level security, we should not overlook this aspect. Therefore, segmentation based on tagging operates within the Kubernetes cluster. All services have specific tags to which the access rights to certain external/internal resources within or outside the cluster are tied.
During the transition, we observed that Kubernetes has all the capabilities of Nomad, which we had been using previously, while also adding many new features. It can be extended through plugins, effectively through custom resource types. This means you have the ability to not only use what comes out of the box with Kubernetes, but also to create your own resource and service that will read your resource. This provides additional opportunities to expand your system without the need to reinstall Kubernetes and without the need for changes.
An example of such use is Prometheus, which runs inside our Kubernetes cluster. In order for it to start collecting metrics from a specific service, we need to add an additional resource type to the service description, known as a service monitor. Prometheus, because it can read custom resource types when running in Kubernetes, automatically begins collecting metrics from the new system. This is quite convenient.
The first deployment we made in Kubernetes was in March 2018. During this time, we have never experienced any problems with it. It operates quite stably without significant bugs. Moreover, we can continue to expand it. As of today, we have sufficient capabilities available, and we are very pleased with the pace of Kubernetes development. Currently, there are over 3000 containers running in Kubernetes. The cluster occupies several nodes. It is maintainable, stable, and highly controllable.
Source: habr.com
