


IP ATC Asterisk is a powerful tool in the field of IP telephony. The FreePBX web interface designed for Asterisk significantly simplifies configuration and lowers the barrier to entry into the system.
If you can think of any task related to IP telephony, it is almost certainly possible to implement it in Asterisk. But be assured that it will require persistence and patience from you.
We faced the task of setting up email notifications for missed calls. Specifically, to notify via email when an incoming call went to a queue but no agent answered this incoming call.
Surprisingly, we did not find built-in tools to solve this task in FreePBX. I will explain how we solved this task below.
Preface
Before tackling the problem 'head-on', we searched for information on the internet, but did not find a turnkey solution (perhaps we searched poorly, but what can you do...).
There aren't as many skills directly working in Asterisk as one would like, so the proposed solution , was not thought through completely and was rejected.
I liked the solution suggested by , even though it did not work. Hence, we emphasized that working in Asterisk needs to be done in the context of queues [ext-queues]. And since we are working in FreePBX, we have to work in the configuration file 'extensions_override_freepbx.conf'. We noted that it is convenient to 'catch missed calls' before the hangupcall event (call end).
After reading the discussion , the idea emerged that we need to filter the 'Disposition' variable in CDR for all agents in the queue. After reading the information, we formed quite specific steps to solve the stated task.
What do we have:
We have FreePBX 13.0.197, which uses Asterisk 13.12.1. The OS version is SHMZ release 6.6 (Final). The distribution is based on CentOS.
In Asterisk, IVR (interactive voice response) is configured to distribute incoming calls to different queues. Each queue has agents assigned, i.e., operators.
Theory
What happens in Asterisk
When an incoming call arrives at Asterisk, it goes to the IVR. The caller makes a choice by pressing a specific number on the phone and enters a specific queue. After that, all free agents in the queue receive the call simultaneously.
To better understand what is happening at that moment and what happens next, let’s refer to Report CDR (Fig. 1).
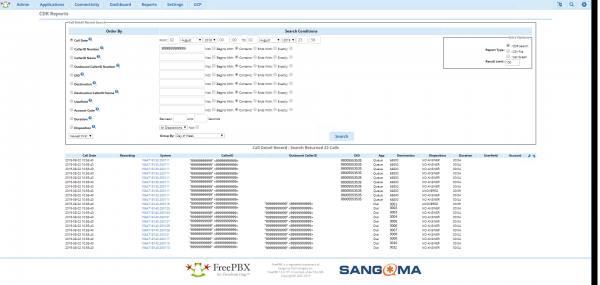
Fig. 1
When an incoming call enters the queue, all agents have the variable "Disposition" set to "NO ANSWER" if they are not busy at that moment. The variable "Disposition" could take on other values (see. ), apart from the value "ANSWERED". At the moment when one of the agents answers the incoming call, that agent's variable "Disposition" becomes "ANSWERED".
From the Report CDR, it can be seen that when the call enters the queue (the App column value becomes "Queue"), all events are listed with the same "uniqueid" (System column).
A Brief Overview of CDR
It is important to understand what CDR is and at what exact moment the data we observe in the Report CDR is entered. CDR, in relation to the operating system, is a database where Asterisk records detailed call reports (see. ). In our case, this database is named asteriskcdrdb, which is located in MySQL. Through experimentation, we found that data about a call with a specific "uniqueid" is entered into asteriskcdrdb not immediately after any event occurs but after the hangupcall event (end of the call).
How the Developed Solution Works
Since we have more knowledge of bash than of Asterisk, the main idea came out as follows. Before the hangupcall event, call a bash script. Pass 3 parameters to this script. The first parameter is "uniqueid" for filtering data retrieved from CDR. The second parameter is "CALLERID(num)" (the caller's number) to know whom to call back. The third parameter is "NODEST" (the queue number) into which the call came to know the inquiry of the call and to whom to send e-mail notification about the missed call.
The bash script should connect to the asteriskcdrdb database in MySQL and retrieve all values of the variable "Disposition" with the specified "uniqueid". From the retrieved data, exclude the values: "NO ANSWER", "BUSY", "FAILED", "UNKNOWN". As a result, it will either be "ANSWERED" — the incoming call was answered, or nothing at all — a missed call.
Then, if the call was missed, the script should send an email notification.
To start with an important point, Asterisk executes commands sequentially, waiting for each to complete (which is logical). We will call the bash script before the hangupcall command is executed. Thus, at the moment the script is executed, the information about the desired 'uniqueid' will not yet have been entered into the CDR. To solve this problem, we will call the bash script with the '&' parameter so that Asterisk immediately proceeds to the next step, i.e., hangupcall. At the beginning of the bash script, we will set a small time delay to allow Asterisk to enter the data with the 'uniqueid' we are interested in into the CDR.
Practice
Before proceeding to configure Asterisk and create the bash script, we need to set up email notifications. For this, we will use the postfix utility.
Postfix Configuration
We have a mail domain 'lucky.ru', hosted by Yandex. We will configure postfix in SMTP client mode and send emails from the account asterisk@lucky.ru.
Based on the solution from here: .
First, we will install/update/check for the presence of the packages:
yum install postfix
yum install mailx
yum install cyrus-sasl cyrus-sasl-lib cyrus-sasl-plain
We will not overwrite the main configuration file of postfix '/etc/postfix/main.cf', but will create a backup of it:
cp /etc/postfix/main.cf /etc/postfix/main.cf.savEdit the file '/etc/postfix/main.cf' and modify it as follows:
nano /etc/postfix/main.cf
#####################
relayhost =
smtp_sasl_auth_enable = yes
smtp_sasl_password_maps = hash:/etc/postfix/private/sasl_passwd
smtp_sasl_security_options = noanonymous
smtp_sasl_type = cyrus
smtp_sasl_mechanism_filter = login
smtp_sender_dependent_authentication = yes
sender_dependent_relayhost_maps = hash:/etc/postfix/private/sender_relay
smtp_generic_maps = hash:/etc/postfix/generic
smtp_tls_CAfile = /etc/postfix/ca.pem
smtp_use_tls = yes
smtputf8_autodetect_classes = all
#####################
Not every line in '/etc/postfix/main.cf' can be commented. Comments in certain lines are not recognized by the parser and are passed for processing, leading to errors. It is better to avoid comments inside this file. You can experiment with this by running 'tail -f /var/log/messages' in a separate window.
I would like to point out the line 'smtputf8_autodetect_classes = all'. This entry enables utf-8 by default, which allows the use of Cyrillic in both the body of the email and the subject line without additional manipulation (See. ).
Let's create a directory for configuration files:
mkdir /etc/postfix/privateEdit the file "/etc/postfix/private/sender_relay". Here you need to specify which SMTP server to refer to when using our email domain:
nano /etc/postfix/private/sender_relay
#####################
@lucky.ru smtp.yandex.ru
#####################
Edit the file "/etc/postfix/private/sasl_passwd". In it, we will specify the email address that we will use for sending emails, as well as the login and password for this account (the login and password are specified with a colon):
nano /etc/postfix/private/sasl_passwd
#####################
asterisk@lucky.ru asterisk@lucky.ru:password_asterisk
#####################
Edit the file "/etc/postfix/generic". Here we will write the rules for rewriting the outgoing address (see. ):
nano /etc/postfix/generic
#####################
root asterisk@lucky.ru
root@localhost asterisk@lucky.ru
root@localhost.localdomain asterisk@lucky.ru
root@freepbx asterisk@lucky.ru
root@freepbx.localdomain asterisk@lucky.ru
root@asterisk asterisk@lucky.ru
root@asterisk.localdomain asterisk@lucky.ru
asterisk asterisk@lucky.ru
asterisk@localhost asterisk@lucky.ru
asterisk@localhost.localdomain asterisk@lucky.ru
asterisk@freepbx asterisk@lucky.ru
asterisk@freepbx.localdomain asterisk@lucky.ru
asterisk@asterisk asterisk@lucky.ru
asterisk@asterisk.localdomain asterisk@lucky.ru
root@localdomain.localdomain asterisk@lucky.ru
#####################
The initial outgoing address depends on the content of "/etc/hosts" and "/etc/hostname", as well as on the username that will send the email. That is, even though we are using an SMTP client and sending emails from asterisk@lucky.ru, Postfix will initially insert "something else" into the sender's address, and this needs to be corrected using the rules from this configuration file.
Here is the content of my file "/etc/hosts":
cat /etc/hosts
#####################
127.0.0.1 localhost localhost.localdomain localhost4 localhost4.localdomain4 asterisk.localdomain
127.0.0.1 localhost.localdomain localhost
::1 asterisk localhost localhost6
#####################
It is important for the server to have some domain (the value after the dot), because the mail utility "looks for" the domain name in "/etc/hosts", and if it does not "find it" immediately, it will continue to do so for several more minutes and only then will send the email. That is, if the domain is not listed, the email will be delayed by several minutes.
Here is the content of my file "/etc/hostname":
cat /etc/hostname
#####################
asterisk
#####################
Next, it is necessary to convert the created configuration files into indexed databases, for this we will execute the following command:
postmap /etc/postfix/generic && postmap /etc/postfix/private/{sasl_passwd,sender_relay}Next, we need to download and place the certificate for smtp.yandex.ru on the server, to do this we will execute the following command:
openssl s_client -starttls smtp -crlf -connect smtp.yandex.ru:25 > /etc/postfix/ca.pemBut after the technical information appears on the screen, the team will continue to hang. Press Ctrl+C to interrupt it.
Now we will manually remove all the garbage from the resulting file and leave only the certificate. It should look something like this:
nano /etc/postfix/ca.pem
#####################
-----BEGIN CERTIFICATE-----
MIIGazCCBVOgAwIBAgIQcUU9mJXW4OUs5Gf0JfLtsjANBgkqhkiG9w0BAQsFADBf
...
nRG0DfdqYIuPGApFORYe
-----END CERTIFICATE-----
#####################
And finally, let's restart postfix:
service postfix restartSending a test email:
echo "This is the body of the email" | mail -s "This is the subject" admin@lucky.ruadmin@lucky.ru — destination address
This completes the postfix setup.
Writing a bash script
Creating a directory to store the bash script (wherever you prefer):
mkdir /home/asterisk/scriptsCreating the bash script file:
touch /home/asterisk/scripts/noanswer.shGranting the script file execution rights:
chmod +x /home/asterisk/scripts/noanswer.shIf there are doubts about the file permissions, you can temporarily give full access to the file for debugging. But this is 'not safe.'
chmod 777 /home/asterisk/scripts/noanswer.shBash script text:
nano /home/asterisk/scripts/noanswer.sh
#####################
#! /bin/bash

sleep 7

res_sql="SELECT disposition FROM cdr WHERE uniqueid = '$1'"

answer=`mysql -u freepbxuser -pPassword_freepbxuser -D asteriskcdrdb -B -N -e "$res_sql" | grep -E -v "NO ANSWER|BUSY|FAILED|UNKNOWN" | head -n 1`

error_kod=0
if [ "$answer" != "ANSWERED" ]
then

 case $3 in
 68800)
 address="big_boss@lucky.ru"
 subject="regarding an important issue"
 ;;
 63100)
 address="debian@lucky.ru"
 subject="on questions regarding linux debian"
 ;;
 63200)
 address="windows@lucky.ru"
 subject="on questions regarding windows"
 ;;
 63300)
 address="freebsd@lucky.ru"
 subject="on questions regarding freebsd"
 ;;
 63400)
 address="ubuntu@lucky.ru"
 subject="on questions regarding linux ubuntu"
 ;;
 63500)
 address="centos@lucky.ru"
 subject="on questions regarding linux centos"
 ;;
 *)
 address="admin@lucky.ru"
 error_kod=1
 ;;
 esac

 case $error_kod in
 0)
 echo "Missed call from subscriber $2, who called about $subject." | mail -s "Missed call from $2" $address
 echo "Missed call for $address from subscriber $2, who called about $subject. uid=$1" | mail -s "Missed call from $2" admin@lucky.ru
 ;;
 1)
 echo "Missed call from $2. Queue unknown. uid=$1" | mail -s "Missed call from $2" admin@lucky.ru
 ;;
 esac

fi
#####################
Brief breakdown of the script:
"sleep 7":
This is the time delay I mentioned earlier. We have a delay set at 7 seconds. Although, I think one second would be sufficient.
"res_sql="SELECT disposition FROM cdr WHERE uniqueid = '$1'"":We moved the MySQL query to a separate variable for convenience.
Next, we will make a request to MySQL and filter the output received. We remove all options except for 'ANSWERED', if such exists. If there are multiple 'ANSWERED' values, we need to keep only one. In the end, we will have either 'ANSWERED' or '' in the variable 'answer'.
If the value of the variable 'answer' is not equal to 'ANSWERED', then this is a missed call. Depending on the queue number, we will specify an address using the case operator, to whom exactly the email notification should be sent, and what to write in this message (the part of the message that can be changed).
Next, we consider the case when the queue is set in Asterisk but is not described in the script. In this case, admin@lucky.ru will receive an email stating that the queue is not known to the script.
If the queue is described, an email will be sent to its destination along with a duplicate email to admin@lucky.ru indicating the 'uniqueid', so that events related to this call can be tracked if necessary.
This is where the script ends.
I will note that for connecting to MySQL, we used the username and password that we previously learned. In FreePBX, to find out the Asterisk user login in MySQL, execute the following command:
cat /etc/amportal.conf | grep AMPDBUSERAnd to find out the Asterisk user password in MySQL, execute the following command:
cat /etc/amportal.conf | grep AMPDBPASSAsterisk Configuration
We use FreePBX. FreePBX has different types of configuration files (see ), some of which FreePBX overwrites upon reboot while others are not overwritten (they are called custom) since they are specially designed for the user.
We will work with the configuration file 'extensions_override_freepbx.conf', as it falls under the custom type.
To start, let's ensure that the file '/etc/asterisk/extensions.conf' includes the file 'extensions_override_freepbx.conf'. For this, execute the following command:
cat /etc/asterisk/extensions.conf | grep extensions_override_freepbx.conf
#####################
#include extensions_override_freepbx.conf
#####################
Edit the file '/etc/asterisk/extensions_override_freepbx.conf' and bring it to the following form:
nano /etc/asterisk/extensions_override_freepbx.conf
#####################
[ext-queues]

exten => h,1,System(/home/asterisk/scripts/noanswer.sh ${CDR(uniqueid)} ${CALLERID(num)} ${NODEST} &)
exten => h,2,Macro(hangupcall,)
#####################
As I mentioned earlier, the symbol «&» at the end is mandatory. Since we will be working in a bash script with CDR data directly from the MySQL database, and this data is entered into MySQL only after executing «exten => h,2,Macro(hangupcall,)», it is necessary not to wait for the completion of the bash script, but to proceed to the next step in Asterisk. The bash script itself should include a time delay before executing its main part.
To ensure that changes in the configuration file «/etc/asterisk/extensions_override_freepbx.conf» take effect, you need to restart the Asterisk core with the following command:
/usr/sbin/asterisk -rx "core restart now"This needs to be done after the bash script has been created.
Conclusion
This is probably the 1001st way to "capture missed calls" in Asterisk. Share in the comments how you solve this task, and what, in your opinion, can be improved/redesigned/optimized. We would appreciate constructive ideas.
Source: habr.com
