

Anyone developing on Voximplant is familiar with the concept of "applications" that link cloud scripts, phone numbers, users, rules, and call queues. Simply put, applications are the cornerstone of development on our platform, serving as the entry point to any Voximplant-based solution, as everything begins with the creation of an application.
Previously, applications "did not remember" either the actions performed by the scripts or the results of calculations, so developers had to store values in third-party services or on their backend. If you've ever worked with local storage in a browser, our new functionality is quite similar, as it allows applications to remember "key-value" pairs, unique to each application in your account. The storage functionality was made possible by a new module. – below you will find a brief guide on how to use it, welcome!
You will need a
- Voximplant account. If you don't have one, registration is available here. ;
- A web client to make a call – we will use our web phone.
- phone.voximplant.com .
First, log into your account:
manage.voximplant.com/auth require(Modules.ApplicationStorage);VoxEngine.addEventListener(AppEvents.CallAlerting, async (e) => { let r = {value: -1};try { r = await ApplicationStorage.get('totalCalls'); if (r === null) { r = await ApplicationStorage.put('totalCalls', 0); } } catch(e) { Logger.write('Failure while getting totalCalls value'); }try { await ApplicationStorage.put('totalCalls', (r.value | 0) + 1); } catch(e) { Logger.write('Failure while updating totalCalls value'); } e.call.answer(); e.call.say(`Greetings. Number of past calls: ${r.value}. `, Language.RU_RUSSIAN_MALE);e.call.addEventListener(CallEvents.PlaybackFinished, VoxEngine.terminate);});
The first line connects the ApplicationStorage module, while the rest of the logic is placed in the event handlerCallAlerting .
First, we declare a variable to compare the initial value with the call counter. Then we attempt to retrieve the value of the key totalCalls from storage. If such a key doesn't exist, we create it:
try {
    r = await ApplicationStorage.get('totalCalls');
    if (r === null) {
        r = await ApplicationStorage.put('totalCalls', 0);
    }
}
Next, we need to increment the value of the key in storage:
try {
        await ApplicationStorage.put('totalCalls', (r.value | 0) + 1);
    }
PLEASE NOTE
For each promise, it's necessary to explicitly handle failures, as shown in the listing above – otherwise, the script execution will be halted, and you will see an error in the logs. More details .
After working with the storage, the script responds to the incoming call with voice synthesis and tells how many times you have called before. After this message, the script ends the session.
After saving the script, go to the 'Routing' tab of your application and click 'New Rule'. Name it startCounting, specify the countingCalls script, and leave the mask as default (.*).
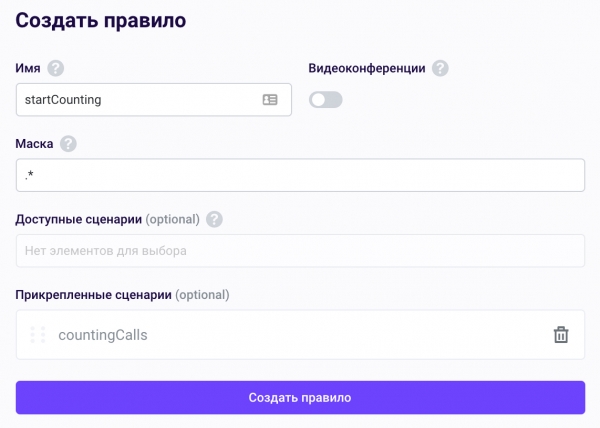
The last step is to create a user. For this, go to 'Users', click 'Create User', specify a name (for example, user1) and a password, then click 'Create'. This username-password pair will be needed for authentication in the webphone.
Checking
Open the webphone via the link and log in using the account name, application name, and the username-password pair from the application. After successfully logging in, enter any string of characters in the input field and click Call. If everything was done correctly, you will hear a synthesized greeting!
We wish you great development with Voximplant, and stay tuned for updates – there will be many more from us 😉
Source: habr.com
