

Hello, Habr!
Do you enjoy flying on airplanes? I love it, but during self-isolation, I also became fond of analyzing data on airline tickets from a well-known resource — Aviasales.
Today, we will explore Amazon Kinesis, build a streaming system with real-time analytics, set up the NoSQL database Amazon DynamoDB as the main data storage, and configure SMS alerts for interesting tickets.
All the details are below! Let's go!

Introduction
For this example, we will need access to . Access is provided for free and without restrictions, all you need to do is register in the 'Developers' section to get your API token for data access.
The main goal of this article is to provide a general understanding of using data streaming in AWS, while we overlook that the data returned by the API in use is not strictly up-to-date and is sent from a cache built from user searches on Aviasales.ru and Jetradar.com over the past 48 hours.
The data on airline tickets obtained through the API will be automatically parsed by the Kinesis agent installed on the producing machine and sent to the appropriate stream via Kinesis Data Analytics. The raw version of this stream will be written directly into storage. The DynamoDB store of 'raw' data will allow for deeper analysis of tickets through BI tools, such as AWS QuickSight.
We will consider two deployment options for the entire infrastructure:
- Manual — via the AWS Management Console;
- Infrastructure as code using Terraform — for lazy automators;
Architecture of the developed system
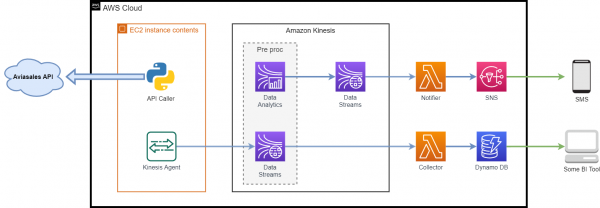
Components used:
- — the data returned by this API will be used for all subsequent operations;
- — a standard virtual machine in the cloud, which will generate the incoming data stream:
- — this is a Java application installed locally on the machine, which provides a simple way to collect and send data to Kinesis (Kinesis Data Streams or Kinesis Firehose). The agent constantly monitors a set of files in specified directories and sends new data to Kinesis;
- — a Python script that makes requests to the API and stores the response in the folder monitored by Kinesis Agent;
- — a real-time data streaming service with extensive scaling capabilities;
- — a serverless service that simplifies the analysis of real-time streaming data. Amazon Kinesis Data Analytics configures resources for applications and automatically scales to handle any volume of incoming data;
- — a service that allows you to run code without provisioning or managing servers. All computing resources automatically scale with each invocation;
- — a key-value and document database that provides single-digit millisecond latency at any scale. With DynamoDB, there's no need to provision servers, apply patches, or manage them. DynamoDB automatically scales tables, adjusting the amount of available resources while maintaining high performance. No system administration tasks are required;
- — a fully managed messaging service using a publish-subscribe model (Pub/Sub) that allows you to decouple microservices, distributed systems, and serverless applications. SNS can be used to send information to end users via mobile push notifications, SMS messages, and emails.
Initial Setup
To simulate a data stream, I decided to use information about flight tickets returned by the Aviasales API. In a fairly extensive list of different methods, let’s take one of them — the ‘Monthly Price Calendar’, which returns prices for each day of the month grouped by the number of layovers. If no search month is passed in the request, it will return information for the month following the current one.
So, let's sign up and get our token.
Example request below:
http://api.travelpayouts.com/v2/prices/month-matrix?currency=rub&origin=LED&destination=HKT&show_to_affiliates=true&token=TOKEN_APIThe above method of obtaining data from the API by specifying the token in the request will work, but I prefer to pass the access token via the header, so we will use this method in the api_caller.py script.
Example response:
{{
   "success":true,
   "data":[{
      "show_to_affiliates":true,
      "trip_class":0,
      "origin":"LED",
      "destination":"HKT",
      "depart_date":"2015-10-01",
      "return_date":"",
      "number_of_changes":1,
      "value":29127,
      "found_at":"2015-09-24T00:06:12+04:00",
      "distance":8015,
      "actual":true
   }]
}
The API response example above shows a ticket from St. Petersburg to Phuket… Oh, why dream…
Since I am from Kazan, and Phuket is currently just a dream for us, let's look for tickets from St. Petersburg to Kazan.
It assumes that you already have an AWS account. I want to draw special attention to the fact that Kinesis and sending notifications via SMS are not included in the annual . But even so, keeping a couple of dollars in mind, it is quite possible to build the proposed system and play with it. And, of course, do not forget to delete all resources after they are no longer needed.
Fortunately, DynamoDB and Lambda functions will be conditionally free for us if we stay within the monthly free limits. For example, for DynamoDB: 25 GB of storage, 25 WCU/RCU, and 100 million requests. And one million Lambda function calls per month.
Manual deployment of the system
Setting up Kinesis Data Streams
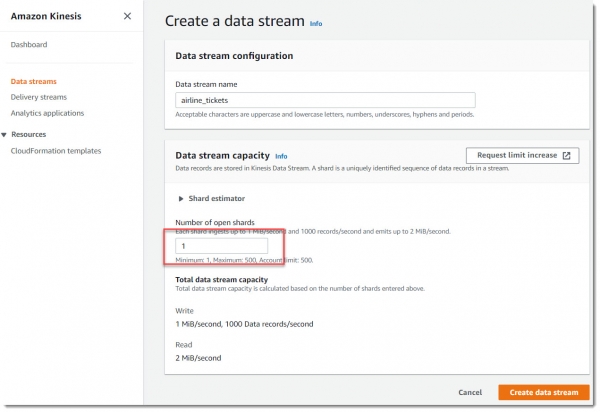
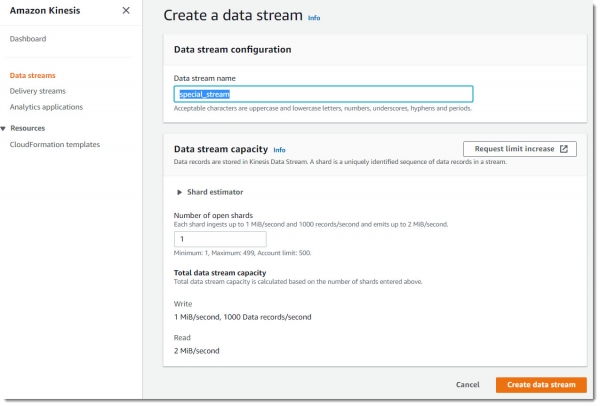
Let's go to the Kinesis Data Streams service and create two new streams, one shard each.
What is a shard?
A shard is the main unit of data transmission in the Amazon Kinesis stream. One shard provides an input data transfer rate of 1 MB/s and an output data transfer rate of 2 MB/s. One shard supports up to 1,000 PUT records per second. When creating a data stream, the required number of shards must be specified. For example, a data stream can be created with two shards. This data stream will provide an input data transfer rate of 2 MB/s and an output data transfer rate of 4 MB/s, supporting up to 2,000 PUT records per second.
The more shards in your stream, the greater its throughput. Essentially, streams are scaled by adding shards. However, the more shards you have, the higher the cost. Each shard costs 1.5 cents per hour and an additional 1.4 cents for every million PUT payload units.
Let's create a new stream named airline_tickets, one shard will be sufficient for it:
Now let's create another stream named special_stream:
Setting up the producer
As a data producer for parsing the task, a regular EC2 instance is sufficient. It doesn't need to be a powerful, expensive virtual machine; a spot t2.micro will be perfectly fine.
Important note: for the example, use the image — Amazon Linux AMI 2018.03.0, as it requires fewer configurations for quickly launching Kinesis Agent.
Go to the EC2 service, create a new virtual machine, select the desired AMI with the type t2.micro, which is included in the Free Tier:
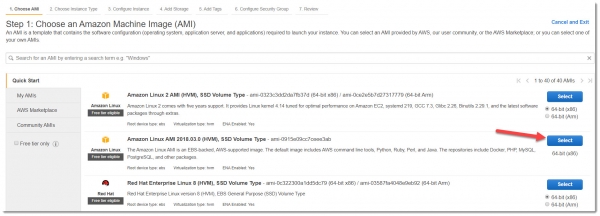
To allow the newly created virtual machine to interact with the Kinesis service, it is necessary to grant it the appropriate permissions. The best way to do this is to assign an IAM Role. Therefore, on the Step 3: Configure Instance Details screen, select Create new IAM Role:
Creating an IAM role for EC2
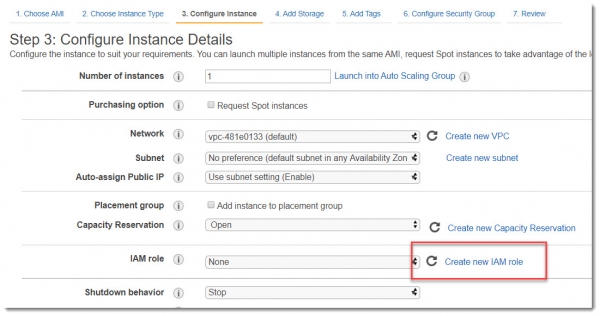
In the opened window, select that we are creating a new role for EC2 and go to the Permissions section:
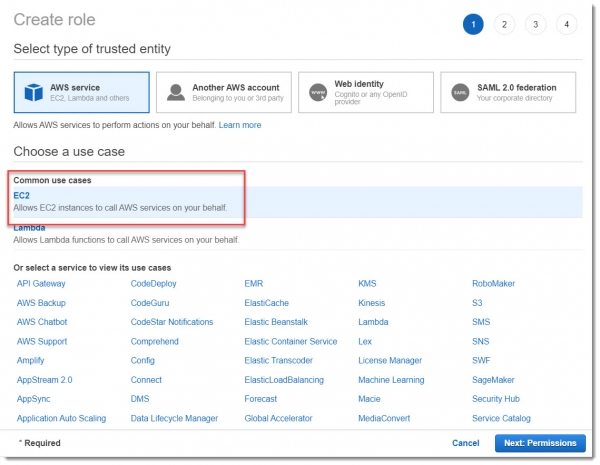
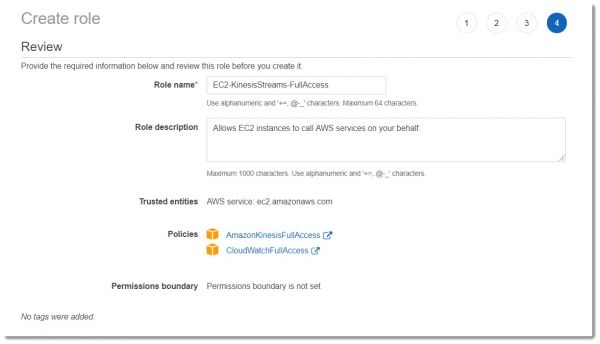
For this tutorial example, we do not need to go into all the details of granular permission configuration, so we will choose the preconfigured Amazon policies: AmazonKinesisFullAccess and CloudWatchFullAccess.
Let’s give this role a meaningful name, for example: EC2-KinesisStreams-FullAccess. As a result, it should look the same as shown in the picture below:
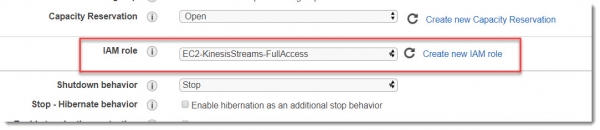
After creating this new role, remember to attach it to the instance of the virtual machine being created:
We do not change anything else on this screen and proceed to the next windows.
You can leave the disk parameters at their default values and the tags as well (although, it is good practice to use tags, at least to give a name to the instance and specify the environment).
Now we are on the Step 6: Configure Security Group tab, where you need to create a new one or indicate your existing Security group that allows connecting via ssh (port 22) to the instance. Select there Source -> My IP and you can launch the instance.
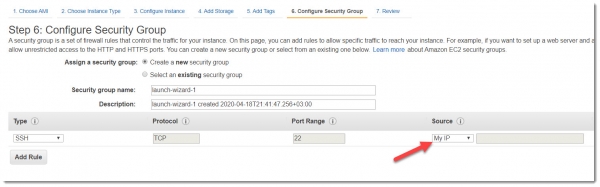
As soon as it transitions to the running status, you can attempt to connect to it via ssh.
To enable working with Kinesis Agent, after successfully connecting to the machine, enter the following commands in the terminal:
sudo yum -y update
sudo yum install -y python36 python36-pip
sudo /usr/bin/pip-3.6 install --upgrade pip
sudo yum install -y aws-kinesis-agent
Create a folder to store the API responses:
sudo mkdir /var/log/airline_ticketsBefore starting the agent, it is necessary to configure its settings:
sudo vim /etc/aws-kinesis/agent.jsonThe content of the file agent.json should have the following format:
{
  "cloudwatch.emitMetrics": true,
  "kinesis.endpoint": "",
  "firehose.endpoint": "",

  "flows": [
    {
      "filePattern": "\/var\/log\/airline_tickets\/*.log",
      "kinesisStream": "airline_tickets",
      "partitionKeyOption": "RANDOM",
      "dataProcessingOptions": [
         {
            "optionName": "CSVTOJSON",
            "customFieldNames": ["cost","trip_class","show_to_affiliates",
                "return_date","origin","number_of_changes","gate","found_at",
                "duration","distance","destination","depart_date","actual","record_id"]
         }
      ]
    }
  ]
}
As seen in the configuration file, the agent will monitor the directory \/var\/log\/airline_tickets\/ for files with the .log extension, parse them, and transmit to the airline_tickets stream.
We restart the service and ensure that it has started and is running:
sudo service aws-kinesis-agent restartNow we will download the Python script that will request data from the API:
REPO_PATH=https:\/\/raw.githubusercontent.com\/igorgorbenko\/aviasales_kinesis\/master\/producer

wget $REPO_PATH\/api_caller.py -P \/home\/ec2-user\/
wget $REPO_PATH\/requirements.txt -P \/home\/ec2-user\/
sudo chmod a+x \/home\/ec2-user\/api_caller.py
sudo \/usr\/local\/bin\/pip3 install -r \/home\/ec2-user\/requirements.txt
The script api_caller.py requests data from Aviasales and saves the received response in the directory that the Kinesis agent scans. The implementation of this script is quite standard; there is a class TicketsApi that allows asynchronous API calls. We pass the header with the token and request parameters to this class:
class TicketsApi:
    """API caller class."""

    def __init__(self, headers):
        """Initialization method."""
        self.base_url = BASE_URL
        self.headers = headers

    async def get_data(self, data):
        """Retrieve data from API query."""
        response_json = {}
        async with ClientSession(headers=self.headers) as session:
            try:
                response = await session.get(self.base_url, data=data)
                response.raise_for_status()
                LOGGER.info('Response status %s: %s',
                            self.base_url, response.status)
                response_json = await response.json()
            except HTTPError as http_err:
                LOGGER.error('Oops! HTTP error occurred: %s', str(http_err))
            except Exception as err:
                LOGGER.error('Oops! An error occurred: %s', str(err))
            return response_json


def prepare_request(api_token):
    """Return the headers and query for the API request."""
    headers = {'X-Access-Token': api_token,
               'Accept-Encoding': 'gzip'}

    data = FormData()
    data.add_field('currency', CURRENCY)
    data.add_field('origin', ORIGIN)
    data.add_field('destination', DESTINATION)
    data.add_field('show_to_affiliates', SHOW_TO_AFFILIATES)
    data.add_field('trip_duration', TRIP_DURATION)
    return headers, data


async def main():
    """Execute the code."""
    if len(sys.argv) != 2:
        print('Usage: api_caller.py ')
        sys.exit(1)
        return
    api_token = sys.argv[1]
    headers, data = prepare_request(api_token)

    api = TicketsApi(headers)
    response = await api.get_data(data)
    if response.get('success', None):
        LOGGER.info('API has returned %s items', len(response['data']))
        try:
            count_rows = log_maker(response)
            LOGGER.info('%s rows have been saved into %s',
                        count_rows,
                        TARGET_FILE)
        except Exception as e:
            LOGGER.error('Oops! Request result was not saved to file. %s',
                         str(e))
    else:
        LOGGER.error('Oops! API request was unsuccessful %s!', response)
To test the correctness of the settings and the functionality of the agent, let's do a test run of the script api_caller.py:
sudo ./api_caller.py TOKEN 
And we check the result in the Agent logs and on the Monitoring tab in the airline_tickets data stream:
tail -f /var/log/aws-kinesis-agent/aws-kinesis-agent.log 
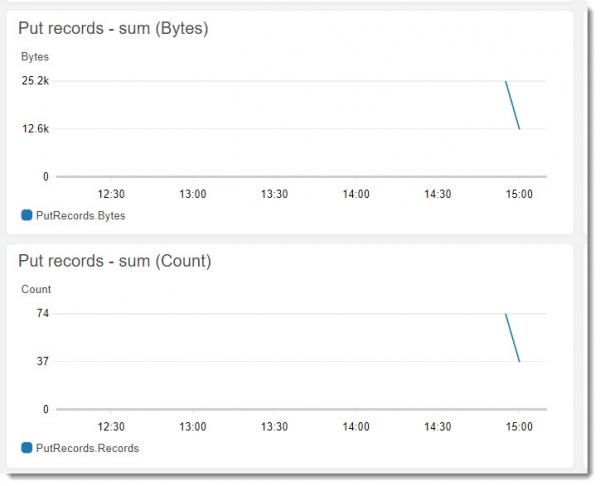
As we can see, everything is working, and the Kinesis Agent successfully sends data to the stream. Now let's set up the consumer.
Configuring Kinesis Data Analytics
Let's move on to the central component of the entire system — we will create a new application in Kinesis Data Analytics named kinesis_analytics_airlines_app:
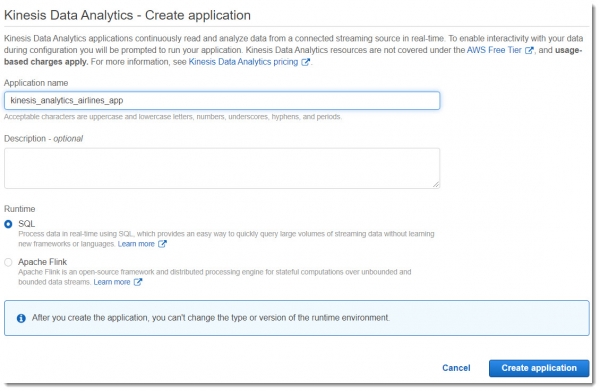
Kinesis Data Analytics allows real-time data analytics from Kinesis Streams using SQL. This is a fully scalable service (unlike Kinesis Streams), which:
- allows the creation of new streams (Output Stream) based on queries to the source data;
- provides an error stream for errors that occurred during the operation of applications (Error Stream);
- can automatically detect the schema of incoming data (which can be manually overridden if necessary).
This is not a cheap service — 0.11 USD per hour of operation, so it should be used carefully and deleted once the work is completed.
We'll connect the application to the data source:
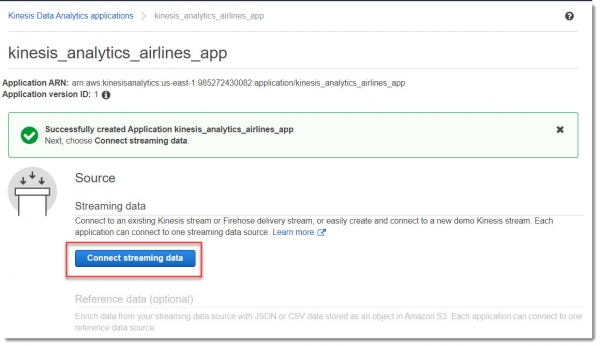
Select the stream we intend to connect to (airline_tickets):
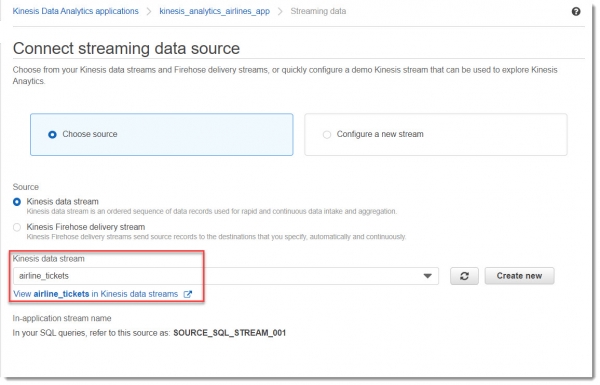
Next, we need to attach a new IAM Role so the application can read from the stream and write to the stream. For this, you don't need to change anything in the Access permissions block:
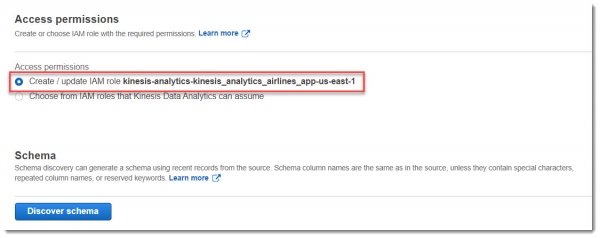
Now we will request schema discovery in the stream by clicking the ‘Discover schema’ button. As a result, a new IAM role will be created, and schema discovery will begin from the data that has already arrived in the stream:
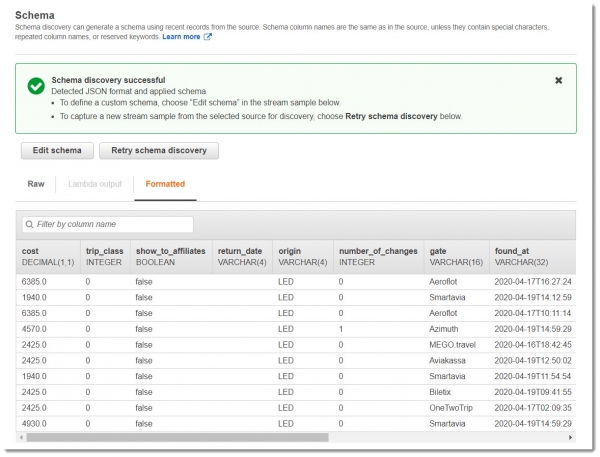
Now we need to go to the SQL editor. When you click this button, a window will pop up asking about launching the application — select what we want to launch:
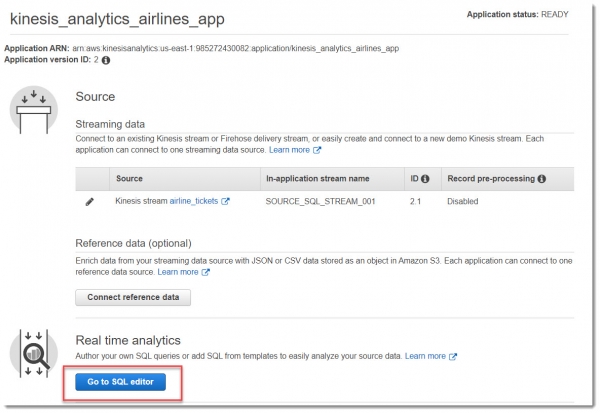
In the SQL editor window, insert this simple query and click Save and Run SQL:
CREATE OR REPLACE STREAM "DESTINATION_SQL_STREAM" ("cost" DOUBLE, "gate" VARCHAR(16));

CREATE OR REPLACE PUMP "STREAM_PUMP" AS INSERT INTO "DESTINATION_SQL_STREAM"
SELECT STREAM "cost", "gate"
FROM "SOURCE_SQL_STREAM_001"
WHERE "cost" < 5000
    and "gate" = 'Aeroflot';
In relational databases, you work with tables using INSERT operators to add records and the SELECT operator to query data. In Amazon Kinesis Data Analytics, you work with streams (STREAM) and 'pumps' (PUMP) — continuous insert queries that insert data from one stream in the application to another stream.
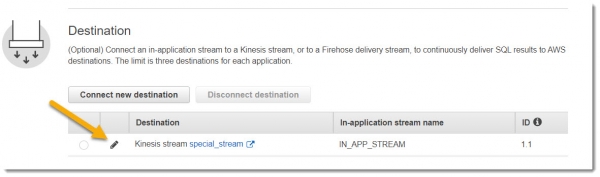
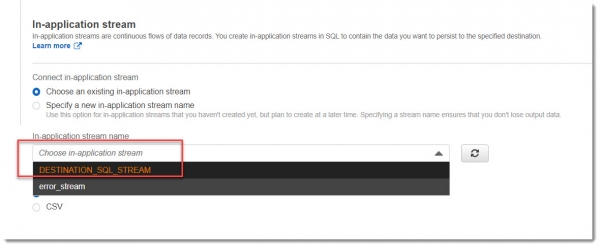
In the above SQL query, we are looking for Aeroflot tickets costing less than five thousand rubles. All records that meet these criteria will be placed into the DESTINATION_SQL_STREAM.
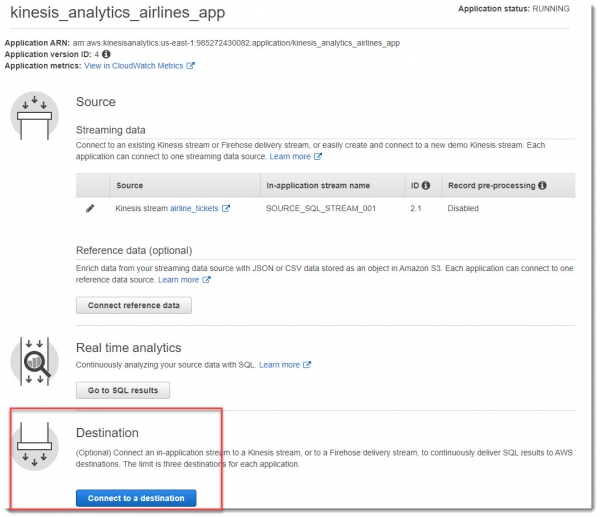
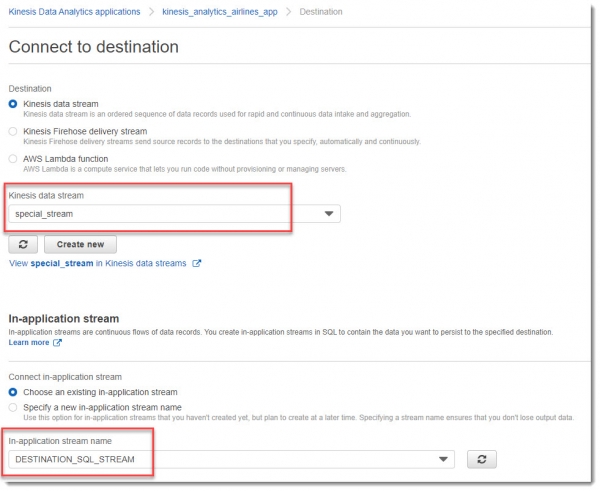
In the Destination block, select the special_stream, and in the In-application stream name dropdown, select DESTINATION_SQL_STREAM:
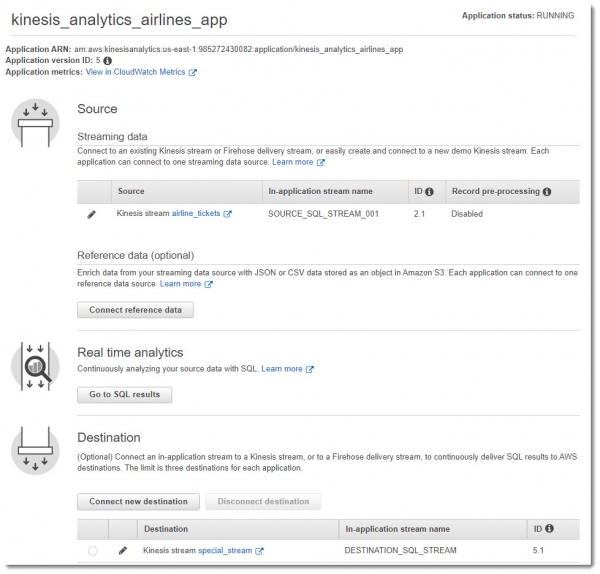
As a result of all manipulations, it should look something like the image below:
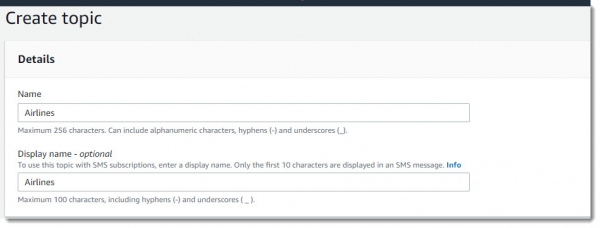
Creating and subscribing to an SNS topic
Go to the Simple Notification Service and create a new topic named Airlines:
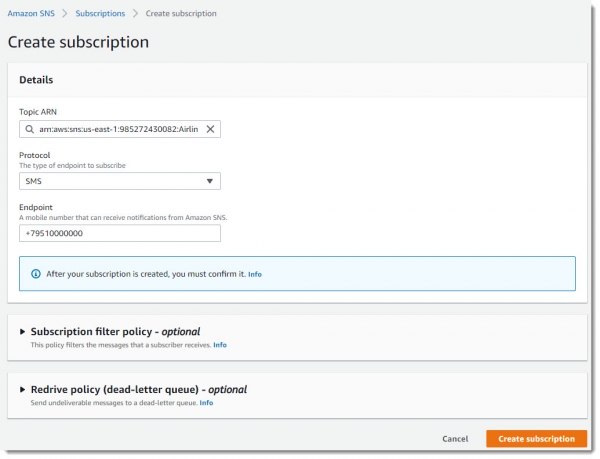
We subscribe to this topic, indicating the mobile phone number to which SMS notifications will be sent:
Creating a table in DynamoDB
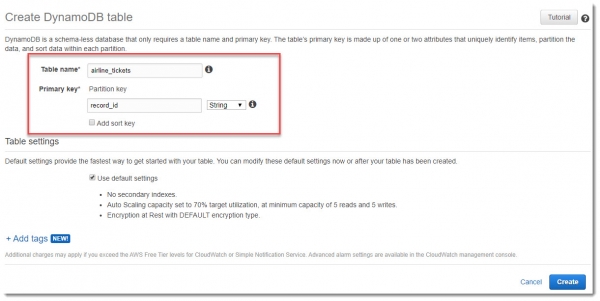
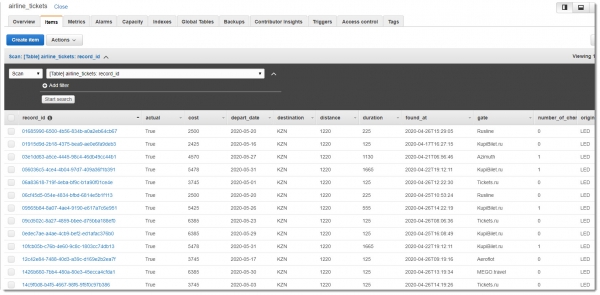
To store the raw data from the airline_tickets stream, we will create a table in DynamoDB with the same name. We will use record_id as the primary key:
Creating a lambda function collector
We will create a lambda function called Collector, which will poll the airline_tickets stream and, if new records are found, insert these records into a DynamoDB table. Obviously, besides the default permissions, this lambda must have access to read from the Kinesis data stream and write to DynamoDB.
Creating an IAM role for the collector lambda function
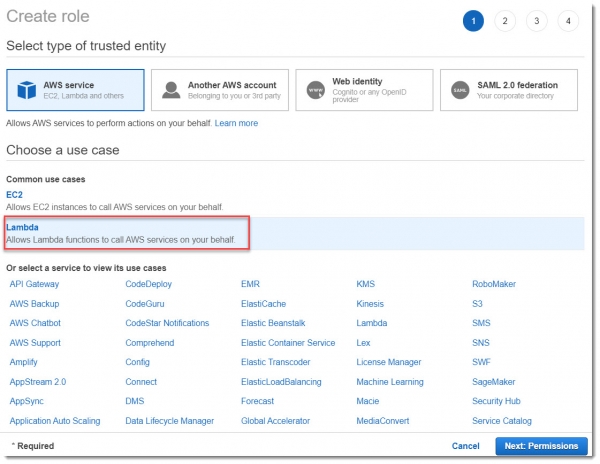
First, we will create a new IAM role for the lambda named Lambda-TicketsProcessingRole:
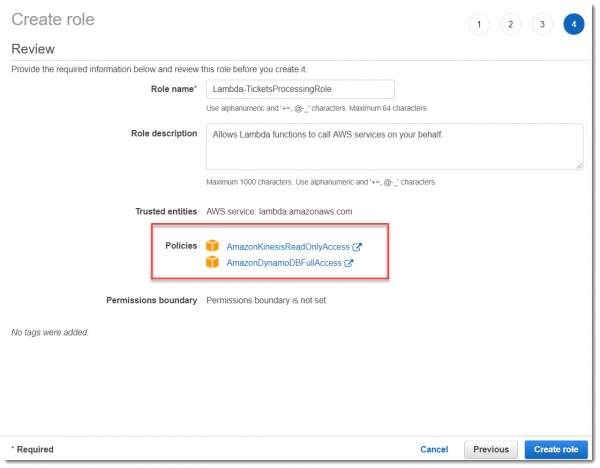
For our test example, the preconfigured policies AmazonKinesisReadOnlyAccess and AmazonDynamoDBFullAccess will suffice, as shown in the image below:
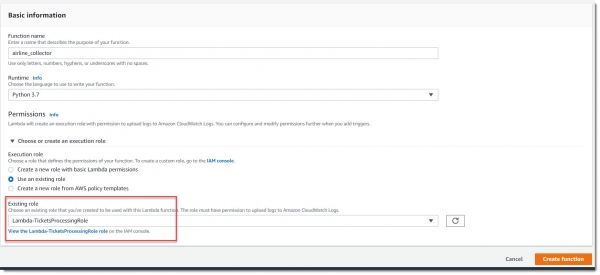
This lambda should be triggered by Kinesis when new records are added to the airline_stream, so we need to add a new trigger:
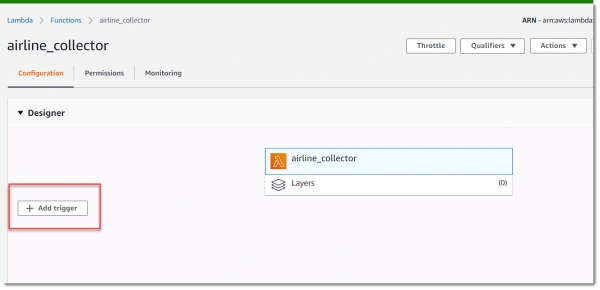
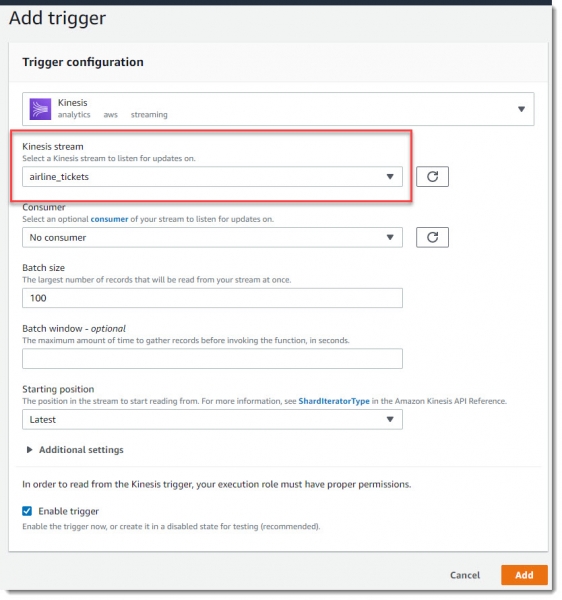
Now, just insert the code and save the lambda.
"""Parsing the stream and inserting into the DynamoDB table."""
import base64
import json
import boto3
from decimal import Decimal

DYNAMO_DB = boto3.resource('dynamodb')
TABLE_NAME = 'airline_tickets'

class TicketsParser:
    """Parsing info from the Stream."""

    def __init__(self, table_name, records):
        """Init method."""
        self.table = DYNAMO_DB.Table(table_name)
        self.json_data = TicketsParser.get_json_data(records)

    @staticmethod
    def get_json_data(records):
        """Return deserialized data from the stream."""
        decoded_record_data = ([base64.b64decode(record['kinesis']['data'])
                                for record in records])
        json_data = ([json.loads(decoded_record)
                      for decoded_record in decoded_record_data])
        return json_data

    @staticmethod
    def get_item_from_json(json_item):
        """Pre-process the json data."""
        new_item = {
            'record_id': json_item.get('record_id'),
            'cost': Decimal(json_item.get('cost')),
            'trip_class': json_item.get('trip_class'),
            'show_to_affiliates': json_item.get('show_to_affiliates'),
            'origin': json_item.get('origin'),
            'number_of_changes': int(json_item.get('number_of_changes')),
            'gate': json_item.get('gate'),
            'found_at': json_item.get('found_at'),
            'duration': int(json_item.get('duration')),
            'distance': int(json_item.get('distance')),
            'destination': json_item.get('destination'),
            'depart_date': json_item.get('depart_date'),
            'actual': json_item.get('actual')
        }
        return new_item

    def run(self):
        """Batch insert into the table."""
        with self.table.batch_writer() as batch_writer:
            for item in self.json_data:
                dynamodb_item = TicketsParser.get_item_from_json(item)
                batch_writer.put_item(dynamodb_item)

        print('Has been added ', len(self.json_data), 'items')

def lambda_handler(event, context):
    """Parse the stream and insert into the DynamoDB table."""
    print('Got event:', event)
    parser = TicketsParser(TABLE_NAME, event['Records'])
    parser.run()
Creating a notifier lambda function
The second lambda function, which will monitor the second stream (special_stream) and send notifications to SNS, is created in a similar way. Therefore, this lambda must have read access from Kinesis and the ability to send messages to the specified SNS topic, which will then be sent by the SNS service to all subscribers of this topic (email, SMS, etc.).
Creating an IAM Role
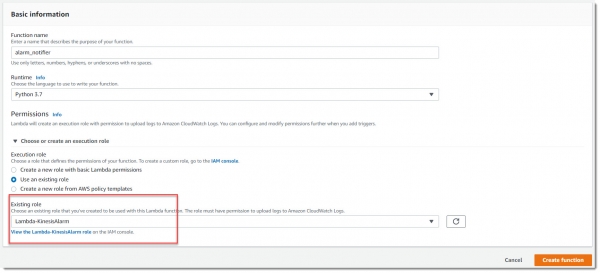
First, we create the IAM role Lambda-KinesisAlarm for this lambda, and then we assign this role to the created alarm_notifier lambda:
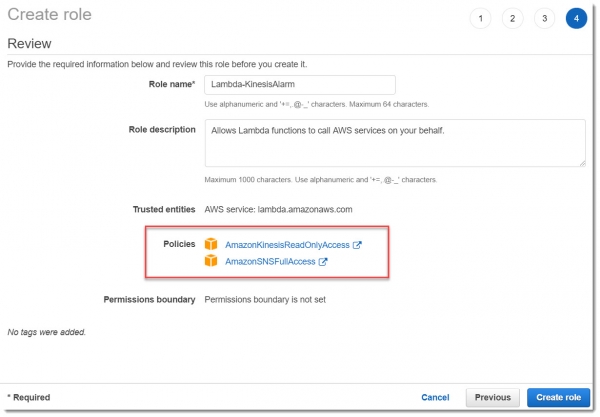
This lambda should work on a trigger for new records in the special_stream, so it is necessary to set up the trigger similarly to how we did for the Collector lambda.
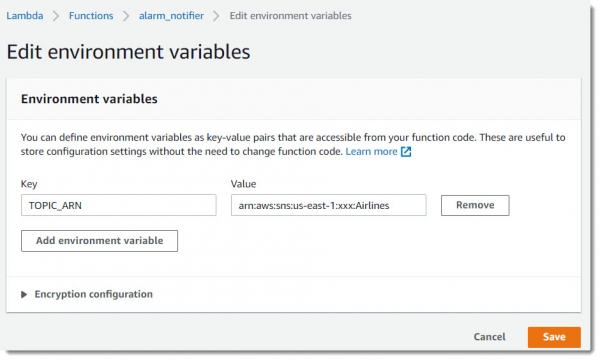
For the convenience of configuring this lambda, we will introduce a new environment variable — TOPIC_ARN, where we place the ARN (Amazon Resource Names) of the Airlines topic:
And we insert the lambda code; it's quite simple:
import boto3
import base64
import os

SNS_CLIENT = boto3.client('sns')
TOPIC_ARN = os.environ['TOPIC_ARN']


def lambda_handler(event, context):
    try:
        SNS_CLIENT.publish(TopicArn=TOPIC_ARN,
                           Message='Hi! I have found an interesting stuff!',
                           Subject='Airline tickets alarm')
        print('Alarm message has been successfully delivered')
    except Exception as err:
        print('Delivery failure', str(err))
It seems that the manual setup of the system is now complete. We only need to test and ensure that everything is configured correctly.
Deployment from Terraform code
Required preparation
— a very convenient open-source tool for deploying infrastructure from code. It has its own syntax, which is easy to learn, and many examples of how and what to deploy. There are many useful plugins in the Atom or Visual Studio Code editors that make working with Terraform easier.
You can download the distribution . A detailed breakdown of all the capabilities of Terraform goes beyond the scope of this article, so we will stick to the main points.
How to Run
The complete project code is located . Clone the repository to your own machine. Before running, it is important to ensure that you have the AWS CLI installed and configured, as Terraform will look for credentials in the file ~/ .aws / credentials.
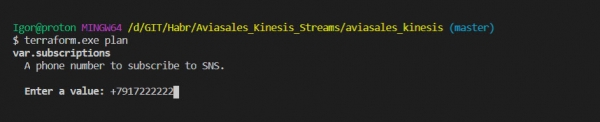
It is a good practice to run the plan command before deploying the entire infrastructure to see what Terraform will create in the cloud:
terraform.exe planYou will be prompted to enter your phone number to send notifications to it. At this stage, entering it is not mandatory.
After analyzing the program's work plan, we can begin creating resources:
terraform.exe applyAfter sending this command, a prompt for your phone number will appear again. Type 'yes' when asked if you want to proceed. This will allow the entire infrastructure to be raised, configure all necessary EC2 settings, deploy lambda functions, etc.
Once all resources are successfully created via Terraform code, you need to access the details of the Kinesis Analytics application (unfortunately, I couldn't find how to do this directly from the code).
Starting the application:
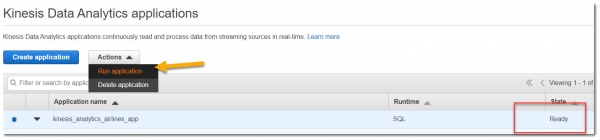
After this, you must explicitly set the in-application stream name by selecting it from the dropdown list:
Everything is now ready to go.
Testing the application
Regardless of how you deployed the system, whether manually or via Terraform code, it will function the same.
Access the EC2 virtual machine via SSH, where the Kinesis Agent is installed, and run the script api_caller.py.
sudo ./api_caller.py TOKENNow we just need to wait for the SMS on your number:

The SMS—message arrives on the phone in about 1 minute:
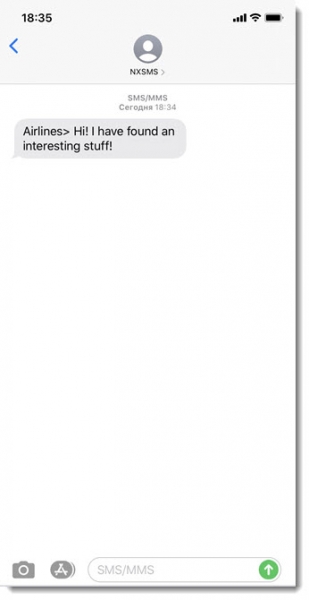
Next, we need to check whether the records are saved in the DynamoDB database for further, more detailed analysis. The table airline_tickets contains approximately the following data:
Conclusion
As a result of the work done, a real-time data processing system was built based on Amazon Kinesis. Various options for using the Kinesis Agent in conjunction with Kinesis Data Streams and real-time analytics with Kinesis Analytics using SQL commands were examined, as well as the interaction of Amazon Kinesis with other AWS services.
The aforementioned system was deployed in two ways: a lengthy manual method and a quicker one using Terraform code.
The entire source code of the project is available , I invite you to take a look at it.
I am happy to discuss the article and look forward to your comments. I hope for constructive criticism.
Wishing you success!
Source: habr.com
