

In my work, I often experience obsessions regarding the lack of information about infrastructure. As the number of servers I manage increases, this becomes a real torment. Even when I was an admin in small organizations, I always wanted to know where everything was located, where it was plugged in, who was responsible for which piece of hardware or service, and most importantly, to document changes throughout. When you arrive in a new place and face an incident, a lot of time is spent searching for this information. Next, I will share what I encountered at RuVDS and how I resolved the issue mentioned in the title.
Background
As an enterprise admin, I had little experience working in a data center, but I caught a glimpse of RackTables. It clearly displayed the rack with all the servers, UPSs, switches, and all the connections between them. RuVDS did not have a similar system, only Excel/paper files with information about the servers, some of their components, rack numbers, etc. With this approach, it is very challenging to track changes and keep an eye on smaller components. The most critical and frequently replaced consumable for servers is disks. It is vital to maintain up-to-date information about the status of disks and their strategic reserves. If a disk fails in a RAID array and there is no quick replacement, it could ultimately lead to fatal consequences. Therefore, we need a system to monitor the location of disks and their status to understand what we may be lacking and which specific models need to be purchased.
GLPI came to the rescue, an open-source product designed to improve the operations of IT departments and bring them up to ITIL standards. It includes equipment inventory and rack management, a knowledge base, a service desk, document management, and much more. GLPI has many plugins, including FusionInventory and OCS Inventory, which allow for automatic data collection about computers and other devices through agent installation and SNMP. You can read more about the installation of GLPI and its plugins in other articles, best of all — . It can be installed on our hosting with a ready-made template .
However, after deploying the agent, we will open the computer components in GLPI and see this:

The problem is that none of the plugins can see information about physical disks in LSI RAID arrays. I saw how this issue was solved for monitoring in Zabbix using a PowerShell script. I decided to write a similar one for transferring information to GLPI.
Data about the disks in the array can be obtained using utilities from the controller manufacturer; in the case of LSI, this is StorCLI. From it, you can get data in JSON format, parse it, and pass it to the GLPI API. We will link the disks to the computers already created by FusionInventory. When the script is run again, it will update the disk data and add new ones. The script Send-RAIDtoGLPI.ps1 is located Next, I will explain how to use it.
What is required
- version 9.5.1 (this version was tested)
- Plugin and an agent for Windows
- Windows 2012 R2 (or higher) as the host system, or a management VM with the controller passed through, PowerShell version 4 or above.
- Installed MegaRAID driver.
- PowerShell module —
- An account in GLPI with an Admin profile for API authorization, with generated UserToken and AppToken.
An important point. In GLPI, for some reason, there are 2 different entities for the disk model, but there is no property for "media type." Therefore, to record the property for HDD and SSD, I decided to use the dropdown list "Hard Disk Models" (front/devicemodel.php?itemtype=DeviceHardDriveModel). For the script to function, these values must exist in the GLPI database; otherwise, it cannot record disk model data. Therefore, you need to enter HDD first, then SSD, into this empty list so that the IDs of these elements in the database become 1 and 2. If there are others, then replace in this line of the Send-RAIDtoGLPI.ps1 script after HDD and SSD the corresponding IDs instead of 1 and 2:
deviceharddrivemodels_id = switch ($MediaType) { "HDD" { "1" }; "SSD" { "2" }; default { "" } }If you don't want to deal with this or you're using this dropdown list differently, you can simply remove this line from the script.
You also need to add statuses for the disks in "Element Statuses" (front/state.php). I added the statuses "MediaError" (there was at least one read error to the disk) and "OK"; the line in the script where their IDs are passed, "2" for "OK" and "1" for "MediaError:",
states_id = switch ($MediaError) { 0 { "2" }; { $_ -gt 0 } { "1" } }These statuses are necessary for convenience; if you do not need these properties, you can also delete this line entirely.
In the script, don't forget to specify the variables for your setup. $GlpiCreds should contain the URL to the GLPI API server, UserToken, and AppToken.
What’s in the script
Due to cumbersome JSON parsing and a series of if-statements, the script is poorly readable; hence, I will describe its logic here.
Upon the first run on the host, the script will go through all controllers and look for disks in the GLPI database by their serial numbers. If it doesn’t find them, it will search for the model. If the model is not found either, it will add the new disk model to GLPI and record the disk in the database.
With each new run, the script will attempt to detect new disks, but it cannot remove absent ones, so this will have to be done manually.
Deployment example
In the script repository, there is a script Deploy-Send-RAIDtoGLPI.ps1, which will download a ZIP archive with the necessary files from our GLPI server and deploy them on each host.
After copying the files, the script will install the FusionInventory agent to run as a daily task and create a similar task for our script. After successful implementation, we will finally be able to see the disks in the 'Components' section of the computer in GLPI.
Result
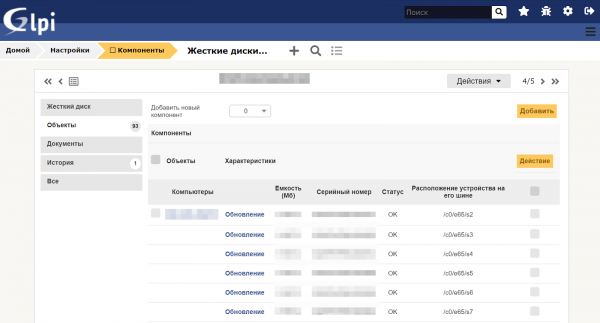
Now, by logging into GLPI and going to the menu 'Settings' -> 'Components' -> 'Hard Disks', we can click on the disk models and check their quantities to determine what we need to purchase.
Source: habr.com
