

In this article, I want to thoroughly discuss the process of publishing a Java artifact from scratch through Github Actions to the Sonatype Maven Central Repository using the Gradle build tool.
I decided to write this article due to the lack of a proper tutorial all in one place. I had to gather all the information piece by piece from various sources, and not all of them were very recent. If you're interested, welcome under the hood.
Creating a repository in Sonatype
The first step is to create a repository in Sonatype Maven Central. For this, we go , register, and create a new task requesting to create a repository for us. We input our GroupId project, Project URL link to the project, and SCM URL link to the version control system where the project resides. GroupId this should be in the form of com.example, com.example.domain, com.example.testsupport, and can also be a link to your GitHub: -> io.github.yourusername. In any case, you will need to confirm ownership of this domain or profile. If you specified a GitHub profile, you will be asked to create a public repository with the required name.
After some time following confirmation, your GroupId will be created, and we can move on to the next step, Gradle configuration.
Configuring Gradle
At the time of writing this article, I couldn’t find any plugins for Gradle that could assist with publishing the artifact. the only plugin I found, however, the author has discontinued its support. Therefore, I decided to do everything myself, as this is not overly complicated.
The first thing to clarify is Sonatype's requirements for publishing. They are as follows:
- The presence of source code and JavaDoc, i.e., the following files must be included:
-sources.jarand-javadoc.jarfiles. As stated in the documentation, if one cannot provide the source code or documentation, a placeholder can be made-sources.jaror-javadoc.jarwith a simple README inside, to pass the verification. - All files must be signed using
GPG/PGP, and.asca file containing the signature must be included for each file. - The presence of
pomfile - Correct values for
groupId,artifactIdandversion. The version can be an arbitrary string and cannot end with-SNAPSHOT - The presence of
name,descriptionandurl - Presence of information about the license, developers, and version control system
These are the main rules that must be followed when publishing. Complete information is available. .
We implement these requirements in build.gradle the file. First, we will add all necessary information about the developers, license, version control system, and also set the URL, name, and description of the project. To do this, we will write a simple method:
def customizePom(pom) {
    pom.withXml {
        def root = asNode()

        root.dependencies.removeAll { dep ->
            dep.scope == "test"
        }

        root.children().last() + {
            resolveStrategy = DELEGATE_FIRST

            description 'Some description of artifact'
            name 'Artifact name'
            url 'https://github.com/login/projectname'
            organization {
                name 'com.github.login'
                url 'https://github.com/login'
            }
            issueManagement {
                system 'GitHub'
                url 'https://github.com/login/projectname/issues'
            }
            licenses {
                license {
                    name 'The Apache License, Version 2.0'
                    url 'http://www.apache.org/licenses/LICENSE-2.0.txt'
                }
            }
            scm {
                url 'https://github.com/login/projectname'
                connection 'scm:https://github.com/login/projectname.git'
                developerConnection 'scm:git://github.com/login/projectname.git'
            }
            developers {
                developer {
                    id 'dev'
                    name 'DevName'
                    email 'email@dev.ru'
                }
            }
        }
    }
}
Next, you need to specify that files are to be generated during the build. -sources.jar and-javadoc.jar To do this, in the java section, you need to add the following:
java {
    withJavadocJar()
    withSourcesJar()
}
Let's move on to the last requirement, the configuration of GPG/PGP signature. To do this, we will connect the plugin signing:
plugins {
    id 'signing'
}
And add the section:
signing {
    sign publishing.publications
}
Finally, let's add the section publishing:
publishing {
    publications {
        mavenJava(MavenPublication) {
            customizePom(pom)
            groupId group
            artifactId archivesBaseName
            version version

            from components.java
        }
    }
    repositories {
        maven {
            url "https://oss.sonatype.org/service/local/staging/deploy/maven2"
            credentials {
                username sonatypeUsername
                password sonatypePassword
            }
        }
    }
}
Here sonatypeUsername and sonatypePassword are the variables containing the username and password created upon registration at .
Thus, the final build.gradle will look as follows:
The complete code of build.gradle
plugins {
    id 'java'
    id 'maven-publish'
    id 'signing'
}

java {
    sourceCompatibility = JavaVersion.VERSION_1_8
    targetCompatibility = JavaVersion.VERSION_1_8
    withJavadocJar()
    withSourcesJar()
}

group 'io.github.githublogin'
archivesBaseName = 'projectname'
version = System.getenv('RELEASE_VERSION') ?: "0.0.1"

repositories {
    mavenCentral()
}

dependencies {
    testImplementation 'org.junit.jupiter:junit-jupiter-api:5.5.2'
    testRuntimeOnly 'org.junit.jupiter:junit-jupiter-engine:5.5.2'
}

test {
    useJUnitPlatform()
}

jar {
    from sourceSets.main.output
    from sourceSets.main.allJava
}

signing {
    sign publishing.publications
}

publishing {
    publications {
        mavenJava(MavenPublication) {
            customizePom(pom)
            groupId group
            artifactId archivesBaseName
            version version

            from components.java
        }
    }
    repositories {
        maven {
            url "https://oss.sonatype.org/service/local/staging/deploy/maven2"
            credentials {
                username sonatypeUsername
                password sonatypePassword
            }
        }
    }
}

def customizePom(pom) {
    pom.withXml {
        def root = asNode()

        root.dependencies.removeAll { dep ->
            dep.scope == "test"
        }

        root.children().last() + {
            resolveStrategy = DELEGATE_FIRST

            description 'Some description of artifact'
            name 'Artifact name'
            url 'https://github.com/login/projectname'
            organization {
                name 'com.github.login'
                url 'https://github.com/githublogin'
            }
            issueManagement {
                system 'GitHub'
                url 'https://github.com/githublogin/projectname/issues'
            }
            licenses {
                license {
                    name 'The Apache License, Version 2.0'
                    url 'http://www.apache.org/licenses/LICENSE-2.0.txt'
                }
            }
            scm {
                url 'https://github.com/githublogin/projectname'
                connection 'scm:https://github.com/githublogin/projectname.git'
                developerConnection 'scm:git://github.com/githublogin/projectname.git'
            }
            developers {
                developer {
                    id 'dev'
                    name 'DevName'
                    email 'email@dev.ru'
                }
            }
        }
    }
}
I want to note that we obtain the version from the environment variable: System.getenv('RELEASE_VERSION'). We will set it during the build and take it from the tag name.
Generating a PGP key
One of the requirements from Sonatype is to sign all files using a GPG/PGP key. For this, we go and download the GnuPG utility for our operating system.
- We generate a key pair:
gpg --gen-key, enter the username, email, and also set a password. - We find out
idour key with the command:gpg --list-secret-keys --keyid-format short. The Id will be indicated after the slash, for example: rsa2048/9B695056 - We publish the public key to the server with the command:
gpg --keyserver [https://keys.openpgp.org](https://keys.openpgp.org/) --send-keys 9B695056 - We export the secret key to an arbitrary location, as we will need it later:
gpg --export-secret-key 9B695056 > D:\gpg\9B695056.gpg
We configure GitHub Actions
Let's move on to the final step, setting up the build and automatic publication using Github Actions.
Github Actions is a feature that allows you to automate your workflow, implementing a complete CI/CD cycle. Builds, tests, and deployments can be triggered by various events: code pushes, release creations, or issues. This functionality is completely free for public repositories.
In this section, I will show how to set up the build and code push and deployment to the Sonatype repository upon release, as well as the configuration of secrets.
Setting up secrets
For automatic builds and deployments, we will need several secret values, such as the key ID, the password we entered when generating the key, the actual PGP key itself, and the username/password for Sonatype. These can be set in a special section in the repository settings:
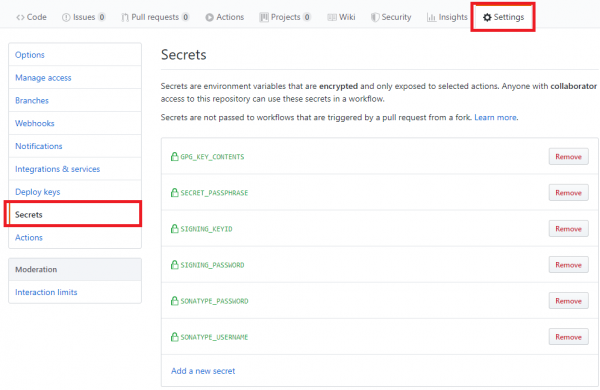
We will configure the following variables:
- SONATYPE_USERNAME/SONATYPE_PASSWORD — the username/password we used when registering with Sonatype
- SIGNING_KEYID/SIGNING_PASSWORD — the PGP key ID and the password set during generation.
I would like to elaborate on the GPG_KEY_CONTENTS variable. The thing is, we need the private PGP key for publishing. To place it in the secrets, I used and additionally performed a series of actions.
- We will encrypt our key using gpg:
gpg --symmetric --cipher-algo AES256 9B695056.gpg, entering the password. It should be placed in the variable: SECRET_PASSPHRASE - Let's convert the obtained encrypted key to text format using base64:
base64 9B695056.gpg.gpg > 9B695056.txt. The contents will be placed in the variable: GPG_KEY_CONTENTS.
Setting up the build when pushing code and creating PR
First, you need to create a folder in the root of your project: .github/workflows.
In it, place a file, for example, gradle-ci-build.yml with the following content:
name: build

on:
  push:
    branches:
      - master
      - dev
      - testing
  pull_request:

jobs:
  build:
    runs-on: ubuntu-latest
    steps:
      - uses: actions/checkout@v1
      - name: Set up JDK 8
        uses: actions/setup-java@v1
        with:
          java-version: 8

      - name: Build with Gradle
        uses: eskatos/gradle-command-action@v1
        with:
          gradle-version: current
          arguments: build -PsonatypeUsername=${{secrets.SONATYPE_USERNAME}} -PsonatypePassword=${{secrets.SONATYPE_PASSWORD}}
This workflow will run when pushing to the branches master, dev and testing, and also when creating pull requests.
The jobs section outlines the steps that should be executed based on the specified events. In this case, we will be compiling on the latest version of Ubuntu, using Java 8, and also utilizing a plugin for Gradle. eskatos/gradle-command-action@v1, which will execute the commands specified in the latest version of the builder. arguments. The variables secrets.SONATYPE_USERNAME and secrets.SONATYPE_PASSWORD are the secrets we defined earlier.
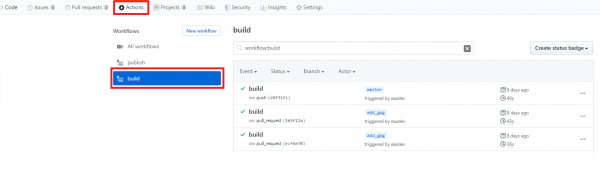
The build results will be reflected in the Actions tab:
Auto-deploy on release of a new version
For auto-deploy, we will create a separate workflow file gradle-ci-publish.yml:
name: publish

on:
  push:
    tags:
      - 'v*'

jobs:
  publish:
    runs-on: ubuntu-latest
    steps:
      - uses: actions/checkout@v1
      - name: Set up JDK 8
        uses: actions/setup-java@v1
        with:
          java-version: 8

      - name: Prepare to publish
        run: |
          echo '${{secrets.GPG_KEY_CONTENTS}}' | base64 -d > publish_key.gpg
          gpg --quiet --batch --yes --decrypt --passphrase="${{secrets.SECRET_PASSPHRASE}}"
          --output secret.gpg publish_key.gpg
          echo "::set-env name=RELEASE_VERSION::${GITHUB_REF:11}"

      - name: Publish with Gradle
        uses: eskatos/gradle-command-action@v1
        with:
          gradle-version: current
          arguments: test publish -Psigning.secretKeyRingFile=secret.gpg -Psigning.keyId=${{secrets.SIGNING_KEYID}} -Psigning.password=${{secrets.SIGNING_PASSWORD}} -PsonatypeUsername=${{secrets.SONATYPE_USERNAME}} -PsonatypePassword=${{secrets.SONATYPE_PASSWORD}}
The file is almost identical to the previous one except for the event that triggers it. In this case, it is triggered by the creation of a tag starting with v.
Before deploying, we need to retrieve the PGP key from the secrets, place it in the project root, and decrypt it. Next, we need to set a special environment variable RELEASE_VERSION which we refer to in the gradle.build file. All of this is done in the section Prepare to publish. We obtain our key from the GPG_KEY_CONTENTS variable, convert it into a gpg file, then decrypt it, placing it in the file secret.gpg.
Next, we reference a special variable GITHUB_REF, from which we can extract the version that we specified when creating the tag. This variable, in this case, has the value refs/tags/v0.0.2 from which we trim the first 11 characters to obtain the specific version. Then we standardly use Gradle commands for publication: test publish
Checking the deployment results in the Sonatype repository
After creating a release, the workflow described in the previous section should start. To do this, we create a release:
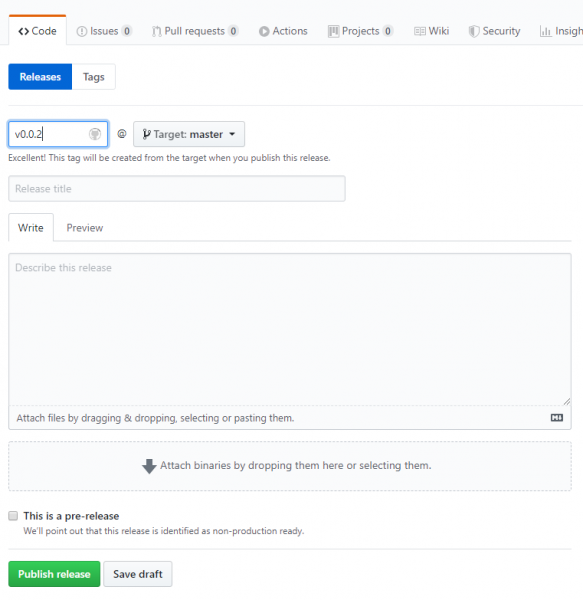
the tag name must start with v. If the workflow is successful after clicking Publish release, we can go to to verify this:
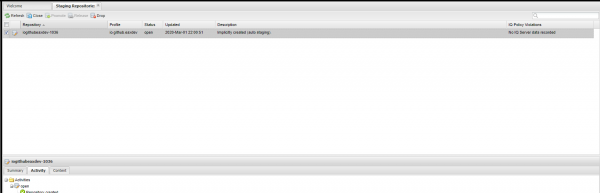
The artifact appears in the Staging repository. Initially, it appears as Open, after which it needs to be manually changed to Closed by clicking the corresponding button. Once all requirements are confirmed, the artifact transitions to Closing status and is no longer available for modification. In this form, it will go to MavenCentral. If everything is fine, you can click the button Release, which will place the artifact in the Sonatype repository.
In order for the artifact to get to MavenCentral, you need to request it in the task we created at the very beginning. This needs to be done only once, as we are publishing for the first time. In subsequent instances, this is not required, everything will synchronize automatically. They enabled synchronization for me quickly, but it took about 5 days for the artifact to become available in MavenCentral.
That's it; we have published our artifact to MavenCentral.
Useful links
- Similar , just publishing through Maven
- Staging Sonatype
- Sonatype, where you need to create a task
- repository where everything is configured
Source: habr.com
