

In this part of our Docker series translation, we will discuss data management, specifically Docker volumes. Throughout these materials, we've continually compared Docker's software mechanisms to various culinary analogies. Let’s not deviate from this tradition here. Data in Docker can be considered as spices. The world has many types of spices, and Docker has numerous ways to work with data.
→
→
→
→
→
→
Please note that this material is prepared using Docker Engine version 18.09.1 and API version .
Data in Docker can be stored temporarily or permanently. Let’s start with temporary data.
Temporary data storage
In Docker containers, there are two ways to manage temporary data.
By default, files created by applications running in a container are saved in a writable layer of the container. For this mechanism, no special configuration is needed. It’s simple and effective. The application just needs to save the data and continue working. However, once the container ceases to exist, the data saved this way will also disappear.
Another solution for storing temporary files in Docker is available for cases that require a higher performance level compared to the standard temporary data storage mechanism. If you don’t need your data to persist beyond the life of the container, you can connect tmpfs—a temporary storage system that uses the host's RAM. This will speed up data read and write operations.
Often, data needs to be stored even after the container has ceased to exist. For this, we will need mechanisms for persistent data storage.
Persistent Data Storage
There are two ways to extend the data lifespan beyond the container lifespan. One method involves using bind mount technology. With this approach, you can mount a real folder to the container. Processes outside of Docker will be able to work with the data stored in that folder. Here’s how tmpfs mounting and bind mount technology.
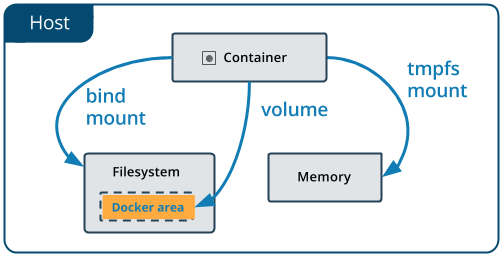
tmpfs mounting and bind mount
The downsides of using bind mount technology are that it complicates data backup, data migration, and sharing data among multiple containers. It is much better to use Docker volumes for persistent data storage.
Docker volumes
A volume is a file system that resides on the host machine outside of containers. Docker is responsible for creating and managing volumes. Here are the main characteristics of Docker volumes:
- They are means for permanent information storage.
- They are autonomous and separate from containers.
- They can be shared among different containers.
- They allow for efficient reading and writing of data.
- Volumes can be hosted on resources of a remote cloud provider.
- They can be encrypted.
- They can be named.
- A container can pre-fill a volume with data.
- They are convenient for testing.
As you can see, Docker volumes have remarkable properties. Let’s talk about how to create them.
Creating volumes
Volumes can be created using Docker or through API requests.
Here’s an instruction in Dockerfile that allows you to create a volume when starting a container.
VOLUME /my_volumeWith such an instruction in Docker, after creating the container, a volume will be created containing the data that already exists in the specified location. Note that if you create a volume using Dockerfile, it does not exempt you from specifying the volume's mount point.
Volumes can also be created in Dockerfile using the JSON format.
Additionally, volumes can be created using command line tools while the container is running.
Managing volumes from the command line
▍Creating a volume
You can create an independent volume with the following command:
docker volume create --name my_volume▍Checking information about volumes
To view the list of Docker volumes, use the following command:
docker volume lsYou can inspect a specific volume like this:
docker volume inspect my_volume▍Removing a Volume
You can remove a volume like this:
docker volume rm my_volumeTo remove all volumes that are not used by containers, you can use the following command:
docker volume pruneBefore removing volumes, Docker will prompt you for confirmation to perform this operation.
If a volume is associated with a container, that volume cannot be removed until the corresponding container is deleted. However, even if the container is deleted, Docker does not always recognize it. If this happens, you can use the following command:
docker system pruneIt is intended to clean up Docker resources. After executing this command, you should be able to remove volumes that were previously incorrectly identified.
The flags --mount and --volume
When working with volumes, you will often need to use flags when invoking the command. dockerFor example, to create a volume while creating a container, you can use the following construction:
docker container run --mount source=my_volume, target=/container/path/for/volume my_image In the old days (before 2017), the flag --volumewas popular. Originally, this flag (it can also be used in a shortened form, looking like -v) was used for standalone containers, while the flag --mount was for Docker Swarm environments. However, starting from Docker 17.06, the flag --mount can be used in any scenarios.
It should be noted that using the flag --mount increases the amount of additional data you need to specify in the command, but for several reasons, it is better to use this flag instead of --volume. The flag --mount -- this is the only mechanism that allows working with services or specifying volume driver parameters. Furthermore, it is simpler to work with this flag.
In existing command examples that focus on working with data in Docker, you can find many instances of using the flag -v. When trying to adapt these commands for yourself, consider that the flags --mount and --volume use different parameter formats. That is, you cannot simply replace -v to --mount and get a working command.
The main difference between --mount and --volume is that when using the flag --volume all parameters are collected together in one field, whereas when using --mount parameters are separated.
When working with --mount parameters are presented as key-value pairs, specifically, it looks like key=value. These pairs are separated by commas. Here are commonly used parameters --mount:
type— mount type. The value for the corresponding key can be , or . Here we are talking about volumes, meaning we are interested in the valuevolume.source— mount source. For named volumes, this is the volume name. For unnamed volumes, this key is not specified. It can be shortened tosrc.destination— the path where the file or folder is mounted in the container. This key can be shortened todstortarget.readonly— mounts a volume that is intended . This key is optional, and it does not have a value assigned.
Here is an example of usage --mount with multiple parameters:
docker run --mount type=volume,source=volume_name,destination=\/path\/in\/container,readonly my_imageSummary
Here are useful commands that can be used when working with Docker volumes:
docker volume createdocker volume lsdocker volume inspectdocker volume rmdocker volume prune
Here is a list of commonly used parameters for --mount, applicable in a command of the form docker run --mount my_options my_image:
type=volumesource=volume_namedestination=\/path\/in\/containerreadonly
Now that we've completed this series of materials on Docker, it's time to say a few words about where those studying Docker can go next. a great article about Docker. a book on Docker (when buying this book, try to get the most recent edition). another book that would suit those who believe that practice is the best way to learn technologies.
Dear readers! What materials on Docker would you recommend for beginners?
Source: habr.com
