

Despite the fact that everyone knows perfectly well that it is important and necessary to test your software, and many have been doing it automatically for a long time, in the vastness of Habr there was not a single recipe for setting up a bunch of such popular products in this niche as (we love) GitLab and JUnit . Let's fill this gap!

Introductory
Let me start with the context:
- Since all of our applications run on Kubernetes, running the tests on the appropriate infrastructure will be considered.
- To build and deploy we use (in terms of infrastructure components, this also automatically means that Helm is involved).
- I will not go into the details of directly creating tests: in our case, the client writes the tests himself, and we only ensure their launch (and the presence of the corresponding report in the merge request).
What will the general sequence of actions look like?
- Assembly of the application - we will omit the description of this stage.
- Deploy the application to a separate namespace of the Kubernetes cluster and start testing.
- Finding artifacts and parsing a JUnit report by GitLab.
- Removing the previously created namespace'a.
Now - to implementation!
Setting
GitLab CI
Let's start with a snippet .gitlab-ci.yaml, which describes the deployment of the application and the launch of tests. The listing turned out to be quite voluminous, therefore it is thoroughly supplemented with comments:
variables:
# объявляем версию werf, которую собираемся использовать
  WERF_VERSION: "1.0 beta"

.base_deploy: &base_deploy
  script:
# создаем namespace в K8s, если его нет
    - kubectl --context="${WERF_KUBE_CONTEXT}" get ns ${CI_ENVIRONMENT_SLUG} || kubectl create ns ${CI_ENVIRONMENT_SLUG}
# загружаем werf и деплоим — подробнее об этом см. в документации
# (https://werf.io/how_to/gitlab_ci_cd_integration.html#deploy-stage)
    - type multiwerf && source <(multiwerf use ${WERF_VERSION})
    - werf version
    - type werf && source <(werf ci-env gitlab --tagging-strategy tag-or-branch --verbose)
    - werf deploy --stages-storage :local
      --namespace ${CI_ENVIRONMENT_SLUG}
      --set "global.commit_ref_slug=${CI_COMMIT_REF_SLUG:-''}"
# передаем переменную `run_tests`
# она будет использоваться в рендере Helm-релиза
      --set "global.run_tests=${RUN_TESTS:-no}"
      --set "global.env=${CI_ENVIRONMENT_SLUG}"
# изменяем timeout (бывают долгие тесты) и передаем его в релиз
      --set "global.ci_timeout=${CI_TIMEOUT:-900}"
     --timeout ${CI_TIMEOUT:-900}
  dependencies:
    - Build

.test-base: &test-base
  extends: .base_deploy
  before_script:
# создаем директорию для будущего отчета, исходя из $CI_COMMIT_REF_SLUG
    - mkdir /mnt/tests/${CI_COMMIT_REF_SLUG} || true
# вынужденный костыль, т.к. GitLab хочет получить артефакты в своем build-dir’е
    - mkdir ./tests || true
    - ln -s /mnt/tests/${CI_COMMIT_REF_SLUG} ./tests/${CI_COMMIT_REF_SLUG}
  after_script:
# после окончания тестов удаляем релиз вместе с Job’ом
# (и, возможно, его инфраструктурой)
    - type multiwerf && source <(multiwerf use ${WERF_VERSION})
    - werf version
    - type werf && source <(werf ci-env gitlab --tagging-strategy tag-or-branch --verbose)
    - werf dismiss --namespace ${CI_ENVIRONMENT_SLUG} --with-namespace
# мы разрешаем падения, но вы можете сделать иначе
  allow_failure: true
  variables:
    RUN_TESTS: 'yes'
# задаем контекст в werf
# (https://werf.io/how_to/gitlab_ci_cd_integration.html#infrastructure)
    WERF_KUBE_CONTEXT: 'admin@stage-cluster'
  tags:
# используем раннер с тегом `werf-runner`
    - werf-runner
  artifacts:
# требуется собрать артефакт для того, чтобы его можно было увидеть
# в пайплайне и скачать — например, для более вдумчивого изучения
    paths:
      - ./tests/${CI_COMMIT_REF_SLUG}/*
# артефакты старше недели будут удалены
    expire_in: 7 day
# важно: эти строки отвечают за парсинг отчета GitLab’ом
    reports:
      junit: ./tests/${CI_COMMIT_REF_SLUG}/report.xml

# для упрощения здесь показаны всего две стадии
# в реальности же у вас их будет больше — как минимум из-за деплоя
stages:
  - build
  - tests

build:
  stage: build
  script:
# сборка — снова по документации по werf
# (https://werf.io/how_to/gitlab_ci_cd_integration.html#build-stage)
    - type multiwerf && source <(multiwerf use ${WERF_VERSION})
    - werf version
    - type werf && source <(werf ci-env gitlab --tagging-strategy tag-or-branch --verbose)
    - werf build-and-publish --stages-storage :local
  tags:
    - werf-runner
  except:
    - schedules

run tests:
  <<: *test-base
  environment:
# "сама соль" именования namespace’а
# (https://docs.gitlab.com/ce/ci/variables/predefined_variables.html)
    name: tests-${CI_COMMIT_REF_SLUG}
  stage: tests
  except:
    - schedules
Kubernetes
Now in the directory .helm/templates create YAML with Job - tests-job.yaml - to run tests and the Kubernetes resources it needs. See explanation after listing:
{{- if eq .Values.global.run_tests "yes" }}
---
apiVersion: v1
kind: ConfigMap
metadata:
  name: tests-script
data:
  tests.sh: |
    echo "======================"
    echo "${APP_NAME} TESTS"
    echo "======================"

    cd /app
    npm run test:ci
    cp report.xml /app/test_results/${CI_COMMIT_REF_SLUG}/

    echo ""
    echo ""
    echo ""

    chown -R 999:999 /app/test_results/${CI_COMMIT_REF_SLUG}
---
apiVersion: batch/v1
kind: Job
metadata:
  name: {{ .Chart.Name }}-test
  annotations:
    "helm.sh/hook": post-install,post-upgrade
    "helm.sh/hook-weight": "2"
    "werf/watch-logs": "true"
spec:
  activeDeadlineSeconds: {{ .Values.global.ci_timeout }}
  backoffLimit: 1
  template:
    metadata:
      name: {{ .Chart.Name }}-test
    spec:
      containers:
      - name: test
        command: ['bash', '-c', '/app/tests.sh']
{{ tuple "application" . | include "werf_container_image" | indent 8 }}
        env:
        - name: env
          value: {{ .Values.global.env }}
        - name: CI_COMMIT_REF_SLUG
          value: {{ .Values.global.commit_ref_slug }}
       - name: APP_NAME
          value: {{ .Chart.Name }}
{{ tuple "application" . | include "werf_container_env" | indent 8 }}
        volumeMounts:
        - mountPath: /app/test_results/
          name: data
        - mountPath: /app/tests.sh
          name: tests-script
          subPath: tests.sh
      tolerations:
      - key: dedicated
        operator: Exists
      - key: node-role.kubernetes.io/master
        operator: Exists
      restartPolicy: OnFailure
      volumes:
      - name: data
        persistentVolumeClaim:
          claimName: {{ .Chart.Name }}-pvc
      - name: tests-script
        configMap:
          name: tests-script
---
apiVersion: v1
kind: PersistentVolumeClaim
metadata:
  name: {{ .Chart.Name }}-pvc
spec:
  accessModes:
  - ReadWriteOnce
  resources:
    requests:
      storage: 10Mi
  storageClassName: {{ .Chart.Name }}-{{ .Values.global.commit_ref_slug }}
  volumeName: {{ .Values.global.commit_ref_slug }}

---
apiVersion: v1
kind: PersistentVolume
metadata:
  name: {{ .Values.global.commit_ref_slug }}
spec:
  accessModes:
  - ReadWriteOnce
  capacity:
    storage: 10Mi
  local:
    path: /mnt/tests/
  nodeAffinity:
   required:
     nodeSelectorTerms:
     - matchExpressions:
       - key: kubernetes.io/hostname
         operator: In
         values:
         - kube-master
  persistentVolumeReclaimPolicy: Delete
  storageClassName: {{ .Chart.Name }}-{{ .Values.global.commit_ref_slug }}
{{- end }}
What are the resources described in this configuration? When deploying, we create a unique namespace for the project (this is also indicated in .gitlab-ci.yaml tests-${CI_COMMIT_REF_SLUG}) and roll it into it:
- ConfigMap with test script;
- Jobs with pod description and specified directive
command, which just runs the tests; - PV and PVC, which allows you to store test data.
Pay attention to the introductory condition with if at the beginning of the manifest - accordingly, other YAML files of the Helm chart with the application must be wrapped in inverse construction so that they do not deploy during testing. That is:
{{- if ne .Values.global.run_tests "yes" }}
---
я другой ямлик
{{- end }}
However, if tests require some infrastructure (for example, Redis, RabbitMQ, Mongo, PostgreSQL ...) - their YAMLs can be not turn off. Deploy them in a test environment ... of course, tweaking as you see fit.
Final touch
Because build and deploy with werf works so far only on the build server (with gitlab-runner), and the pod with tests is launched on the master, you need to create a directory /mnt/tests on the master and give it to the runner, e.g. via NFS. An expanded example with explanations can be found in .
The result will be:
user@kube-master:~$ cat /etc/exports | grep tests
/mnt/tests    IP_gitlab-builder/32(rw,nohide,insecure,no_subtree_check,sync,all_squash,anonuid=999,anongid=998)

user@gitlab-runner:~$ cat /etc/fstab | grep tests
IP_kube-master:/mnt/tests    /mnt/tests   nfs4    _netdev,auto  0       0
Nobody forbids to make an NFS-share right on the gitlab-runner, and then mount it in pods.
Note
You may be asking why complicate things at all by creating a Job when you can just run the script with the tests right on the shell runner? The answer is rather trivial...
Some tests require access to the infrastructure (MongoDB, RabbitMQ, PostgreSQL, etc.) to check the correctness of working with them. We make testing unified - with this approach, it becomes easy to include such additional entities. In addition to this, we get standard deployment approach (even if using NFS, additional mounting of directories).
Experience the Power of Effective Results
What will we see when we apply the prepared configuration?
The merge request will show summary statistics for tests run in its latest pipeline:
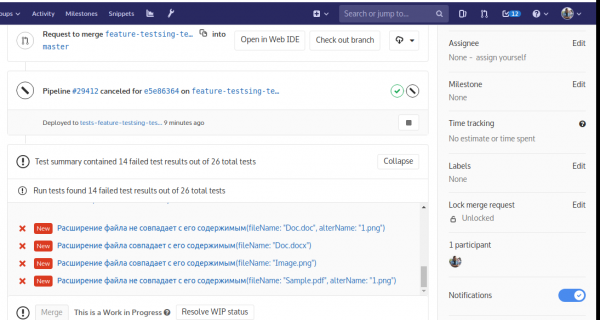
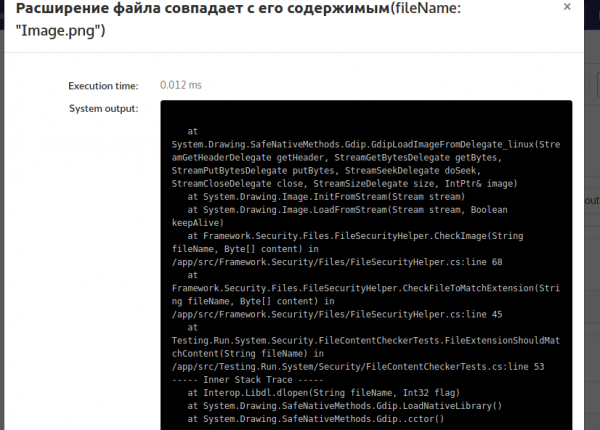
Each error can be clicked here for details:
NB: An attentive reader will notice that we are testing a NodeJS application, and in the screenshots - .NET ... Do not be surprised: just as part of the preparation of the article, there were no errors in testing the first application, but they were found in another.
Conclusion
As you can see, nothing complicated!
In principle, if you already have a shell builder and it works, but you don’t need Kubernetes, attaching testing to it will be an even easier task than described here. And in you'll find examples for Ruby, Go, Gradle, Maven, and more.
P.S.
Read also on our blog:
- «";
- «";
- «».
Source: habr.com
