


If you are working with Kubernetes, then kubectl is probably one of the most widely used utilities. Whenever you spend a lot of time working with a specific tool, it's worth studying it thoroughly and learning to use it effectively.
The command This is an article translated by Daniel Weibel, where you will find tips and tricks for effective use of kubectl. It will also help you gain a deeper understanding of how Kubernetes works.
According to the author, the goal of the article is to make your daily work with Kubernetes not only more efficient but also more enjoyable!
Introduction: What is kubectl
Before learning to use kubectl more effectively, you need to gain a basic understanding of what it is and how it works.
From a user's perspective, kubectl is a management interface that allows operations on Kubernetes.
From a technical standpoint, kubectl is a Kubernetes API client.
The Kubernetes API is an HTTP REST API. This API is the true user interface of Kubernetes, through which it is fully controlled. This means every Kubernetes operation is represented as an API endpoint and can be executed via an HTTP request to that endpoint.
Therefore, the primary task of kubectl is to perform HTTP requests to the Kubernetes API:
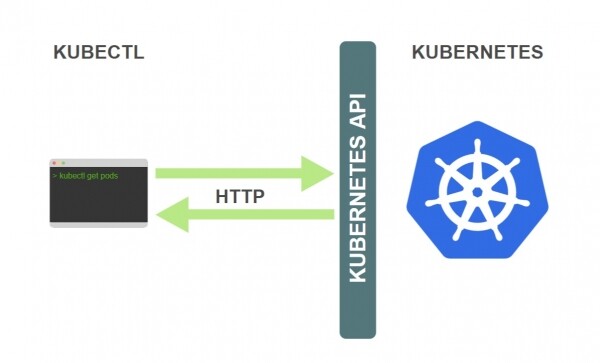
Kubernetes is entirely resource-oriented. This means it maintains the internal state of resources, and all Kubernetes operations are CRUD operations.
You have complete control over Kubernetes by managing these resources, and Kubernetes figures out what to do based on the current state of the resources. For this reason, the reference to the Kubernetes API is organized as a list of resource types with their related operations.
Let's look at an example.
Suppose you want to create a ReplicaSet resource. To do this, you describe the ReplicaSet in a file named replicaset.yaml, and then run the command:
$ kubectl create -f replicaset.yamlThis will create a ReplicaSet resource. But what happens behind the scenes?
In Kubernetes, there is a create ReplicaSet operation. Like any other operation, it is provided as an API endpoint. The specific API endpoint for this operation looks like this:
POST /apis/apps/v1/namespaces/{namespace}/replicasetsAPI endpoints for all Kubernetes operations can be found in the including the ). To make an actual request to the endpoint, you first need to add the API server URL to the endpoint paths listed in the API documentation.
Therefore, when you execute the command mentioned above, kubectl sends an HTTP POST request to the aforementioned API endpoint. The definition of the ReplicaSet specified in your file replicaset.yaml, is passed in the body of the request.
This is how kubectl works for all commands that interact with the Kubernetes cluster. In all these instances, kubectl simply sends HTTP requests to the corresponding Kubernetes API endpoints.
Note that you can fully manage Kubernetes with utilities like curl, manually sending HTTP requests to the Kubernetes API. Kubectl just simplifies the use of the Kubernetes API.
This is the basics of what kubectl is and how it works. But there's more about the Kubernetes API that every kubectl user should know. Let's take a brief dive into the inner workings of Kubernetes.
The Inner Workings of Kubernetes
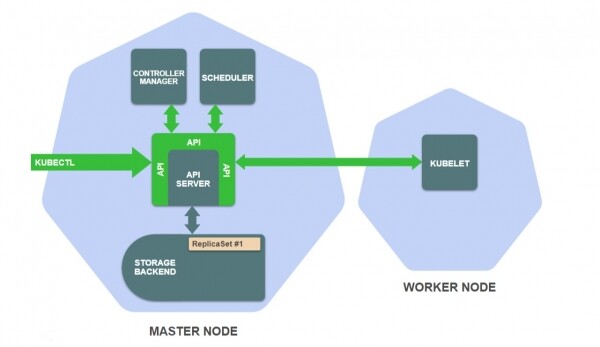
Kubernetes consists of a set of independent components that run as separate processes on the cluster nodes. Some components run on the master nodes, while others run on worker nodes, with each component performing its specific task.
Here are the most important components on the master nodes:
- Storage — Stores resource definitions ().
- API server — Provides the API and manages storage.
- Controller Manager — Ensures that resource statuses match the specifications.
- Scheduler — Schedules pods on worker nodes.
And here is one of the most important components on worker nodes:
- Kubelet — Manages the running of containers on the worker node.
To understand how these components work together, let's consider an example.
Suppose you just ran kubectl create -f replicaset.yaml, after which kubectl made an HTTP POST request to the (passing the ReplicaSet resource definition).
What happens in the cluster?
- After execution,
kubectl create -f replicaset.yamlthe API server saves your ReplicaSet resource definition in the storage:
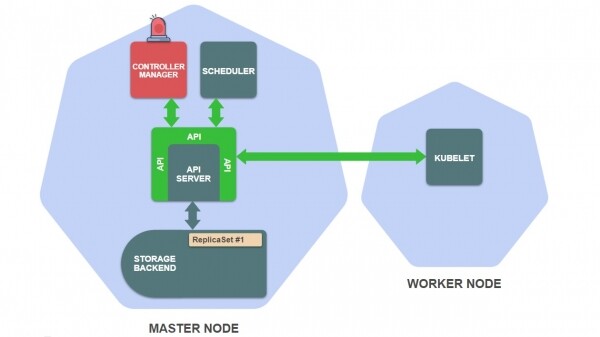
- Next, the ReplicaSet controller in the controller manager activates, which handles the creation, modification, and deletion of ReplicaSet resources:

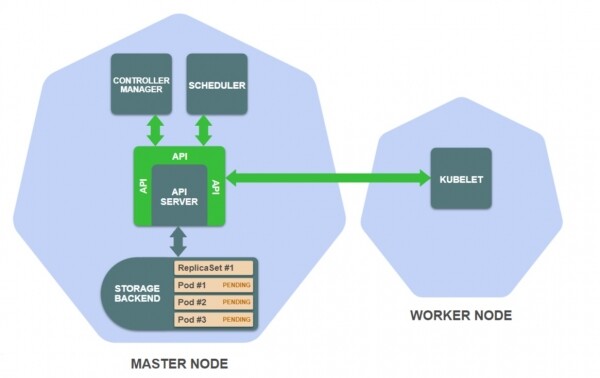
- The ReplicaSet controller creates a pod definition for each ReplicaSet replica (according to the pod template in the ReplicaSet definition) and saves them in storage:

- The scheduler starts, tracking pods that have not yet been assigned to any worker node:

- The scheduler selects a suitable worker node for each pod and adds this information to the pod definition in the store:
- On the worker node to which a pod is assigned, Kubelet starts, monitoring the pods assigned to that node:

- Kubelet reads the pod definition from the store and commands the container runtime, such as Docker, to launch containers on the node:

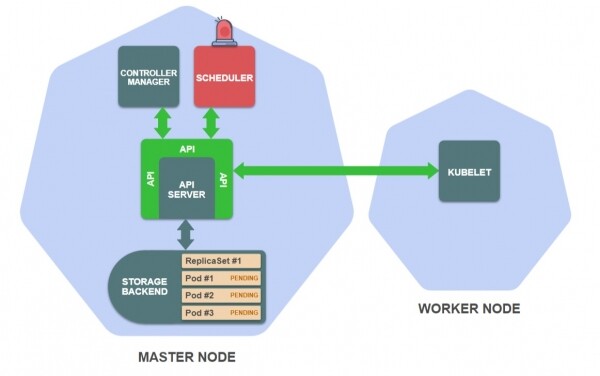
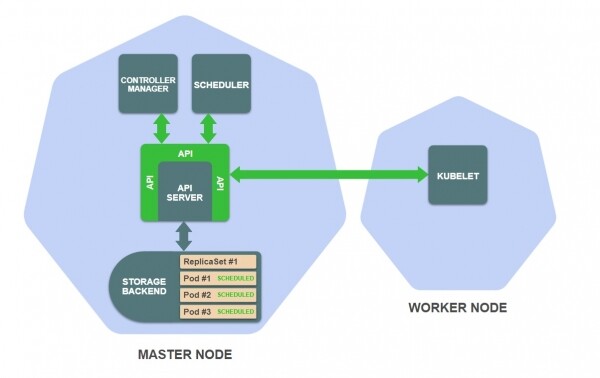
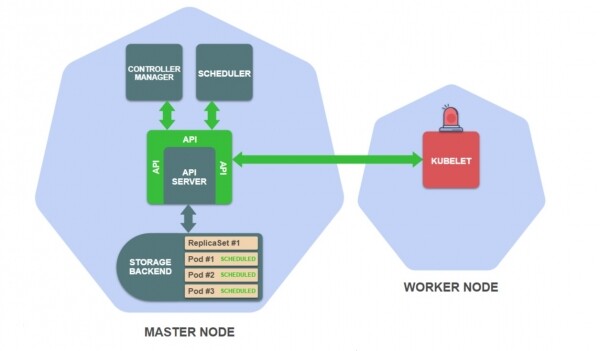
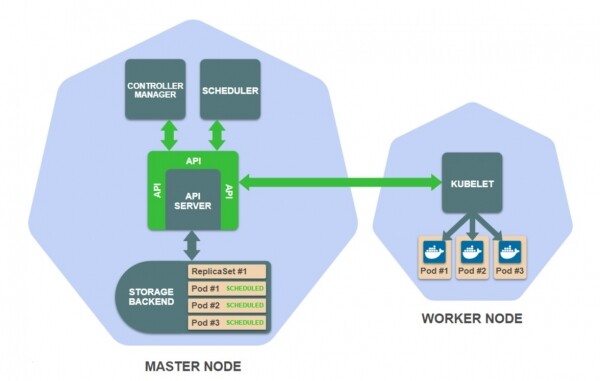
Below is the text version of this description.
An API request to the ReplicaSet creation endpoint is handled by the API server. The API server authenticates the request and stores the ReplicaSet resource definition in the store.
This event triggers the ReplicaSet controller, which is a subprocess of the controller manager. The ReplicaSet controller monitors the creation, updating, and deletion of ReplicaSet resources in the store and is notified about events when they occur.
The ReplicaSet controller's task is to ensure that the desired number of replica pods exists. In our example, no pods currently exist, so the ReplicaSet controller creates these pod definitions (according to the pod template in the ReplicaSet definition) and stores them in the store.
Creating new pods triggers the scheduler, which tracks pod definitions that have not yet been scheduled for worker nodes. The scheduler selects a suitable worker node for each pod and updates the pod definitions in the store.
Note that up to this point, no workload code has been executed anywhere in the cluster. Everything done so far is — the creation and updating of resources in the store on the master node.
The last event triggers Kubelet, which monitors the pods scheduled for their worker nodes. The Kubelet of the worker node for which your ReplicaSet pods are set must instruct the container runtime, such as Docker, to pull the required container images and start them.
At this point, finally, your ReplicaSet application is running!
Role of the Kubernetes API
As you saw in the previous example, Kubernetes components (except for the API server and the store) watch for changes to resources in the store and modify resource information in the store.
Of course, these components do not interact with the storage directly, but only through the Kubernetes API.
Let's consider the following examples:
- The ReplicaSet controller uses the API endpoint with the parameter
watchto observe changes in ReplicaSet resources. - The ReplicaSet controller uses the API endpoint (create pod) to create pods.
- The scheduler uses the API endpoint (modify pod) to update pods with information about the selected worker node.
As you can see, this is the same API that kubectl accesses. Using the same API for both internal components and external users is a fundamental design concept of Kubernetes.
Now we can summarize how Kubernetes works:
- The storage maintains the state, that is, Kubernetes resources.
- The API server provides an interface to the storage in the form of the Kubernetes API.
- All other components and users of Kubernetes read, observe, and manipulate the state (resources) of Kubernetes through the API.
Understanding these concepts will help you better understand kubectl and make the most of it.
Now let's look at a number of specific tips and tricks that can help boost your productivity when using kubectl.
1. Speeding up input with command completion
One of the most useful, yet often overlooked, techniques to enhance productivity with kubectl is command completion.
Command completion allows you to automatically fill in parts of kubectl commands by pressing the Tab key. This works for subcommands, options, and arguments, including complex ones like resource names.
See how kubectl command completion works:

Command completion works for Bash and Zsh shells.
contains detailed instructions on setting up autocompletion, but below we will provide a brief summary.
How command completion works
Command completion is a shell feature that works through a completion script. The completion script is a shell script that defines the completion behavior for a specific command.
Kubectl automatically generates and outputs completion scripts for Bash and Zsh with the following commands:
$ kubectl completion bashOr:
$ kubectl completion zshTheoretically, it’s enough to connect the output of these commands to the corresponding shell so that kubectl can complete commands.
In practice, the connection method differs for Bash (including the differences between Linux and MacOS) and Zsh. Below we will discuss all these options.
Bash on Linux
The completion script for Bash relies on the bash-completion package, so you first need to install it:
$ sudo apt-get install bash-completionOr:
$ yum install bash-completionYou can test that the package is successfully installed using the following command:
$ type _init_completion If a shell function code is output, then bash-completion is correctly installed. If the command gives an error 'not found', you need to add the following line to your file ~/.bashrc:
$ source /usr/share/bash-completion/bash_completion Whether or not to add this line to the file ~/.bashrc depends on the package manager you used to install bash-completion. For APT, this is necessary; for YUM, it is not.
After installing bash-completion, you need to configure everything so that the kubectl completion script is included in all shell sessions.
One way to do this is to add the following line to the file ~/.bashrc:
source <(kubectl completion bash) Another way is to add the kubectl completion script to the directory /etc/bash_completion.d (create it if it doesn't exist):
$ kubectl completion bash > /etc/bash_completion.d/kubectl All completion scripts in the directory /etc/bash_completion.d are automatically included in bash-completion.
Both options are equally applicable.
After restarting the command shell, the autocompletion of kubectl commands will work.
Bash on MacOS
In MacOS, the setup is somewhat more complicated. The default comes with Bash version 3.2, and the kubectl autocompletion script requires Bash version 4.1 or higher and does not work on Bash 3.2.
The use of an outdated version of Bash on MacOS is related to licensing issues. Bash version 4 is distributed under the GPLv3 license, which Apple does not support.
To set up kubectl autocompletion on MacOS, you need to install a newer version of Bash. You can also set the updated Bash as the default command shell to prevent future issues. This is not difficult, details are provided in the article '».
Before proceeding, make sure you are using a recent version of Bash (check the output of bash --version).
The autocompletion script in Bash depends on the project , so you first need to install it.
You can install bash-completion using :
$ brew install bash-completion@2 Here @2 indicates bash-completion version 2. Autocompletion for kubectl requires bash-completion v2, which in turn requires at least Bash version 4.1.
Command output brew-install contains a Caveats section that states you need to add to the file ~/.bash_profile:
export BASH_COMPLETION_COMPAT_DIR=/usr/local/etc/bash_completion.d
[[ -r "/usr/local/etc/profile.d/bash_completion.sh" ]] && .
"/usr/local/etc/profile.d/bash_completion.sh"
However, I recommend adding these lines not to ~/.bash_profile, then moving this task to the section ~/ .bashrc. In this case, autocompletion will be available not only in the main shell but also in child shells.
After restarting the shell, you can check the installation's correctness with the following command:
$ type _init_completionIf you see a shell function in the output, everything is set up correctly.
Now you need to make sure kubectl autocompletion is enabled in all sessions.
One way to do this is to add the following line to your ~/ .bashrc:
source <(kubectl completion bash) Another way is to place the autocompletion script in the folder /usr/local/etc/bash_completion.d:
$ kubectl completion bash
>/usr/local/etc/bash_completion.d/kubectl
This method will work only if you installed bash-completion through Homebrew. In this case, bash-completion loads all scripts from this directory.
If you installed , you don’t need to perform the previous step, as the autocompletion script will be automatically placed in the folder /usr/local/etc/bash_completion.d during installation. In this case, kubectl autocompletion will start working as soon as you install bash-completion.
Ultimately, all these options are equivalent.
Zsh
Autocompletion scripts for Zsh do not require any dependencies. All you need to do is enable them when the shell loads.
You can do this by adding a line to your ~/ .zshrc file:
source <(kubectl completion zsh) If you received the error not found: compdef after restarting your shell, you need to enable the built-in function compdef. You can enable it by adding to the start of your file ~/ .zshrc the following:
autoload -Uz compinit
compinit
2. Quick Overview of Resource Specifications
When creating YAML resource definitions, you need to know the fields and their values for these resources. One place to find this information is in the API reference, which contains full specifications for all resources.
However, switching to a web browser every time you need to look something up isn’t convenient. Therefore, kubectl provides a command kubectl explain, which shows specifications for all resources directly in your terminal.
The command format is as follows:
$ kubectl explain resource[.field]...The command will display the specification of the requested resource or field. The output information is identical to what is contained in the API documentation.
the net/http kubectl explain shows only the first level of field nesting.
See how this looks .
You can display the entire tree by adding the option --recursive:
$ kubectl explain deployment.spec --recursiveIf you are not sure which resources you need, you can display them all with the following command:
$ kubectl api-resources This command displays resource names in plural form, for example, deployments instead of deployment. It also shows a short name, for example, deploy, for those resources that have one. Don't worry about these differences. All these name variations are equivalent for kubectl. That means you can use any of them for kubectl explain.
All of the following commands are equivalent:
$ kubectl explain deployments.spec
# or
$ kubectl explain deployment.spec
# or
$ kubectl explain deploy.spec
3. Use custom column output format
By default, the output format of the command kubectl get:
$ kubectl get pods
NAME                     READY    STATUS    RESTARTS  AGE
engine-544b6b6467-22qr6   1/1     Running     0       78d
engine-544b6b6467-lw5t8   1/1     Running     0       78d
engine-544b6b6467-tvgmg   1/1     Running     0       78d
web-ui-6db964458-8pdw4    1/1     Running     0       78d
This format is convenient, but it contains a limited amount of information. Compared to the full resource definition format, it only outputs a few fields.
In this case, you can use a custom column output format. It allows you to specify which data to display. You can output any resource field in a separate column.
The use of a custom format is defined by options:
-o custom-columns=:[,:]... You can define each output column by a pair <jsonpath> — an expression defining the resource field.
Let's look at a simple example:
$ kubectl get pods -o custom-columns='NAME:metadata.name'

NAME
engine-544b6b6467-22qr6
engine-544b6b6467-lw5t8
engine-544b6b6467-tvgmg
web-ui-6db964458-8pdw4
The output contains one column with the pod names.
The expression in the option selects the pod names from the field metadata.name. This is because the pod name is defined in the child field name of the metadata in the pod resource description. You can read more in the or type the command kubectl explain pod.metadata.name.
Now suppose you want to add an additional column to the output, for example, showing the node on which each pod is running. To do this, you can simply add the appropriate column specification to the custom columns option:
$ kubectl get pods
  -o custom-columns='NAME:metadata.name,NODE:spec.nodeName'

NAME                       NODE
engine-544b6b6467-22qr6    ip-10-0-80-67.ec2.internal
engine-544b6b6467-lw5t8    ip-10-0-36-80.ec2.internal
engine-544b6b6467-tvgmg    ip-10-0-118-34.ec2.internal
web-ui-6db964458-8pdw4     ip-10-0-118-34.ec2.internal
The expression selects the node name from spec.nodeName — when the pod is assigned to a node, its name is recorded in the field spec.nodeName of the pod's resource specification. More detailed information can be found in the output of kubectl explain pod.spec.nodeName.
Note that Kubernetes resource fields are case-sensitive.
You can view any resource field as a column. Just review the resource specification and try it with any fields you like.
But first, let's take a closer look at field selection expressions.
JSONPath expressions
Expressions for selecting resource fields are based on .
JSONPath is a language for querying data from JSON documents. Selecting a single field is the simplest use case of JSONPath. It has much , including selectors, filters, and so on.
Kubectl explain supports a limited number of JSONPath capabilities. Below are the capabilities and examples of their usage:
# Выбрать все элементы списка
$ kubectl get pods -o custom-columns='DATA:spec.containers[*].image'
# Выбрать специфический элемент списка
$ kubectl get pods -o custom-columns='DATA:spec.containers[0].image'
# Выбрать элементы списка, попадающие под фильтр
$ kubectl get pods -o custom-columns='DATA:spec.containers[?(@.image!="nginx")].image'
# Выбрать все поля по указанному пути, независимо от их имени
$ kubectl get pods -o custom-columns='DATA:metadata.*'
# Выбрать все поля с указанным именем, вне зависимости от их расположения
$ kubectl get pods -o custom-columns='DATA:..image'
The operator [] is particularly important. Many Kubernetes resource fields are lists, and this operator allows you to select elements from these lists. It is often used with a wildcard like [*] to select all elements of the list.
Application examples
The possibilities for using custom column output formats are limitless, as you can display any field or combination of resource fields in the output. Here are some examples of applications, but feel free to explore them yourself and find useful applications for you.
- Displaying container images for pods:
$ kubectl get pods
  -o custom-columns='NAME:metadata.name,IMAGES:spec.containers[*].image'

NAME                        IMAGES
engine-544b6b6467-22qr6     rabbitmq:3.7.8-management,nginx
engine-544b6b6467-lw5t8     rabbitmq:3.7.8-management,nginx
engine-544b6b6467-tvgmg     rabbitmq:3.7.8-management,nginx
web-ui-6db964458-8pdw4      wordpress
This command displays the names of the container images for each pod.
Remember that a pod can contain multiple containers; in this case, the image names will be listed in one line, separated by commas.
- Displaying availability zones of nodes:
$ kubectl get nodes
  -o
custom-columns='NAME:metadata.name,ZONE:metadata.labels.failure-domain.beta.kubernetes.io/zone'

NAME                          ZONE
ip-10-0-118-34.ec2.internal   us-east-1b
ip-10-0-36-80.ec2.internal    us-east-1a
ip-10-0-80-67.ec2.internal    us-east-1b
This command is useful if your cluster is hosted in a public cloud. It shows the availability zone for each node.
An availability zone is a cloud concept that restricts the replication zone to a geographical region.
Availability zones for each node are obtained via a special label — . If the cluster is running in a public cloud, this label is automatically created and filled with the names of availability zones for each node.
Labels are not a part of the Kubernetes resource specifications, so you won't find information about them in . However, they can be seen (like any other labels) if you request information about nodes in YAML or JSON format:
$ kubectl get nodes -o yaml
# or
$ kubectl get nodes -o json
This is a great way to learn more about resources, in addition to studying resource specifications.
4. Easy Switching Between Clusters and Namespaces
When kubectl makes a request to the Kubernetes API, it first reads the kubeconfig file to get all the necessary parameters for the connection.
By default, the kubeconfig file is ~/ .kube / config. Usually, this file is created or updated by a special command.
When working with multiple clusters, your kubeconfig file contains connection parameters for all these clusters. You need a way to specify to the kubectl command which cluster you are working with.
Within a cluster, you can create multiple namespaces — a type of virtual cluster within a physical cluster. Kubectl determines which namespace to use based on the kubeconfig file data. This means you also need a way to specify to the kubectl command which namespace to work with.
In this chapter, we will explain how this works and how to achieve effective operation.
Note that you can have multiple kubeconfig files listed in the KUBECONFIG environment variable. In this case, all these files will be merged into a single shared configuration during execution. You can also change the default kubeconfig file by running kubectl with the parameter --kubeconfig. See .
Kubeconfig files
Let's take a look at what the kubeconfig file actually contains:
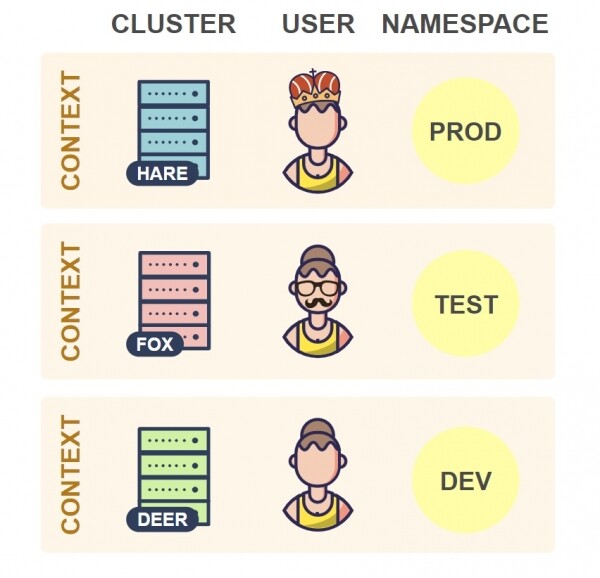
As you can see, the kubeconfig file contains a set of contexts. A context consists of three elements:
- Cluster — the API server URL for the cluster.
- User — the authentication credentials for the user in the cluster.
- Namespace — the namespace used when connecting to the cluster.
In practice, it is common to use one context per cluster in your kubeconfig file. However, you can have multiple contexts for a cluster that differ by user or namespace. Such a multi-context configuration is rare, so usually, there is a one-to-one mapping between clusters and contexts.
At any given time, one of the contexts is current:
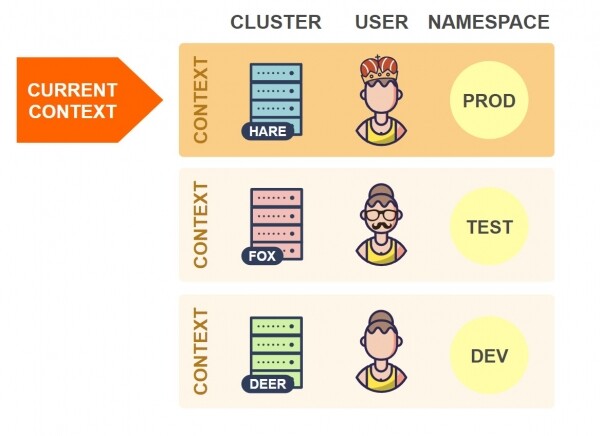
When kubectl reads the configuration file, it always takes information from the current context. In the example above, kubectl will connect to the Hare cluster.
Therefore, to switch to a different cluster, you need to change the current context in the kubeconfig file:
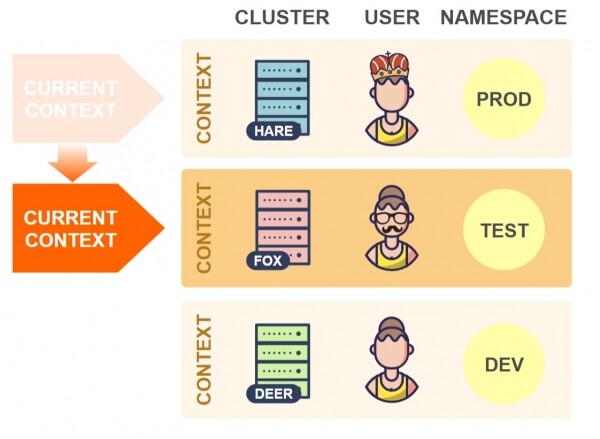
Now kubectl will connect to the Fox cluster.
To switch to another namespace in the same cluster, you need to change the value of the namespace element for the current context:
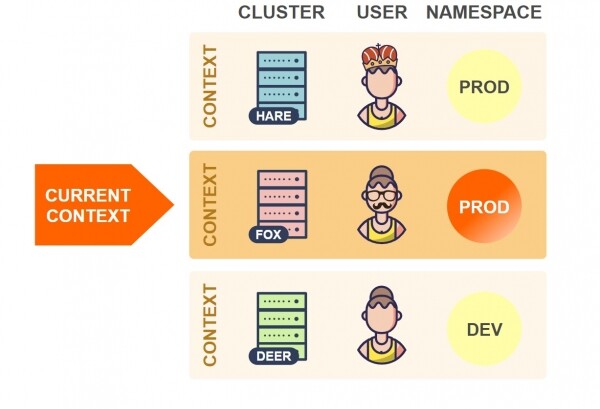
In the example above, kubectl will use the Prod namespace of the Fox cluster (the Test namespace was previously set).
Note that kubectl also provides parameters --cluster, --user, --namespace and --context, which allow you to override individual elements and the current context itself, regardless of what is set in the kubeconfig file. See kubectl options.
In theory, you can manually change parameters in the kubeconfig file. But this is inconvenient. To simplify these operations, there are various utilities that allow you to change parameters automatically.
Use kubectx
A very popular utility for switching between clusters and namespaces.
The utility provides commands kubectx and kubens to change the current context and namespace accordingly.
As mentioned, changing the current context means changing the cluster if you have only one context per cluster.
Here is an example of executing these commands:

Essentially, these commands simply edit the kubeconfig file as described above.
To install kubectx, follow the instructions on
Both commands support autocompletion of context and namespace names, allowing you not to type them fully. Instructions for setting up autocompletion .
Another useful feature kubectx is . It works together with the utility , which needs to be installed separately. Installing fzf automatically makes the interactive mode available in kubectx. In interactive mode, you can choose the context and namespace through the interactive fuzzy-search interface provided by fzf.
Using shell command aliases
You don’t need separate tools to change the current context and namespace because kubectl also provides commands for this. Thus, the command kubectl config provides subcommands to edit kubeconfig files.
Here are some of them:
kubectl config get-contexts: list all contexts;kubectl config current-context: get the current context;kubectl config use-context: change the current context;kubectl config set-context: change the context item.
However, using these commands directly is not very convenient because they are long. You can create shell command aliases for them that are easy to execute.
I created a set of aliases based on these commands that provide functionality similar to kubectx. Here you can see them in action:

Note that the aliases utilize fzf to provide an interactive fuzzy-search interface (like in the interactive mode of kubectx). This means you need to , to use these aliases.
Here are the alias definitions themselves:
# Получить текущий контекст
alias krc='kubectl config current-context'
# Список всех контекстов
alias klc='kubectl config get-contexts -o name | sed "s/^/  /;|^  $(krc)$|s/ /*/"'
# Изменить текущий контекст
alias kcc='kubectl config use-context "$(klc | fzf -e | sed "s/^..//")"'

# Получить текущее пространство имен
alias krn='kubectl config get-contexts --no-headers "$(krc)" | awk "{print $5}" | sed "s/^$/default/"'
# Список всех пространств имен
alias kln='kubectl get -o name ns | sed "s|^.*/|  |;|^  $(krn)$|s/ /*/"'
# Изменить текущее пространство имен
alias kcn='kubectl config set-context --current --namespace "$(kln | fzf -e | sed "s/^..//")"'
To set up these aliases, you need to add the definitions above to your file ~/ .bashrc or ~/ .zshrc and restart your shell.
Using plugins
Kubectl allows loading plugins that are executed similarly to the main commands. For example, you can install the kubectl-foo plugin and run it by executing the command kubectl foo.
It would be convenient to change the context and namespace this way, for example, to run kubectl ctx to change the context and kubectl ns to change the namespace.
I wrote two plugins that do this:
The plugins work based on the aliases from the previous section.
Here's how they work:

Note that the plugins use fzf to provide an interactive fuzzy search interface (like in the interactive kubectx mode). This means you need, to use these aliases.
To install the plugins, you need to download the shell scripts named and to any directory in your PATH variable and make them executable, for example, using chmod +x. Right after that, you will be able to use kubectl ctx and kubectl ns.
5. Input Shortcut with Auto-Aliases
Shell command aliases are a good way to speed up input. The project contains about 800 shortcuts for the main kubectl commands.
You may wonder—how to remember 800 aliases? But you don’t need to remember them all, as they are built on a simple pattern outlined below:
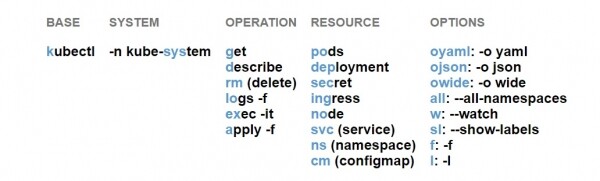
For example:
- kgpooyaml — kubectl get pods oyaml
- ksysgsvcw — kubectl -n kube-system get svc w
- ksysrmcm — kubectl -n kube-system rm cm
- kgdepallsl — kubectl get deployment all sl
As you can see, aliases consist of components, each representing a specific part of the kubectl command. Each alias can have one component for the base command, operation, and resource, and several components for parameters. You simply 'fill' these components from left to right according to the pattern provided above.
The current detailed pattern can be found at . There, you can also find.
For example, the alias kgpooyamlall is equivalent to the command kubectl get pods -o yaml --all-namespaces.
The relative order of options does not matter: the command kgpooyamlall is equivalent to the command kgpoalloyaml.
You can choose not to use all components as aliases. For example, k, kg, klo, ksys, kgpo can also be used. Moreover, you can combine aliases and regular commands or options in the command line:
For example:
- Instead of
kubectl proxycan be written ask proxy. - Instead of
kubectl get rolescan be written askg roles(currently, there is no alias for the resource Roles). - To get data for a specific pod, you can use the command
kgpo my-pod — kubectl get pod my-pod.
Keep in mind that some aliases require arguments in the command line. For example, the alias kgpol means kubectl get pods -l. The option -l requires an argument — a label specification. If you use an alias, it will look like kgpol app=ui.
Because some aliases require arguments, the aliases a, f, and l should be used last.
In general, once you master this scheme, you'll be able to intuitively derive aliases from the commands you want to execute, saving you a lot of time on input.
Installation
To install kubectl-aliases, you need to download the file from GitHub and source it in your file ~/ .bashrc or ~/ .zshrc:
source ~/.kubectl_aliasesAutocomplete
As we mentioned, you often add additional words to the alias in the command line. For example:
$ kgpooyaml test-pod-d4b77b989If you use kubectl command autocompletion, you have probably used autocompletion for things like resource names. But can this be done when using aliases?
This is a very important question because if autocompletion doesn't work, you'll lose some of the benefits of aliases.
The answer depends on which command shell you are using:
- For Zsh, autocompletion for aliases works out of the box.
- For Bash, unfortunately, some actions are required to make autocompletion work.
Enabling autocompletion for aliases in Bash
The issue with Bash is that it tries to complete the alias (every time you press Tab) instead of the command the alias points to (as Zsh does). Since you don't have completion scripts for all 800 aliases, autocompletion does not work.
Project provides a general solution to this issue. It hooks into the completion mechanism for aliases, internally completes the alias to the command, and returns completion options for the completed command. This means that completion for an alias behaves exactly like for a full command.
Next, I will first explain how to install complete-alias, and then how to configure it to enable completion for all kubectl aliases.
Installing complete-alias
First of all, complete-alias depends on . So before installing complete-alias, ensure that bash-completion is installed. Installation instructions were provided earlier for Linux and MacOS.
An important note for MacOS users: like the kubectl autocompletion script, complete-alias does not work with Bash 3.2, which is the default on MacOS. In particular, complete-alias depends on bash-completion v2.brew install bash-completion@2), which requires at least Bash 4.1. This means that to use complete-alias on MacOS, you need to install a newer version of Bash.
You need to download the script from and include it in your file ~/ .bashrc:
source ~/bash_completion.shAfter restarting the command shell, complete-alias will be fully installed.
Enabling autocompletion for kubectl aliases
Technically, complete-alias provides the shell function _complete_alias. This function checks the alias and returns completion suggestions for the alias command.
To bind the function to a specific alias, you need to use the built-in Bash mechanism , to set _complete_alias as the alias completion function.
As an example, let's take the alias k, which represents the command kubectl. To set _complete_alias as the completion function for this alias, you should run the following command:
$ complete -F _complete_alias k The result of this is that whenever you autocomplete the alias k, the function _complete_alias, which checks the alias and returns completion suggestions for the command, gets called. kubectl.
As a second example, let's take the alias kg, which represents kubectl get:
$ complete -F _complete_alias kg Just like in the previous example, when you autocomplete kg, you receive the same completion suggestions that you would for kubectl get.
Note that complete-alias can be used for any alias in your system.
Therefore, to enable autocompletion for all kubectl aliases, you need to run the command above for each of them. The following snippet does exactly that, assuming you have installed kubectl-aliases in ~/ .kubectl-aliases:
for _a in $(sed '/^alias /!d;s/^alias //;s/=.*$//' ~/ .kubectl_aliases);
do
  complete -F _complete_alias "$_a"
done
This piece of code needs to be placed in your ~/ .bashrc, restart the command shell and autocompletion will be available for all 800 kubectl aliases.
6. Extending kubectl with plugins
to load the favicon via HTTP if the current page is opened via HTTPS. , kubectl supports , which allows you to extend its functionality with additional commands.
If you are familiar with , then kubectl plugins are built on the same principle.
In this chapter, we will explain how to install plugins, where to find them, and how to create your own plugins.
Installing plugins
Kubectl plugins are distributed as simple executable files named kubectl-xin the build name means that it will now be produced regularly based on the current state of the repository. In fact, prototypes have been showcased recently at the kubectl- is mandatory, followed by a new kubectl subcommand that allows you to invoke the plugin.
For example, the hello plugin would be distributed as a file named kubectl-hello.
To install the plugin, you need to copy the file kubectl-x to any directory in your PATH variable and make it executable, for example using chmod +x. Right after that, you can invoke the plugin using kubectl x.
You can use the following command to list all the plugins currently installed on your system:
$ kubectl plugin listThis command also displays warnings if you have multiple plugins with the same names, or if there is a plugin file that is not executable.
Searching and installing plugins using Krew
Kubectl plugins are suitable for sharing or reuse like software packages. But where can you find plugins shared by others?
aims to provide a unified solution for sharing, searching, installing, and managing kubectl plugins. The project calls itself the 'package manager for kubectl plugins' (Krew is similar to ).
Krew is a list of kubectl plugins that you can choose and install. Moreover, Krew is also a plugin for kubectl.
This means that installing Krew works essentially like installing any other kubectl plugin. You can find detailed instructions on .
The most important Krew commands:
# Поиск в списке плагинов
$ kubectl krew search [<query>]
# Посмотреть информацию о плагине
$ kubectl krew info <plugin>
# Установить плагин
$ kubectl krew install <plugin>
# Обновить все плагины до последней версии
$ kubectl krew upgrade
# Посмотреть все плагины, установленные через Krew
$ kubectl krew list
# Деинсталлировать плагин
$ kubectl krew remove <plugin>
Keep in mind that installing plugins using Krew does not interfere with installing plugins in the standard way described above.
Note that the command kubectl krew list displays only those plugins that were installed using Krew, while the command kubectl plugin list lists all plugins, including those installed by Krew and those installed in other ways.
Searching for plugins elsewhere
Krew is a young project, currently in its of about 30 plugins. If you cannot find what you need, you can look for plugins elsewhere, such as on GitHub.
I recommend checking the GitHub section . There you will find several dozen available plugins worth checking out.
Writing your own plugins
You can create your own — is not difficult. You need to create an executable file that does what is needed, name it like kubectl-x and install it as described above.
The file can be a bash script, python script, or a compiled go application — it doesn’t matter. The only requirement is that it must be directly executable in the operating system.
Let's create a sample plugin right now. In the previous section, you used the kubectl command to output a list of containers for each pod. You can easily turn this command into a plugin that you can call, for example, using kubectl img.
Create a file kubectl-img with the following content:
#!/bin/bash
kubectl get pods -o custom-columns='NAME:metadata.name,IMAGES:spec.containers[*].image'
Now make the file executable with chmod +x kubectl-img and move it to any directory in your PATH. Immediately after that, you can use the plugin kubectl img.
As mentioned before, kubectl plugins can be written in any programming or scripting language. If you use shell scripts, the advantage is the ability to easily call kubectl from the plugin. However, you can write more complex plugins in real programming languages using . If you use Go, you can also use , which exists specifically for writing kubectl plugins.
How to share your plugins
If you think your plugins might be useful to others, feel free to share them on GitHub. Be sure to add them to the thread .
You can also request to add your plugin to . Instructions on how to do this are available in .
Command Autocompletion
Currently, plugins do not support autocompletion. This means you must type the full name of the plugin and the full names of the arguments.
In the GitHub repository for kubectl, there is an . So, it is possible that this feature will be implemented sometime in the future.
Good luck!!!
What else to read on the topic:
- .
- .
- .
Source: habr.com
