

In a previous article I told how to get an authorization session and substitute it into a local host macro. In this article I will tell you how to make Zabbix friends with Asterisk without external scripts and software.
The idea to "make friends" of these two systems was born a long time ago, and without installing additional software and scripts. A quick google turned up a lot of solutions, it all came down to uploading scripts (in puff, bash, python, etc.) to the server, and you will be happy. I wanted to implement monitoring “out of the box” - without external scripts and installing additional software on the server with monitoring and PBX.
I fiddled with it for a total of 4 working days, but the result was worth it. Working through the AMI interface, low-level discovery, triggers, and most importantly, connecting the PBX and all other settings now takes 15 minutes.
Zabbix 4.4 is available, about 100 pieces of Asterisks version 13. Some PBXs come with a FreePBX web interface, some come with a bare console, a bunch of tricks and dialplan integration.
We receive data from the PBX
The first and main point that needs to be addressed is obtaining data on peers and sip registrations. To do this, there are AGI, AMI, ARI and SSH console interfaces in the PBX. For obvious reasons, I did not consider additional modules.
First you need to figure out what these agi, ami, ari are ....
- AGI - using scripts in the dialplan. Mainly used for call management.
- AMI - can give all the necessary information, works through port 5038, similar to Telnet. Suits us!
- ARI - modern, fashionable, JSON. There are many possibilities, the data format is understandable for Zabbix, but for me there is no main thing: you cannot control the sip registration. Another disadvantage is that there are only two online/offline states for peers, although there are more states and it is useful to take them into account when diagnosing.
- SSH - everything is possible, but sometimes it is not given due to "security reasons". Considerations may be different, I will not analyze them.
However, for all its shortcomings, ARI covers 90% of all monitoring needs.
Zabbix and Telnet are my frustrations
I know AMI well, at one time it implemented tracking losses in conversations with division by remote offices, call management, etc. With Telnet, everything is also very clear: open the connection, send commands and read the response. Which I did, but the result disappointed me.
Zabbix's Telnet isn't the same as the console's. LinuxIt's slightly simpler and designed for standard login/password authentication. If the authentication logic is different and there's no login/password pair requested, an error occurs. After trying unsuccessfully to bypass the authentication requirement, I started looking at the Telnet module's source code.
I realized that until there is a traditional login request with a password, I will not move further. For the sake of interest, I threw out everything related to authorization from the code, rebuilt everything. Works! But it doesn't fit the requirement. Go ahead…
Back to search
I re-read the ARI documentation again, conducted additional tests - there are no registrations here. There are feasts, there are conversations, there are bridges, there are no registrations. At some point, I even thought, do we really need registration?
By a funny coincidence, at this moment another request arrives from the user, with a problem of outgoing calls. The problem was in the freezing of the registration sip and was solved by a simple reboot of the module.
asterisk -rx "sip reload"It would be great to access the AMI on the web: that would solve all the problems, I thought. I start digging in this direction, and literally the first line of the search leads to the official Asterisk documentation, which says that for my tasks there is an option webenabled in file /etc/asterisk/manager.conf, which must be set to YES, in the section [general]
After that, through a normal web request like we get all the necessary information.
When using the FreePBX interface, you cannot enable this option via the web, you need to enable it via the console, making changes to the manager.conf file. FreePBX does not erase it on web configuration changes.
How much I worked with various kinds of Asterisk integrations, I never saw this feature mentioned anywhere. I was surprised that no one describes this method of interaction with the PBX. It even specifically helped to look for information on this topic: there is practically nothing or it was used for completely different tasks.
WEB AMI - what kind of animal?
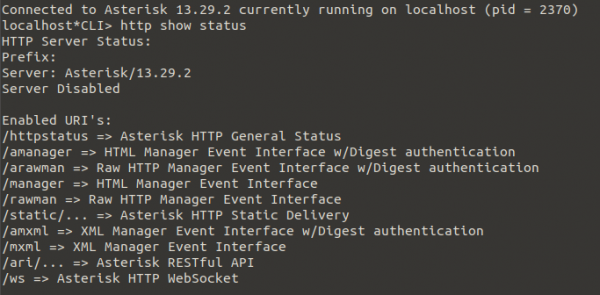
Adding an option webenabled to file manager.conf opened full access to the management of the ATS through the web. All commands available through the regular AMI are now on the web, you can listen to events from the PBX via the socket. The principle of operation is no different from the console AMI. After activating this option, you can contact the PBX at the following addresses:
- a web page with a simple interface, for tests and manual sending of requests. All responses are formatted in readable HTML form. Not very suitable for monitoring.
- only text output, the format is similar to the console AMI
- only text output, in XML format. Suits us!
Then I thought: “Here it is - the solution! Now everything will be ready! Easy Pizzy Lemon Squeeze, but it was too early to rejoice. To get the information we need, it is enough to use a GET request with the necessary action My Action!, which in return returns an xml with a list of all registrations and their status. This is all great, but you need authorization with remembering the session from the cookie. When you test in the browser, you do not think about this process.
Authorization process
First, we address , in response, the server sends us a cookie with the authorization session. This is what an HTTP request looks like:
https://ats:8089/mxml?action=login&username=zabbix&secret=zabbix

Host: ats:8089
User-Agent: Mozilla/5.0 (X11; Ubuntu; Linux x86_64; rv:77.0) Gecko/20100101 Firefox/77.0
Accept: text/html,application/xhtml+xml,application/xml;q=0.9,image/webp,*/*;q=0.8
Accept-Language: ru-RU,ru;q=0.8,en-US;q=0.5,en;q=0.3
Accept-Encoding: gzip, deflate, br
DNT: 1
Connection: keep-alive
Upgrade-Insecure-Requests: 1
Answer:
GET: HTTP/1.1 200 OK
Server: Asterisk/13.29.2
Date: Thu, 18 Jun 2020 17:41:19 GMT
Cache-Control: no-cache, no-store
Content-type: text/xml
Set-Cookie: mansession_id="6f5de42c"; Version=1; Max-Age=600
Pragma: SuppressEvents
Content-Length: 146

<ajax-response>
<response type="object" id="unknown">
<generic response="Success" message="Authentication accepted"/>
</response>
</ajax-response>
To work there you need mansession_id="6f5de42c", i.e. the authorization cookie itself.
Content only needs to check for the answer "Authentication accepted". Further, with all calls to the PBX server, we will need to add an authorization cookie to the request.
https://ats:8089/mxml?action=SIPpeers

Host: ats:8089
Connection: close
Cookie: mansession_id="6f5de42c"
How to receive an authorization cookie and use it in other requests, read here: "»
To create tracking elements in Zabbix, I will use auto discovery.
Auto detection
For auto discovery of registrations and tracking of peer states, you need to refer to the address: or
In response, the PBX returns us an XML response:
<ajax-response>
<response type="object" id="unknown">
<generic response="Success" eventlist="start" message="Registrations will follow"/>
</response>
...
<response type="object" id="unknown">
<generic event="RegistryEntry" host="login.mtt.ru" port="5060" username="111111" domain="login.mtt.ru" domainport="5060" refresh="105" state="Registered" registrationtime="1592502142"/>
</response>
<response type="object" id="unknown">
<generic event="RegistryEntry" host="voip.uiscom.ru" port="5060" username="222222" domain="voip.uiscom.ru" domainport="5060" refresh="105" state="Registered" registrationtime="1592502142"/>
</response>
<response type="object" id="unknown">
<generic event="RegistryEntry" host="voip.uiscom.ru" port="5060" username="333333" domain="voip.uiscom.ru" domainport="5060" refresh="105" state="Registered" registrationtime="1592502142"/>
</response>
...
</ajax-response>
There is a lot of garbage in the response, so in preprocessing we filter it according to the template XPath: //response/generic[@host]
Then the most interesting begins. To work with discovery and dynamically create elements, the response must be in JSON format. XML is not supported in auto discovery.
To convert XML to JSON, I had to play a little with auto-replacement, for which I made a JS script
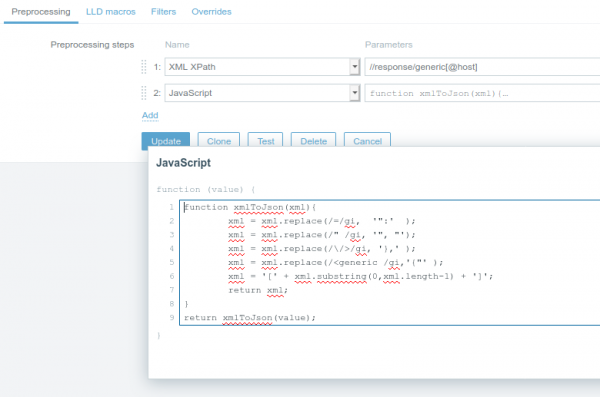
An interesting point, in the ATS response, all parameters are framed with single quotes, and after applying the template //response/generic[@host] they are replaced by doubles.
To create elements, we use variables from the XML response ( now JSON ).
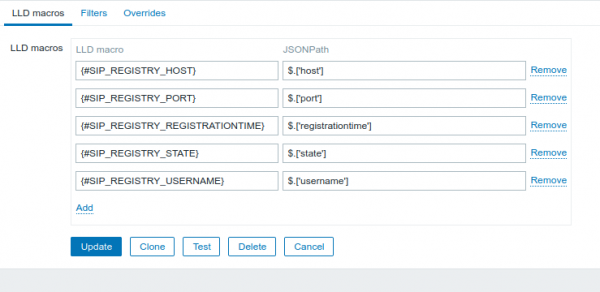
SIP Registry
For sip registrations, we use three variables: username, host, port. I was happy with the name of the element 111111@login.mtt.ru:5060, I did not find situations when you need to use all five variables.
The main element that receives information about all registrations, Asterisk - AMI SIPshowregistry. Once a minute, it makes a GET request to , after which the response XML data is passed to all dependent elements for parsing. I create an element for each registration dependent on it. This is convenient, because we receive up-to-date information in one request, and not for each separately. This implementation has a significant disadvantage - the load on the processor.
When testing up to 100 dependent elements, I did not notice the load, but at 1700 elements, this gave a noticeable 15 second load on the processor. Keep this in mind if you have a large number of dependent elements.
As an option to “smear” the load or set a different polling frequency for an element, you can move the processing logic to each element separately.
I do not store the received information in the main element. Firstly, I don’t see the need for this, and secondly, if the answer is more than 64K, then zabbix cuts it off.
Since we use the full XML response for the dependent element, we need to get the value of this element in preprocessing. Through XPath it is done like this:
string(//response/generic[@event="RegistryEntry"][@username="{#SIP_REGISTRY_USERNAME}"][@host="{#SIP_REGISTRY_HOST}"][@port="{#SIP_REGISTRY_PORT}"]/@ state)
For registration statuses, I did not use text statuses, but translated them into a numerical form using JavaScript:
switch(value) {
  case 'Registered':
    return 1;
  case 'Unregistered':
    return 0;
  default:
    return -1;
}
SIP Peers
By analogy with sip registrations, there is the main element of Asterisk - AMI SIPshowregistry, to which dependent ones are added.
This creates two dependent elements:
- Peer status in text form
- Device response time - if the status is OK, then the device response time is written, otherwise "-1"
The path to the element is already a little easier XPath:
string(//response/generic[@objectname="{#SIP_PEER_OBEJECTNAME}"]/@status)
For the second element I used JavaScript to separate response time from the status of the peer, since they are stored together:
if(value.substring(0,2) == 'OK'){
	return value.match(/(d+)/gm);
}
else {
	return -1;
}
Conclusion
The out-of-the-box solution can be complex and not immediately clear. Increased flexibility and portability between different systems
All pleasant and easy integration! Template and instructions for setting up .
Source: habr.com
